
| Mission Details |
|---|
| **Rewards:** 3500 XP, 443 dollars, Choice between Shotgun and Assault Rifle |
A facility has been found to help Jack build his robot army, but you’re going to need a train to get to it. Go to Triton Flats and head to the northwest corner of the map. Plug the newly named Felicity into the console and wait for the train to arrive. While waiting, some Shugguraths will appear, so kill them and then head to the plant.
You’ll find the initial area overrun with Torks, but it’s only the little ones and the normal Torks. The Swarmlings are perfect for a butt slam, which saves ammo and helps with that particular Challenge. Once they’re all exterminated, attempt to open the door only to have more Torks appear and the door jam.

The Torks are small and agile, making them hard to hit at times, but a good butt slam will quickly kill the Swarmlings.
Felicity has an idea and directs you to the nearby console, which will open up a side door to the facility. Of course, there will be more Torks that come out, so eradicate them and continue into the main facility. Install Felicity onto the nearby console (optional objective), clear the room of enemies and pull the door on the opposite side from the entrance to open it.
A Tork Dredger pops out, which will burrow into the ground and pop up underneath you, dealing some decent damage. Head through the door and you’ll be back outside, where both Torks and Scavs will be present. They’ll fight each other, but that’s a waste of experience, so kill everything yourself.
Inside the Facility
Once the coast is clear, install Felicity into the console next to the door, only to have some turrets appear. Attack them for the moment, as Felicity will hack them and make them fire only at Torks, which should spawn now. You’ll have to kill all of them in order to move on to the next part. Felicity can’t open the door, but says there’s some jump pads nearby that’ll allow you to get inside.
Of course, the jump pads will lead you to an electric barrier, which you will have to disable. There’s a wire that runs from it to a switch that you can barely reach on the rooftop. Shoot it and head past where the electric barrier was, leading you into a small area with even more Torks. Follow this path until you come to the master fuse box, which will shut off all electric fields.
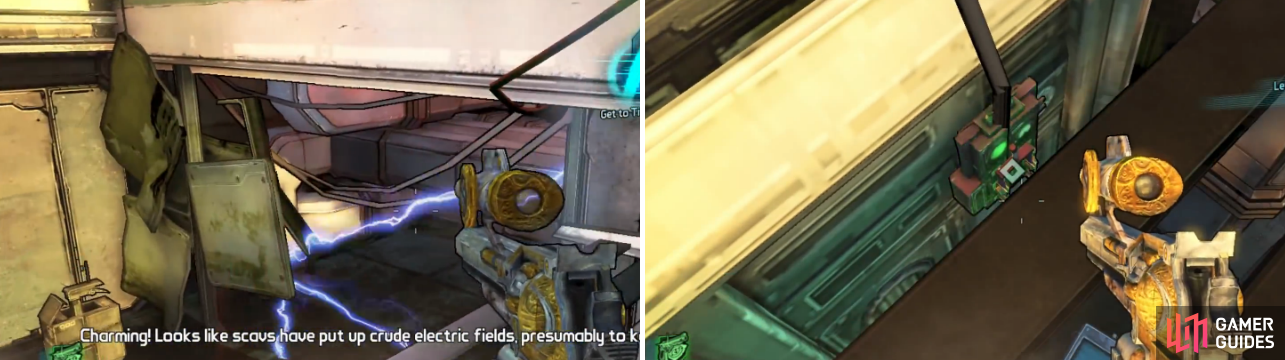
There’s an electric barrier blocking your progress and the switch to shut it off is on the roof right next to it.
Head into the big room and you’ll see some Torks and Scavs fighting with each other. Clean up the leftovers, then turn the crank to open a door that leads into a garage-type room, which houses more Scavs. The exit to the next area is at a height that you might need to jump off of something. This will lead you to an area with more Scavs, but you hear someone who needs your help.
This is Gladstone and he will become important in a bit. For now, though, clear the room of Scavs and approach the door leading to Gladstone. It seems he was working on an off-project prototype that would be able to build robots, which is what Jack was looking for. However, he needs help finishing the build, which is where you come in.
Building the Prototype
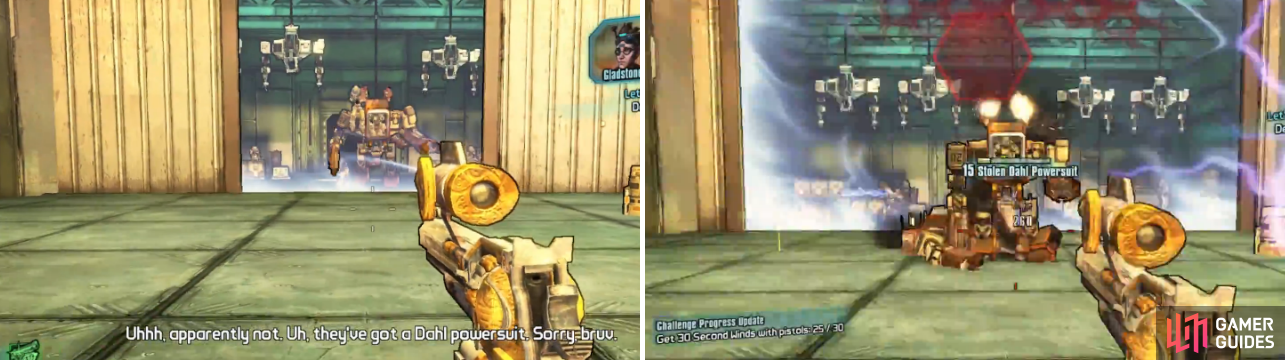
Yep, our next goal is to build the “Constructor” prototype. Head through the door that Gladstone opens up (in the room with the vending machine), into an open area with both Torks and Scavs. Fight your way to the other end, where the Scavs will retreat into a building, which will open up with two Powersuits coming your way.
These Powersuits are armored, so corrosive works best against them. Clear the area, then head into the production plant. Use either set of stairs and you’ll end up in the main room, with a lot of Scavs coming for your head. With them all gone, head to the next objective and you’ll find the door is locked.
The Powersuits are armored enemies, meaning they are weak to corrosive damage.
When Gladstone opens the window, you’ll see some Scavs behind it, teasing you. Of course, the window is vulnerable to cryo, so hit it with that element to shatter the window (there’s a gun vendor right next to the window that could possibly have a cryo-elemental gun if needed). Go through, kill the Scavs, then flip the switch to turn on the power.
The first part to building the prototype is the eye part. To get this done, head to the office overlooking the main area and use the console to call in some security bots. Kill them, as well as the Scavs, then loot the eyes that drop. Go into the oculus lab, place the eyes into the converter, and grab the prototype eye.
Back in the main room, open the torso hatch and place the eye into the main body. Use the console to attach the crane to the torso and follow it into the next room. The next goal is to attach the turrets and then the legs to the main body, with the turrets coming first. Head into the room and you’ll have to soften up the Lunatics so the turrets can kill them.
The turrets will need to kill a total of 12 enemies, and every single one will be a Lunatic. The problem comes when Badass Lil’ Scavs start appearing, as things can get pretty hectic. Once the turrets have met their quota, head back into the main room and use the console to attach them to the main body.
The last piece you need is the legs, which are in the other lab. Head towards that location, killing the Scavs in the room with the furnace, as well as the Powersuit that comes from behind the door. Install Felicity into the prototype powersuit, then escort her back into the main room, where she’ll blow it up to leave the legs for the main body.
Follow the main body into the next room, where more Scavs will be, so kill them all and head to the southern side of the objective to find the door that leads into the control room. A Badass Outlaw will be behind that door, so be prepared to kill him, then go inside to turn the rails around. More enemies will appear, so kill them and head into the next room, preparing for a boss fight.
Boss: Felicity Rampant
You’ll notice right off the bat that the boss can shoot little energy balls at you, which can be hard to avoid, but keep moving to try and dodge them. Thankfully, you can destroy the turrets on the sides that do this attack, as well as the grenade one on top. Sometimes she will drop mines on the ground, which will have a red bubble around them, so stay away.
She also has a few melee attacks, such as a stomp and a charge attack, both of which can be very damaging. In fact, it might be best to keep your distance in this fight, unless you have a very damaging shotgun weapon (like the Boganella tends to be). She’ll also spawn robots throughout the fight, but they are more used for Second Wind than anything, so leave them alone unless you need to kill them.
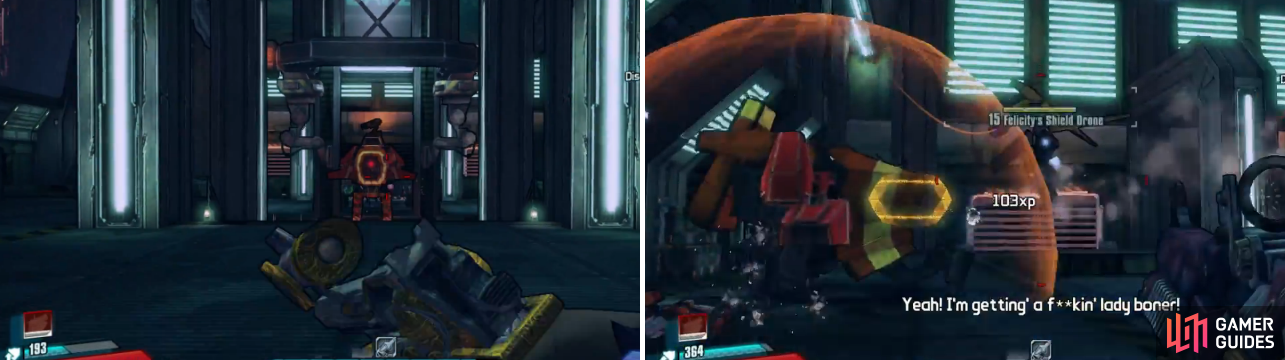
It’s probably best to stay at long range during the fight with Felicity Rampant. Whenever she deploys her shield drone, quickly destroy it so you can continue damaging her.
Periodically, Felicity will sometimes spawn a drone that will place a shield around her, making you unable to deal any damage. Luckily, all it takes is a few shots to destroy this drone, so the shield shouldn’t be up for long if you’re paying attention. The only problem is that the drone will fly around behind the shield, making you unable to hit it.
Once Felicity’s health reaches a certain point, the legs will come off and she’ll go into her second phase. Note that she’ll still be able to shoot lasers and missiles, but she’ll gain a ground pound attack in this stage. Also, keep a lookout for the robots, as well as the shield drone. Keep up the attack and the boss will go down in no time.
After the fight is over, use the fast travel machine in the room to get back to Concordia. Note that the fast travel machine is a one way ticket out of there and you won’t be able to get back to that particular one again. Head to Moxxi’s bar and turn in your quest to Jack.


No Comments