You’ll get a re-cap of what happened in the previous episode before starting this episode. Always good to re-cap things!
We’ll then see an opening scene of more TerraSave employees. Seems like we aren’t along by a long stretch. Claire and Moira will stumble upon two other survivors: Gabe and Pedro. It seems we’ve made it to the Wossek.
We can now explore the bar for a bit but soon the Overseer will talk to us. After this chat, Gabe will open the door he was blocking and beckon us to follow him. Let’s explore the bar together first, though.
There is the obvious workbench here. This bar is the “hub area” of sorts for a short while, so use it when you need it. Upstairs is the Fishing Village Map . There is a Barrel up here too. Downstairs behind the bar on the shelf is some Odorous Chemical , a mixing agent. Behind Pedro and the workstation is some Cloth and in the small room a Barrel, Empty Bottle, and Decoy Bottle x2 . Decoy bottles are.. kinda like the pipe bombs from Left 4 Dead. They attract zombies and then blow up after a short time. Check underneath the bar to find a Sparkle Item . Once you have all these things head outside.
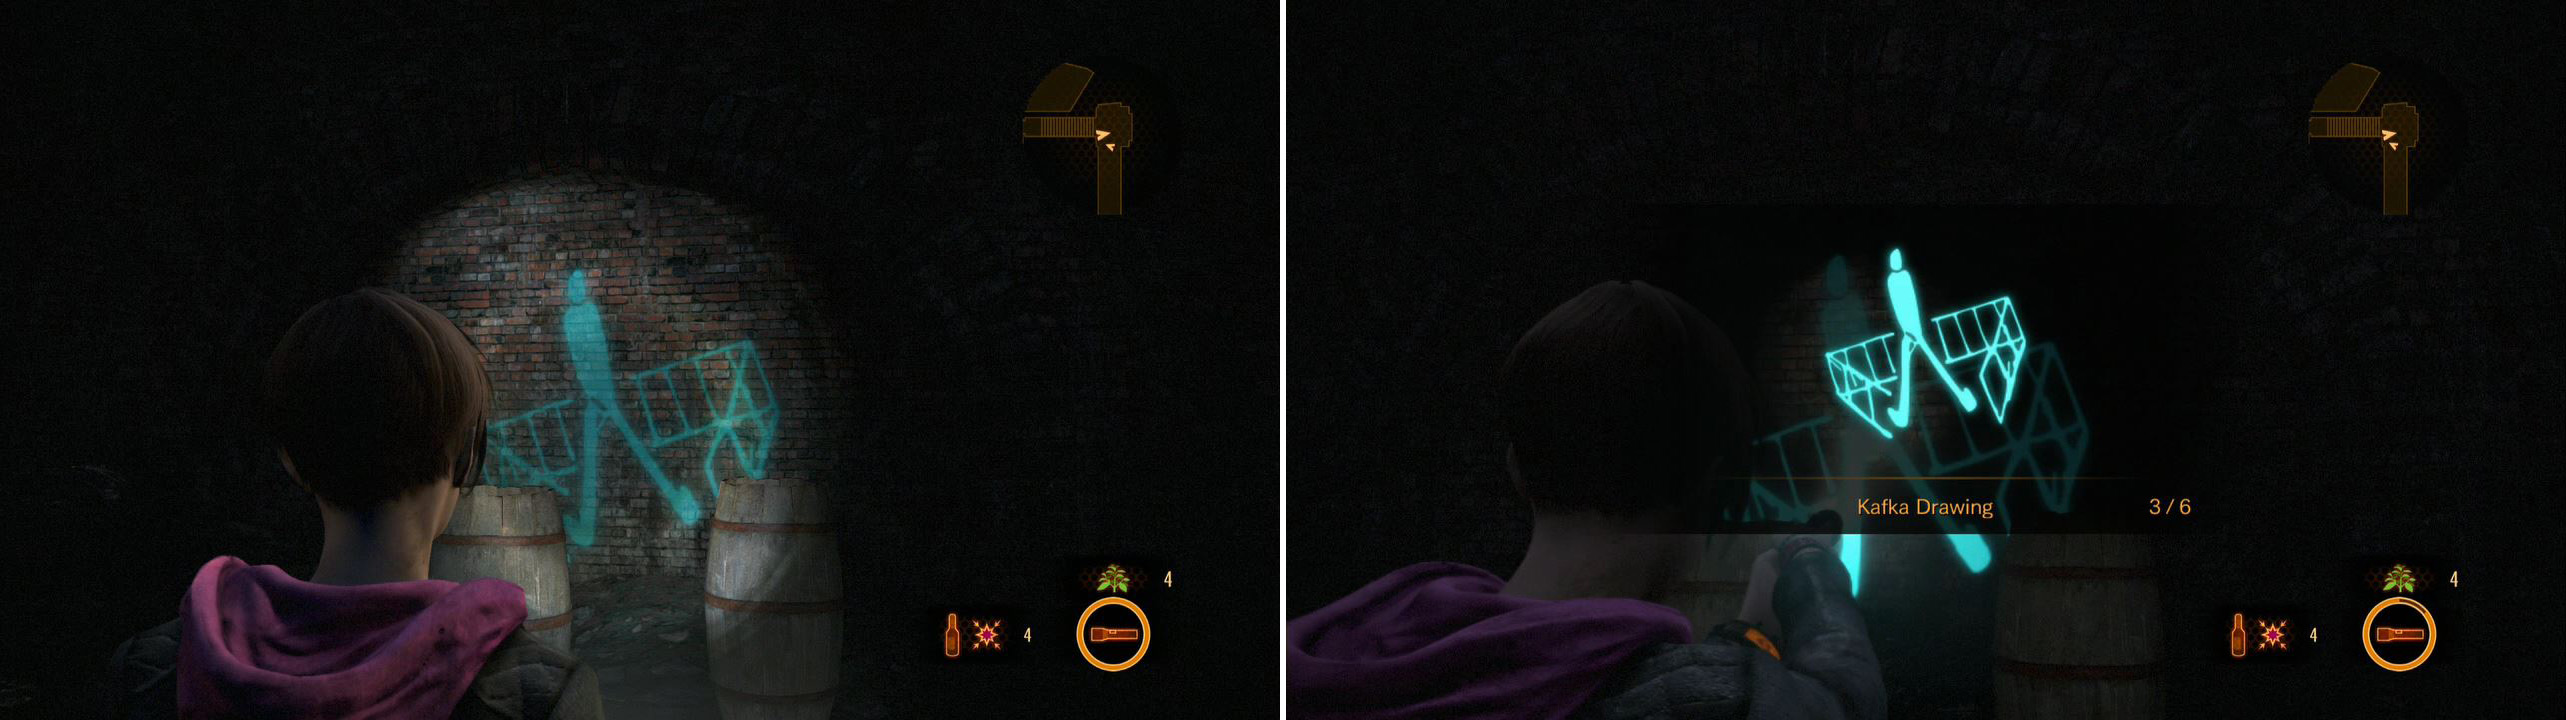
Before we go follow Gabe, switch to Moira and her all-powerful flashlight (seriously…) to focus on the Wossek sign and find Kafka Drawing 1/6 .
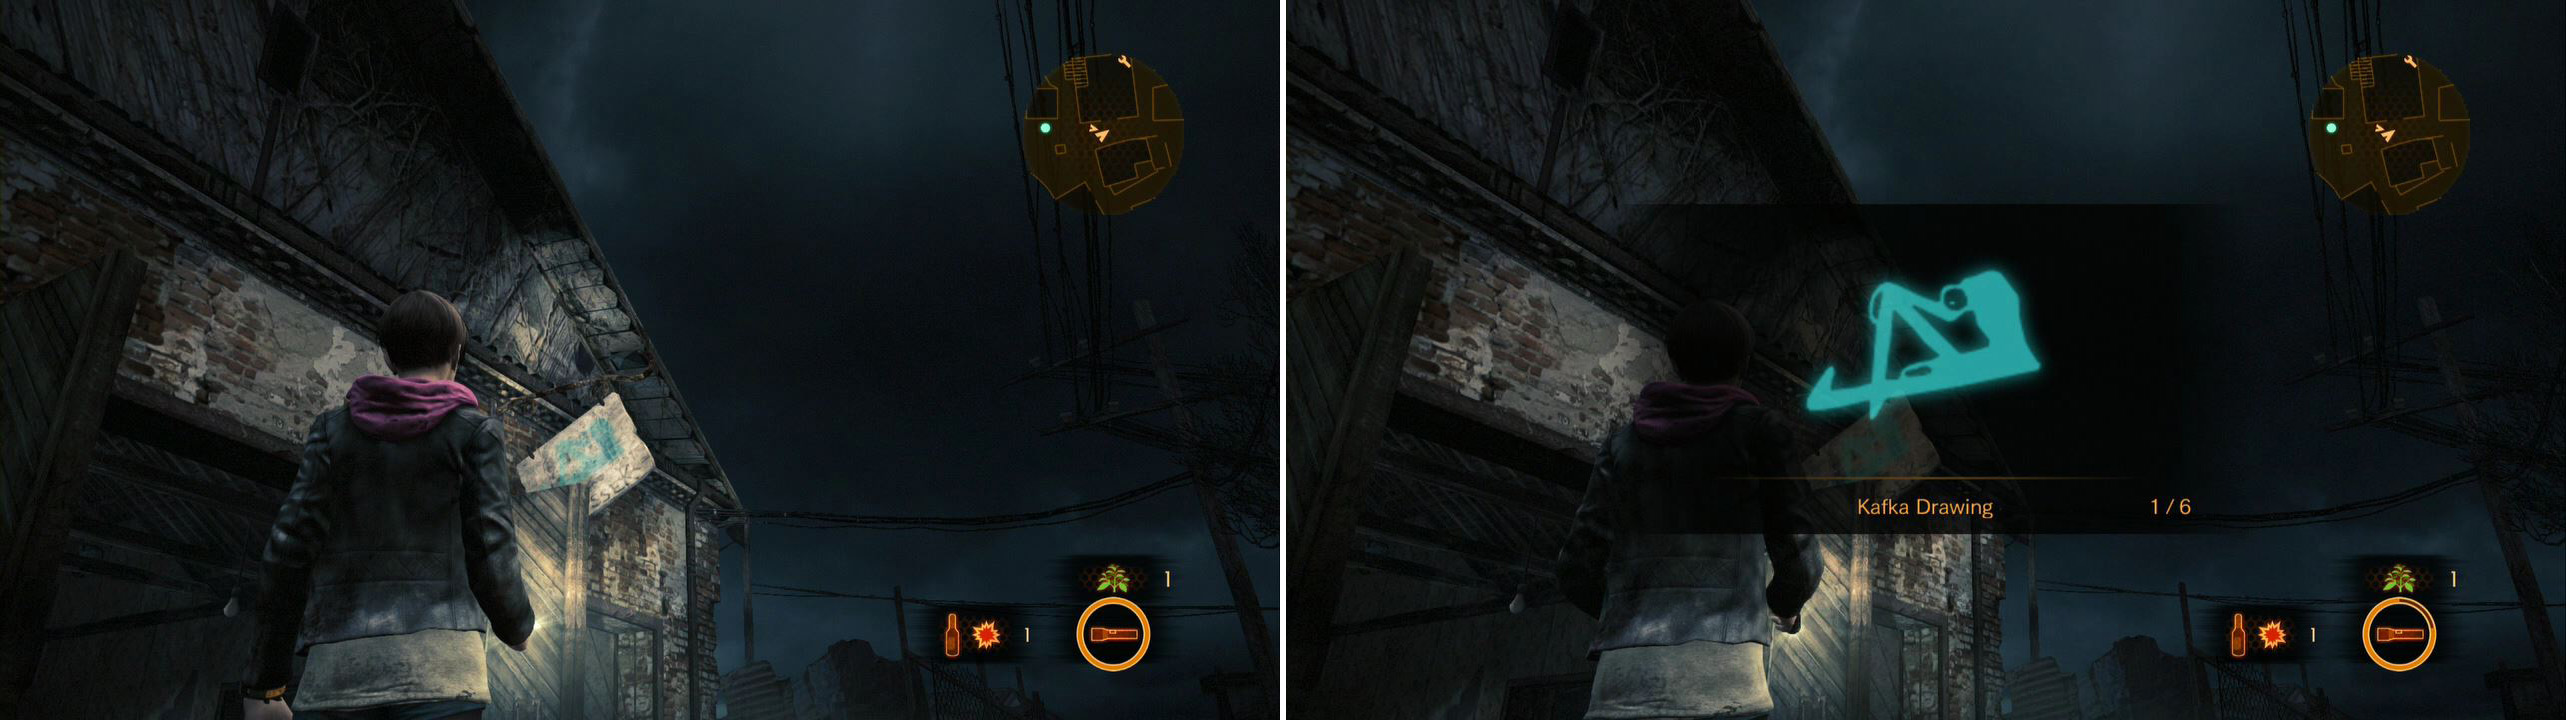
The first Kafka Drawing of the episode. 5 more to go.
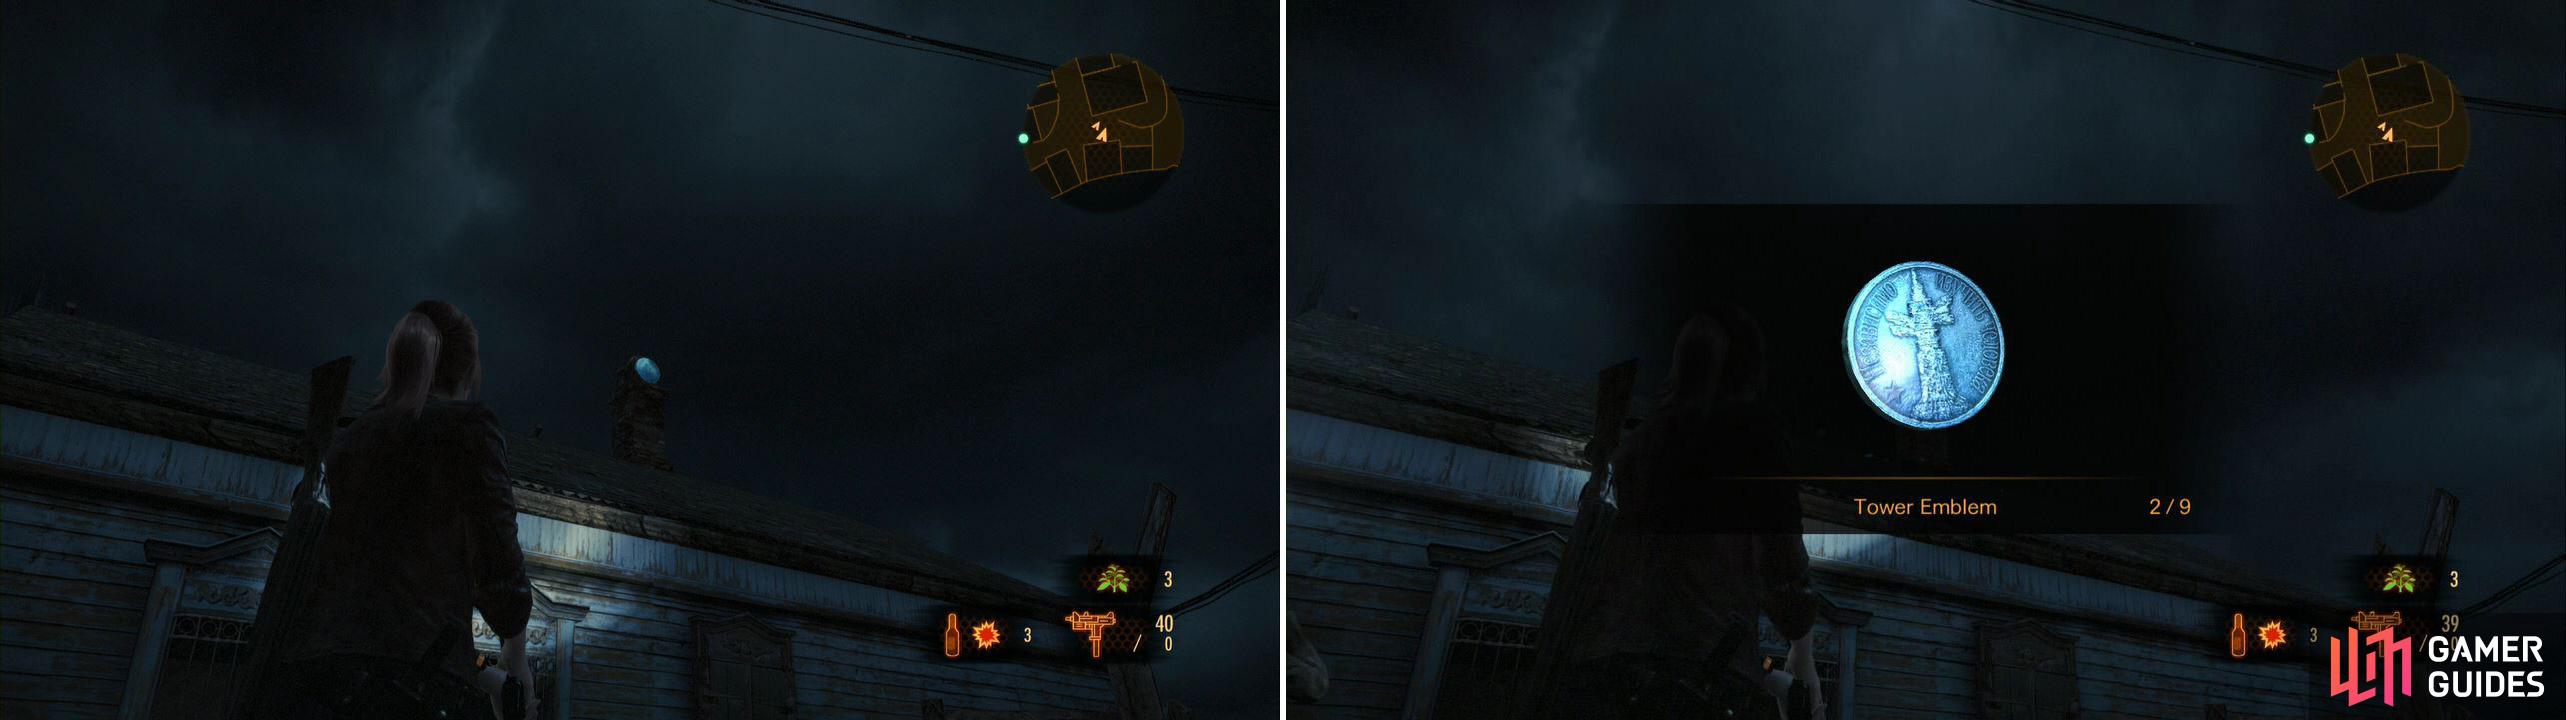
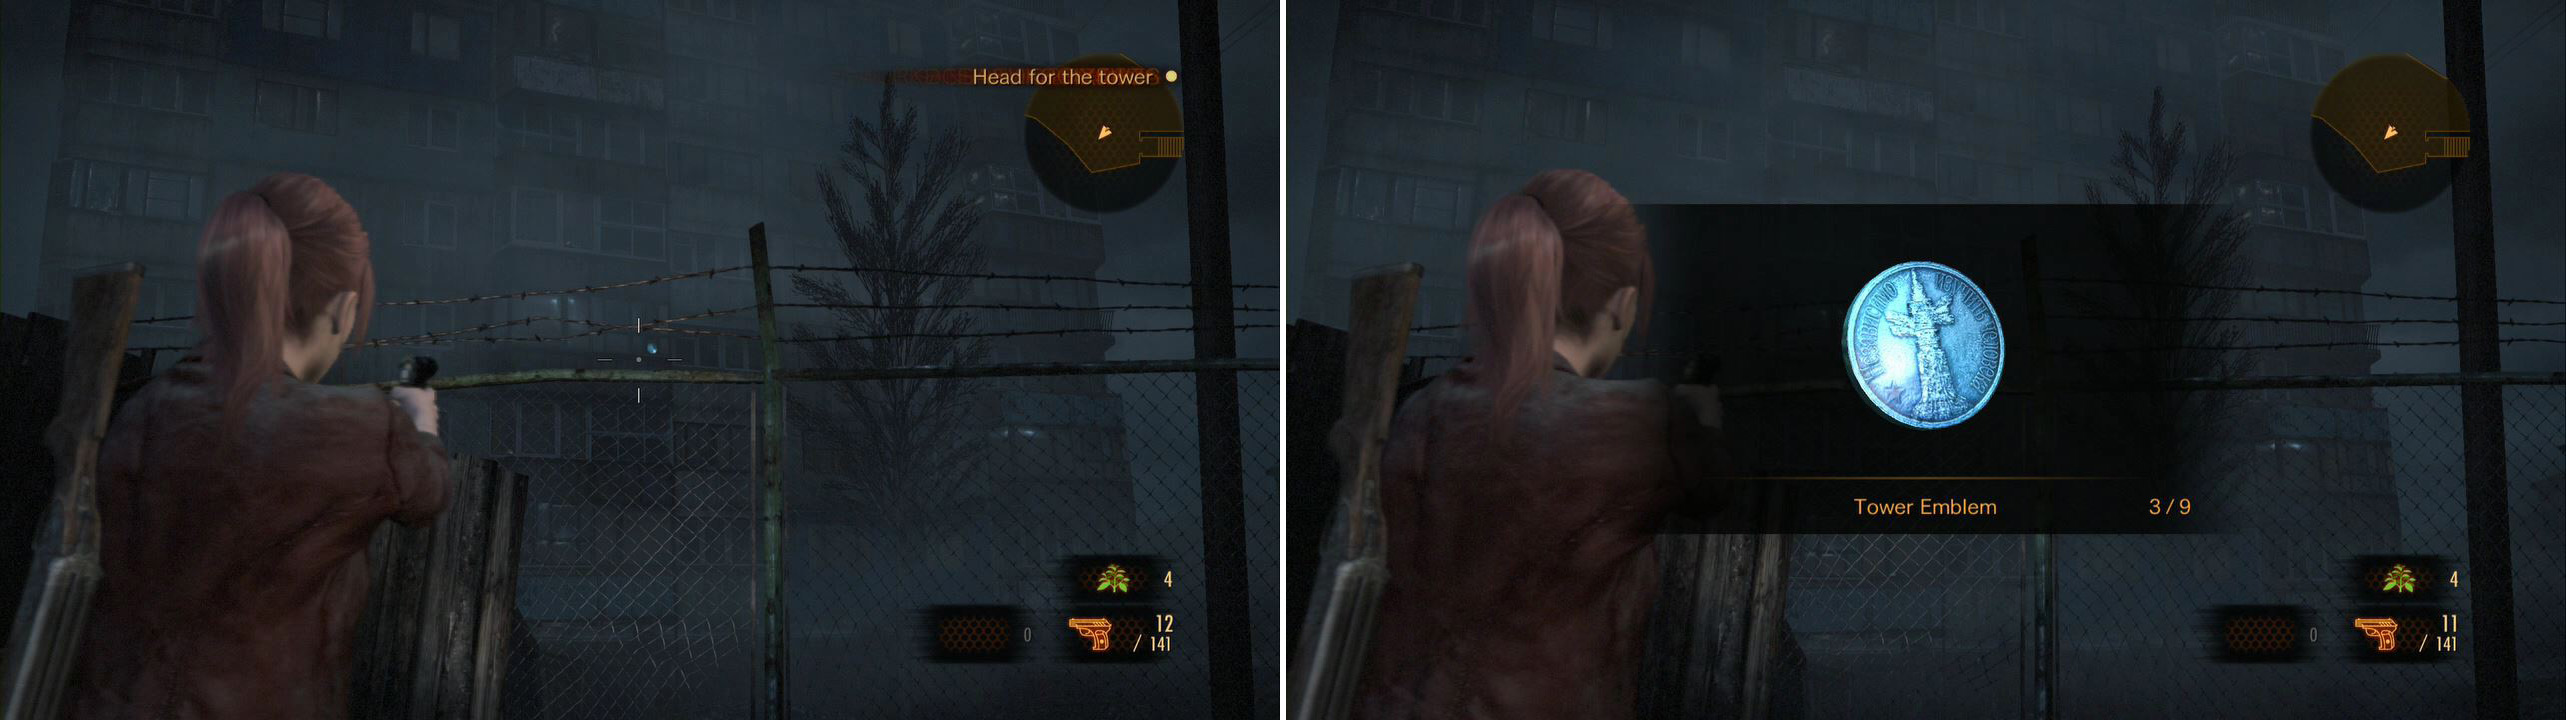
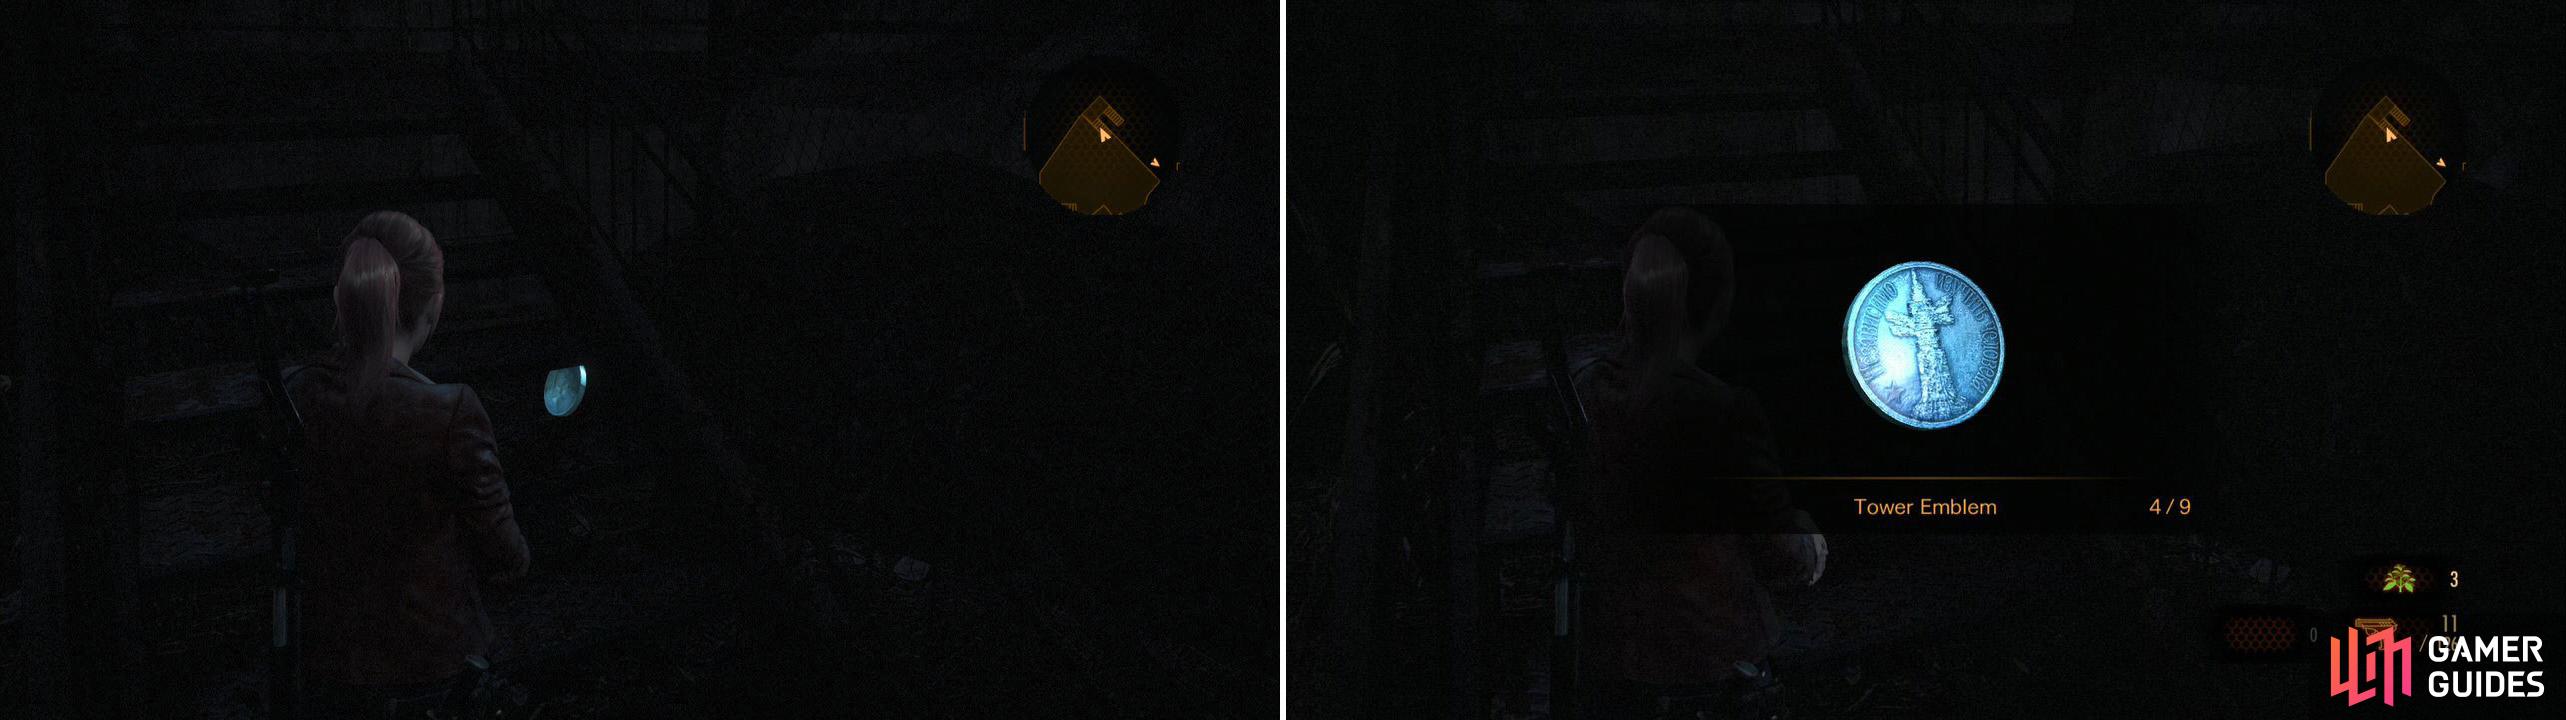
We could go explore a ton right now, but let’s just get a few items nearby and then follow Gabe. Head BEHIND the bar (avoid the steps here, but do note that there is a chest back here for Natalia later) and in the back you can find some Gunpowder and Tower Emblem 1/9 .
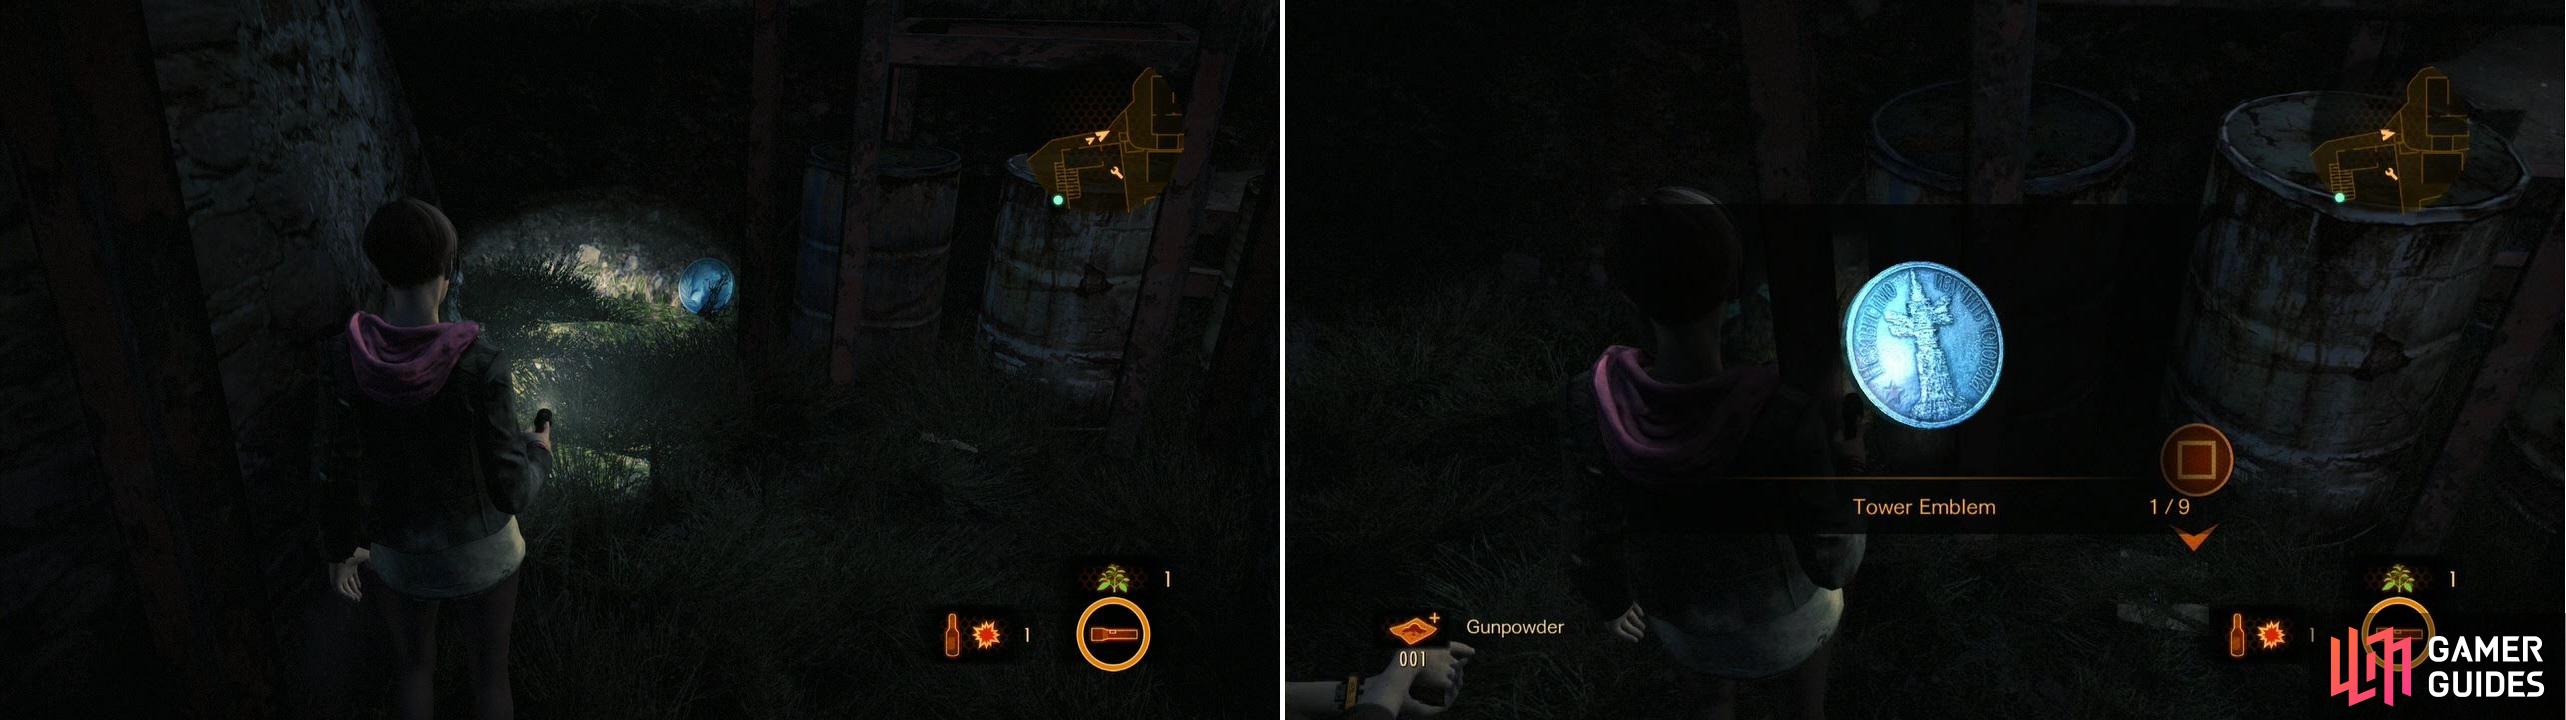
First Tower Emblem of the Episode.
Head to the front again and go ahead and follow Gabe. It’s just to pick up our objective in this area, and some goodies around where he is taking us. Follow him as he heads off to a steel door to the right. Note that the shed to the left before the door has some more Gunpowder . Nab it and enter the door.
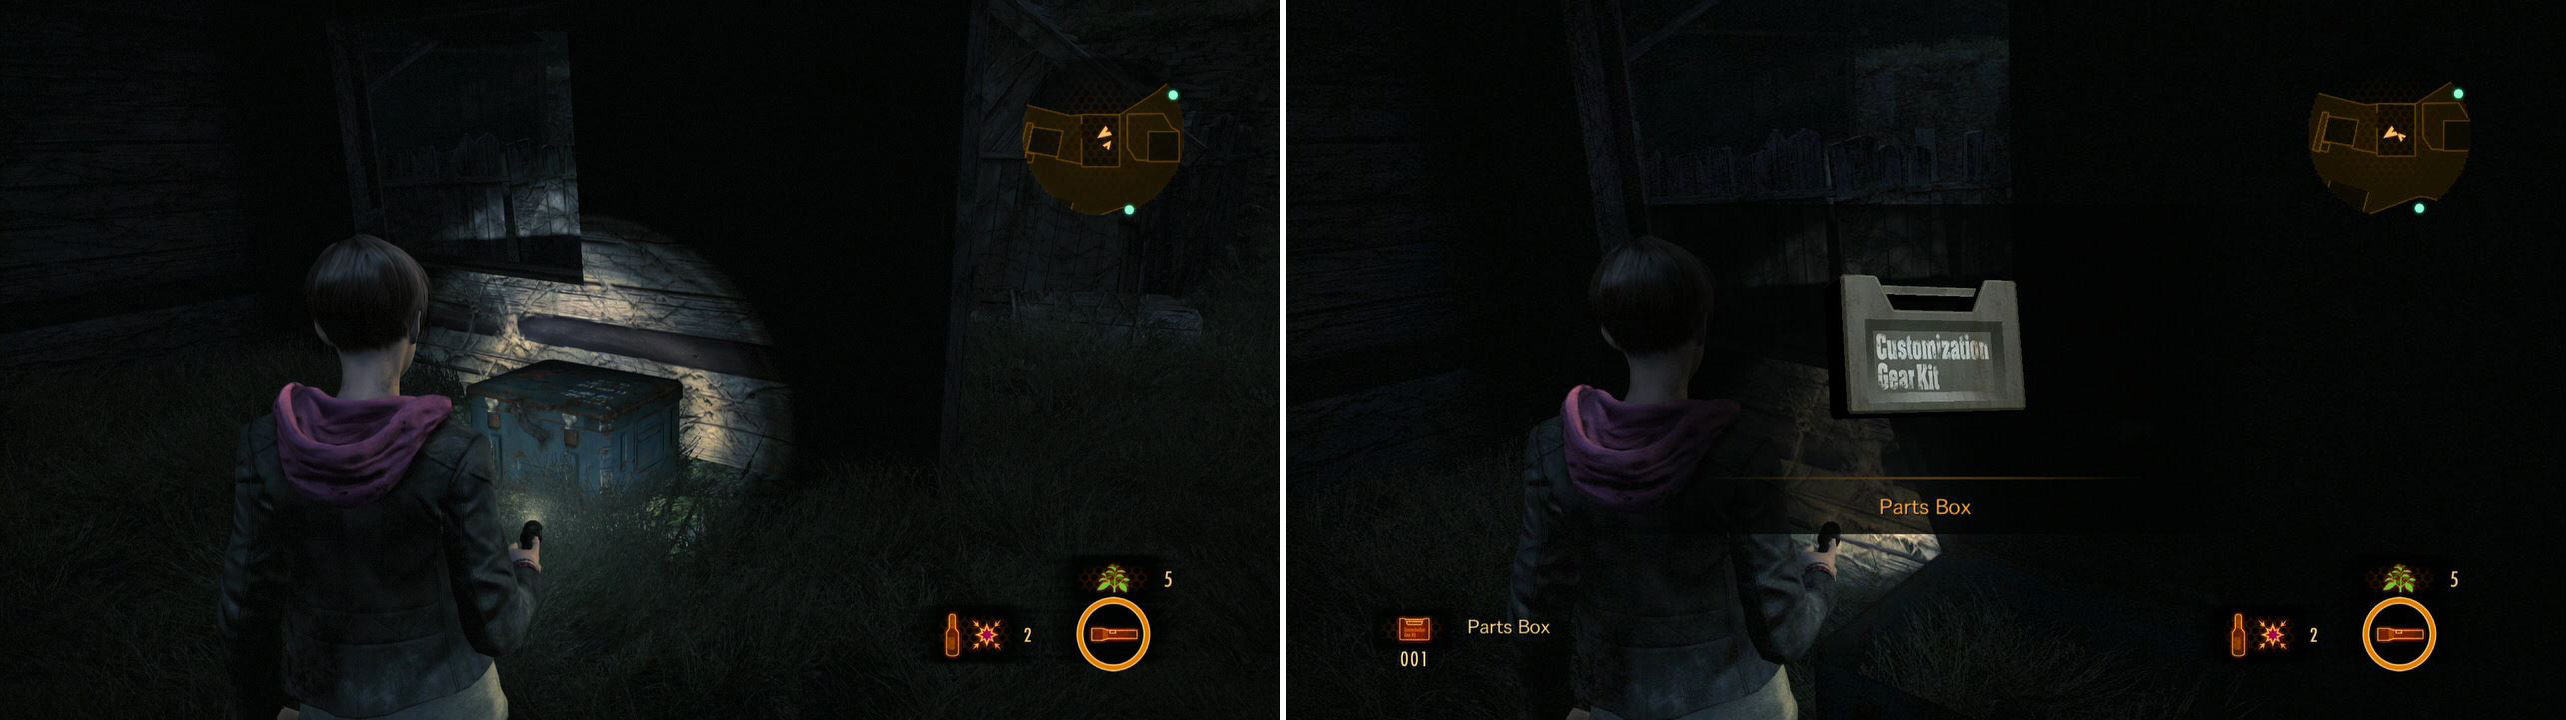
And… he’s leading us to a helicopter!? Heh, but it can’t run without fuel and a battery . Finding these two things is our next chore! First though is a Military Box to the left of the chopper. Get it open for a Parts Box .
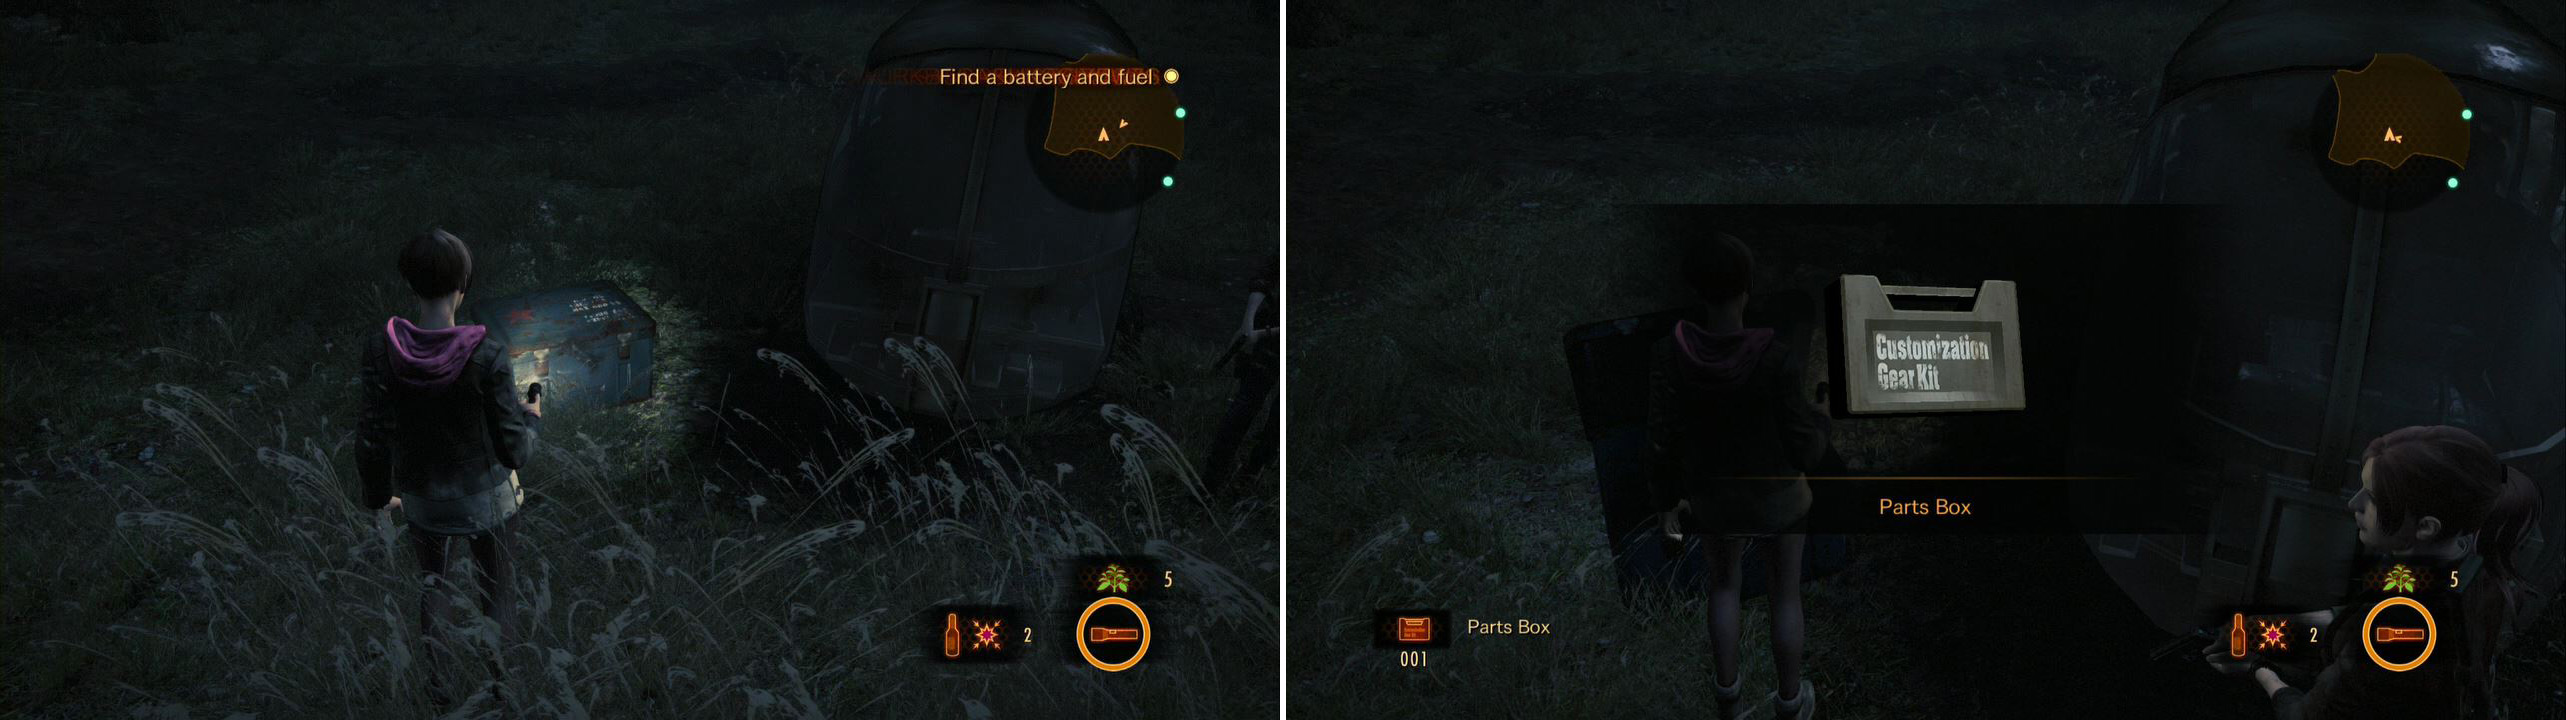
Open up this Military Box right next to the helicopter.
Also, check the back side of the chopper for a blue mark, which when combined with the flashlight is Kafka Drawing 2/6 .
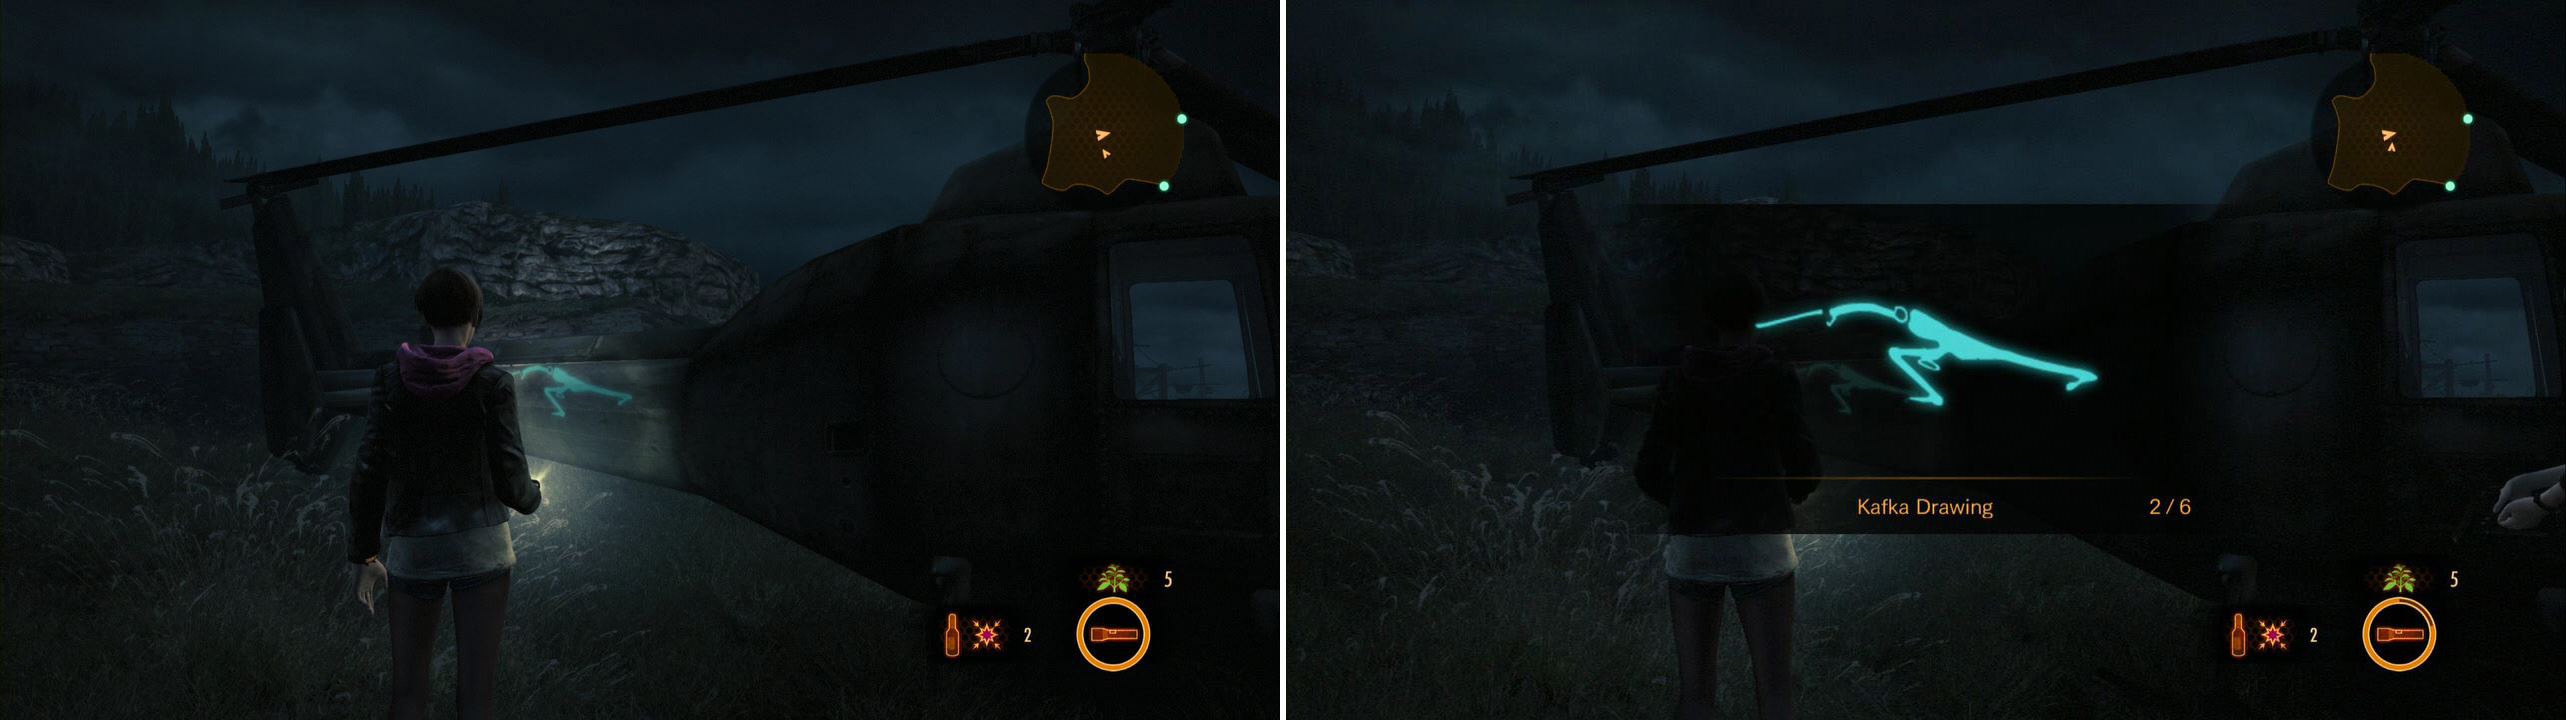
The second Kafka Drawing. Sitting on the helicopter.
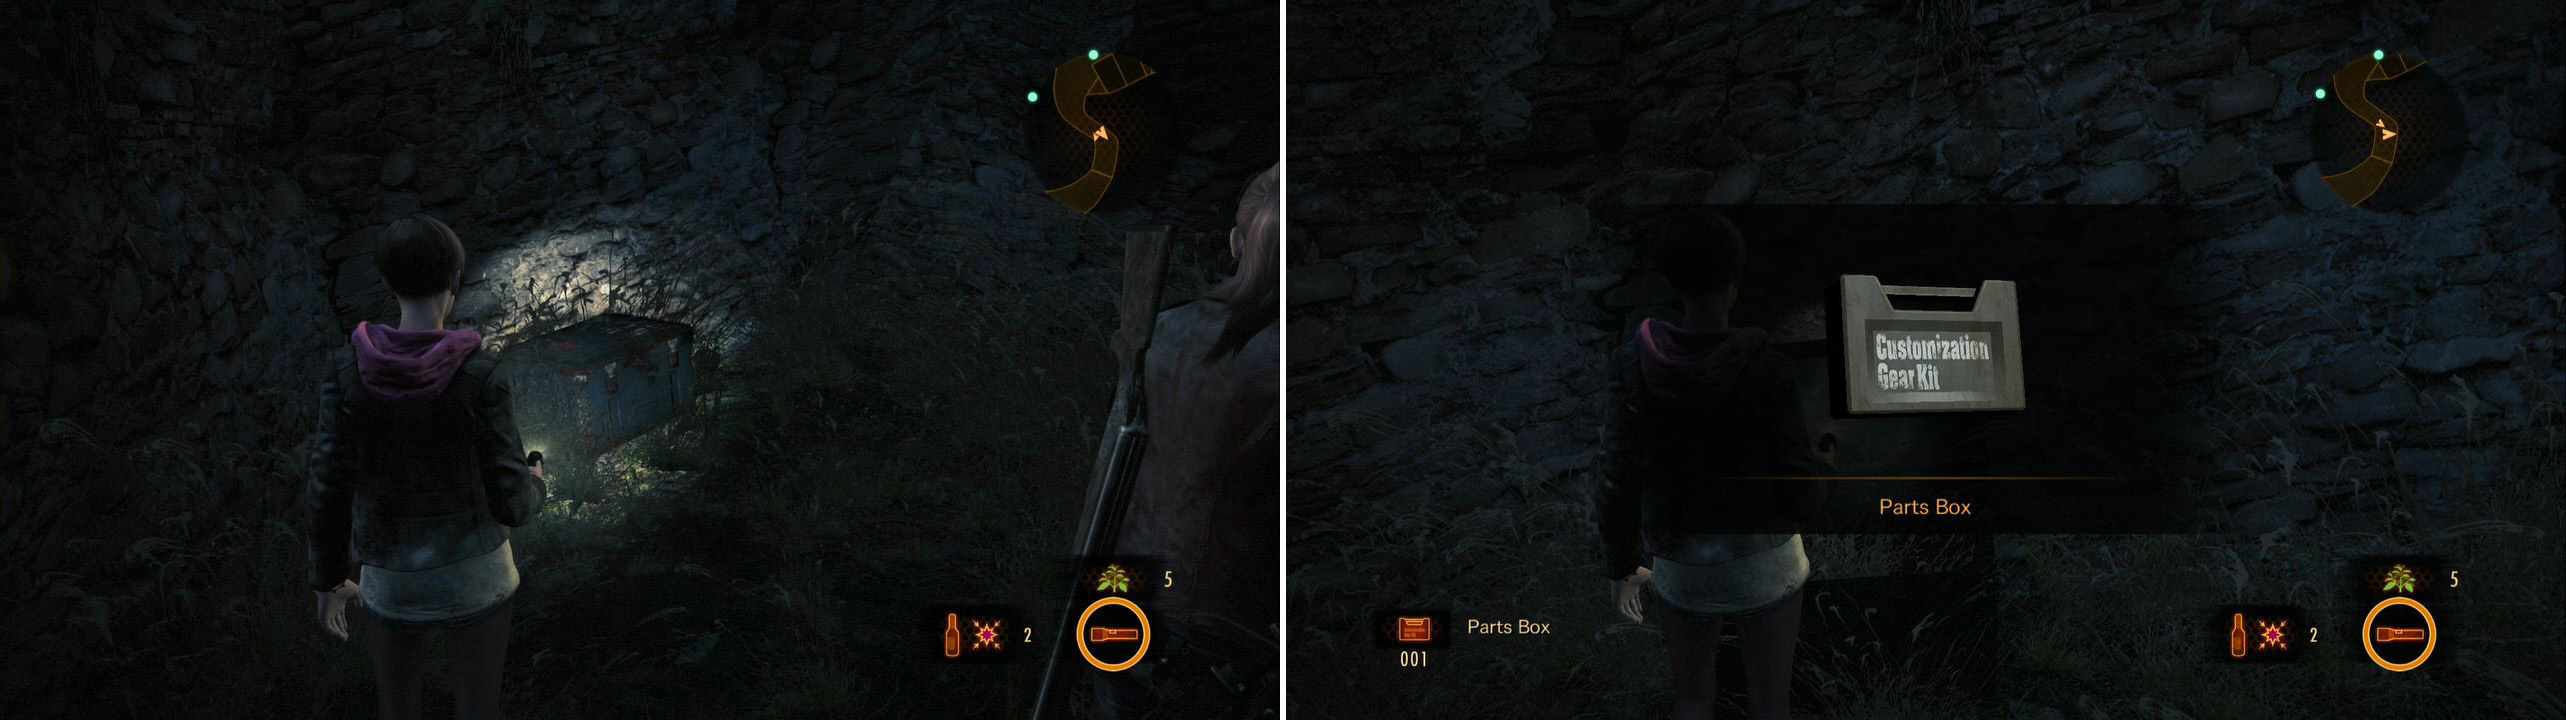
Head back to the door and hang left. There’s a shack back here. There is a Crate out in front of it and some Odorous Chemical and an Empty Bottle inside. There’s also a Military Box here that you can crack open for another Parts Box .
Check out the little room at the dead end to find a Military Box with some Crates.
This should give you some options on new things to attach to your weapons for sure.
Head back to the bar now. We’ll get a comment from Claire on how we are not alone. Naturally… can’t be a deserted village after all! Head past the bar now and there’s an open shed just past it. There is a Sparkle Item in here if you search and an Empty Bottle . Head past the shed to see a slope up on your left. This slope, if you ran up it, leads to a locked gate. We’ll play with that gate later of course.
More importantly, the house at the start of the slope is let up! From the door, head to the cubby on the left to find a godly RED HERB ! The door here is locked, of course, but we can head around to the back. There is a Crate back here and a broken ladder. Use it to send Moira alone into the house.
There is Gunpowder to the left on the shelf. Let’s go ahead and get the bad out of the way first: go ahead and open the main door from this side to let Claire have access to the house as well, but also drops a big afflicted into the house. One of the face-shielded ones. Take him out with some shotgun blasts and beware of these tight hallways.
Once he’s dead we can explore in piece. In the corner past the entrance door is a Sparkle Item in a cabinet. Open the other door here to see another Military Box . Open it up for the EXPANSION BAG (MOIRA) . This let’s dear Moira FINALLY carry 10 items like Claire. About time. Also found in this room is an Empty Bottle and a BATTERY , one of the two items we need to repair the helicopter! Now all we need is some fuel!
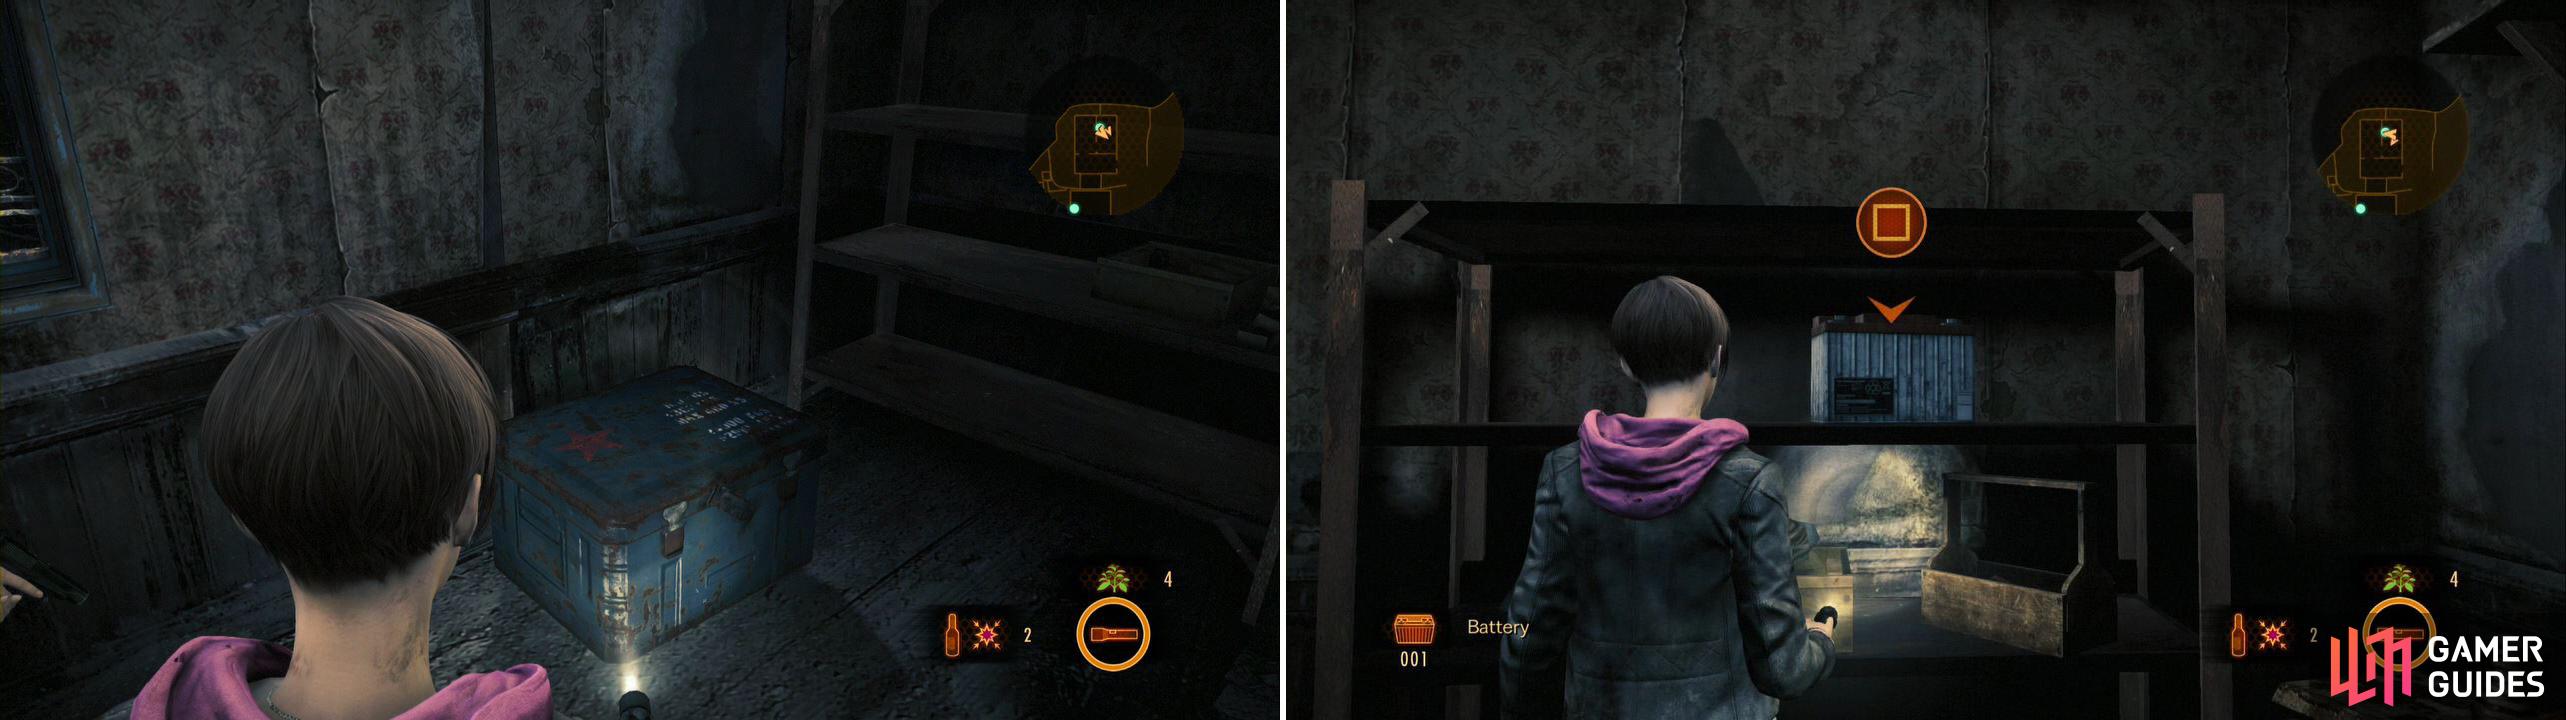
You get both a Military Box and the Battery in the same room!
OK, more exploring. Exit the house and head right, going down into the village some more (avoid the slope to your far left). Head down to the telephone down here (the one with the light on) and you’ll see Pedro! He’s done tinkering with the bracelet for now and has found a drill. He’ll go on to break down the door of this house, which was blocked by a weak wall.
BEFORE you go inside, check out the blue house behind us. Up on the roof is a chimney which has Tower Emblem 2/9. Shoot it down. Also, go around the house for a Crate . It leads to the beach. There is another enemy out here, a big afflicted, take him out. You can explore the far end of the beach for one more Crate . Head back to the weak wall after that.
Break the Tower Emblem on top of this house’s chimney.
Follow Pedro inside to find a Sparkle Item x2 , one in a corner and one under the stove. Also on a shelf is the Traveler’s Diary . More importantly, Claire can find the MP-AB50 by the corpse, the sub-machine gun for Claire. Oh yeah! From this house, exit and hang a right. Note the small open barn to the right and continue to the left, which leads to a dead end (which I believe is where we came from in the last episode), which has a Military Box . Open it up with Moira for a Parts Box , then head back to the shed we passed on the way to the dead end.
There’s a Military Box in the dead end to the south of the village. Don’t miss it.
Follow it to find another weak wall. We need to go get Pedro though. Before you do, head north a bit and kill the Afflicted hiding inbetween the buildings. The shed to the north has a Crate and an Exploding Bottle . Head outside the shed and go around the blue building in front of you as the fences back here are hiding one last Crate .
Go get Pedro now and lead him to the weak wall. Get ready to fight though, as his drilling is going to call in enemies! You will face about five afflicted here and one big one. They usually drop down from the roof behind you, so get ready. There’s no need to really protect Pedro, but they will stop his drilling if they get near him. Still, Exploding Bottles are gold in this cramped area, as is the shotgun.
Once Pedro breaks through you can explore the building. Nab the Handgun Ammo from the Barrels near the front and to the right in a corner are some Barrels x2. There’s also some Shotgun Ammo on top of the Barrels up ahead. In the back room is the FUEL , but there is an afflicted back there so be ready to take him out.
Now that we have the fuel it is time to head back to Gabe. Go ahead and do do for a cut-scene. The siren above the bar is going off, and we have to stop it. Head back that way with Pedro. Fight your way to the bar taking out the afflicted one by one. Do it safely right now: no need to rush. Turn off the siren with Claire by entering the bar and going upstairs to the panel.
We now have to survive in the bar. Think of this like the house section from Resident Evil 4 . Afflicted will assault our position, but will have to break through the windows. What you need to do is, as Claire, headshot them as they try to break in. This is fairly easy as they are, for the most part, just standing still. Moira players can help by blinding and stunning the enemies that Claire isn’t getting to (a little underwhelming, I know). Do your best not to let any in.
As you are fighting, you may notice Pedro is… freaking out. This will result in a cutscene after a few minutes of holding out, where the Overseer will announce what is happening. Pedro is… gone… and in his place is a hulking behemoth with a drill…
Your first time through the game (or this episode), you will want to avoid Pedro at all costs. Don’t waste your ammo. After a few minutes, some afflicted will break down the door and you can escape. If this isn’t your first time, take note of the note below for a special trophy that’s available now, but only if you can afford to waste the ammo.
You could also get the trophy and then die on purpose to hang on to all of the ammo that it cost you…


Once you are out in the village, the next step is to evade some more! We have to survive out here for a few minutes and we can’t go running to Gabe either (for some reason…). However, after you last for a few minutes (just run around and/or use Decoy Bottles ), Fisher will show up and drop a ladder near the bar. Go use it and take a right (follow him) to a narrow cliff-side path. This leads to the gate past the house we found the battery in, which he will open up for us to escape past.
SAFE! For now… there is a Green Herb back here you can pick up, then follow Fisher to the weak wall and have Claire interact with it. We’ll end up in a tunnel system from here.
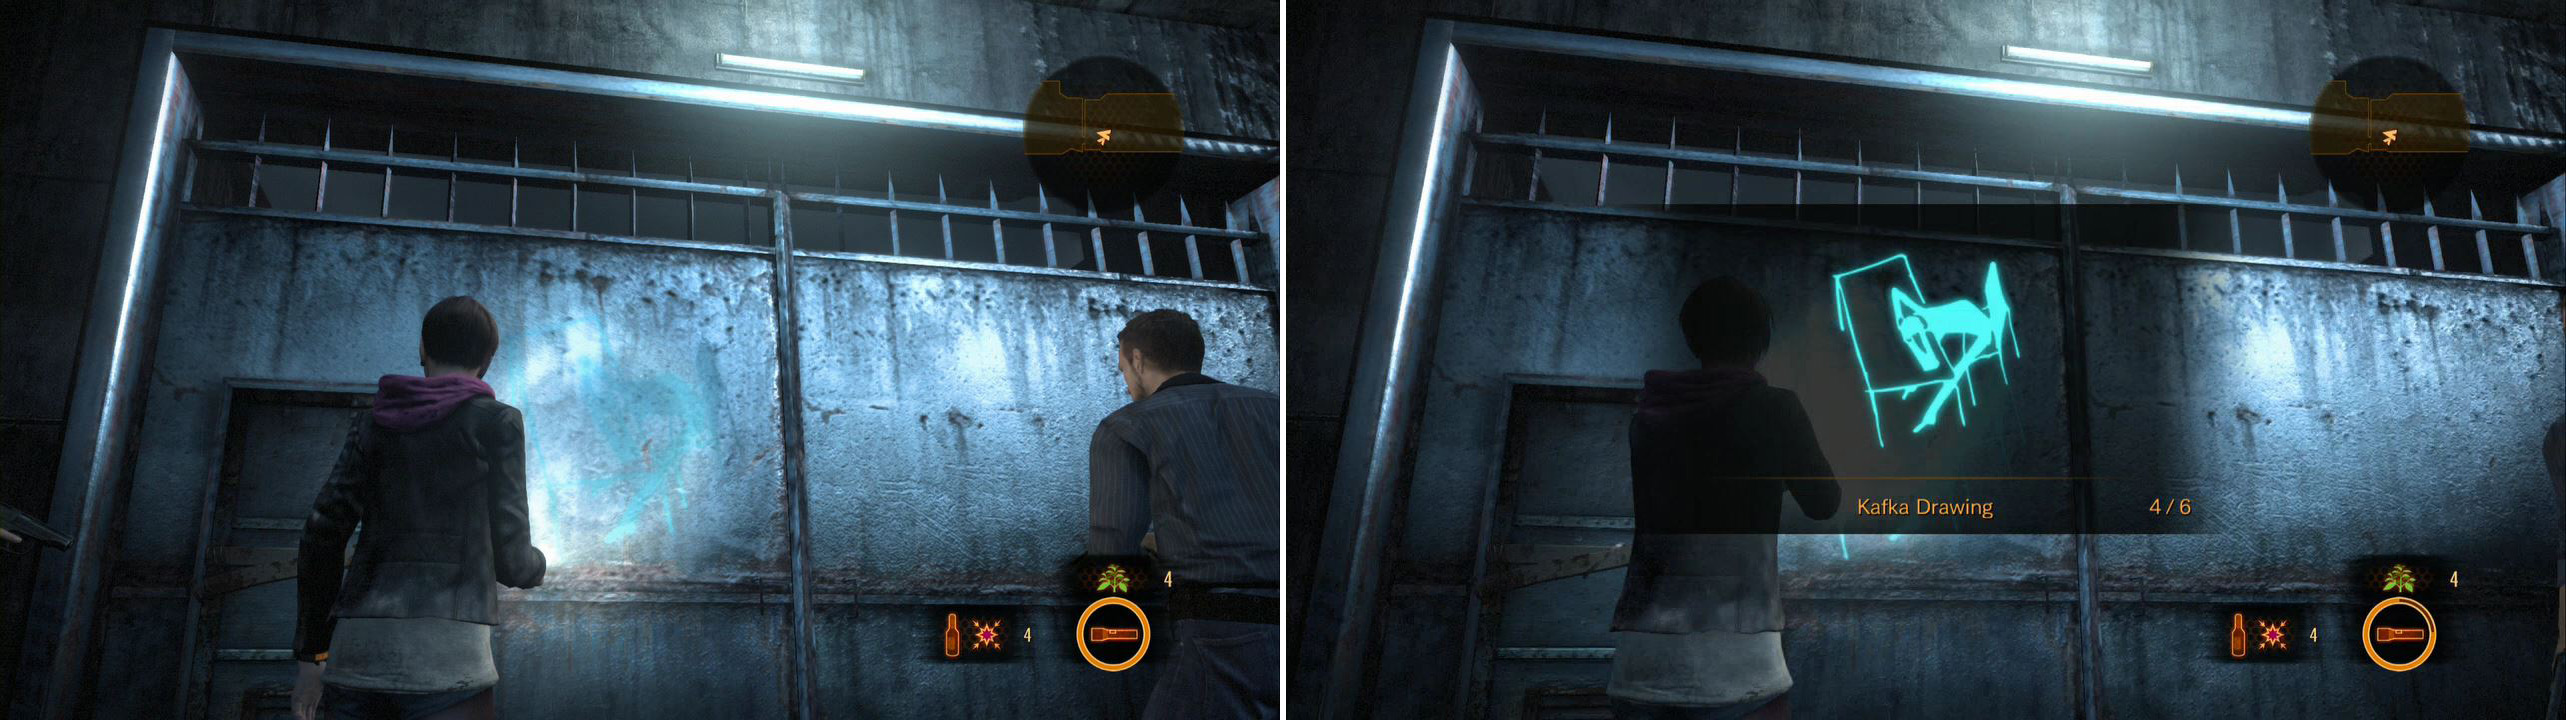
Head down the slope and grab the Town Map here. You’ll get some dialog as Moira meets Neil for the first time, officially. In the open room, check the left corner for an Empty Bottle and the Crate nearby for some Odorous Chemical . Up the slope are Barrels x2 and behind them on the wall to the right is a GIANT Kafka Drawing 3/6 . Very hard to miss this one at least! Exit the tunnels now.
Right before you leave the tunnel, mark this Drawing.
Once you get outside you’ll see the tower. Claire will push to head there now vice waiting for dawn, since we have no idea what was injected into us. Fair point. There is a WELL HIDDEN emblem nearby: with Claire, look to the left past the wooden fence to the building in the background. Resting on one of the walls is Tower Emblem 3/9 , which you can shoot with a well-placed shot. Very well hidden!
This Tower Emblem is really far away. You can try to shoot it down or wait until you pass here with Barry and use a Sniper Rifle.
Head onward on the right side of the area (check behind you to see a Crate near the closed-off tunnel). See the car on the left? The last one? There is a DOG hidden behind it. It is the newest enemy type and appears to have been blinded and tortured. Poor thing… but it is evil and must die! You can actually surprise this one and shoot it to kill it but another one will come soon. If you have the PARTNER AI shooting skill, it’s recommended to use Moira here and have Claire shoot it (which stuns it), then beat it to death. Neil helps out as well. Near the end of the area is the exit door, but two more dogs come out to play. Take care of them as well, but note to the right of the door is Kafka Drawing 4/6 .
Make sure to kill the dogs before marking the Drawing.
There is a Sparkle Item in the right corner as well. Note that as you break down the door with Moira, two more dogs come out to play, so be ready. Break the final door barrier and proceed.
In this next area break the Crate in front of you and note the afflicted in the small area to the right. No point in shooting them here, so save your ammo. To the right is a broken ladder and right of that is a bunch of scrap metal with a Sparkle Item . Grab it and use the ladder for a short scene. Well… hope he’ll do OK. Up here is a Topaz in the corner. Head inside once you grab it.
Head into the next room and straight ahead is some Alcohol . The desk nearby has some Cloth in it as well. You can actually make some Disinfectant with this combination if you wish (it wipes gunk away from the screen, which is handy if you can’t see anything). Head out the door and check near the railing for a Military Box . This one has a Parts Box inside it.
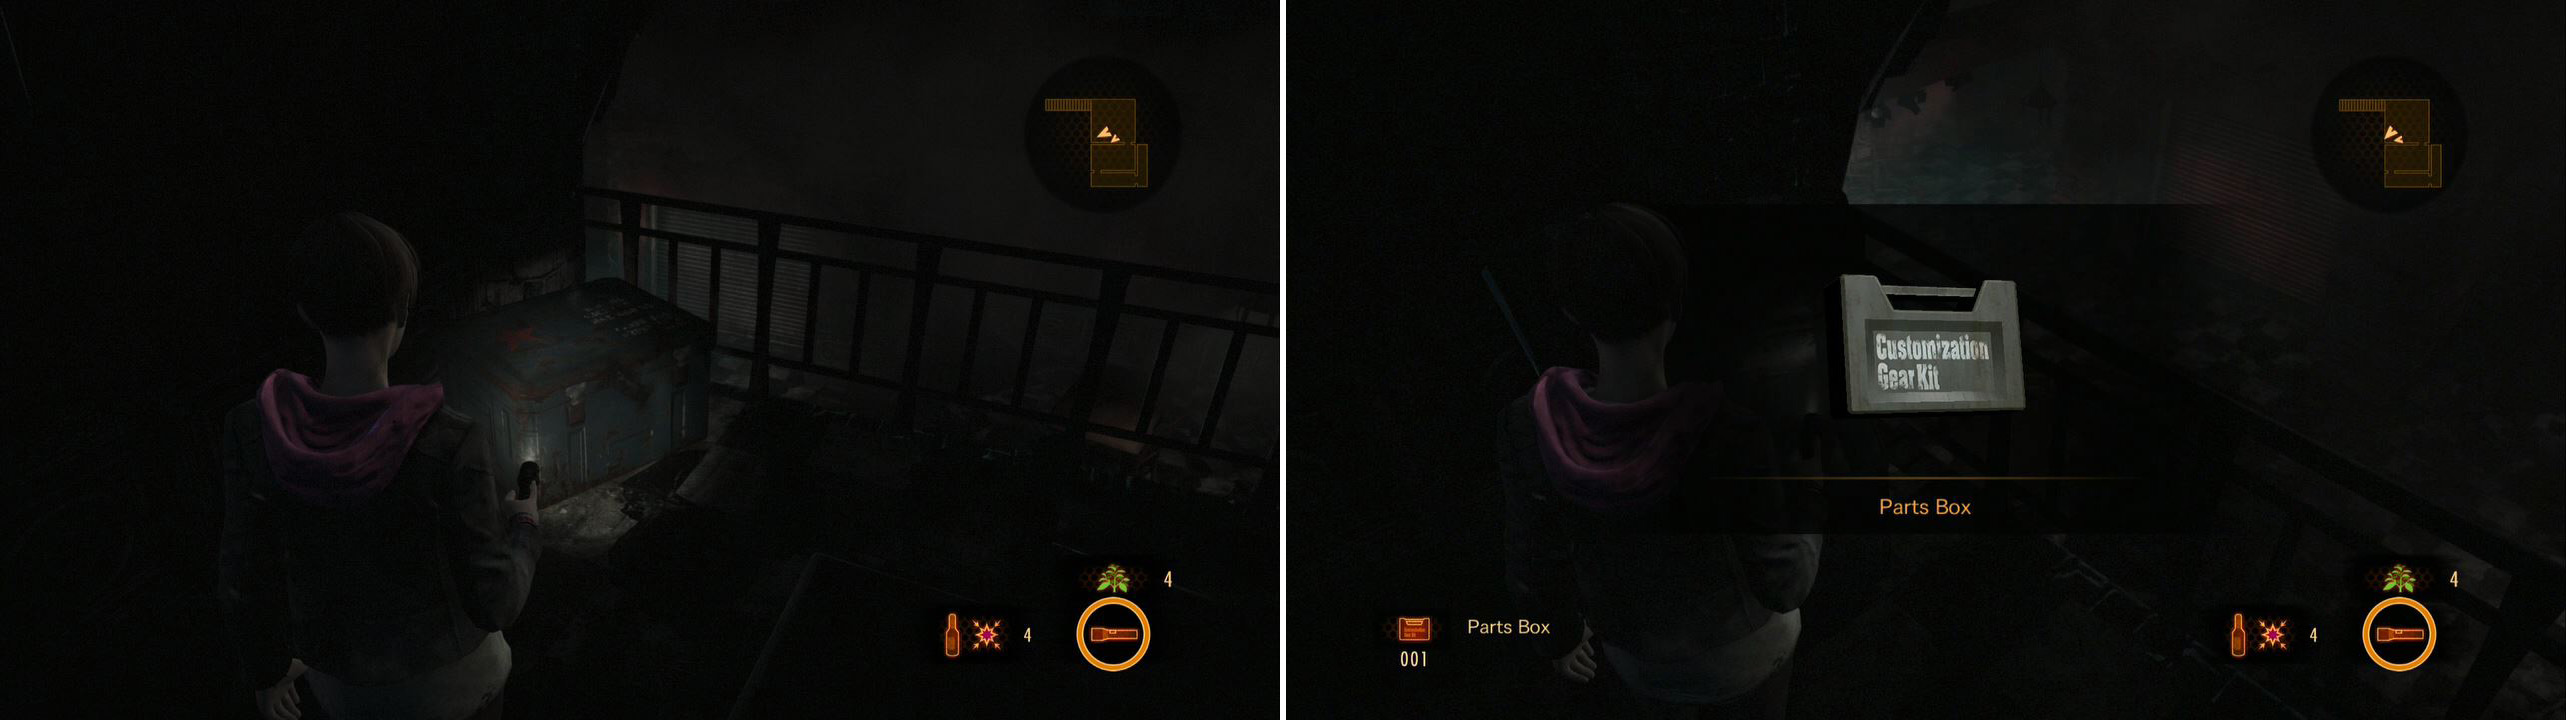
Right before heading down to the massacre with the giant Afflicted, break open the Military Box.
You undoubtedly hear the grunting down below. Yes, there are enemies. Head down the stairs and while half-way down you can actually see an armored afflicted in the kitchen area to the lower left. Shoot him now if you wish to fight just him by the stairs (there are two more afflicted in the back). Take him out and then the two other afflicted in the area.
Once they are dead, explore the bottom floor for a Crate in the back and a Sparkle Item by the stack of chairs. The kitchen has a moveable box in it you can move just to the right for some Shotgun Ammo , then bring it out into the dining room to get the ShotgunTAP194 from the wall, a new weapon for Claire. It holds more shots than the one you have and is overall just an updated model. Use the metal gate here to continue on.
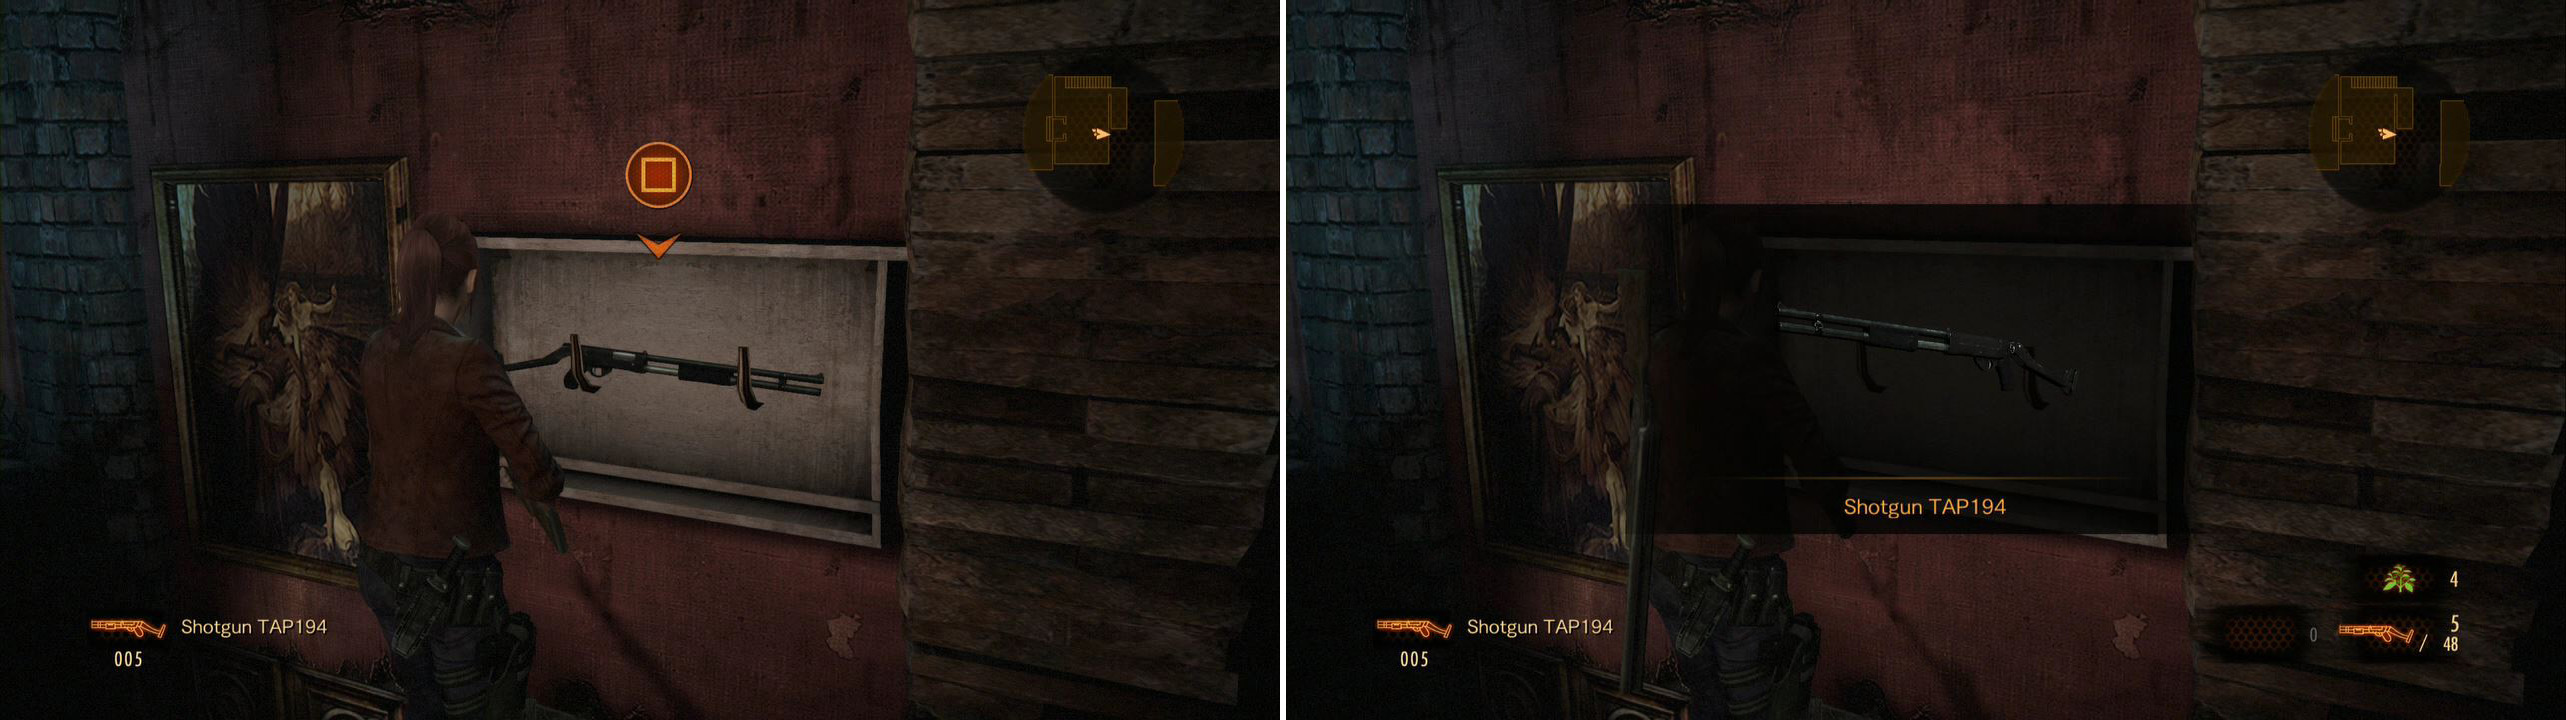
This is an upgrade to the shotgun you’re carrying. You need to kill the Afflicted in the room to get it though.
Out here, head south for a Crate , then lure the big afflicted down here and kill him. Be sure to keep him in the south so you don’t get noticed by anything else. Now, to the north is a dog sleeping in the street. Take him out with Claire. To the left is a playground. There is a dog down here as well sleeping, along with an afflicted. Take them both out. Check the south side of the playground for an almighty Red Herb and under the benches you can find a Sparkle Item . To the north is one last armored afflicted, so take him out to make the area safe. To continue, push the Crates by the bus (note that the southern one gets pushed before the northern one can be).
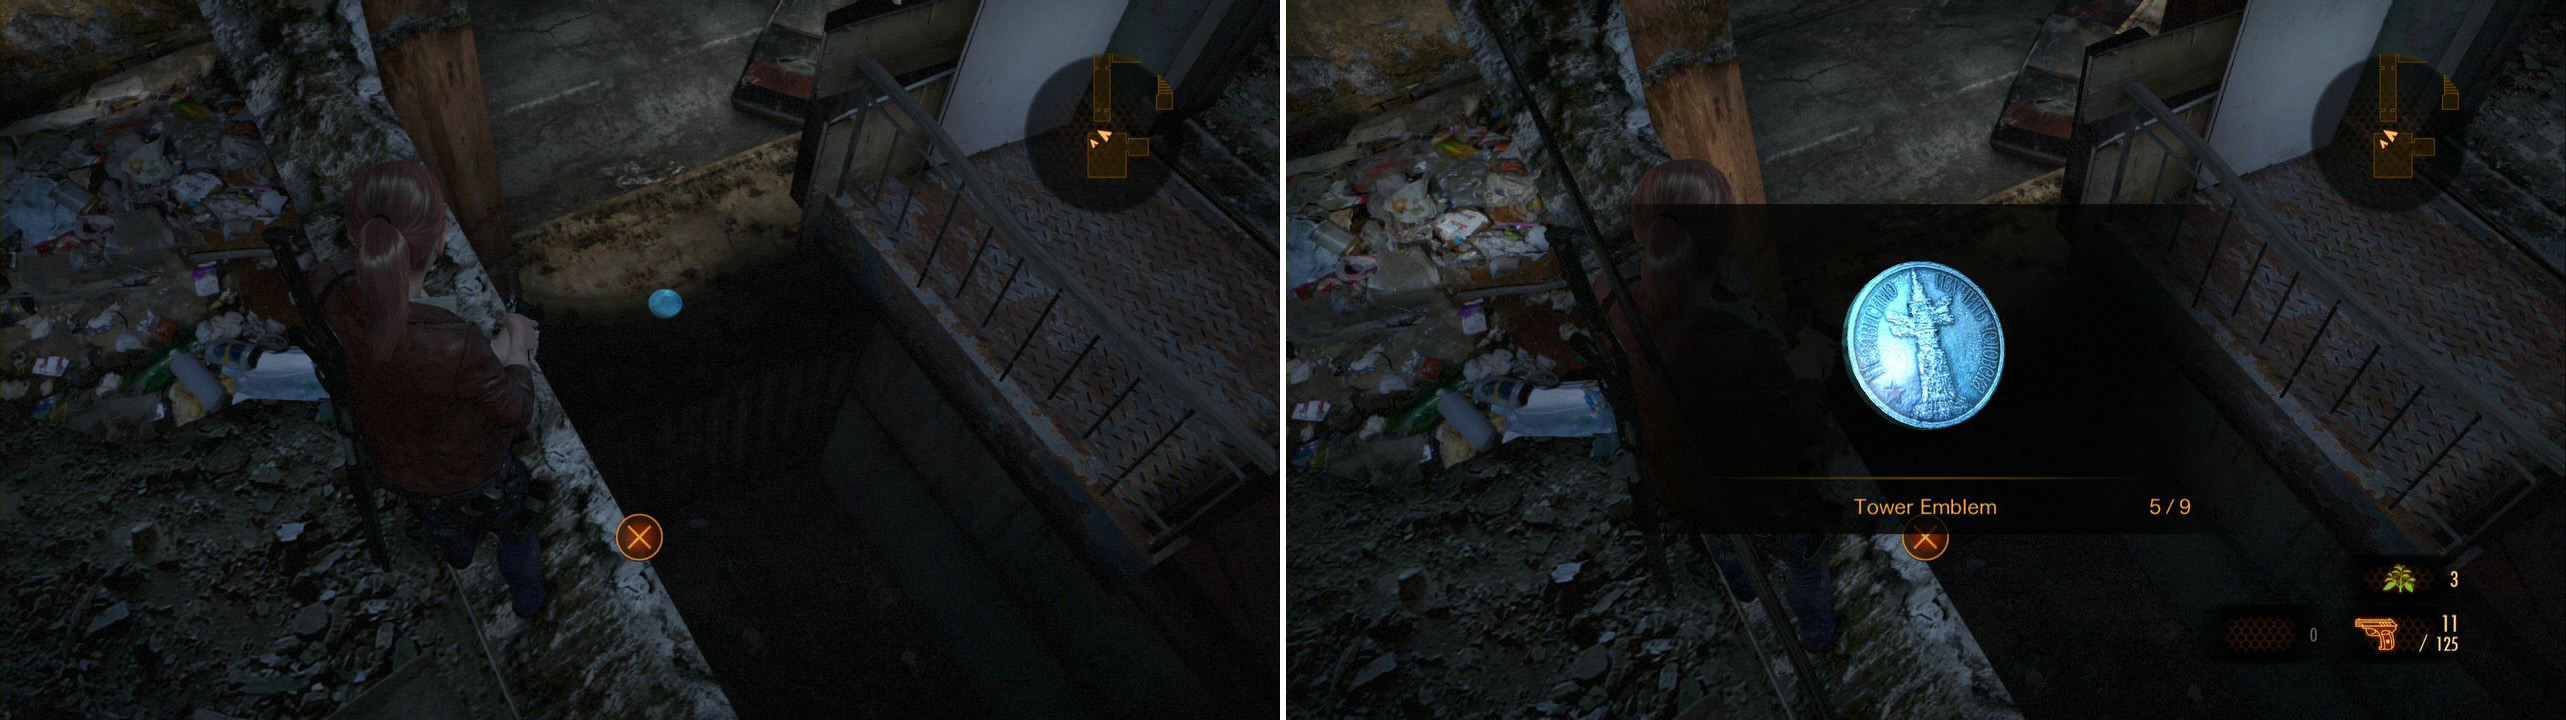
Head through the bus and check the back for a Topaz . Just outside the bus under the metal beam in front of it is a Sparkle Item . Continue on past the gate up here to see the mysterious girl (well… we know who this is!) run away. Nab the Empty Bottle nearby and head up the staircase after her, entering the building.
The path straight ahead is blocked. There’s a hole where she probably went through. Head right and take a left. The door is locked here but ahead in the room is a Sparkle Item . Go back and down the stairs now. To the left under the sink is another Sparkle Item . Nab it and open the doors with Claire, shotgun in hand.
Straight ahead is a Boomer. They try to get near you and explode. If you have to, retreat up the stairs and kill him from a distance. There is another enemy inside the room: an armored afflicted. Take him out carefully before we go explore.
Once he’s dead, check the left corner past the entrance for a Military Box They love giving us these things! Inside is a Shotgun Ammo Case for Claire, which is nice. There is a Sparkle Item under the nearby sink here as well.
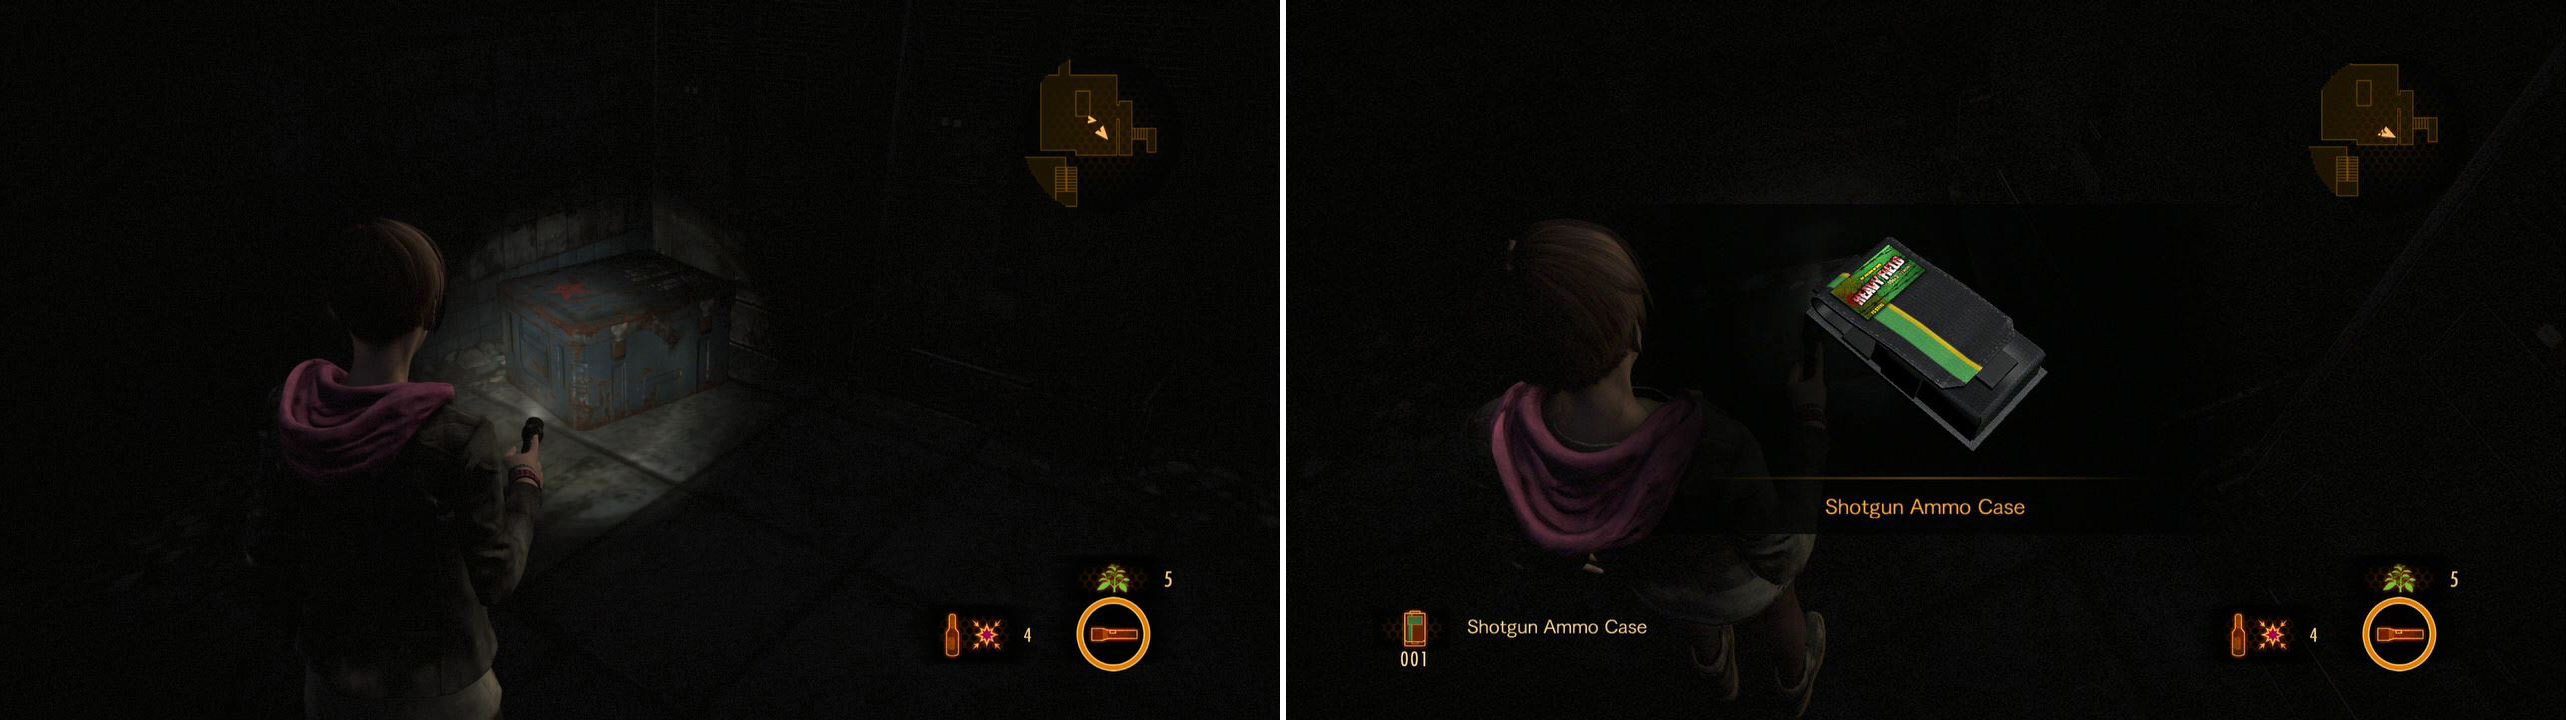
This ammo case allows you to carry more shotgun ammo in a single inventory space. Really useful!
Head for the stairs at the end of the room and kill the afflicted that comes down them. Up in the upper room is another Boomer, so be careful there. In the upper room, on a shelf to the left is the Mock Experiment Results , right next to some Alcohol.
There’s Sparkle Item x2 in the room as well: one to the right of the Alcohol , down in the cubby near the floor, and another under a bed by the Natalia box. Also, be sure to check the desk on the right side of the room for some Handgun Ammo . On the wall to the right of the desk is Kafka Drawing 5/6 as well. Once we have all of these goodies we can exit via the door.

An easy to miss Drawing. Right next to the desk.
We’re in the control room from the start of this building. Check the desk here for some Cloth and unlock the door to the left. To the right is a door switch, but we need to split up as the door will close after you use the switch. If you have an AI partner, have them stay here and head to the door. Pull the lever with whoever stayed, switch partners, and go through. You can push the box in the doorway to keep it open, but it will likely take another time opening the door.
The door on the left here has a Boomer in it. We should take him out though, as there’s also a Crate and a Sparkle Item . Up to you whether it’s worth it I suppose. There’s a hole in the floor as well, but it just leads down to the basement, and we’ve already got everything down there. Exit through the other door to get outside again.
Go past the walkway and you’ll see Natalia in the distance. Still running from us it seems. Go down the stairs and turn around at the bottom, as we can see Tower Emblem 4/9 here. Pretty easy to find naturally, actually, unlike the last one! There is an afflicted out here, so deal with him (he’s lying down past the middle car). There’s also a Crate to the left. Nab it and continue to the next building.
Check behind the stairs to get this Tower Emblem.
There’s a workshop here you can use if you need to. Head to the right and you’ll see a hallway to the left. Head straight for now and check the post boxes here for a Ruby . You can call down the elevator if you wish, but two afflicted will pop out (easy to take care of with a shotgun blast or two since they are so cramped up).
Head back to the hallway now and enter the right door. On the shelf in here is the Town Resident’s Memo . There’s a Sparkle Item in the bathroom next to you. Back in the hallway the door straight ahead is locked (this is for Barry…), but we can break down the left door. Open it up and check the room inside for a Natalia chest and a Parts Box . Good thing we have a workshop nearby!

Grab the lone Parts Box next to the Gimmick Box.
Now from here we MUST go use the elevator. Be ready for those two afflicted I mentioned earlier! Once they are dead, enter and head up. We skip the second floor. In the left corner up here is an Empty Bottle , and across the gap Natalia will see us and run off. Again. BEFORE you cross the gap, have Claire go up to it and look down. To the left is Tower Emblem 5/9 . Easy to miss if you aren’t going slow!
Make sure to break it before jumping across!
Cross the gap now and Claire will have to open the door, but we’ll get a very neat scene here. Very cool. Once you regain control, go down the hallway while listening to the dialog. A shelf on the right has some Cloth . Enter the next room and break the Crate to the left. Check the desks in here next for some Gunpowder and a Ruby . You can find Sparkle Item x2 under the desks as well, and an Empty Bottle right of the workshop.
Continue on through the door and around the corner. STOP at the top of the stairs though. Use Moira here to look at the ceiling for Kafka Drawing 6/6 before moving on. You’ll have to jump down some rubble soon and a short scene will start, followed by an intense battle.
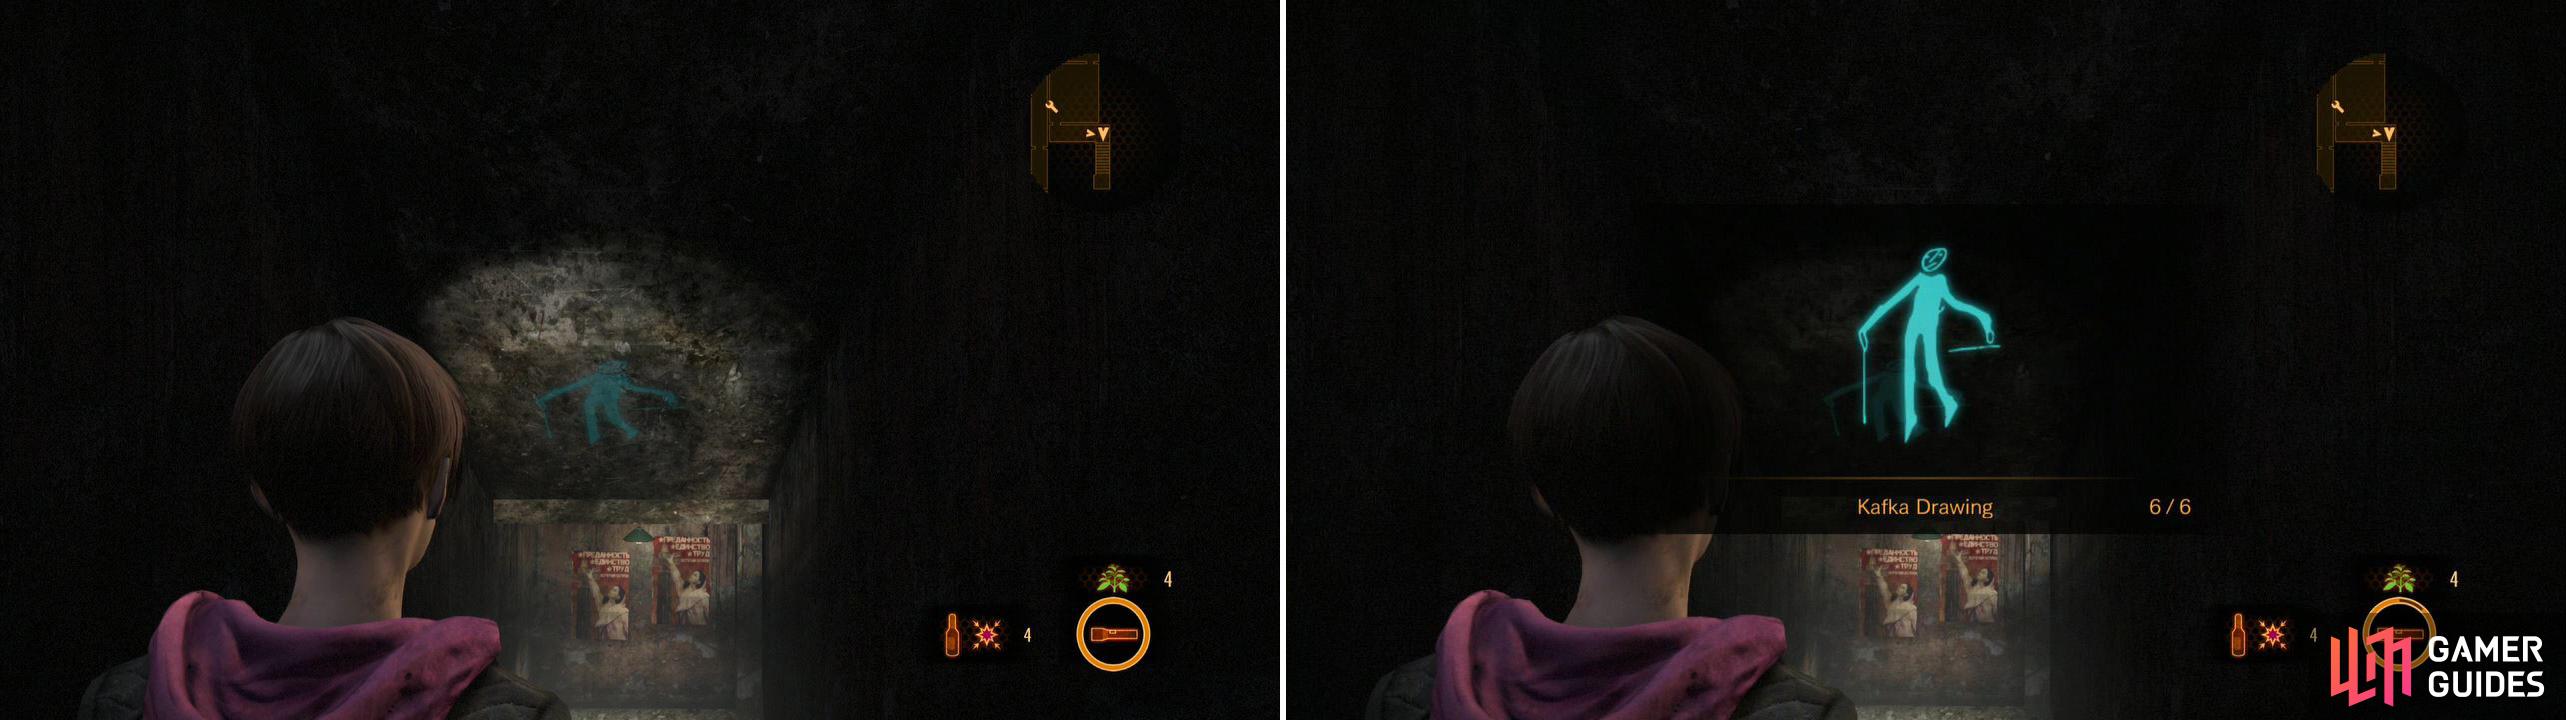
Even if you jump down you can still get this Drawing.
Well… the intense battle is coming. Lure the armored afflicted and the normal one to fight by the stairs and take them out. Now… get ready! If you are playing with an AI, then I recommend giving Claire all the sub-weapons at this point. When you walk into the middle area, a huge fire-spitting zombie will drop down! GAH! Let’s call him Dave!
Dave is, uh… dangerous as hell. He has a ton of health and will spit his fireballs at you, causing flame to engulf whatever area it hits. He can also charge at you (which will likely knock you over). As soon as he comes down, start chucking explosive bottles at him. Ideally a partner does this while you pump Shotgun Shells in him. He will actually fall with about four explosive bottles and 12-13 shotgun blasts. Don’t try to just stand there though: he WILL spit fire at you, so stay on the move when he gets the fire on his stick!
What really makes this fight hard is the fact that normal afflicted will keep pouring in as long as he lives. Them chasing you is not good times. If you have them, use the decoy bottles. These bottles even make Dave distracted, and make him spit at the bottle (which may kill other zombies). This is one reason why killing Dave fast is so important: it limits the enemies you face.
If that fails, run around and take potshots with your handgun at his head, adopting a hit and run strategy. Use bottles when you can. The game is also programmed to drop ammo from enemies here, to make sure you don’t COMPLETELY run out of ammo. Note that the left and right walls of this long room each have a Crate on them (this is TWO Crates), and one of the shelves in the middle has a Green Herb if you climb up it. There’s also a Sparkle Item next to the green desks near the stairs. Try and save all of your heavy hitting weapons and ammo for the fire-breathing behemoth until he falls, then clean up with the handgun and flashlight afterwards.
Once he is down, go get Natalia and examine the door here. There’s one of her holes off to the lower right. Examine it and she’ll open the door for us! What service, indeed! Head outside and go SOUTH first. Check your left as you go for Sparkle Item x2 , one behind the first outcrop of junk and one to the very south. Check behind the cars back here too for a Ruby . After that, head north until you see a scene…
No Comments