Watch the amazing intro to Barry’s chapter and we’ll regain control, but Natalia is hurt and we’ll have to carry her on our back. Go down the stairs and go right to find Sapphire in the corner. Walk along the path while listening to the conversation between Barry and Natalia. Now we get to hear, at least a little bit, of why the resentment from Moira to Barry. You’ll come across the Sewer Map so make sure to take it.
As soon as we hear a growling, Natalia is fine. Grab the Topaz in the corner and go up the stairs. Remember this area? Up here you can find a Cloth and a Sparkle Item x2 : one behind the Barrels and one as you exit the small alcove. Proceed and go forward where the rockslide is to find Odorous Chemical . Now go down the path and you’ll find a Sparkle Item at the bottom.
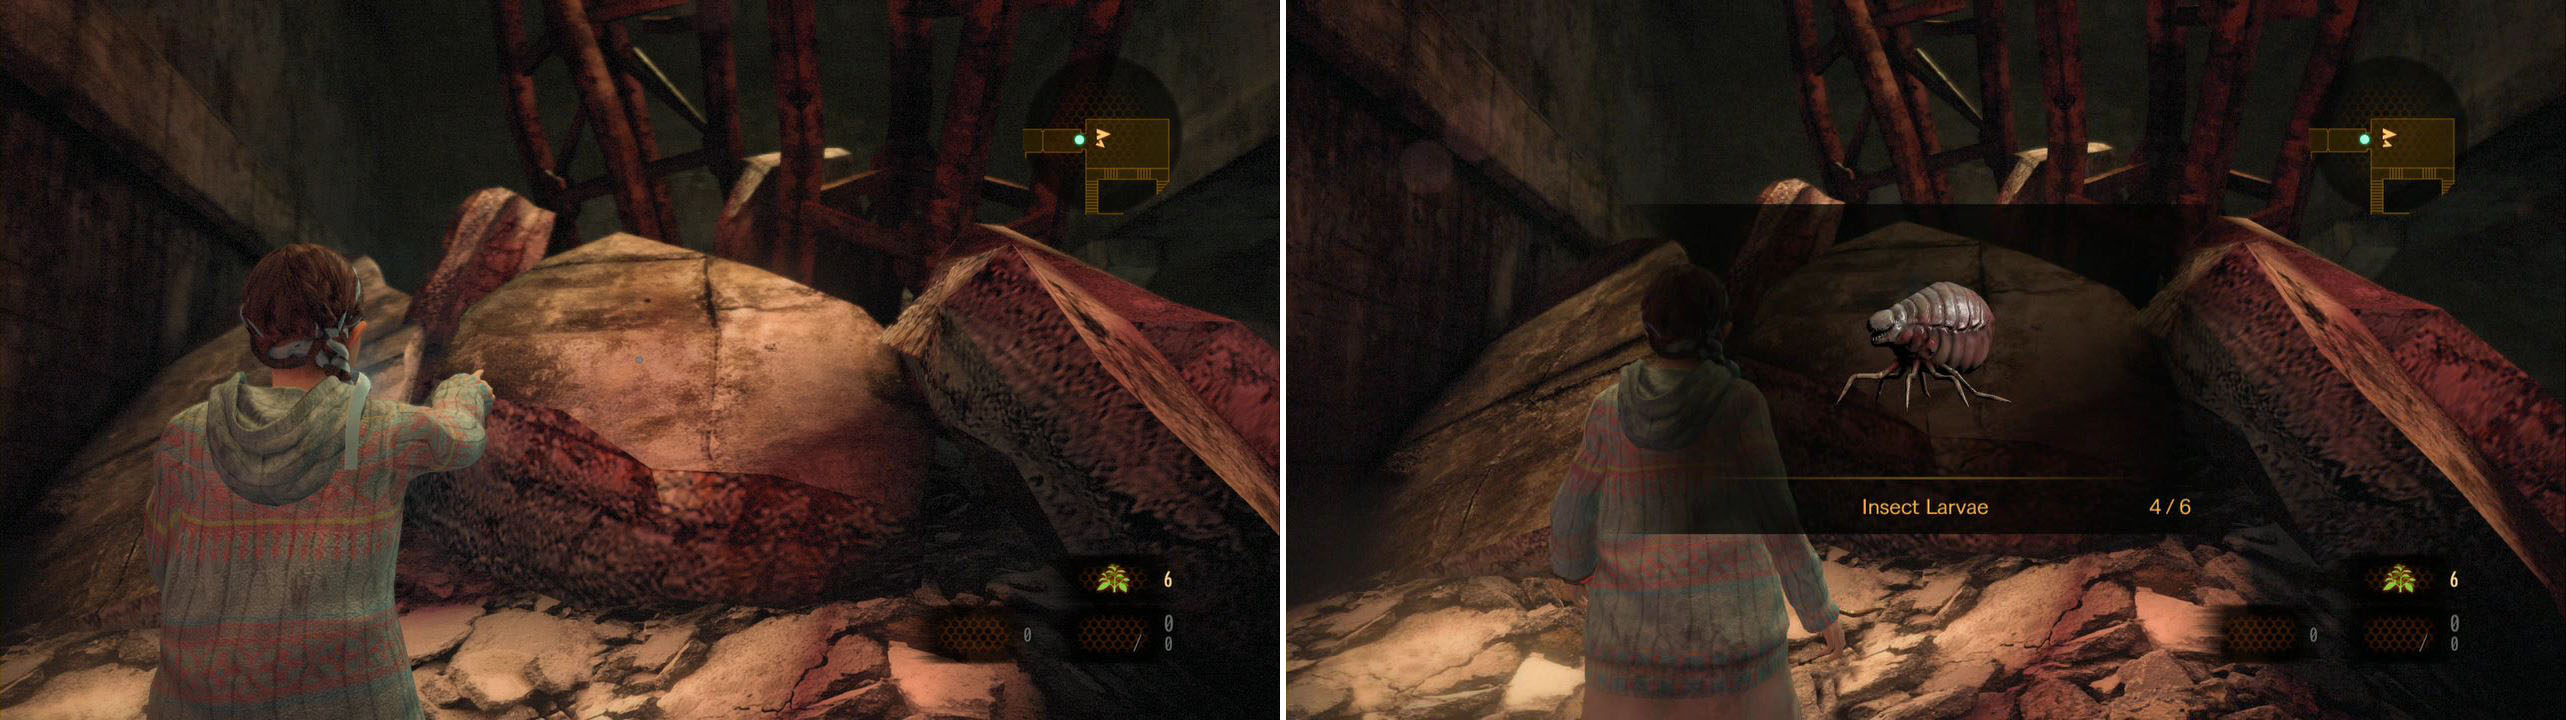
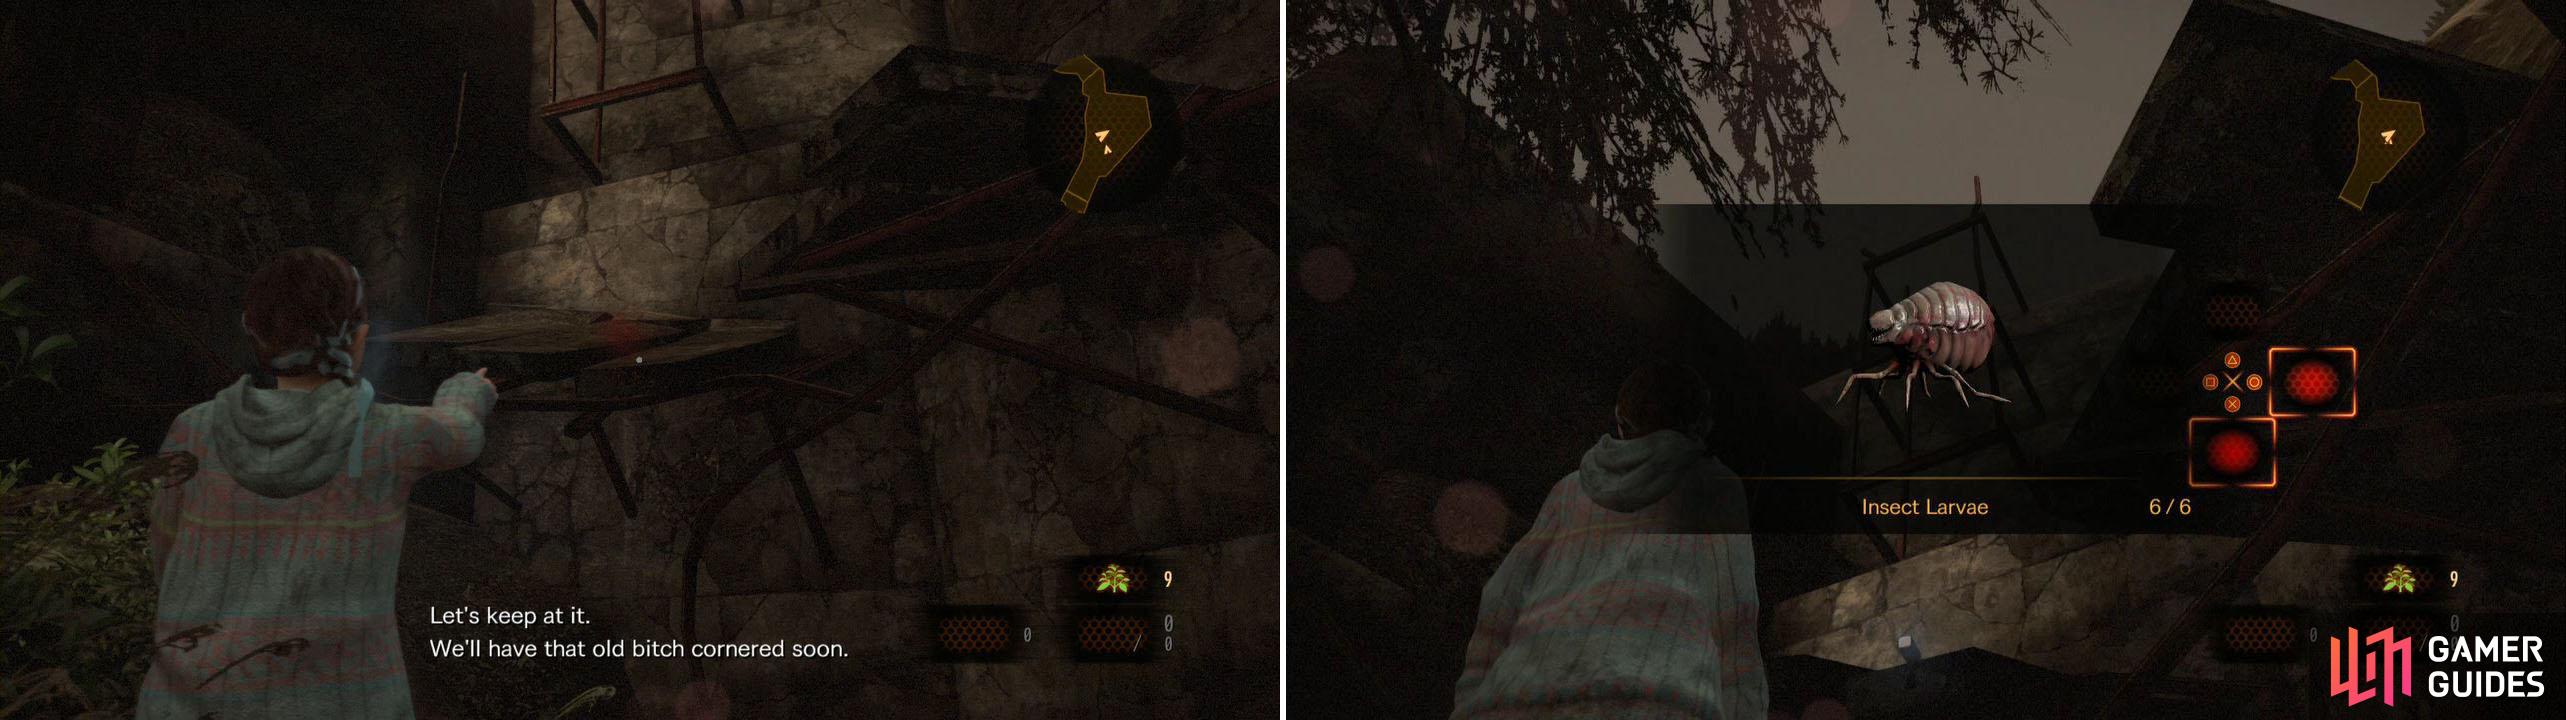
In this large room check the lower right corner to find Topaz . That’s it for this area so proceed north up the stairs and up here you’ll hear some more growling, and you can see a Sparkle Item on the left behind the rubble. You can see right in front of you Insect Larvae 1/6 under the bridge and a brick on top of it. Go around to get it.
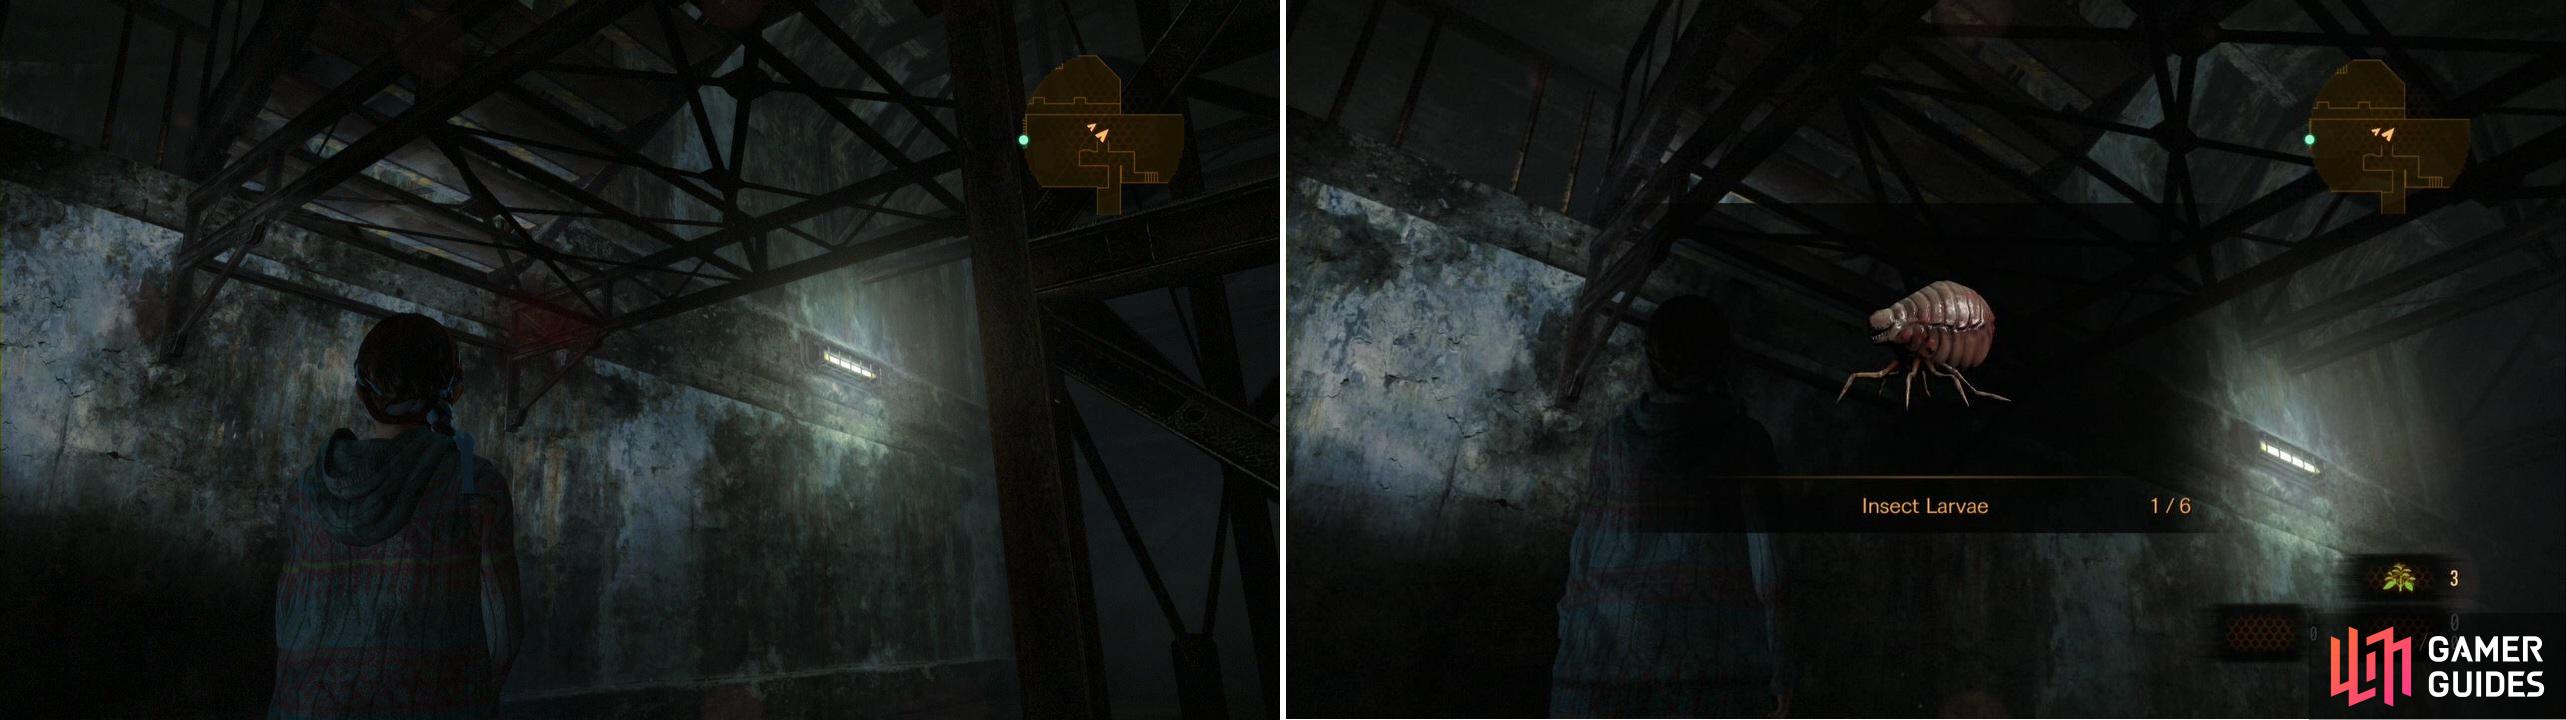
Grab this Larvae (kill it) before proceeding.
You’ll also see a couple Afflicted on the other side of the gate and a Sparkle Item on top of the stairs, among the Barrels.
You can toss the brick at them or go down with Barry and headshot them. Easy. Grab the Sparkle Item mentioned before and there will be 3 more afflicted at the end of the hall. One of them comes running at you so be careful. As you move a little bit forward the other two come running as well. Take care of them, grab the Sparkle Item near the Crates and proceed through the door.
There’s a Sparkle Item to your left as you enter so get it. There will also be a ton of bugs coming at you. Use your knife to get rid of them. You have to get down the stairs or they will keep respawning. As you go down the stairs make a quick left and you’ll find a Gimmick Box at the end of it with Assault Rifle Ammo Case inside. Getting this Ammo Case will net you a trophy.

Now you can carry more ammo for your Assault Rifle. Awesome!
There’s also a Green Herb and a Tower Emblem 8/11 .
Thankfully you flipped the switch as Claire so we could get these goodies.

A Ripple in Time
Obtain the item that lies beyond the gate in the sewers in Barry's Episode Three.

20
Now in the main area there are 3 afflicted walking around and there are 2 more on the upper left ledge. The ones laying around don’t do anything, BUT there’s one that’s gonna crawl and try to bite you (its located in the large bunch). Now use the metal crate to go up the ledge on the right (where we couldn’t reach in the previous chapter) to find Parts Box and Crate x2 .
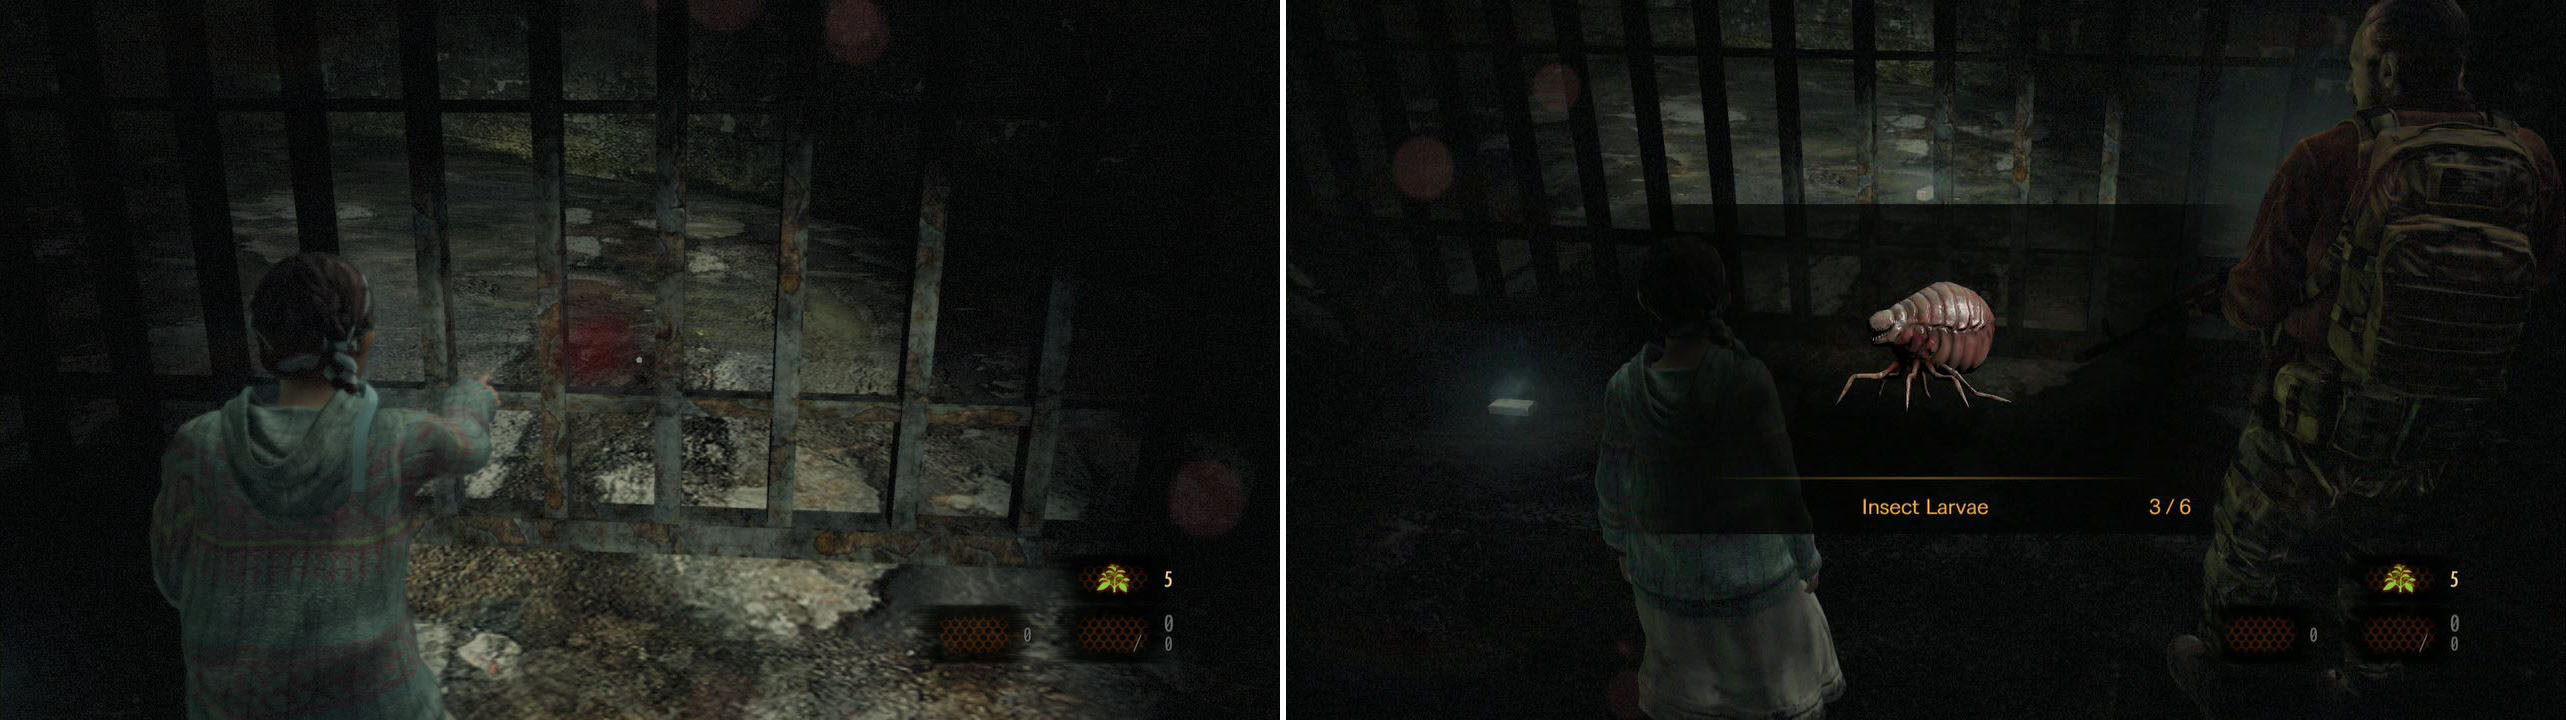
As you jump down one of the afflicted comes back to life. Ugh. Kill it, grab the brick and from here you can look south and spot a red spot down the hall on the right side (inside a concrete cylinder). There are 2 bricks around in the area so make sure to get this Insect Larvae 2/6 .

Another hard to spot Larvae and hard to hit. You have limited bricks so make them count.
Now proceed down the hall all the way to the end to find a weapon for Barry, the AK-7 . You know what to do.
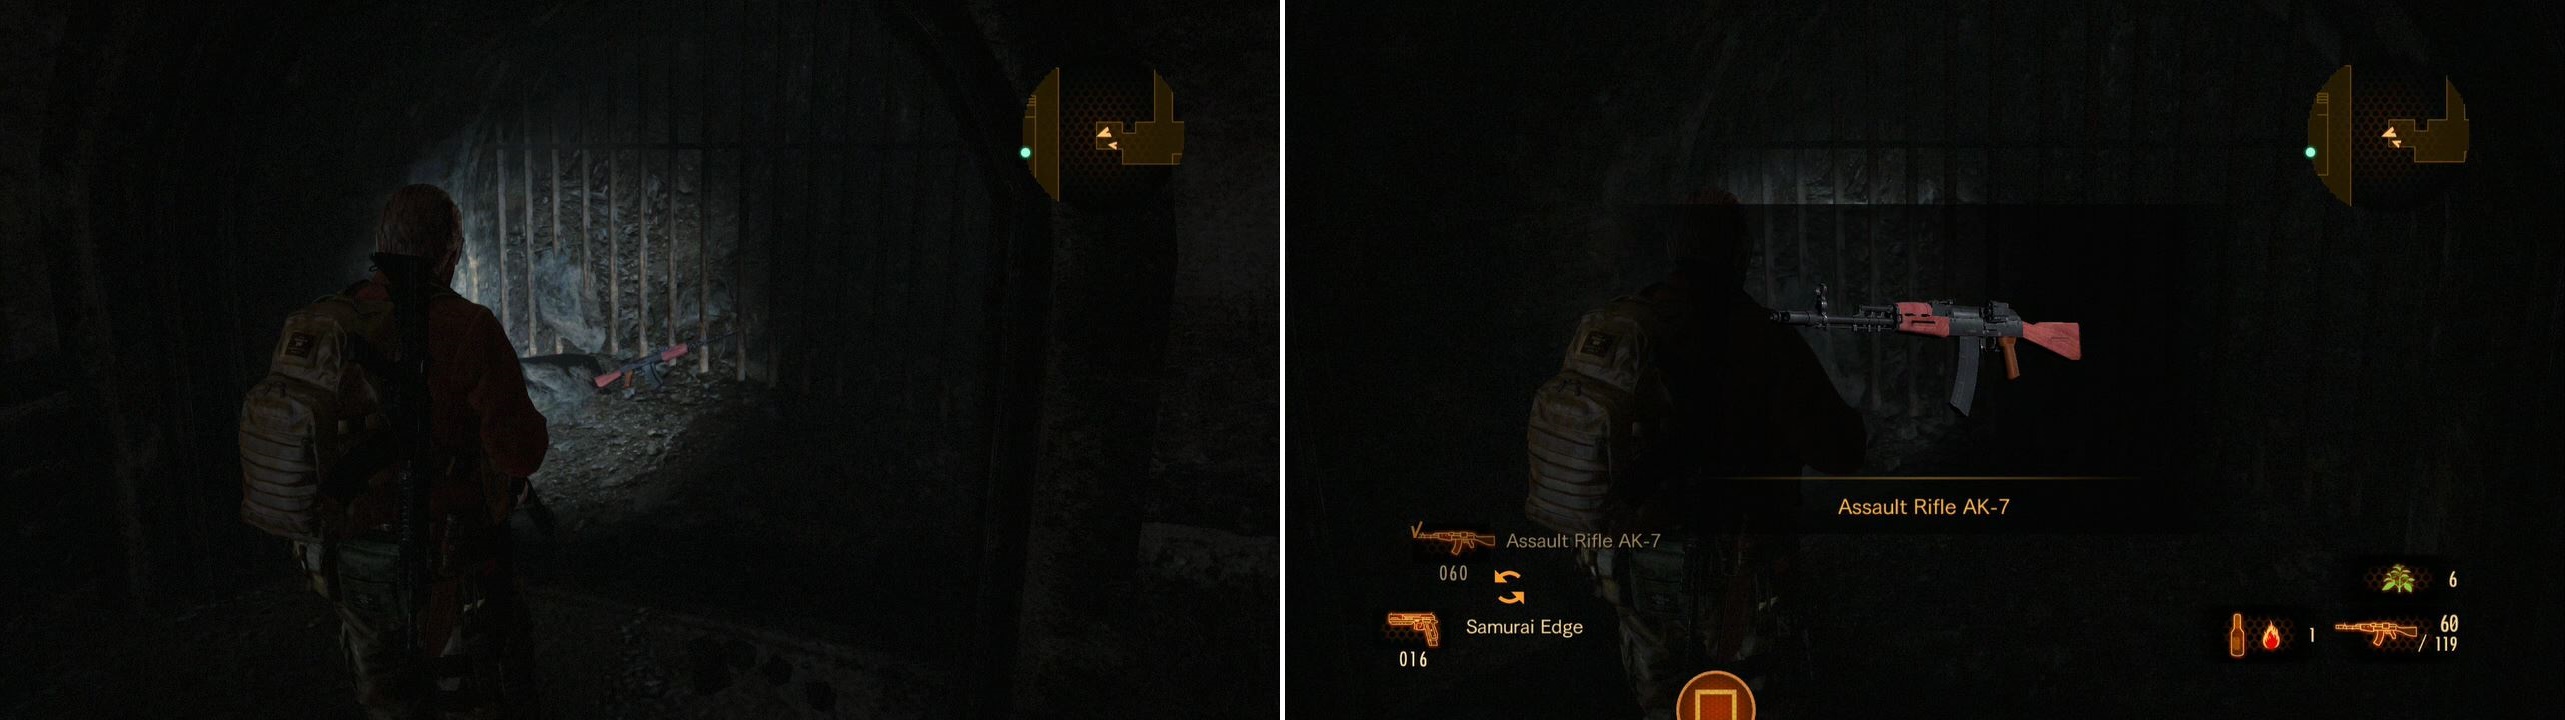
A nice replacement for your current Assault Rifle. Change it at the workbench.
Continue down the path and make a right at the fork. You can find here a Crate and a Sparkle Item . Return and go left this time. There’s a Sparkle Item where the Barrel and shelf are right next to the corner. Around the corner though is a Glasp so move back a little bit and get rid of it. We’re now at the place where the old man was. Before going up, continue along the sewer to find Odorous Chemical near the rubble.
The workbench has been moved inside, and the old man is dead. Sucks to be him. Such a sentimental scene. Right in the feels man! Let’s man up (or woman up (?) if you’re a gal) and let’s loot the area for Alcohol x2 , Empty Bottle , Gunpowder , the Sewer Passage Key and check the corpse of the old man to find a Sparkle Item … why here of all places? You can also read the document The Old Man’s Journal . Man was this a long read.
That’s it for this room. The little alcove at the end of the sewers has a Smoke Powder so get it before proceeding through the door and under the iron curtain. Descend the stairs and as you enter the room, cross the bridge and go down the ladder. If you check behind the bars you’ll find Insect Larvae 3/6 and behind an afflicted a Sparkle Item .
Although its not hard to hit, there are very few bricks this time around.
Locate the cyan footprints and crawl through the hole. Go up the ladder and cross the bridge to the right. Collect the Sewage Treatment Plant Map and use the valve to open up a path for Barry. Proceed down the catwalk as Natalia and when you get to a second valve an afflicted raises. Have Barry shoot him from down here and proceed to use the valve. Before returning to Barry, push the explosive container from the bridge and when you approach as Barry, most of the afflicted will raise up and attack.
SHOOT this container to get rid of all of them. Now, as Natalia, grab the Green Herb from this circular catwalk and drop down both explosive containers. You’ll have to shoot the wooden thing that block Natalia’s path so do so and use the valve. Do you see how it has a big red number 2 on it? Loot the area (as Barry) to find Gunpowder , Smoke Powder and a Crate x2.
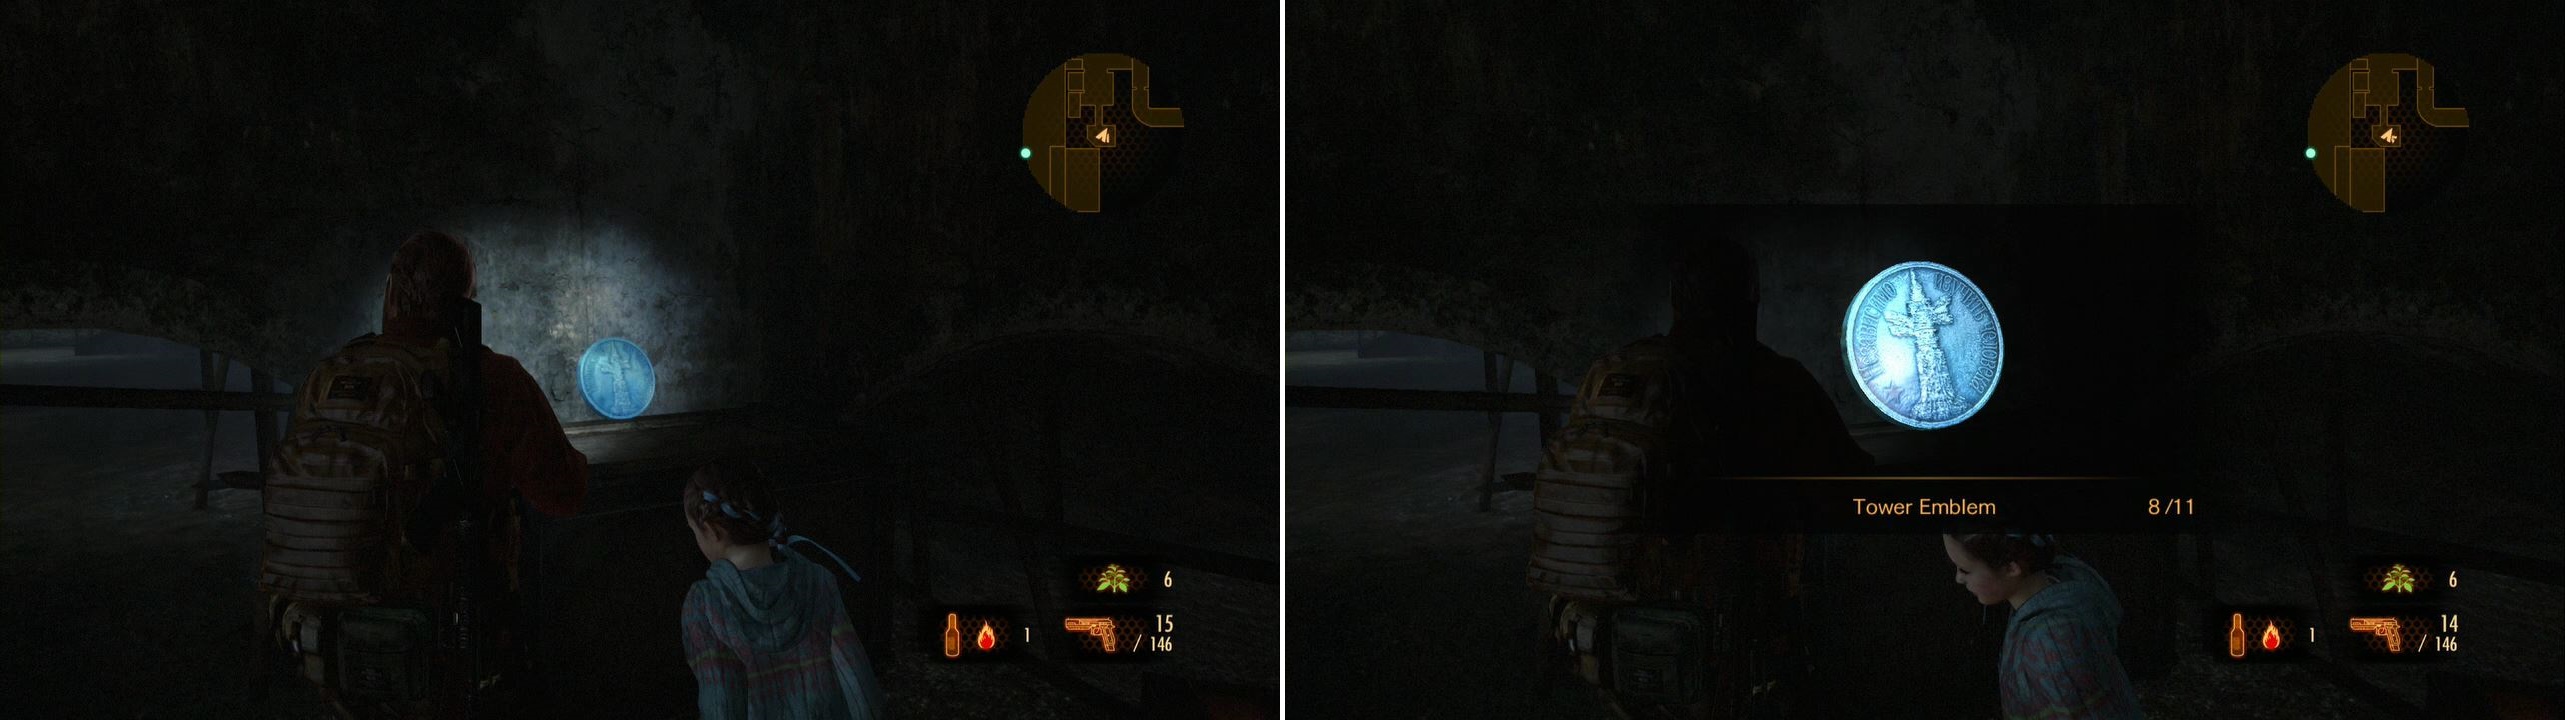
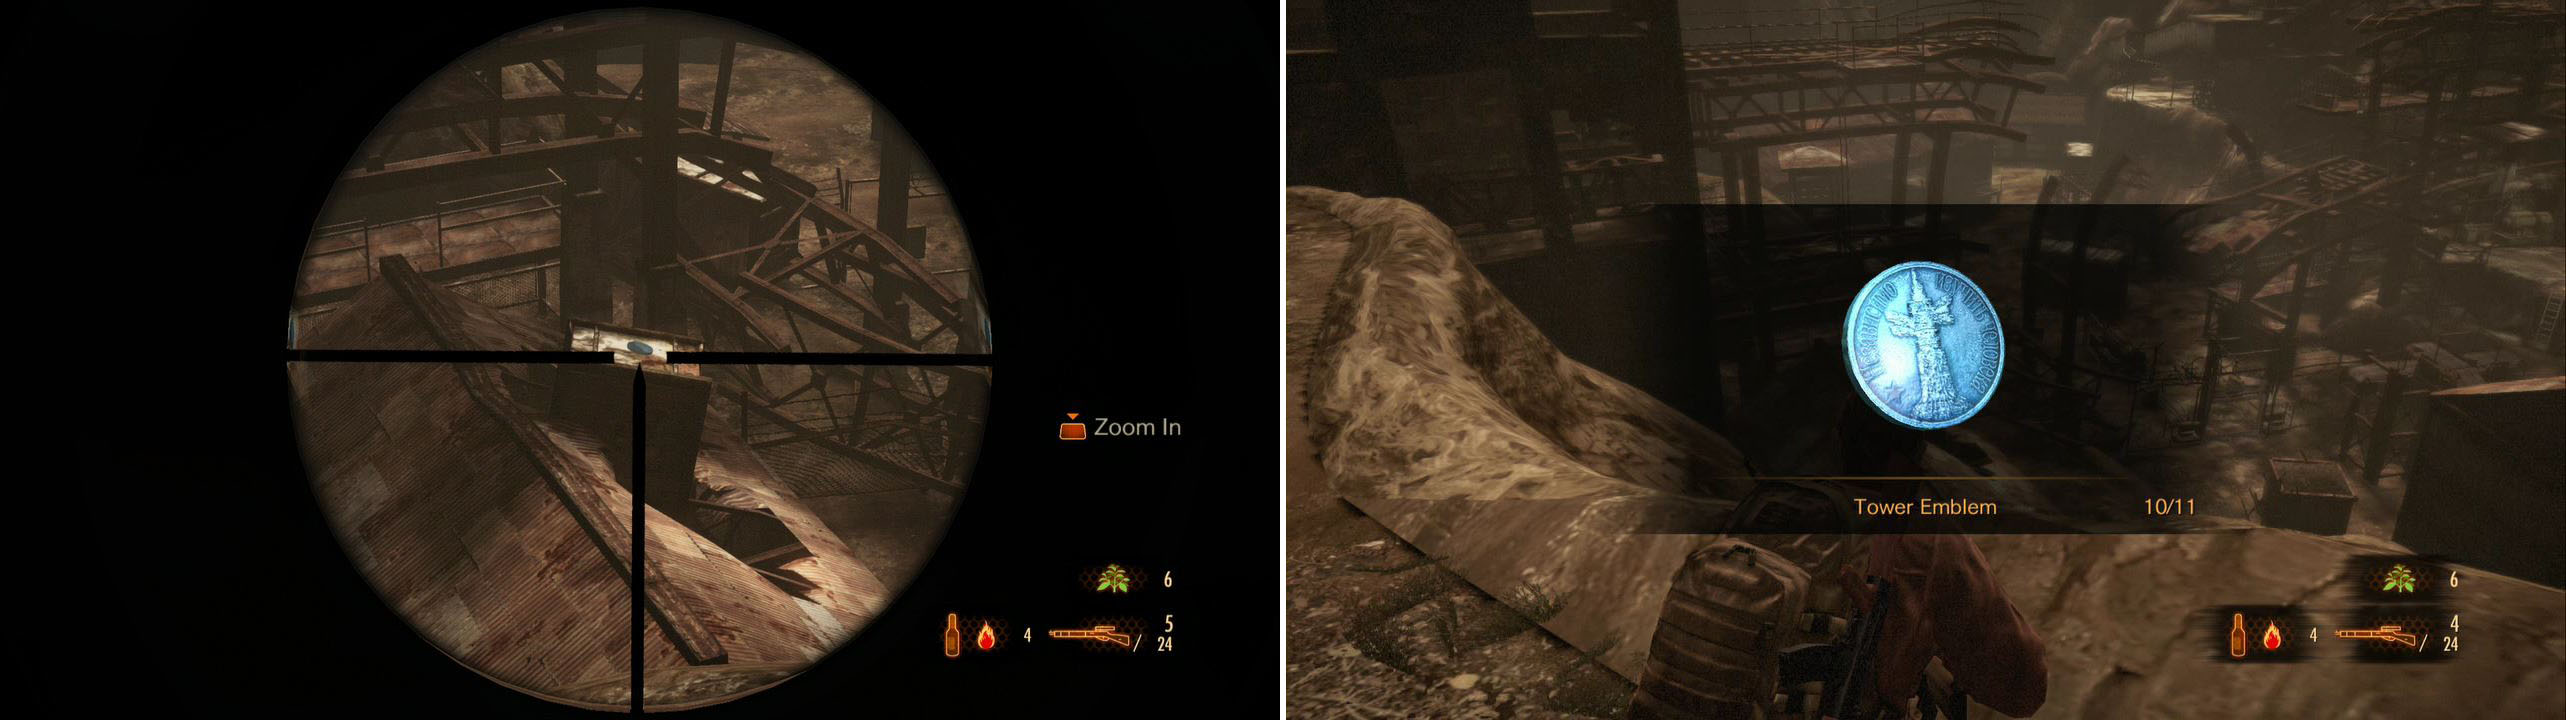
Just as you pass the #2 gate, look to your left and up to find Tower Emblem 9/11 .
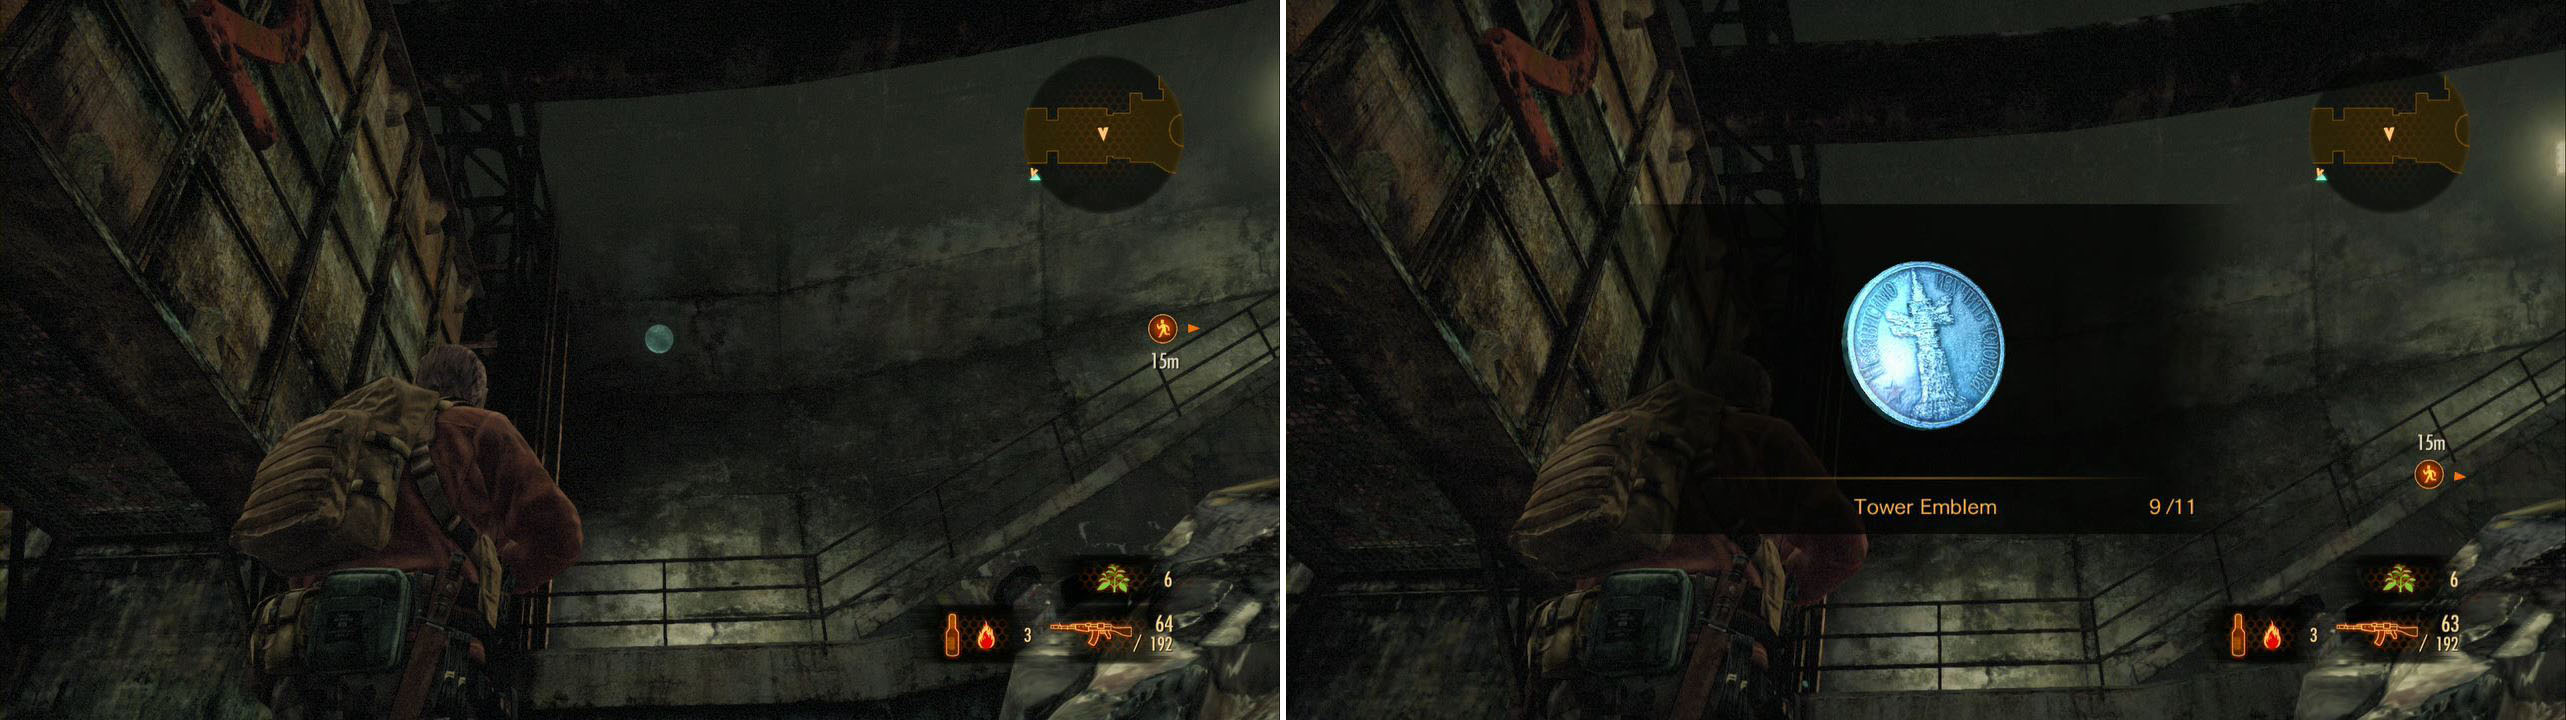
This one is right after you cross gate #2. Hard to miss looking at the picture.
You’ll see an afflicted walking on the top part of the area. Take this one out with the sniper and when you shoot the dog 2 more will come (3 total). Kill them and shoot the wooden thing blocking Natalia’s path. Cross it and you’ll find an Empty Bottle on one side and a Gimmick Box with Rare Parts Box on the other. BE CAREFUL because as you approach it one of the afflicted nearby will raise.
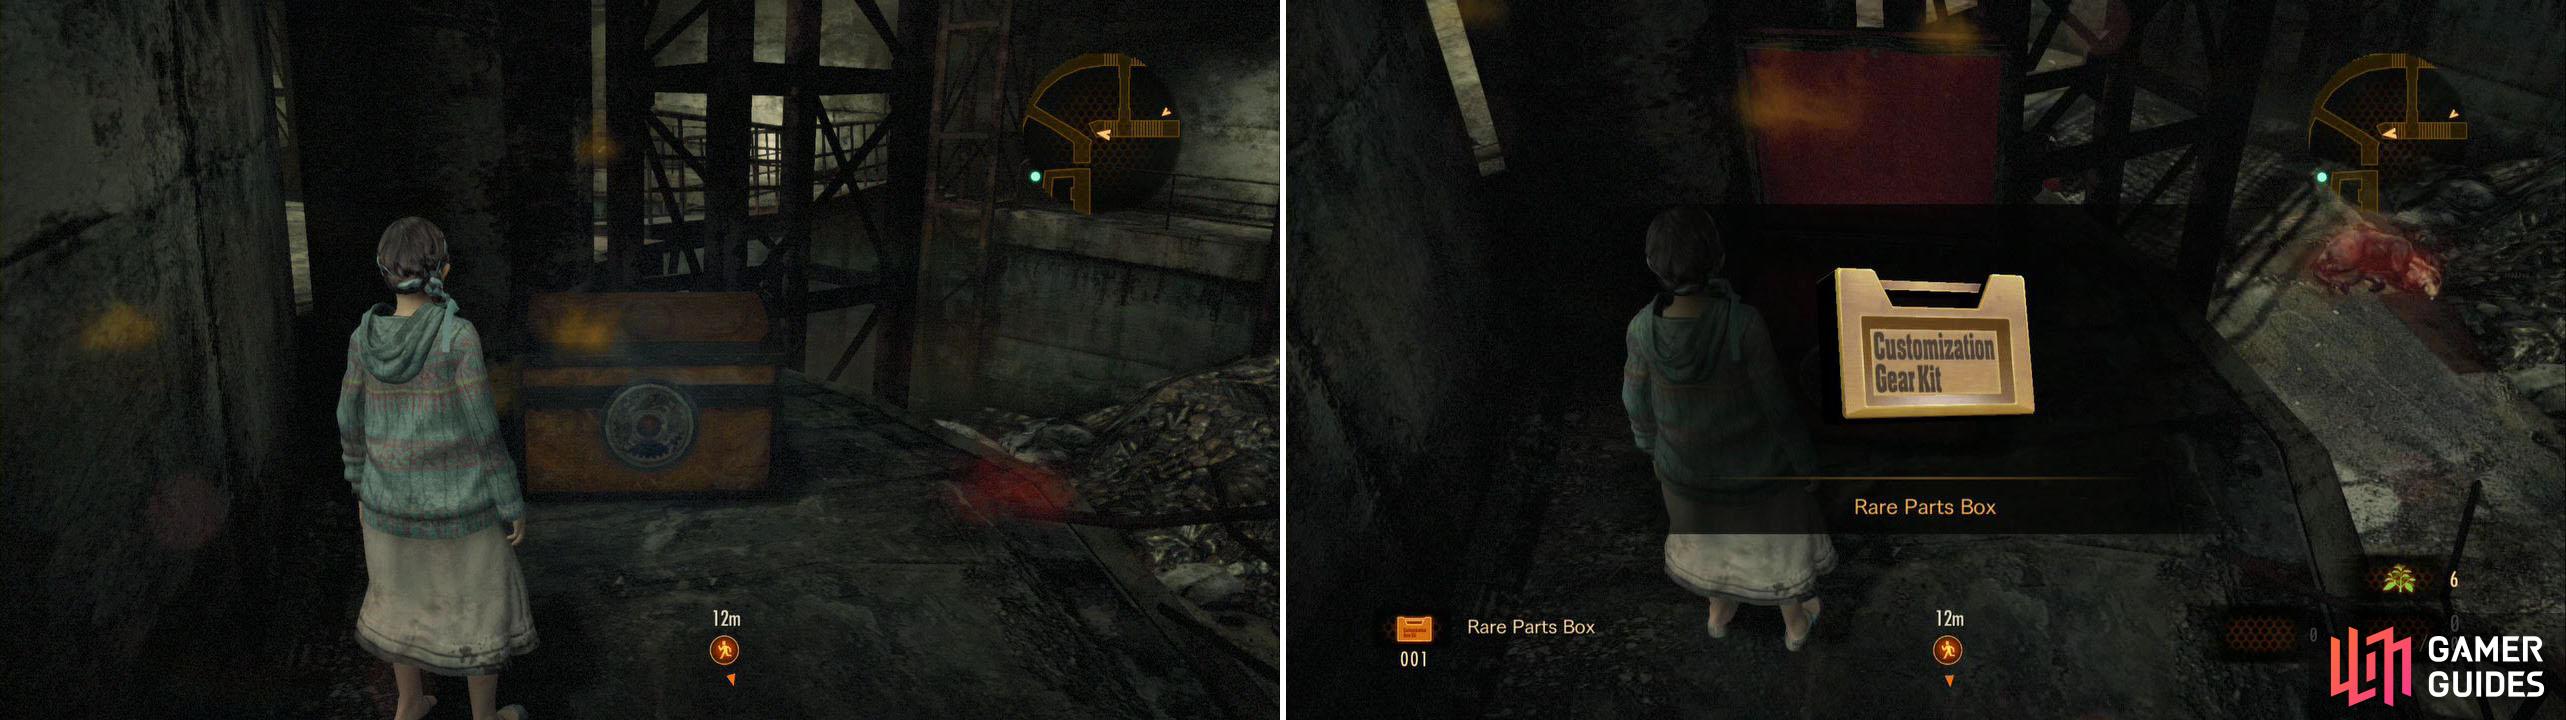
Lure the Afflicted and have Barry kill them before getting this box.
Continue as Natalia and when you reach an explosive container, an afflicted comes our of the small room. Run back and have Barry take care of it. Go inside this room to find a Sparkle Item and Gunpowder . Drop down the explosive container as well and use it with Barry to take out the afflicted nearby. Shoot the fire extinguishers to create smoke screens and kill the remaining afflicted. Kill the afflicted at the end of Natalia’s pathway as well (near the explosive container).
Grab the Alcohol and break the Crate on the left and jump over the obstacle on the right. Hop on the pipe (as Natalia) and look down and to the right side of the map to find a Sparkle Item (pick it up with Barry). When you reach the other side, spot another Sparkle Item down here and one in front of you (on Natalia’s level). There’s also a Glasp here, but you can use the fire extinguisher to create a smoke screen and be able to see it (kinda).
Now have Natalia follow the path and at the end of the pipe road you’ll find a Sparkle Item right next to an afflicted’s head. Before heading to the valve, have Barry slice open the Crate x2 nearby and an afflicted will raise near the valve (on the upper level). Shoot it down from here and now have Natalia use the valve. Move her towards the back and drop down the ladder, then grab the Sparkle Item . Don’t crawl in just yet.
As Barry, proceed to the open area, open up the Crate before going in and the afflicted will raise. Kill them ASAP and TWO Glasps appear as well. Use the fire extinguisher nearby to see them, allowing you to kill them really easy. Open up the Crate nearby and go back to Natalia. Crawl into the room and the afflicted will come up. Crawl back out and have Barry take care of them. There’s a Sparkle Item in the corner in here so make sure to get it as well.
Use the valve once its safe and another Glasp appears near the Gimmick Box outside. Kill it and open it up to find Expansion Bag (Barry) . He can finally carry 15 items, just like Claire.
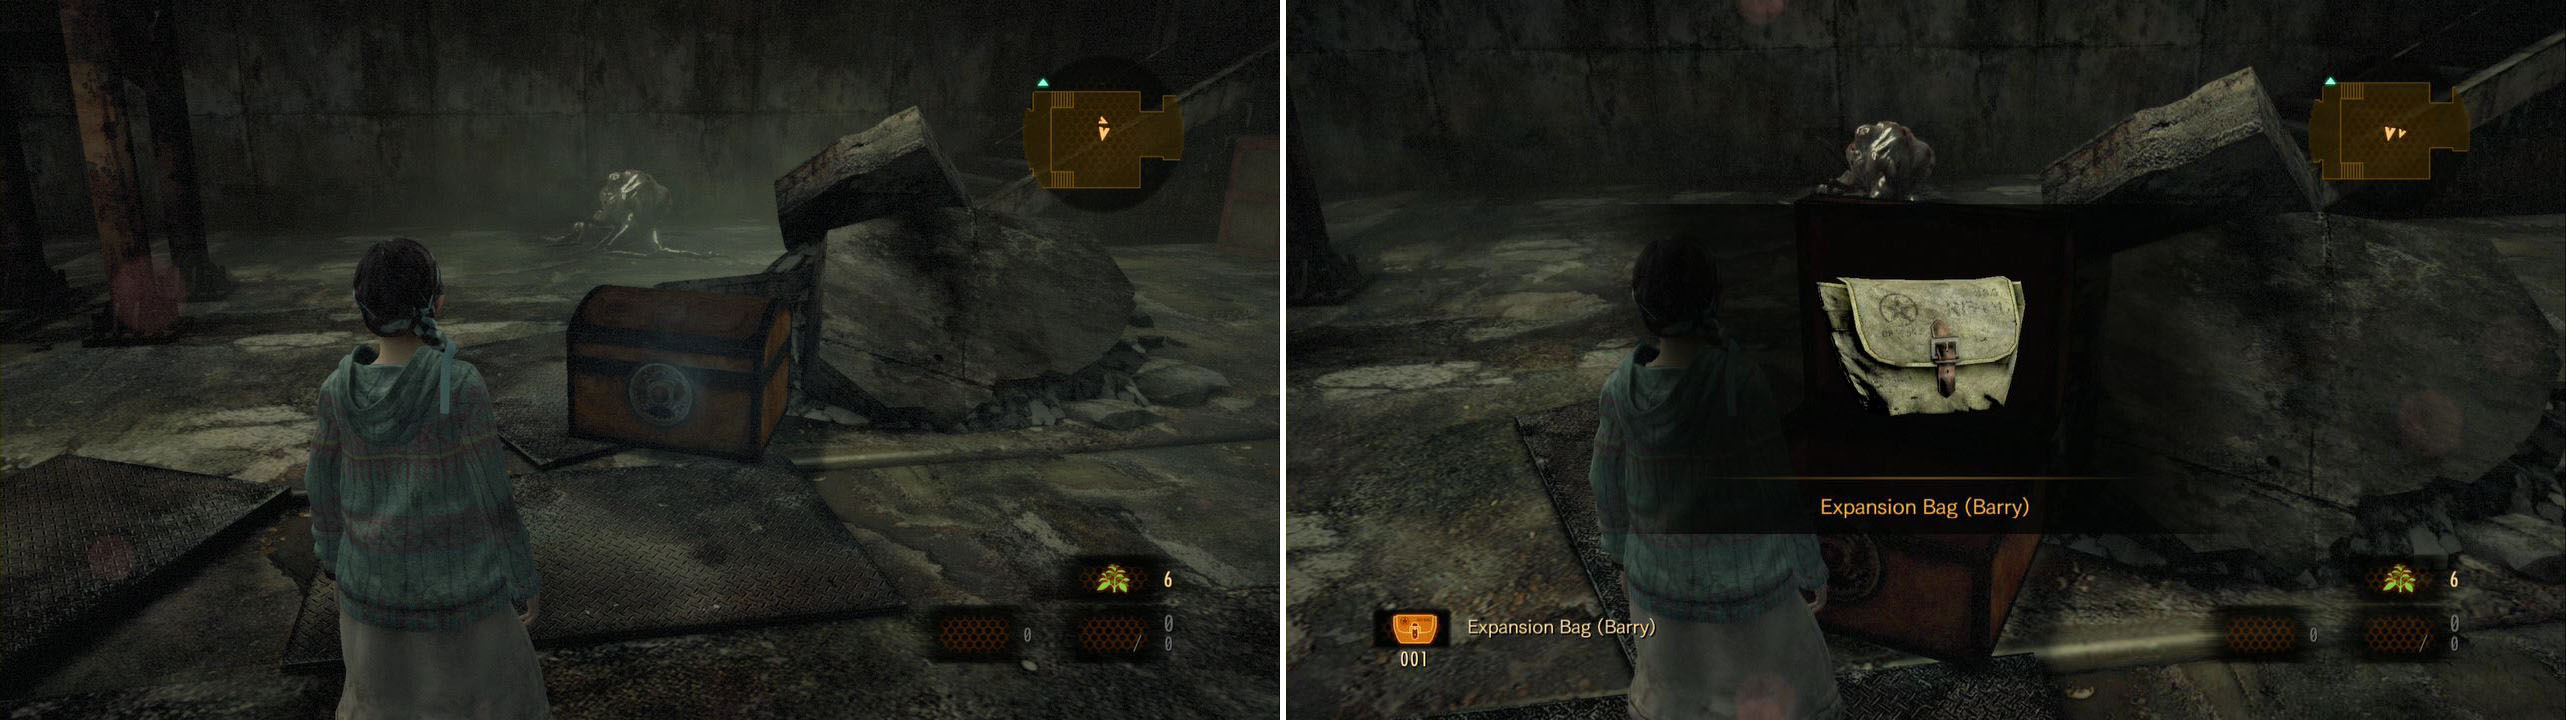
This Box is sitting in the open, but make sure you’ve killed all the Glasps from the surroundings.
Proceed through the double doors. There’s a large structure to the north and we’ll be going to the top.
Grab the brick nearby and jump down. Follow the path, jump across the gap and go down for a Crate . Cross the next catwalk to the right and another Glasp will be here. Use any Smoke Bottles you’ve got and get rid of it then check to the left of the ladder for a Topaz . Now climb the ladder for a Gimmick Box with Rifle Ammo Case .
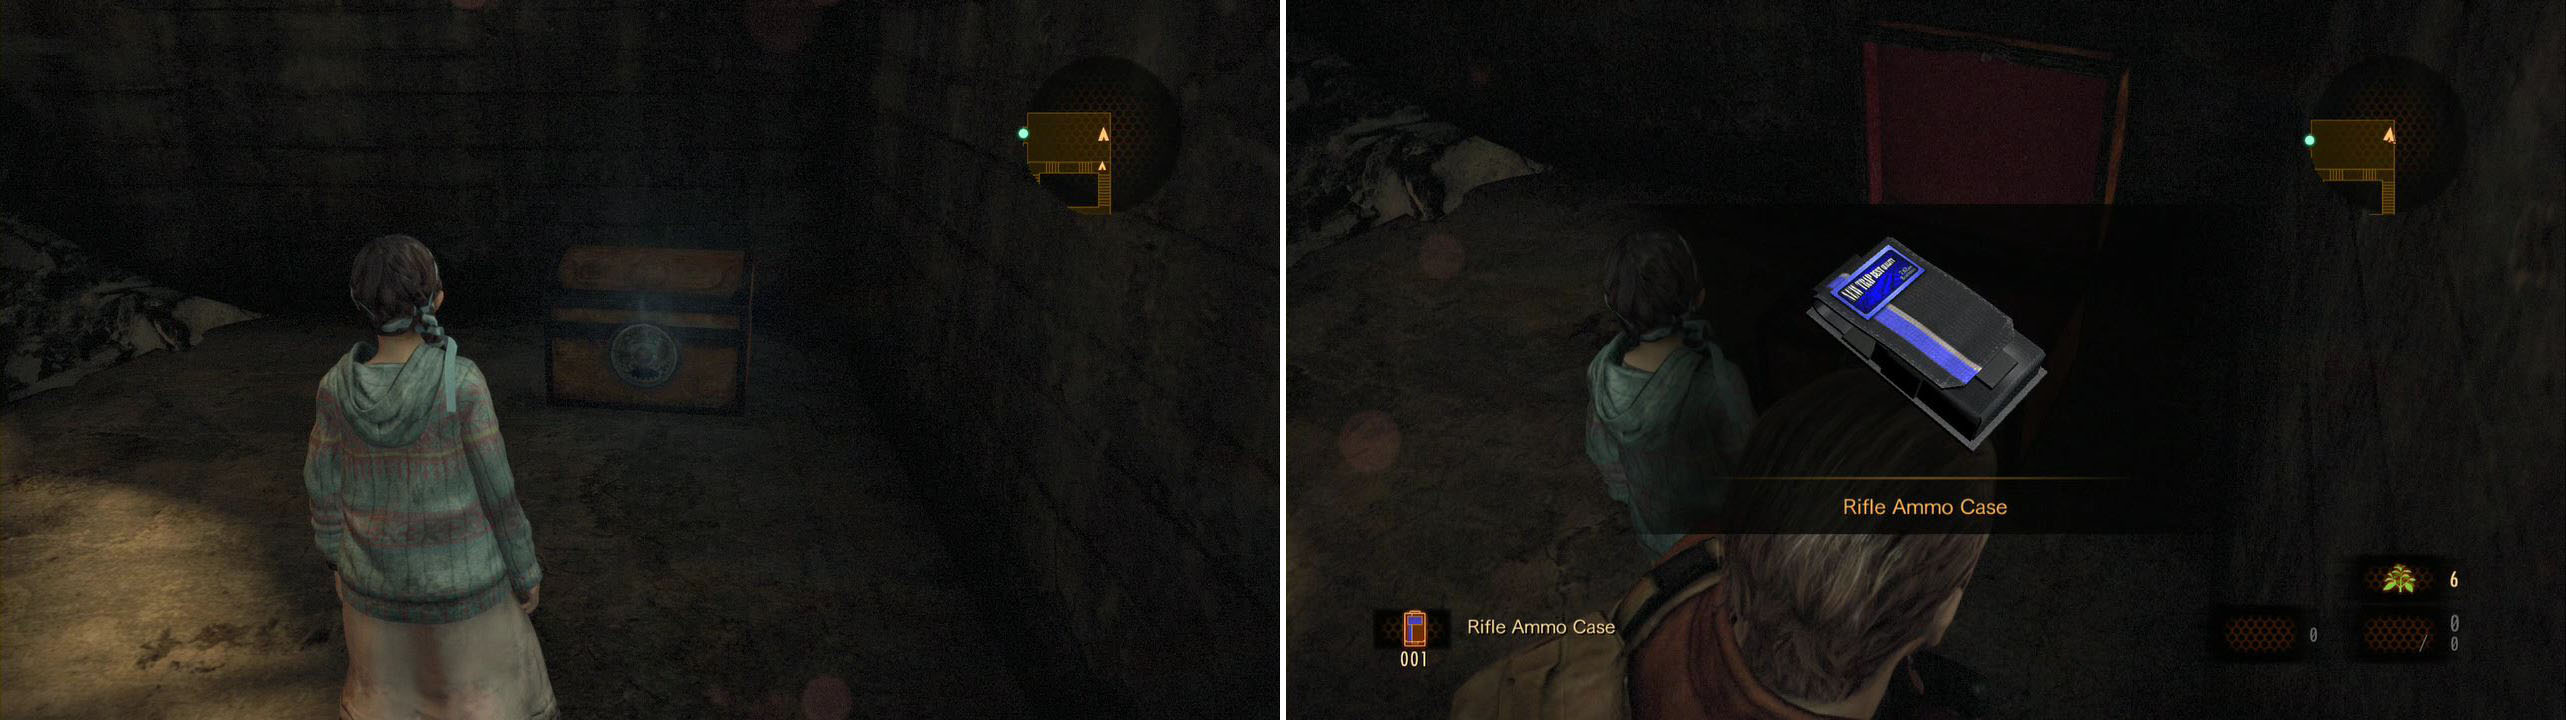
We can now carry more Rifle Ammo! Hopefully you’re using your Sniper Rifle.
Now go up the left side of the rubble (make sure to throw a brick up here) and destroy the Insect Larvae 4/6 among the rubble. Now leave this area for good.
This one is hard to spot due to the similar colors. You can see it from below though.
Listen to the conversation between them and move up the road. Break the lock cross the fence. Look directly in front of you over a rooftop to find Tower Emblem 10/11 .
We’re greeted with a Tower Emblem on top of a house.
Move along the cliff side, walk over the rail and go down three ladders. As you reach the bottom, look to your right to find a Sparkle Item near a beam. Now go inside the house.
Check the desk on the left to find Quarry Map . Check INSIDE the same desk to find Gunpowder . Open up the lockers on the other side of the room to find Smoke Powder and examine the monitor in the center of the room. Now open up the desk in the corner to find Handgun Ammo and check the fallen locker for a Sparkle Item .
There’s a Revenant right outside the building and its moving in a circular pattern so sneak behind it and kill it. Go northeast from here to find a Crate . Go up the ladder this time and up here check the upper right corner to find an Alcohol . Now go up another ladder and read the document Generator Guide right next to the Green Herb . Go up the ladder next to these to find a Crate.
Jump back down and go left this time. Before jumping down, from the bottom of the stairs look at the floor in front of you for a Sparkle Item . On the ground, check the piles of metal to the south to find another Sparkle Item , and Gunpowder right next to it. There’s a hole we can crawl through so do so to get an Empty Bottle and a Crate .
Now go left, jump down once again and move south. Between the building with the conveyor belt and the wall you’ll find Insect Larvae 5/6 behind the fence. This is the toughest one yet so make sure to do your best. There are a ton of bricks nearby for you to use. Grab the nearby Empty Bottle as well.

THE hardest Larvae to get. Have fun!
If you look west you can see a tentacle coming out of a hole and as you approach it, it goes back in pulling a corpse. Run past this building and you’ll see another one with a workbench in it. Just outside it, near the boxes is a Sparkle Item . Use the workbench if needed and read the document Irina’s Last Words . And we just learnt about the Old Man and Irina. Open up the lockers in here to find Alcohol .
Now jump out the window on the left to find a Barrel , a Green Herb and a Sparkle Item . Jump back inside and as you do look left to see another Sparkle Item hidden among the bushes. Now enter the building to the right, break the Crate and start the generator. This gets the conveyor belts going. Back outside there will be 2 Revenants on the right side of the map. Kill them and enter now the building where the tentacle was.
Such a nasty room. Break the Crate on top and jump down. Break a second Crate , grab the Sparkle Item on the left side (other side of the bars) and a Cloth near the end of the room. Now pick up the metal Crate, which is a power source and roll it out using the conveyor belt. As you try to leave, this “tentacle” monster appears and has a huge orange blob in its center. It’s called the Dhurlga .
The weak point is really open and Firebomb Bottles are your best friend here. You won’t be killing it but you need to wear it down as much as you can. Shoot it with your AK-7 while its on fire and use your sniper rifle. If you have the ammo and want to use it, use your Python to deal massive damage. It charges at you spinning the limb on its head, dealing massive damage. If you see it start spinning it, quickly stop shooting and make a run. Also jumping near the entrance is a good idea. After some time and shots, it’ll flee… its head is formed of several heads… :o.
Climb the boxes near the window to get out. Outside move the metal Crate near the trailer and climb it to find Assault Rifle Ammo . Now move the metal Crate to the conveyor belt on the upper left side of the area (up the stairs) and go to the end of it. Move the metal Crate where the fallen ladder is (you can see cyan footprints on the floor) and climb up. Break the Crate and go up once again. Grab the Rifle Ammo and from here look south and up to see a corpse hanging. Shoot it and collect the Rifle SVD from it.
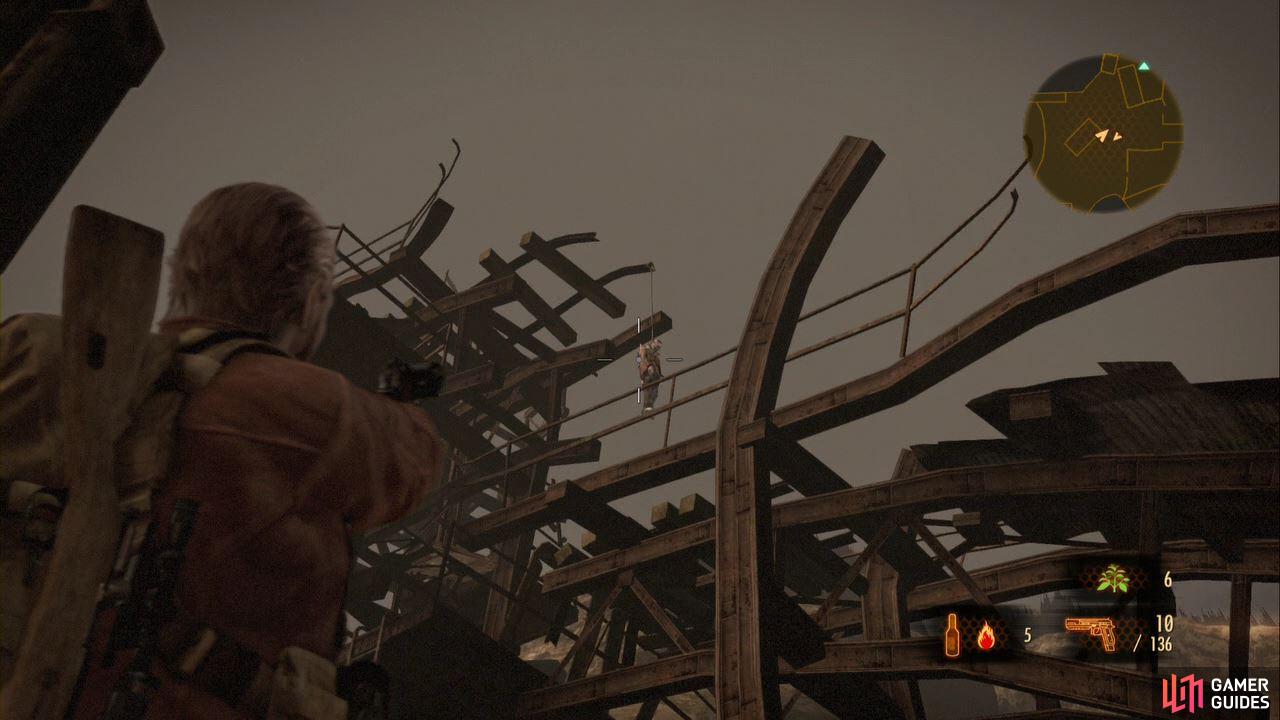
SHOOT DOWN this corpse which has a sniper rifle! Don’t forget about it.
Return down to the floor and now move the metal Crate south to where the tower structure is (has a ripped green Cloth hanging). Climb to the top to find a Gimmick Box with Rare Parts Box .

Easy to get and easy to open. What else do you want?
Climb down and place the power source on the metal square near the generator. Now have Barry stay where the switch it on the other side of the fence and have Natalia crawl through the hole and use the second switch. You got to do it one after the other to open the gate, which creates a loud sound but no enemies come.
Now move to the building on the right with the power source but use it to reach a higher ledge that has a Crate and an entrance to the building. Approach the Revenant from behind and break a second Crate . Now open the locked door and take the power source to the top, onto the conveyor belt and grab the Empty Bottle that sits up here. Go outside, up the ladder and put the power source on the next conveyor belt.
There’s a Revenant on top of the elevator but you can’t kill it. Place the power source where it goes and quickly kill the Revenant when it goes wild. Now go up the elevator and it just stops. Dammit. Follow the outer path, break the Crate on the left when you get to it and continue up the stairs. There are 2 Revenants up here really easy to kill so do so and go south along the broken bridge.
Break the Crate along the bridge and when you get to the edge you’ll be able to see Tower Emblem 11/11 on top of the tower to the south.
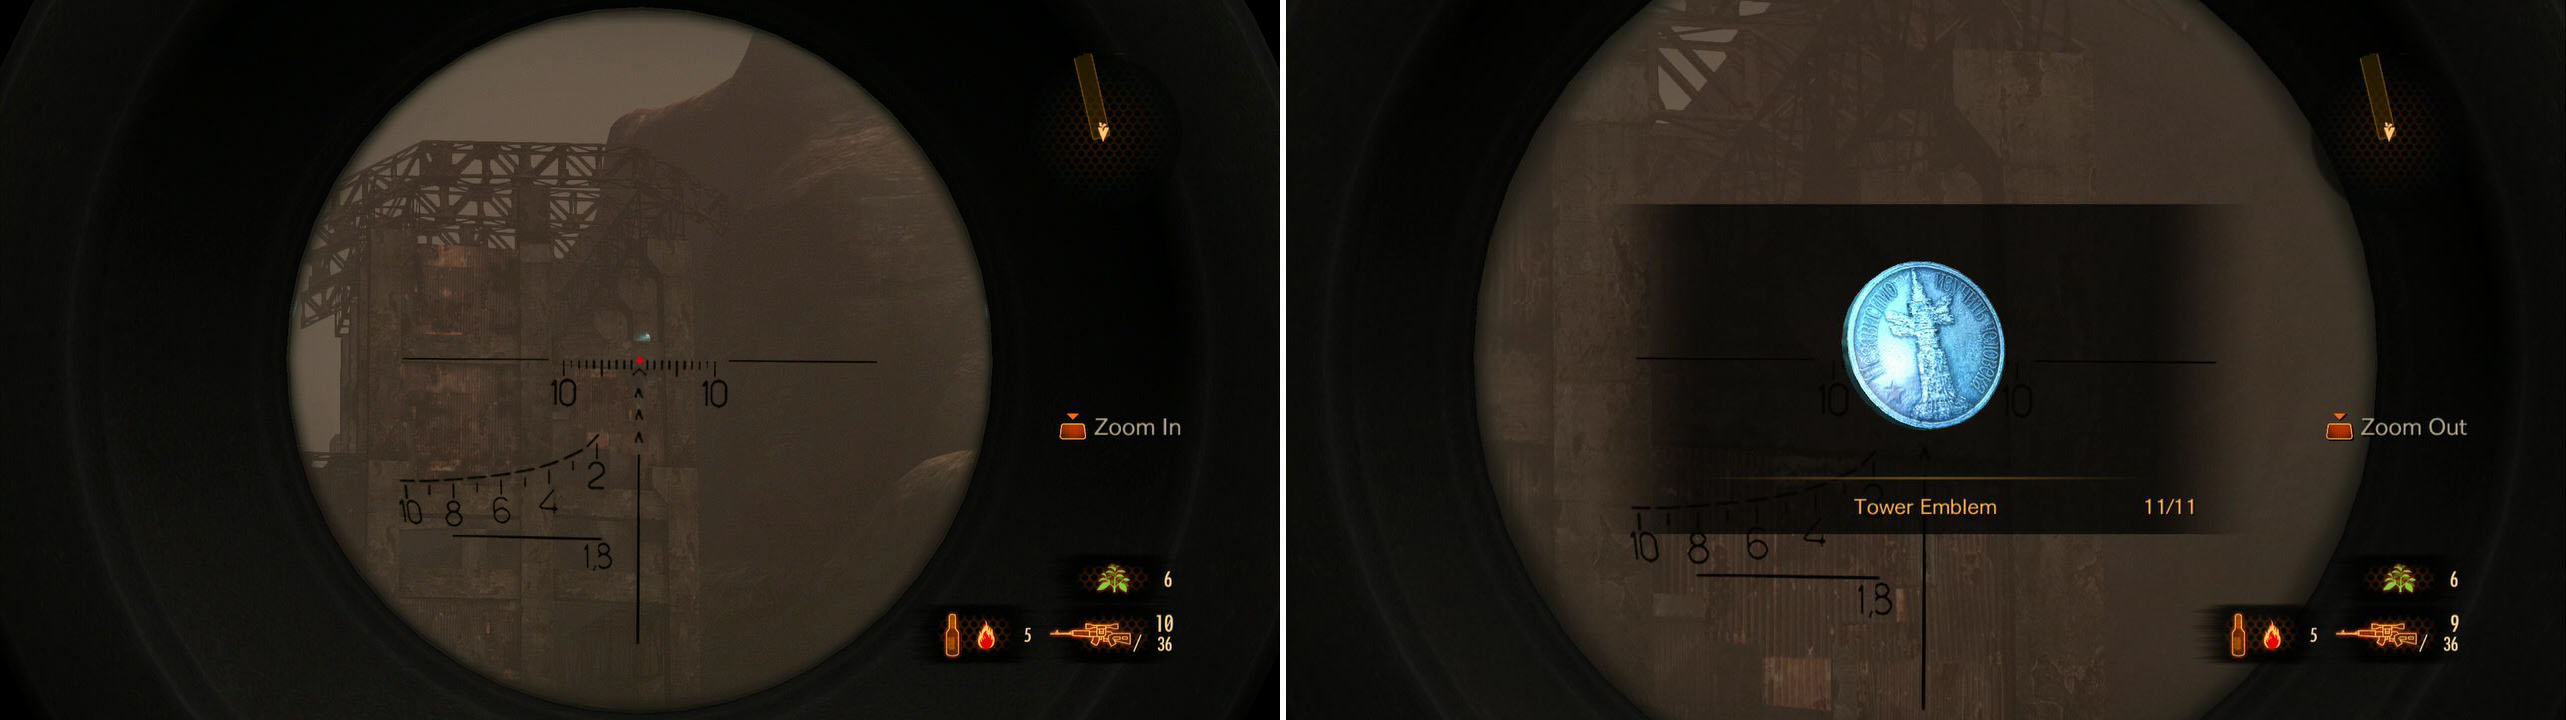
Get this Tower Emblem before the fight!
It’s REALLY REALLY recommended to have Natalia stay at the end of the bridge. You’ll see why in a second. Return and check the right side of the area for a document, Note on Corpse Disposal. Break the Crate x3 around the area and check up the lower left corner area for a Ruby . Now as you start moving the power source you’ll be attacked by the Dhurlga… ALONG with a Revenant AND a blob-throwing enemy.
Oh dear God. First of all let go of the power source and take our your SVD. Take out the throwing enemy as fast as possible then locate the Revenants weak spot and take it down while you evade Dhurlga. When Dhurlga is by itself it becomes a little easier but its still hard. DON’T use your Firebomb Bottles. You don’t want to destroy the Dhurlga’s outer shell because it becomes too fast.
Shoot the weak spot with your Assault Rifle and move as far away as possible and use your SVD to snipe it. This is an excellect opportunity to use your Python too. This is the first time I’ve ever used it and had over 20 bullets. The one thing to be careful about is when it shrieks, its about to run at you and try to grab you. IF it grabs you its game over so be extremely careful. Use your surroundings to keep Dhurlga at bay.
Have Natalia come to you and now you can move the power source to where it belongs. Cross these gates and in this bushy area pick up a brick and toss it at the Insect Larvae 6/6 on the right side and proceed up the ledge.
This Larvae is right at the end of the episode. Don’t miss it.
Now simply follow the path to trigger a scene and the end of this amazing episode!
No Comments