
Messing with MyCastle VIII
No new buildings this time, but plenty of good upgrades, including the Dawn Armory, Rod Shop, Lottery Shop and Mess Hall. The upgraded Dawn Armory and Rod Shop expand their inventory greatly, as expected, while the Lottery Shop’s upgrade improves your odds of winning better stuff. Last and least is the Mess Hall upgrade, which allows you to use more ingredients when cooking, making more yummy (and beneficial) meals.
Play with MyCastle, then consider taking a gander at Ryoma and Scarlet, your two new characters. Ryoma is a LV 4 Swordmaster (a.k.a walking agent of destruction) with a massive Attack score and Evade rate. Scarlet is more humble, as a LV 1 Wyvern Lord, but she’s still likely on par or better than your best characters right now. In particular her Attack is good and her Critical rate is impressive due to her Killer Axe weapon. Neither of them should require any leveling before putting them into action. In fact, you might want to sit Ryoma out for a bit so other characters can benefit from the XP foes will give.
Border Walls
| Location | Objective |
|---|---|
| Nohr’s Castle | Defeat the boss. |
| Enemies |
|---|
| Knight |
| Fighter |
| Cavalier |
| Paladin |
| Outlaw |
| Mercenary |
| General |
| Hero |
| Berserker |
| Strategist |
When you start the next mission, everybody will yuk it up in the Cheve underground. Ryoma’s been hiding out here, and your reckless attempt to “rescue” him could have blown the whole deal, but somehow he’s still happy you all arrived. Scarlet is surprised to find out that the entire noble family of Hoshido is here, but Ryoma, being classy and humble to the end allows her to get away with simply calling him “Lord Ryoma”. This guy gets peasantry. Fortunately, Scarlet is a born servant, so everybody gets along well enough. Predictably, however, the safe-house proves less than safe, and everybody decides on a course of action that Garon won’t expect… probably because it’s basically suicide, and exactly what Garon would probably want. Oh well.
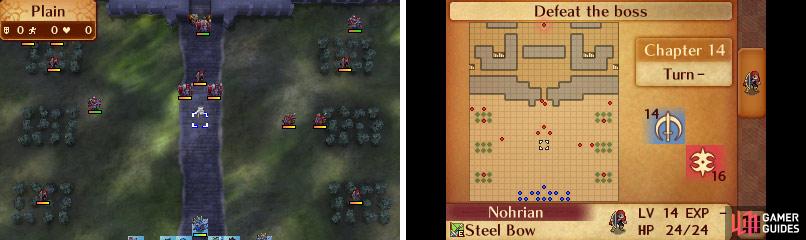
Map of Chapter 14.
Most of the enemy types listed that you will face will arrive in the form of reinforcements.
This map can be split into two halves; the southern half consists of wide open fields with a number of common Nohrian units, and the northern half is a fortress wherein the battle’s boss, Daniela, resides. The enemies here are a few levels higher than in the last fight, and there are promoted units on the southern half the battlefield; Paladins. They have high Hit Points and drop weapons when slain (a Wakizashi and a Silver Naginata ), but otherwise aren’t terribly interesting. The entrance to the fortress is guarded by Benny (Knight) and Charlotte (Fighter), units with higher-than-average Hit Points and Attack, but not impressively so. Aside from the fact that they come paired up, there’s little to note about them.
Fight your way north, moving just far enough on the western side of the map to lure the Paladin over there into making a ranged attack (which is much weaker than his melee attack), after that try to lure the Outlaws to you as well. Whether you provoke them or not, two of the Knights will accompany an Outlaw down the center of the map, providing a fine target for you on the second round.
Once you’ve progressed halfway to the fortress and disposed of many of the units in the south, the garrison in the fortress will appear and complicate things. There are many more units waiting for you in the fortress, including three Berserkers with fearsomely high Hit Point and Attack. There are also four Generals (who aren’t much weaker), a Hero and plenty of mundane units that await you.
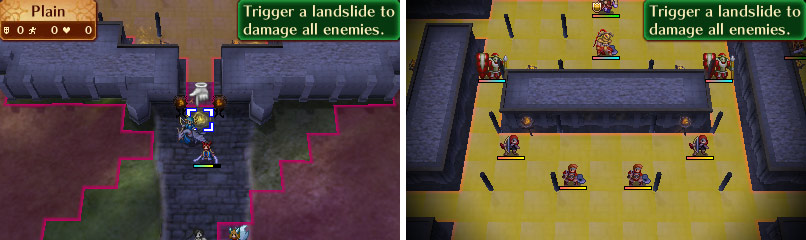
These Dragon Veins will help you have an easier time defeating enemies within the fort.
There is, however, a way to turn the tide back in your favor; Dragon Veins. One of them lies under the Benny/Charlotte pair and two more can be found close to the entrance of the fortress. Each Dragon Vein will, when activated, deal ten damage to all hostile units in the fortress, no friendly fire. Activating all three of these will reduce the strength of the garrison units considerably, although it won’t actually kill any units. Expect to face off against both of the Fighters and the Outlaws when you enter the fortress; taking a noble unit with high Defense and/or Evade rate is suggested, especially if you pair them with another helpful unit. Ryoma is ideal, if you brought him, but he’s an experience hog. Otherwise your protagonist, Azura or Takumi may suffice. Hinoka is likely to shot down by the Outlaws, though, so keep her away.
Once the units in the fortress are one-hit-kills, it’s time to go back to the old lure-and-destroy tactic. All the units here will not engage unless you come inside their range, which makes them stupidly susceptible to this. The Generals are powerful defensive units that will take little damage from melee attacks, but your Diviners will blast them to bits. Or Ninjas with Sting Shuriken. Lure the northern ones out with units with high Defense and/or Evade rate (Rinkah can easily withstand their attacks), then dispatch them. Beware the Berserker behind them, though.
The eastern and western Generals are less touchy, just lure their Knights away, then take them out with ranged units. The Berserkers to the east and west can be dealt with by luring them into attack a unit with a high Evade rate (their Hit rate isn’t great) or, honestly, you can just ignore them. The Berserker to the north and the Hero can also be individually lured and destroyed, if you want the excellent XP these foes are worth. It should be noted that the northern Berserker has a Thunder Axe, which will not do quite as much damage to melee units as the weapons held by the other Berserkers, although he can use it to attack at a range.
Remove the obstacles separating you from Daniela (or kill everything for XP) and defeat the boss. She has almost no movement range, so it shouldn’t be hard for you to score the first hit, and after three Dragon Veins, that’s all it should take. Once she falls, victory is yours.
No Comments