
Messing with MyCastle, I
After the cutscene ends you will be greeted by Lilith, who will transport you to the astral plane, where you will get short tutorial on how to customize a new feature: MyCastle ! No skipping this one, Lilith insists on you building something here, so give it a go and select Buildings, then Build , and choose either a Dawn Armory or a Rod Shop. Rod shops are nice, as it’ll allow you to purchase new healing staves when your old ones get depleted, but it doesn’t matter too much what you build.
Keep in mind that building costs Dragon Vein Points (DVP), which are earned by visiting other castles or by completing battles, the latter of which will be covered shortly. You currently only have one DVP, so build whatever building you prefer, then it’s time to discuss the rest of the meager options available to you. As more things in MyCastle unlocks, they’ll be covered, but if you want to see it all in one place, skip to the MyCastle section of the guide.
When you’re back in control, note two objects to the north; a “Crystal Ball” which activates online functions (visiting castles, your inbox, amiibos, etc.) and the “Shelf”, which brings up the Support menu. The Support menu allows you to improve support ranks between characters. More information is in the Basic Mechanics section of this guide!
Keep in mind to check out the menus between missions, as characters will improve their relationships by helping each other in combat (buffing, pairing or tag team attacks). You can also toggle inventory, equip skills, save, etc. etc.
With that out of the way, you’re finally ready to head south off the elevated platform and onto the castle grounds, where you can find one food generating area and one gem generating area, randomly chosen. You can use the food to feed Lilith, and the gems to forge weapons, the former of which will be discussed shortly, and the latter of which is more of a concern for later. Just check these every so often and gather their resources. You’ll need to visit other player’s castles to harvest their resources, too, as you won’t have all of them. Visit other castles using the Crystal Ball.
Next up is Lilith’s Shrine , where you can find Lilith, of course. Feed her food and level her up so that she’s more helpful when you call on her in combat. Feeding her different foods increases different stats, but she’ll end up maxing out eventually no matter what you feed her, so you shouldn’t worry about it too much. And if you’re not interested in MyCastle battles, you can ignore her altogether (but she’s so cute!).
In the Private Quarters you can invite allies over once per day to schmooze them and improve your relationship with them, as well and change your hair style. Only characters with a heart next to their name will benefit from being invited over (i.e. they’ll gain more support points).
Lastly there’s the Records Hall , a largely extraneous building with many options. If you pick the “Compatibility” option you can pick the “Sage Match” and “Hubba Tester”, which just gives randomly generated fluff for humor. The “Library” lets you view the Unit Roster (like a dex) and also “ancient texts” which give some lore. The “Theater” menu lets you watch previously viewed cutscenes and listen to the soundtrack. Finally, there’s the “Support Log”, which allows you to watch old support conversations between characters. Everything in the Records Hall carries over from file to file, and even game path to game path (example: If you clear Birthright and then Conquest , your unit roster will show all units in both paths, plus all cutscenes in both paths).
There’s one more thing to point out at this time; standing around are random team-mates, who occasionally are worth talking to. If they have an “!” over their head, talk to them and there’s a good chance you’ll get either a boon, an item (usually food, but rarely a weapon) or a relationship boost.
Now it’s time to finally leave your castle, which can be done by heading out one of the three gates. When you do, you’ll see the world map, or the bit you have access to, along with a menu with four options. “Chapter 7” will take you to the next story mission, but before you rush headlong into that, you’ve got other things you can considering doing. First is the Dragon’s Gate, where you can buy and play DLC content, which will be covered in the Downloadable Content section of the guide. Next, you can adjust the difficulty down (but not up!) if you’re having a rough time getting through the game.
Finally, it’s everybody’s favorite option; grinding! Err… or rather, the “Scout” command. For a relatively low cost you can scout out an area, after which a random encounter will spawn there. Once scouted, just pick the “Challenge” command to go to said map and dispatch a group of baddies. This allows you to harvest XP, support ranks and gold (every map tends to have a unit that will drop 1000G, which will pay back the gold you spent scouting with change to spare). If you want to grind a few levels on your weaker characters now, go ahead.
Anyways, that’s all for MyCastle! for now. Grind scout missions, visit other player’s castles, build up romances… whatever you wish. When you’re ready to continue on, proceed to Chapter 7’s story mission.
Fort Jinya
| Location | Objective |
|---|---|
| Fort Jinya, Hoshido | Rout the enemy. |
| Enemies |
|---|
| Fighter |
| Knight |
| Outlaw |
| Lancer |
| Cavalier |
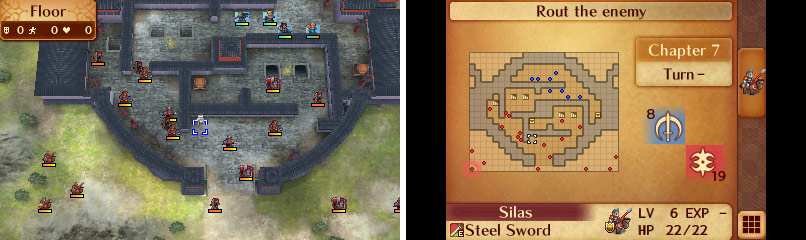
Map of Chapter 7.
Enjoy the cutscene as you enter Fort Jinya. You are to help with the wounded… except that the Nohrians don’t seem to mind surrounding you wherever you go! You’ll get two new characters you can add to your roster: Subaki (shouldn’t it be “Tsubaki”?) and Hana. Subaki is a Sky Knight and Hana is a Samurai. Both are new classes for you, so you should make the most out of it! Subaki, as a Sky Knight, is very vulnerable to bows and arrows, but enjoys large movement range and fast attacks. Hana is like a balance between Rinkah and Kaze, being stronger than Kaze (but weaker than Rinkah) and faster than Rinkah (but slower than Kaze). Her well-balanced stat spread when you get her should help you greatly.
Right as you begin the battle, a short cutscene will initiate. Fire Emblem veterans will likely see Silas as a recruitable character, and you’re right! However, he is automatically recruited when you finish the chapter, so no fancy tricks required this time.
The battlefield here is riddled with walls and corridors, which sucks not only because it impedes your movements, but Archers can also hit you through walls!
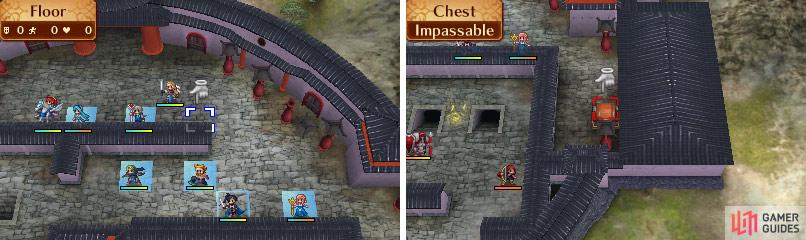
Locktouch and Chest Keys will open chests, revealing the loot inside!
There are also a pair of locked chests (22. Locks) here as well, and Kaze - with his Locktouch gift - will be able to automatically open any chests and doors. There are also many Dragon Vein points scattered around which will reveal Healtiles when activated, should you need more healing than Sakura and Felicia can provide.
All in all, this is a pretty tame battle; pair up two complimentary melee characters (Hana/Rinkah are a fine pair) to lead the way through the corridors. Kaze should take some time to open the chests on the map, while he and Felicia can help the melee characters by instigating tag-team attacks. If your protagonist is a melee type, they can benefit from being paired with Subaki and taking advantage of his movement range to take advantage of compromised foes. Azura will help the party out by Singing for units who would make good use of two turns, and Sakura can provide any necessary healing the Healtiles may not be handy for.
Start out by grabbing the chest to the right to recover a Seraph Robe (Permanently increase Max HP by 5) and be sure to slaughter a Knight in a room to the south (you’ll have to travel left, then backtrack right to reach him) to score a whopping 5000G . Once he’s gone, loot the chest to the left of him for an Armorslayer weapon. There are now only two units left; a Cavalier (who also has 5000G ) and Silas, who is also a Cavalier who carries a Steel Sword for melee and a Javelin for ranged attacks. Silas and the mounted unit beside him will likely pair up when they attack you, in which case make sure you don’t attack with solo units, have units adjacent to them or paired with them (or both!) to boost your own stats in return. Once they’re defeated the battle will be over, more cutscenes will ensue, after which your army will be swelled by the addition of Silas, Orochi, and Saizo.
Silas and his ridiculous haircut ride upon a horse as a Cavalier. Similar to Subaki, as long as the terrain doesn’t bog him down, he has a wider range of movement than you. Orochi is a Diviner, and as such she attacks with scrolls. That’s right, she’s your very first magic-user! Saizo is Kaze’s twin brother and serves Ryoma. So, like Kaze, he is a Ninja. Note his odd skill Pyrotechnics, which will take 20% off of him and surrounding enemies’ Pit points if he defeats a foe below 50% hit points.
It’s time to move on to the next chapter! Don’t forget to grind to level up your new characters if you would like to do so, and also manage your MyCastle (which will have a few new things to build), and fulfill your new support conversations, if you have any.
No Comments