
| Location | Objective |
|---|---|
| Castle: Throne Room, Nohr | Defeat King Garon. |
| Enemies |
|---|
| Strategist |
| Maid |
| Malig Knight |
| Dark Knight |
| General |
| Wyvern Lord |
| Berserker |
| Bow Knight |
| Hero |
| Nohrian King |
Half of your adopted family is dead, while the other half is out of the fight. Not exactly surgical precision, there, but at least you’ve made it to Garon. Speaking of which, when you make it to the next mission, Garon will do his best evil guy laugh, unnecessarily vandalize his throne room and show off how mean and powerful he is. Fortunately, Yato ex machina gives you a power-up, enabling you to do more than tickle Garon. In response, he’ll summon his army so a proper battle can be had.
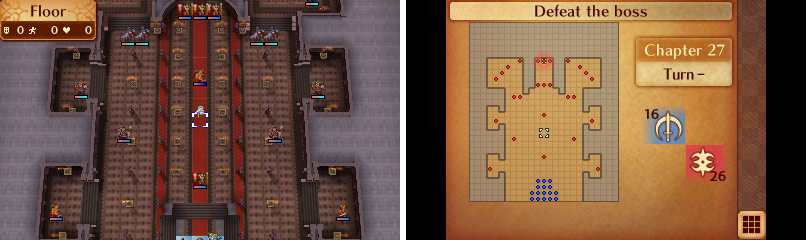
Map of Chapter 27.
The idea of this map, like so many others, is to advance up the map to confront the boss at the northern end. Given how the enemy is laid out, however, this is almost like two different battles; the southern end of the map is populated by physical damage units, while the north possesses plenty of magic-damage units. Your first threat is a General to the north, who is thankfully not supported by any nearby units, enabling you to dispatch him easily enough with a magic-user. It should be noted that he, and the other Generals and Wyvern Lords, all have Spears in addition to close-quarters weapons, so don’t expect ranged attacks outside of the realm of possibility.
After the General has been put down (hopefully with one or two ranged characters who stay out of the reach of any other units), you can end the turn, wait for the Berserker to the west and the Hero to the east to move out, then seize the initiative and dispatch them too. It’ll be hard to do this without getting into spear range of the Great Knights to the north, and you can expect the Bow Knights behind them to start moving shortly after they do. Play defensively until the Bow Knights come into range, then move up and smite them, even if this provokes some Wyvern Lords near Garon. While doing this be mindful of the second Berserker to the north; his Brave Axe gives him two attacks, and you probably don’t want him hitting anybody twice.
Also beware the Strategist in the northeastern corner of the map, who has an “Entrap” rod. This will teleport a character in his massive range to an adjacent square, and with three Dark Knights near him, that probably won’t end well. You can spot this out by the green squares highlighting the “danger area”.
Once the Bow Knights and Wyvern Lords have moved, expect the Malig Knights in the northwestern corner to start heading down, too. Stay away from the Berserker for a bit longer and give the Malig Knights some high Resistance bait (Falcon Knights and Ninjas) to draw them in so they can be disposed of. Their attendant Strategist will likely move down shortly thereafter, but aside from some long-range healing, there’s not much to note about this doomed unit. When the Dark Knights move, mark the extent of their reach and form a defensive wall at the edge of it, wait for them to come in range, then take them down, and shortly afterwards, their Strategist.
Now it’s time to stop being passive and finally move against the Berserker. Ranged attacks are the best option here, but keep in mind that you’ll be in range of three Great Knights after the Berserker falls, so be sure to leap-frog any ranged units you used against the Berserker with high Defense units, or otherwise make sure they’re paired up for defensive purposes. Once the Berserker and the Great Knights are gone, it’s time for the main event (unless you just sped past them since, you know, none of this juicy experience is going to be saved).
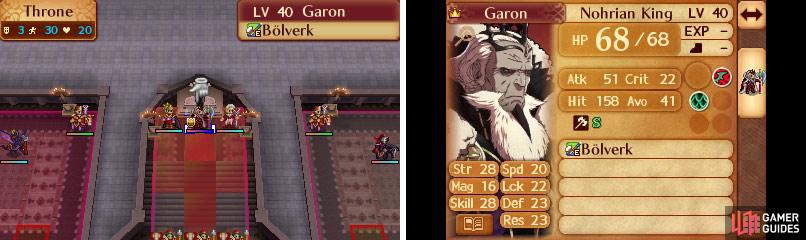
This is King Garon, your ultimate foe! Revenge is overdue, so enjoy it.
Garon is no pushover like many bosses have been, despite the fact that he doesn’t move very far. He can afford to play passive, since he’s got good Defense and Resistance, the highest Hit Point total you’ve likely seen so far, a massive Attack score, and a range of up to three squares. On top of this he’s got a good Critical rate and just enough of an Avoid rate to trip some characters up. He’s also surrounded by two equally stationary stooges who will help defend him in combat; a Maid with plenty of healing and a Sorcerer, presumably there to help balance the offensive bias the other two enemies have, and to punish low Resistance foes. You at least need to take out the Maid if you don’t think you can knock out Garon in one turn, as her healing will allow him to persist.
Note that Garon’s skillset allows him to take passively halved damage from almost every kind of weapon. This will be factored into the combat forecast, so you don’t need to do the math yourself. If your avatar’s Dragon Fang skill triggers, only its third hit will deal any sort of damage. Astra will not deal any damage. And Lethality and other skills are also useless.
Garon is strong, but no longer over-whelming, but don’t waste units taking him down, you may need them shortly…
No Comments