
Messing with MyCastle VI
Another mission, another bit of discussion on MyCastle. This time you can craft more castle battle structures, including a Ballista and a Launcher. You can also create the Einherjar Shop , which will create “Einherjar” clones of existing characters, or randomly generated characters you can buy to bolster your army. So, if you lost a character in a previous battle, or you just like a character so much you want to have a second one, this is the place to go. These units can participate in scouting missions and main missions, they require their own set of gear, and can level up and even be promoted. They cannot, however, participate romantically with other characters.
Lastly, you’ll notice you can now upgrade Lilith’s Shrine , which will increase Lilith’s stat growth past 20th level, for what that’s worth. Anyways, level up characters as you wish, upgrade weapons, get chased out of the Hot Spring, whatever you need to do to get ready for the next mission, then head on out.
Opera House
| Location | Objective |
|---|---|
| Opera House, Cyrkensia | Have Avatar escape. |
| Enemies |
|---|
| Outlaw |
| Cavalier |
| Fighter |
| Knight |
| Great Knight |
| Nohrian King |
| Paladin |
| Mercenary |
After a series of cutscenes introducing you to Kaden, a kitsune (think “Taguel” for those who played Awakening ), you will find yourself in the center of Nohr, with Azura about to confront Garon. However, you will soon find yourself embroiled in another battle.
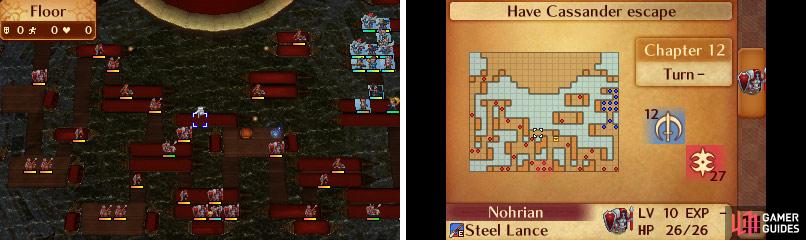
Map of Chapter 12.
You have a unique objective in this battle: to escape . Specifically, your goal is to make your way to the glowing red tile at the top center of the map. To provide you some incentive for this retreat are the numerous Nohrian soldiers at the southern end of the map, who - while diverse - mostly aren’t terribly powerful. The exceptions are Garon, who is a LV 30 “Nohrian King”, a promoted class. A quick glance at his stats should let you know that you don’t want to mess with him, as his Attack, range and Hit Points are just silly. Less impressive, but still note-worthy, are the two Great Knights, who have Attack and Hit Points scores a good ten points higher than the more common foes lurking around.
On the good-guy side of things (that’s you!) you’re joined by your new foxy-friend; Kaden is a Kitsune LV 14 who has a hefty number of Hit Points and a great Avoidance score, but a relatively low attack. Another thing worth noting about the units on the map is that pretty much every enemy has a ranged weapon, be it a Javelin, Hand Axe or a Steel Bow. Don’t expect your own ranged units to be able to attack unchallenged this map, and your melee characters will also likely be at a slight disadvantage, unless you’ve purchased whatever ranged weapons for them you can… which at this point in the game is basically a Throwing Club for Rinkah. On the plus side, melee characters using ranged weapons tend to have poor Attack, Hit Rate and Critical Rate.
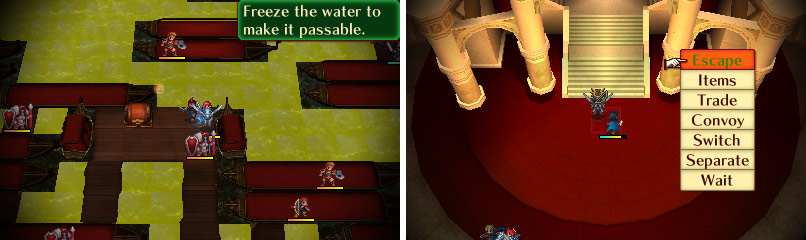
Escaping operates similar to Seizing. On the right is the Dragon Vein of this map.
If you don’t like your odds, good news! You can win this battle in around three turns. Just pair your protagonist with a flying unit and fly them up to the exit. Easy as pie. But there’s XP and treasure to be had on this map, so you might want to try and fight it out. Assuming that’s the case, you’ll see that you’re immediately confronted with a bottleneck, beyond which awaits a Great Knight and plenty of underlings with ranged units. Lead with a character with high Avoidance and follow them with a ranged character for support. This is how you’ll have to clear up the first group of foes, unless you wish to fly your protagonist (or use Hinoka) to activate a nearby Dragon Vein, which will freeze the water on the map and allow you to maneuver with more freedom. Be wary, however, as this will also prompt the mundane units on the map to rush to the east. All things considered, it may be easier to maintain local superiority by not messing with the Dragon Vein.
After a few turns, reinforcements will arrive in the form of Xander (Paladin), Laslow (Mercenary) and Peri (Cavalier). Of the three, Xander is quite a bit stronger than even the Great Knights, but not as overwhelmingly powerful as Garon, and he’s safely hidden away on the western end of the map. Kill your way to the Dragon Vein, along the way you’ll score 3000G from an Outlaw and a Hammer from the Great Knight.
Make your way west and when you reach the Dragon Vein you’ve got a major decision to make, which will influence the course of the battle. If you use the Dragon Vein, the water will freeze, but this will cause the enemy to rush over to you. The ice also doesn’t allow for fast movement, meaning the enemy will, by virtue of their numbers and ranged attacks, have a more significant advantage over you. They can be fought off easily enough if your units are leveled; just form a defensive melee wall with ranged units behind them and wait for the enemy to engage or use the impassible parts of ships to defend ranged units. Go through the level however you wish, but be sure to take a Ninja near the chest north of Garon, as it contains a Dracoshield (Permanently increases Def by 2)… just give Garon a wide berth; he can’t move far and likely won’t move at all unless you come within his movement range, but still. Best not to press your luck.
As for Xander, Laslow and Peri, only Xander has a ranged attack. Laslow has a “Killing Edge” sword that boosts up his Critical Rate, and he’s got a scarily high chance to critically hit, so he’s best dealt with at range. Peri is less threatening, unless you happen to be a Beast unit, in which case you’ll be vulnerable to her aptly named “Beast Killer” weapon. Xander, however, is probably not worth provoking, as he’ll likely one-hit kill most of your units while taking little damage in return. Fortunately the three of them will not move unless you come into their range.
Once you move your protagonist to the escape square at the northern end of the map, this battle will end.
No Comments