
To enter this dungeon you must have the Sand Rod (obtained at the end of the Thieves’ Hideout dungeon). So while you can attempt the Lorule dungeons in any order, you can’t start with this dungeon. From the entrance (1F south), go up and cast the Sand Rod up, to create a bridge of sand pillars leading up.
Cross the sand bridge to the other side; here, go left and around and cast the Sand Rod right. Merge into the sand pillars and walk right to reach the chest, which contains a measly 5 rupees. Next, merge back up and continue right to reach the door leading up.
In the next room (1F north), go up, minding the Dark Rats and Gibdos. Ascend the stairs to the right and go down. Right before the Beamos, merge into the wall on the right, then walk right to sneak past them unscathed. At the end, go through the door to the right. Next (1F north-east), head up and at the end cast the Sand Rod right, then walk right across the sand bridge. From here, go up until you’re standing just before the stairs going down.
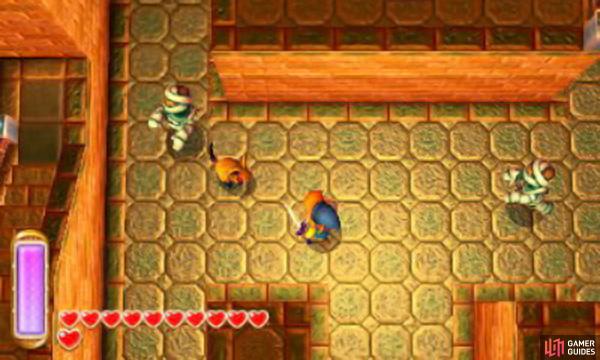
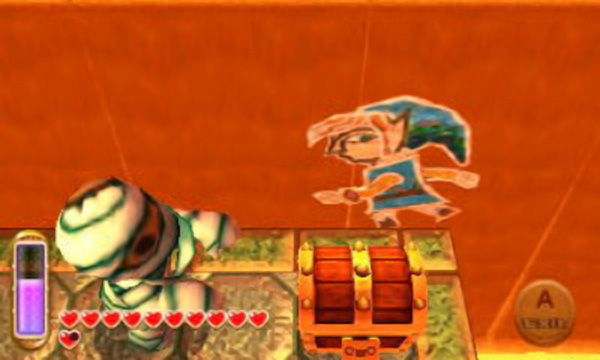
Gibdos are mummies that shuffle towards Link. Unlike other monsters, they don’t bounce back much if you hit them, so slash as quick as you can if they get close. Alternatively, set them on fire with the Fire Rod to turn them into Stalfos.
Charge the Sand Rod left, aiming to create a line of sand pillars between the two platforms on the left side. Walk left, on top of the sand pillars and stand in the centre of the four platforms, then slash left and quickly slash right to activate all four round switches before time runs out. The wall further down will subside, opening a new path.
When ready; drop down, head south and watch out for the Leevers emerging from the sand. As soon as you reach the Beamos, cast the Sand Rod down at the nearby sand to create a line of sand pillars, which you can use to shield yourself from the Beamos.
Hastily make your way down and go through the door leading down. In the next room (1F south-east), there are more Leevers in the sand, so watch your step. Head down and stop before the gargoyle statue on the left; grab the statue with A and drag it a few paces right, then a few paces up, so it’s to the right of an outcrop.
Next; head down and go up the stairs leading left. At the end, drag the nearby gargoyle statue onto the raised floor tile a few paces away. Next, stand on the outcrop facing the gargoyle on the lower floor and cast the Sand Rod right to lift the gargoyle up.
Quickly grab the gargoyle statue from the sand pillar and drag it on top of the next raised floor tile. Finally, stand on the highest outcrop and charge the Sand Rod right to create a sand pillar bridge; then go right and quickly drag the third gargoyle statue left. Of course, if you upgraded the Sand Rod, you can take your time, but if you’re using the regular one, the sand pillars don’t last forever. Then, place the statue on top of the last raised floor switch, to open the door in the bottom-left corner and keep it open.
The key to this dungeon is in using the sand paths as somewhere you can merge and move around. This trick is needed throughout the whole dungeon.
Through the door and you’ll be back in the first room (1F south). Step on the floor switch just ahead to reveal a flight of stairs, which you can use to quickly return to the entrance. Next, cast the Sand Rod left. Then walk left across the sand bridge, while avoiding the moving spikes, and through the door to the left.
Inside the next room (1F south-west), the doors will lock. Walk toward the sand and a Hokkubokku will emerge from the sand, then disappear. When it emerges again, cast the Sand Rod in its direction to blast it to the surface.
Once defeated, the doors will unlock, plus a chest will appear near the bottom of the room, surrounded by big rocks that you cannot lift yet. For now, head up the stairs near the top of the room and through the door leading up. In this next room (1F west), watch out for Devalents in the sand.
Follow the room up and at the end, take the stairs to the right and follow it down. Watch out for the Bari, and at the end, cast the Sand Rod left. Merge into the line of sand pillars and walk across to the left side, where there’s a chest containing one Monster Tail . From here, go left and merge into the wall on the left, then walk right to cross the gap. Across, head all the way up and through the door leading up.
Head for the top-right corner of the next room (1F north-west) to find a chest containing the Compass and a pull switch. Grab the pull switch and pull backwards; sand will now flow in from above and to the previous room. Return to the previous room (1F west) and drop down by the right to collect a chest containing a Small Key . From the chest, go right and up the stairs; then head down and open the locked door on the right. You will now be in a familiar room (1F north); go up and yank the pull switch; a curtain of sand will flow from above, filling the room with sand. Go down a few paces and step right before the stairs leading down.
Point the Sand Rod right, then merge into the sand pillars and use them to cross onto the small platform. Next, cast the Sand Rod up and merge into the sand pillars again to move up to the larger platform. Here, step on the floor switch to open the way to the big chest in the top-right corner.
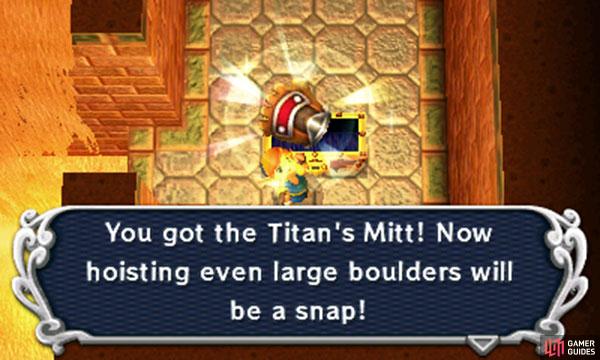
Next, cast the Sand Rod left, then merge and walk all the way right to reach the big chest and claim the Titan’s Mitts inside. With this awesome glove, Link can now lift giant rocks. Head back to the entrance of this room and return to the previous room (1F west).
Next, go down and take the door leading down and you’ll be back in the room where you fought the Hokkubokku (1F south-west). Go right, then ascend the stairs. At the end and before the door to the right, cast the Sand Rod down and walk down across the sand bridge.
Use your newly acquired Titan’s Mitts to lift up the giant rock on the left and reach the chest containing a Small Key . Drop down and head up, then lift the giant rock ahead and use your new key to open the locked door leading left. In the next room (1F far south-west), head all the way down to exit the dungeon.
Outside, go down the stairs and DON’T fall right, off the cliff (if you do, don’t worry, because you only need to go through three rooms to get here again). Head left, then go up and around, where you’ll find a cave with a disturbing pattern above it; enter the cave to continue the dungeon. Inside (2F south), the doors will lock and flying tiles will assault Link–as usual, shield to deflect.
Once they’re all gone; two Devalents will appear where the tiles used to be–use the Sand Rod to expose them. After the threat has died, the doors will open and a warp zone to the entrance will appear further ahead.
Ascend the stairs ahead, then cast the Sand Rod up. Merge into the sand pillars and walk left and across, then take the door leading left. Next (2F centre-west), drop down and head up, minding the Leevers and Devalents. At the end, slay the awakened Gimos to the right and head up where it used to be, through a secret passage, to reach a big rock.
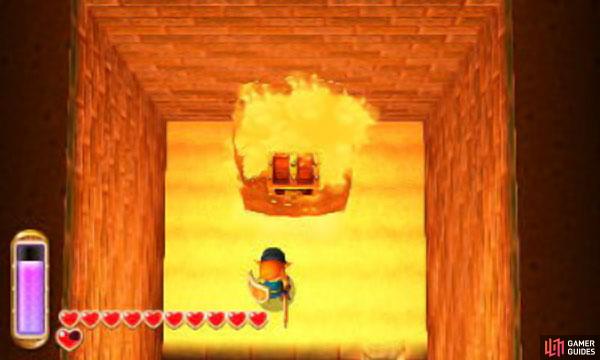
Lift up the big rock and then Sand Rod the buried treasure chest to excavate it–inside is 100 rupees. After you’re done, head all the way back to the entrance of the room.
Never forget that the Sand Rod is designed to lift items buried in the sand (whether that be MaiMai’s, treasure or enemies).
This time don’t drop off and instead cast the Sand Rod directly ahead to create a long bridge of sand; walk up across the bridge, while avoiding the moving spikes and knocking the bothersome Bari with your Hookshot or the like. At the end, enter the door leading right (to 2F centre). Down the stairs, aim the Sand Rod at the Beamos to move it up and out the way, then merge into the sand pillars to get around to the other side. Open the chest along the way to score yourself 100 rupees, then pass through the door leading right. In the next room (2F centre-east), enter the door to the right.
From here (2F east), head up, then down the stairs to the right. On the lower floor, watch out for the shooting arrows and Gimos. Carefully make your way down until you find a blue round switch. Step on top of the lowered red barrier and strike the round switch to raise yourself up, then head left and up, up the stairs.
At the end; cast the Sand Rod right and move across to the platform on the right. Go down until you stand above the gargoyle statue, then cast the Sand Rod down and quickly drag the statue onto the platform you’re standing on.
Cast the Sand Rod anywhere else to get rid of the sand pillar below (or wait until the sand pillar crumbles by itself) and some magic will happen. With the gargoyle statue out of the way, the shooting arrow will hit the round switch, over and over; this will make the coloured platforms lower and rise without you doing anything. When you’re ready, drop down to the right and head for the bottom-right corner of the room. Step on the coloured platforms and let them take you up. Open the chest ahead to claim a Small Key .
When you’re done, drop down and head up, going backwards through the room. Before the stairs, you’ll come across another set of automatic lowering and raising coloured barriers–use these to make your way up to the right. Then go through the door ahead, leading up. Next (2F north), go down the stairs to the left and then go up and turn right. Lift the big rock to reveal a half-buried chest–cast the Sand Rod to expose the chest and grab the 100 rupees inside. From here, head all the way left, disposing of the usual sand creatures.
Halfway across the room, go down and through the obscured door to reach a small room (2F centre-east) with a big rock. Lift the rock, then cast the Sand Rod at the half-buried chest to bring it to the surface; open the chest to claim 100 rupees . Next, return to the previous room (2F north) and continue left. At the end, cast the Sand Rod to create a sand pillar in the gap in the wire mesh path, allowing the lower cannonball to continue right, smashing the cracked crate. Once the crate is gone, head right, then up the stairs.
Create sand pillars for the cannonballs to travel across.
At the left-most point of the wire mesh path, cast the Sand Rod left to let the middle cannonball continue right (don’t forget to move out of its way), smashing the second cracked crate. Or you could just bomb the two cracked crates in the first place, but we think it’s more fun this way… plus it’s good practice for your next endeavour.
With both crates out of the way, head down the higher set of stairs and along the narrow platform. Lift up the big rock and throw it out of the way. Then go left and stop right before the stairs.
Wait for a cannonball to come from the left–as soon as one comes, cast the Sand Rod up to create a sand pillar, allowing the cannonball to continue onto the wire mesh path above. While it does this, quickly go right and stand in front of the nearby sand between two platforms.
Once the cannonball passes the first sand pillar, cast the Sand Rod up to create a second sand pillar. Finally, go right quickly and up against the wall. After the cannonball passes the second sand pillar, cast the Sand Rod right to create two sand pillars and allowing the cannonball to reach all the way to the right.
At its destination, the cannonball will smash a cracked crate in the corner, releasing a flow of sand into the room below. Drop down and head right, up the stairs and back to the earlier room. Here (2F east), walk down and at the end, cast the Sand Rod left and merge to cross to the platform on the left.
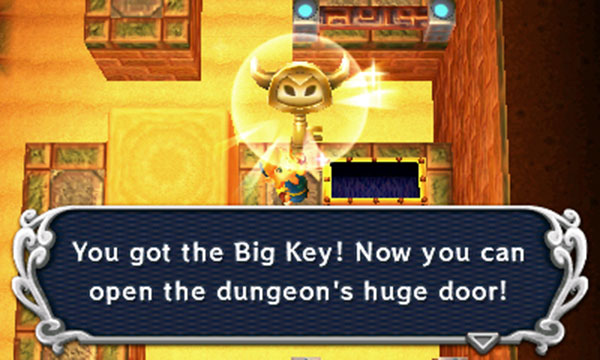
Step in the bottom-right corner and cast the Sand Rod down, then merge and walk left to reach the big chest containing the Big Key. Next drop down and head all the way down; at the end, go down through an obscured door to reach a secret room (2F south-east) containing fairies and some rupees. Then head back up (to 2F east).
Return to the entrance of the room on the left; exit left (to 2F centre-east) and enter the next door to the left. You will be in the Beamos room (2F centre) again; use the same trick as before to get past and head through the door leading left (to 2F centre-west). Finally; open the locked door to the left and step through. In the next room (2F north-west), descend the stairs and head left.
Face the Beamos from its left and cast the Sand Rod right to raise the Beamos up. Then watch as the laser strikes the three round switches for you, opening the door leading down. Head down and through the new door.
The next room (2F south-west) will lock itself. Step in the middle of the sand and four Leevers will emerge; slay them and two Devalents will appear. Once all the monsters are dust, the door will open and a chest will appear–open it for a Small Key . Now return to the previous room (2F north-west). From here, go up, past the Beamos, then right. Watch out for the Gibdos and take care not to get hit by the Beamos where there’s a gap. Next, head up to find another Beamos; cast the Sand Rod left to lift it up. Wait for its laser to strike the first round switch, then go right and step on the lowered blue barrier.
When the second switch is hit, move up to the lowered red barrier. Finally, when the third switch is struck, merge into the wall on the right and walk left across the gap. Then open the locked door ahead to reach Floor 3F. Here, walk down until you reach the halfway point of the corridor, then turn left into the sand curtain to reach a hidden room (3F far north-west); inside is a chest containing 100 rupees. Back in the previous room (3F north-west), continue down and take the door leading down. In the next corridor (3F centre), take the next door leading down.
Here (3F south), go down then turn right. Cast the Sand Rod right to create a long sand bridge going right, then hastily head right. Quickly slay the three Gimos in the way before the bridge crumbles; at the end is a chest containing a Small Key . Should you fall, head through the door in the top-left corner to return to the previous room and make your way back from there. Either way, once you’ve got the key, drop down and head for the top-left corner of the room to leave. Before leaving, head down and walk below the higher platform to find a secret stash of rupees.
In the previous room (3F centre), go all the way right, past the Gibdos and Gimos and head through the locked door at the very end (to 3F north). Next, bomb the cracked crate blocking the way ahead–if you don’t have bombs, use the Bawbs around.
Past the crate, head for the top-left corner and bomb the crate in the corner, then head left to grab a bunch of rupees. Back in the middle, drop a bomb next to one of the higher platforms where a cracked crate rests, then cast the Sand Rod at the bomb to raise it up, blowing up the crate.
Do this for all three crates on higher ground and the shooting arrow from the right will be able to strike the round switch higher up, repeatedly. Return to the room’s entrance, then turn left and use the automatic coloured barriers to raise yourself up. Continue left and at the end, go through the door leading down. In the previous room again, pull the pull switch immediately to the right to fill the room with sand. Drop down and head all the way right, where you’ll find the big door.
Strike (or lay) a bomb down at the base of the pillar with the cracked sand cube. Raise it up with your Sand Rod so it explodes at the top, taking out the cube.
Through the door, cast the Sand Rod down to cross over the quicksand. Lift the giant rock out of the way, then cast the Sand Rod down to continue. Outside, merge onto the wall and go through the doorway to Lorule. Emerge and drop down to the left or right to begin the boss battle.
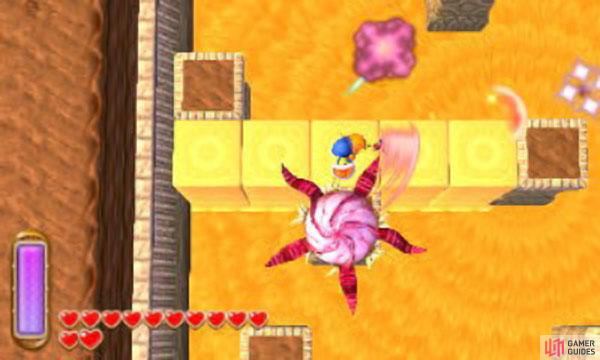
Boss: Zaganaga
The battlefield consists of many small platforms over a large pool of quicksand. To navigate, you’ll need to use the Sand Rod to create bridges between platforms. Remember that casting the Sand Rod will destroy the previous sand pillars you created, so don’t cast the Sand Rod while standing on sand pillars or you’ll fall into the quicksand. Instead, you will be forming sand bridges between solid platforms only. To begin with, use the Sand Rod to create bridges and get close to the boss, then give it a good whack with your sword.
The boss won’t stay where it is for long and will move to another platform–watch its path through the quicksand below to see where it’ll go next. Sometimes you may have to create a few bridges before you can reach the boss’s platform.
When attacking the boss, remember not to stay on your sandbridge for too long, lest it crumble (unless you’ve upgraded the Sand Rod). You can also opt to fire arrows at the boss, but it deals damage slower and consumes the energy gauge, which you should reserve for the Sand Rod.
After taking a few hits, the boss will spit out flying Peahats each time it surfaces; dispose of them early on as they’re a nuisance. Use the Tornado Rod when the going gets tough, but remember it eats up a lot of the energy gauge. More hits and the boss will reveal five eyes on its flower. Now, after spitting out Peahats, the boss will gather sand for a while and then shoot a massive slow-moving sand laser in a quarter or semi-circle. At this point, form a sand bridge away to safety and get out of the way of the laser.
Despite its massive range, avoiding the laser shouldn’t be a problem, due to its slow speed. More than anything, you should watch out for the Peahats; if you have good reflexes, kill them before and during your escape from the laser. Once away from the laser, create more bridges and make your way to the back of the boss and hack away at it from there. Once the boss falls, the quicksand will vanish and you can go up to grab a heart container and Irene’s Painting .
No Comments