
| Enemy Name | Weak | Resist | Null |
|---|---|---|---|
| Blind Cupid | Wind, Dark | Fire | -- |
| Elegant Mother | Light, Dark | -- | -- |
| Gorgeous King | Fire | Light, Dark | -- |
| Natural Dancer | Ice, Light | -- | -- |
| Tranquil Idol | Ice, Light | Fire, Elec, Wind | -- |
| Wondrous Magus | Elec, Dark | Fire, Ice, Wind | -- |
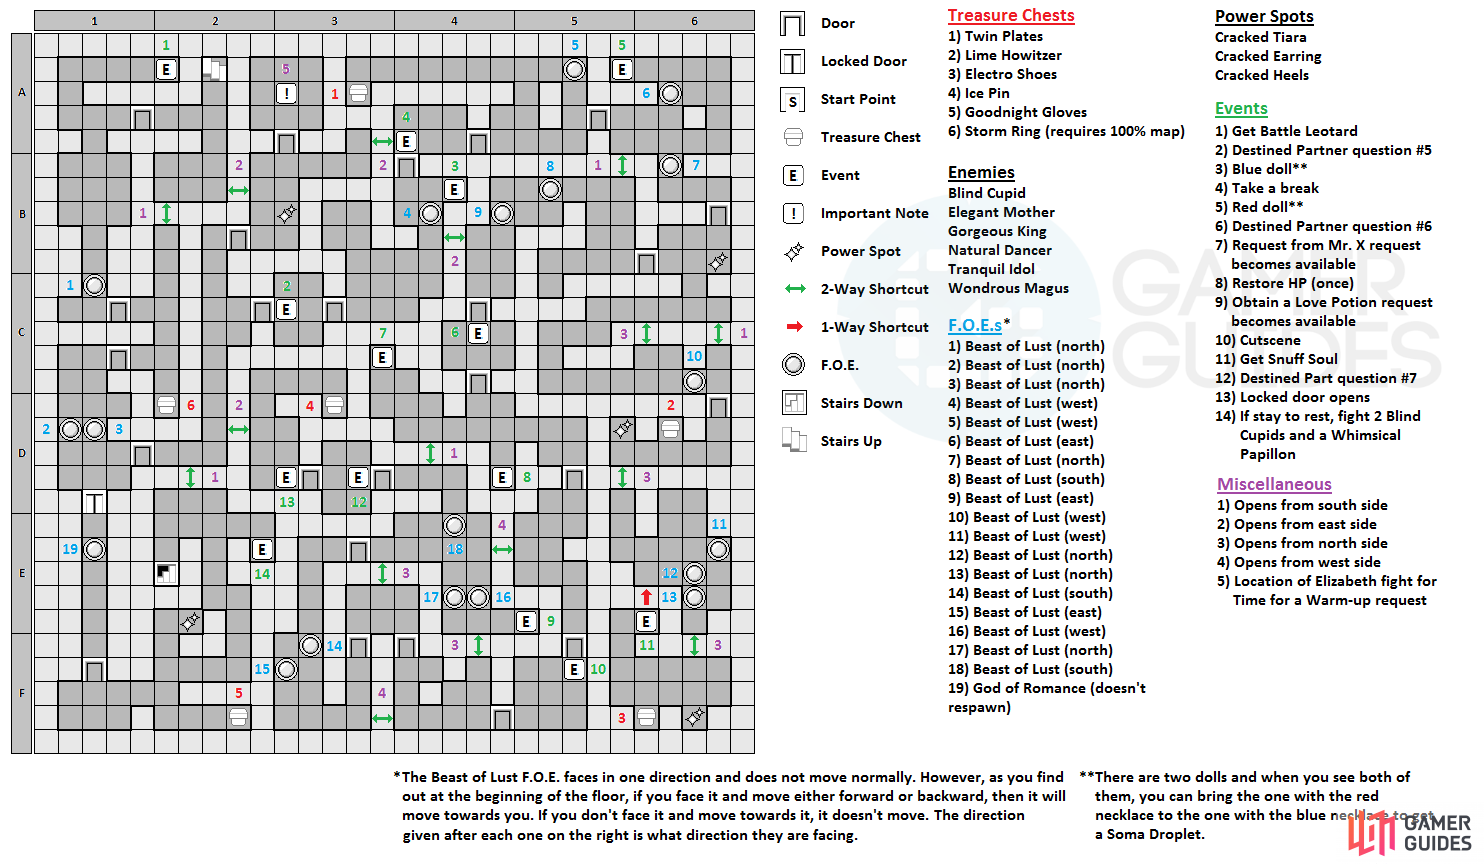
At the start of the floor, you get a warning about the high number of FOEs and how they aren’t moving or even changing positions. In fact, you’ll meet the first FOE after passing through the first door and attempt to go south. This is the Beast of Lust FOE and you’ll run into many more throughout this floor. Basically, if you face the FOE and move towards it, it will also move towards you. However, if you’re not facing it when moving towards it, the FOE will stay put and not move at all. Ignore it for now and go to the nearby dead end for an event, where if you let Koromaru be, he will get you a Battle Leotard .

The Beast of Lust will only move towards you if you move towards it while facing it head on.
Now, go back to the FOE and using the knowledge above, lure it into the middle of the room, which will let you by it without having to fight it. Go through the door and north to open a shortcut, then south and through the next door (the 100% map chest is at the southern dead end and contains a Storm Ring ). Here, you’ll find two more Beast of Lust FOEs, which are right next to each other. While not facing them, move next to one of them and then face towards the one, moving north two steps. This will let you bypass both of them, where you’ll find a locked door to the south and a normal one to the east.
This will be a long hallway here, with a door on the north end and another leading east. The north end one leads to an area with a Power Spot, shortcut back to the beginning area and another room that is empty (it’s for a request later on). Go back and head through the other door mentioned to be presented with Destined Partner Quest #5 , so answer it and continue forward. There will be another FOE here, facing west, which is blocking your path, so you’ll need to find a way to get it to move. Go to the northwest corner area and face the FOE, then move forward or backward to get it to move.
Just past the FOE is a small alcove, where you’ll find a doll. Inspect it and then ignore it for now, going through the door to view a short scene (shortcut right by the door). In the next room, there will be a FOE in the northeast corner and a long corridor that leads west, with a chest at the end ( Twin Plates ). All you have to do is not face the FOE as you’re moving away from it (as well as the way back, so you don’t get cornered) to get to the chest. Past that room will be another area with two more FOEs, with one facing north and block a path to the south and the northern one facing east.
Go around to the east side and face the one facing east, getting right next to it before moving to get it out of the way. With that done, you can move to the left of the FOE you just moved and face south, then moving up/down to get the southern FOE out of the way there. Note that the dead end to the north has another doll (red necklace), which you can bring back to the first doll you found to get a Soma Droplet . If you did this after moving the FOEs, then you’ll have to move them again (they reset after going exiting the room). Enter the next room and you’ll be presented with two paths here, one leading south (which comes to a dead end, but it has a few treasures) and one going west. Let’s go south first.

Bringing both the red doll and blue doll together will net you a Soma Droplet.
The path south is long and there’ll be a FOE in the way, blocking the path as usual. You should notice two shortcuts, though, one of which opens from the north and the other opening from the south. Open the one you can and then lure the FOE enough that you will be able to pass it by utilizing the shortcut again, then bypass the FOE and open the other shortcut. Go south through the door to find a chest ( Lime Howitzer ) and a Power Spot, as well as another shortcut, leading to a room with three more FOEs. Two are facing north and one more facing west.
To get pass all three, follow the directions given now. Stand in front of the first one facing north, then move north two steps. Move around and face the westward looking FOE, then move west two squares, allowing you to move one step when facing the last FOE to get around it and through the shortcut just to the south. This will put you in a room with another treasure chest ( Electro Shoes ) and Power Spot, as well as an event at the dead end, which will yield a Snuff Soul (choose first option to be safe). To return back without worrying about the FOEs in the previous room, there will be a one-way shortcut right next to the event with the Snuff Soul.
Return to the door from before and head west into a room with two more FOEs. This one is tricky, as the path to continue is past them, so you’ll need to be careful how you do move them, as it’s possible to get them stuck (reset the room by leaving). Face the FOE that’s looking to the east and make it move one space east, then go into the little dead end area to the south and make the other FOE move one space south, allowing you to pass both. In the next room, you’ll have to answer Destined Partner Question #6 . Through the next door, go west to a dead end that’ll make the Request from Mr. X request available.
There will be another dead end almost directly south of the door you just came through, where you can relax to restore some of your party’s health. Keep going south, through the next room and there will be a short scene after using the next door. There’s nothing else in the room, so continue on into the next area, where you should be able to spot a FOE to the west before entering the door. Don’t make it move yet (doesn’t matter since it will reset anyways) and keep moving until you get into the same room as it and yet another FOE nearby.
Here, you’ll want to move the northern FOE south two spots, then use the shortcut in the southeast corner to get back to that spot where you could see the FOE before, moving it east one square. Now, use the shortcut again and you’ll be able to pass both FOEs without getting into trouble. As soon as you pass through the next door, open the shortcut, then go back through to see three FOEs to your east. To continue the story, simply move the northern one down one spot to pass it. However, the dead end to the south of the other two holds a request.
To get at it, you will need to move the northern-facing one spot, then use that shortcut right by the door to move the other FOE one spot west (the request is Obtain a Love Potion ). Make sure you open any other shortcuts before delving into the next room, which has Destined Partner Question #7 . Past that is when you hear the click that unlocks the door on the floor and the shortcut nearby leads back to the starting area, but there’s a chest north of that at the dead end ( Ice Pin ). Go back to the starting area via the shortcut and go through the locked door to fight a new enemy, the God of Romance.

The God of Romance is more a mini-boss than an FOE. It is weak to ice, so any characters with that element can get into Boost mode.
While it looks like an FOE and is called one, it’s not as bad as the actual FOEs you’ve encountered so far, as for one, it is weak to ice. It can boost its attack and defense with Tarukaja/Rakukaja, as well as use Poison Breath, which has a medium chance of poisoning your party. As far as attacks go, its main one is Assault Shot and it will sometimes use Power Charge before using that one. In addition to that, it can also use Maragi, so be careful if anyone has a fire weakness.
Once you take the mini-boss down, continue on through the door, where you’ll find two dead ends with a treasure chest ( Goodnight Glove ) and a Power Spot. Near the stairs, there will be another dead end, where you have the choice of resting again, but doing that this time will put you into a fight with two Blind Cupids and a Whimsical Papillon. Be careful with the latter, as it knows Poison Breath, Hama and Mudo. When you’re ready, use the stairs to go to the fourth floor.
No Comments