
| Enemy Name | Weak | Resist | Null |
|---|---|---|---|
| Agitating Haberlie | Wind, Light | Fire, Ice, Elec | -- |
| Burning Beetle | Ice | Light, Dark | -- |
| Calm Pesce | Elec, Dark | -- | -- |
| Enslaved Beast | Fire, Light, Dark | -- | -- |
| Heat Balance | Elec, Wind, Light, Dark | Fire, Ice | -- |
| Jupiter Eagle | Wind, Light | -- | -- |
| Justice Sword | Ice, Dark | -- | -- |
| Lying Haberlie | Bash, Fire, Elec, Light | -- | -- |
At the very start of the floor, you’ll be told that there’s a special surprise waiting for you at the Velvet Room, so exit the dungeon and you’ll automatically go there. As it turns out, you now gain the ability to fuse two Personas, creating a new one. You also gain access to the Compendium here, which keeps a record of all Sub-Personas you have had, although they are put into it at their base level. If you want to keep the skills they have on them, then you will need to register that Sub-Persona, but note that it will cost more money to take the Persona out of the compendium.
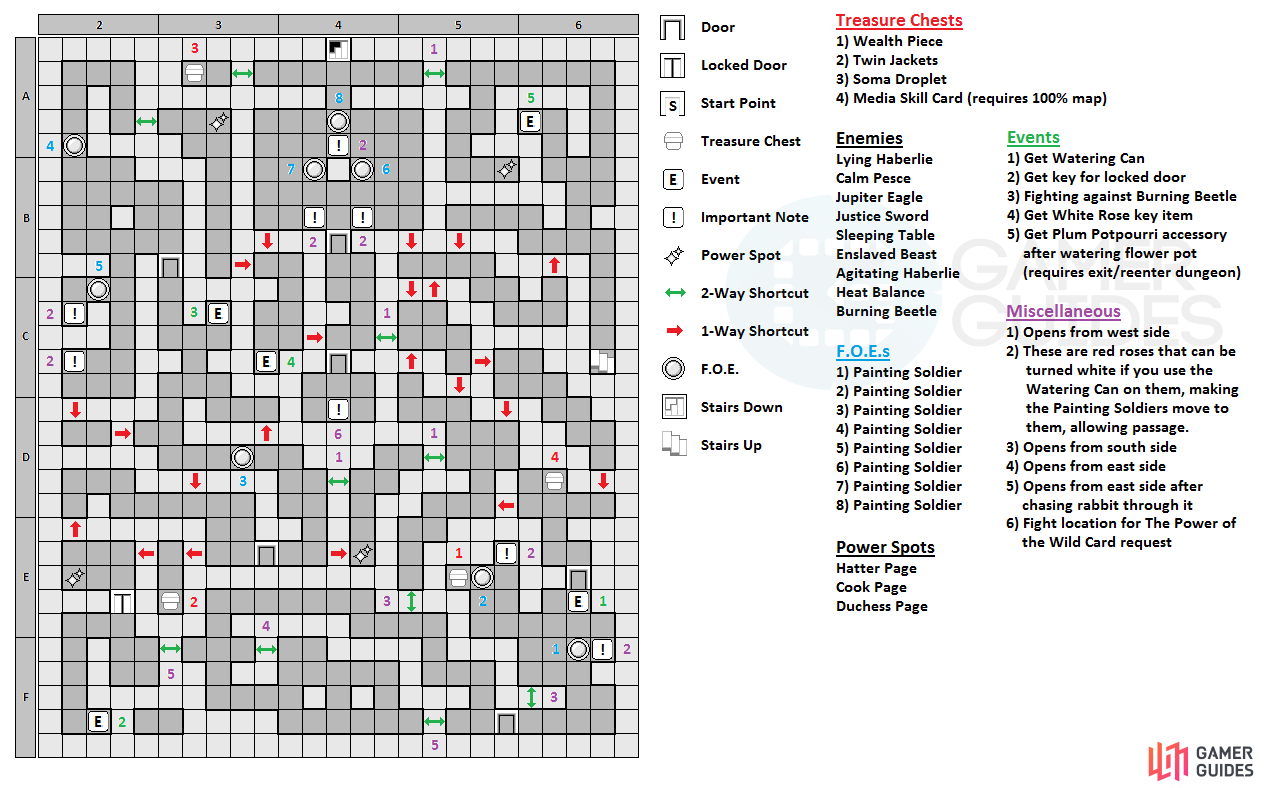
Back in the labyrinth, head north from the stairs and then north again at the first split, where going north on the eastern path will eventually lead you to a Power Spot, while the other one nearby takes you to a dead end with a flower pot that needs watering. Unfortunately, you don’t have one, so go back to the very first fork and head west now to the dead end, where you’ll find a shortcut. The bad thing is that this is a one-way shortcut, so you’ll need to find another way to get back where you were. In this new passage, going east will lead you to another one-way shortcut that leads back to the beginning area, so go west and take the shortcut there to continue south.
You’ll always get a warning (right) whenever you encounter a shortcut that only goes one way.
In the southeast corner of this little area will be two more shortcuts (both one-way), one that goes south and another that goes east. The southern one doesn’t have anything worthwhile, so take the eastern one for now. Immediately to your south is another shortcut, but it takes you to the same area the previously mentioned southern one does, so ignore it. Go to the southeast end and take the shortcut there, which will put you right by the 100% map chest for the floor ( Media Skill Card ). There will be a shortcut to the west of the chest, but ignore it and head through the southern door.
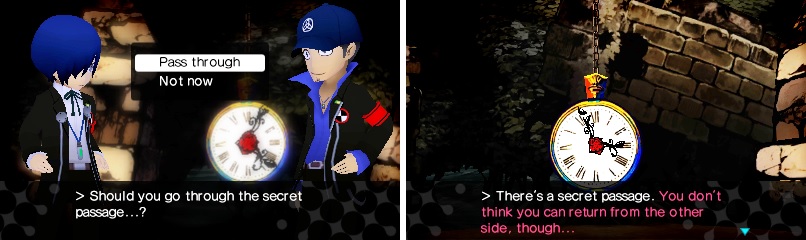
Here, you’ll be introduced to a new type of FOE, the Painting Soldier. As you notice, it is painting the roses red and it’ll be difficult to sneak by it. Thankfully, you find a Watering Can , which you can use to wash the red paint off of the roses. This will make the FOE rush back to the roses and paint them red again, distracting them so you can sneak by their patrol path. Ignore the one to the south for a second and go west to find another FOE by a chest. You can time it so you can reach the roses without fighting the FOE, allowing you to open the chest for a Wealth Piece .
Now you can go back to the previous bouquet of roses and water them, allowing you to get by the FOE. Before going through the door, make sure you open the two-way shortcut right by it. Through the door, there will be a picture right in front of you, so go the northern route, opening the two-way shortcut that will lead back to a previous area, then continue west until you find the pink bunny again. Chase it west, then south and east into a larger room, where you’ll need to get it to the southeast corner. It’ll bust through the wall, creating a shortcut, then go north again.
Go through the shortcut and begin chasing it, but stop when you get the rabbit onto the middle of the crossroad. When it’s there, you have to head back the way you came, take the shortcut the rabbit made before, then another shortcut that’s just east of where you should have made the rabbit stop. This will make the rabbit go west and right in front of another picture, which it will go through, making it so you can go further into the dungeon. You will come to a door that has a padlock on it, meaning you won’t be able to open it until you find a key.
You’ll have you use the Watering Can on the roses to turn them white (left), which will distract the Painting Soldiers enough for you to pass them (right).
Luckily, the key is nearby, so go south to come to an event where you will end up drinking something to shrink yourself and go through a tiny door. You’ll automatically get a key during this cutscene, so go back to the locked door and open it. There will be a Power Spot right past the door, as well as a one-way shortcut in the northwest corner. In this room, go east and before heading through the door, you’ll find a one-way shortcut directly west of it that leads to a chest that contains a Twin Jackets armor for Zen/Rei. Return to the door and go north, where you’ll find a Card Soldier FOE patrolling the corridor.
Ignore it for now and you’ll find a two-way shortcut before that corridor, leading to both a Power Spot (south) and another two-way shortcut that goes back to one of the beginning areas. Back with the FOE, you find that you can’t pass it unless you defeat it, but there’s a one-way shortcut not long into the hallway that lets you bypass the FOE. Go north and you’ll find another pop-up picture book at the dead end, with you having to fight a Burning Beetle if you decide to open it. Anyways, go through the door from before and you’ll run into the pink rabbit again, as well as a Painting Soldier FOE.
In order to get by the FOE to the north, you’ll have to go south, squeezing by another FOE, where you’ll find some roses. Use the Watering Can on these and the southern of the two FOEs will come by to repaint it. This will allow you to go where that FOE was and wash the paint off of the roses there, letting you chase the pink rabbit to the north, where it will jump through another wall. Go through the shortcut, loot the Power Spot and go all the way south, taking another one-way shortcut that leads east. There’s an event on the southern end here, where you’ll get the White Rose item, which is actually a key item.
Take the other shortcut in the room and you’ll be right by a door, which leads to a small room with nothing in it (will be used later). Open the two-way shortcut here, then go through the door to the north, where you’ll find a total of three Painting Soldier FOEs. You will need to make it so you lure the right FOE here to the correct rosebush, but should you happen to mess up, there are one-way shortcuts in the southern corners that will allow you to reset the puzzle when you re-enter the room. To do this correctly, go up either side to the northern rosebush and make sure one of the side FOEs on the other side is right next to you, which will make that one fixated on painting that particular one.
From here, you can wash the paint off the roses on the same side of the other side FOE, allowing you to do the last rosebush to lure the northern FOE and access the stairs. However, before you use the stairs, go west to find a shortcut that leads to a small room with a chest ( Soma Droplet ) and east has a shortcut that leads back to the beginning area. Now you can use the stairs and go down to the final floor of this labyrinth, where you’ll find the pink rabbit once more. It will disappear completely, so continue forward to find a gold gear-like object floating in mid-air. This thing, which is found at the end of all of the labyrinths, is a save spot that also allows you to exit the dungeon, resuming right back at it when you decide to go back. Do that, sell off items, heal up and anything else before going back and through the door, where you’ll face off against the first boss of the game!
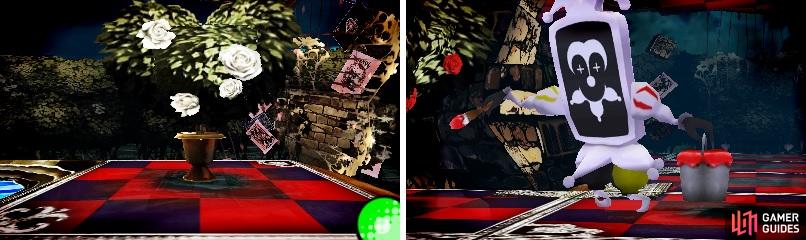
BOSS: Queen of Hearts
Before actually doing battle with the Queen, she sends her minions after you, who all look like miniature versions of the FOEs you’ve seen in the labyrinth so far. Although not weak or anything to physical attacks, all of them are weak to light/dark, as well as the elemental skills, so it should be easy enough to attain Boosted status. There’s four different types of Cards here: Sword (Safeguard and Cleave), Spear (Safeguard and Twin Shot), Staff (Disarm and Scarecrow) and Wand (Zio and Garu). Depending on your party members, it might be wise to take out the Wand one first, then Staff, Spear and Sword.
The problem with them is that if the Sword or Staff use Safeguard on the others, then you can’t hit them with single-target skills, so you’ll have to use some that hit all enemies. After two rounds of these, a cutscene will occur and the cavalry will arrive in the form of characters from the other game that’s represented in the game. You’ll have to fight another round of Card Soldiers, with your main protagonist and other characters mixed in (all of whom are level 12). Once you defeat them, it’ll be time to finally fight the Queen.
The Queen of Hearts has no elemental weaknesses and nulls Light and Dark, and you will fight her with your original party. It’s best to be around level 10-11 (depending on the difficulty), as this should give you some leeway in the battle. At the start, she will use Mow Down, which is a physical attack against a single row, and a regular physical attack. The real battle, though, will start once she reaches 75% HP, which is when she’ll start using Soldier Summon. This will summon one of each type of Card Soldier from before, while the Queen moves to the back row.
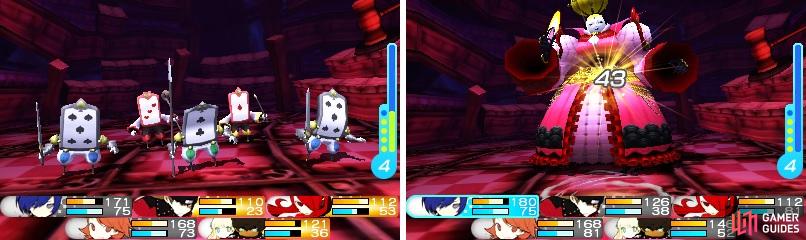
The Queen will continually summon fodder throughout the fight with her (left). After some extra help arrives, the Queen will fight you herself (right).
This wouldn’t be a problem if the Sword and Spear ones wouldn’t use Safeguard on the Queen, meaning single-target attacks won’t actually hit her. To make matters worse, she will begin pulling out elemental moves of her own, as she has access to the single-target mid-tier elemental set (Agilao, Bufula, Zionga and Garula). At 50% is when she’ll use even more moves, such as Fire/Ice/Elec/Wind Dance, each of which hits differently (Fire splashes to the sides, Ice pierces to the back row, Elec hits a single row and Wind hits 2-3 times to random characters in a single row).
So, the main problem with the battle is dealing with the Soldiers that will be summoned more than once during the battle, as well as dealing with the Soldiers in a timely manner. If you’re playing Persona 3 side, then Yukari is great in this battle, since she gets Media at level 10 (you also get a Media Skill Card for getting 100% on the third floor). Zen/Rei is a great party member, due to Thunder Clap being able to hit all Soldiers and Rei’s skills are good for support.
No Comments