
| Enemy Name | Weak | Resist | Null |
|---|---|---|---|
| Amenti Raven | Wind | Cut, Fire | -- |
| Bribed Fuzz | Wind | Stab | -- |
| Change Relic | Ice | Cut, Stab, Fire, Wind | -- |
| Devious Maya | Light | Bash | Dark |
| Earnest Calocy | -- | -- | -- |
| Fate Seeker | Ice | Light, Dark | -- |
| Phantom Master | Fire | Wind, Dark | -- |
| Rainy Brother 1 | Elec, Light, Dark | -- | -- |
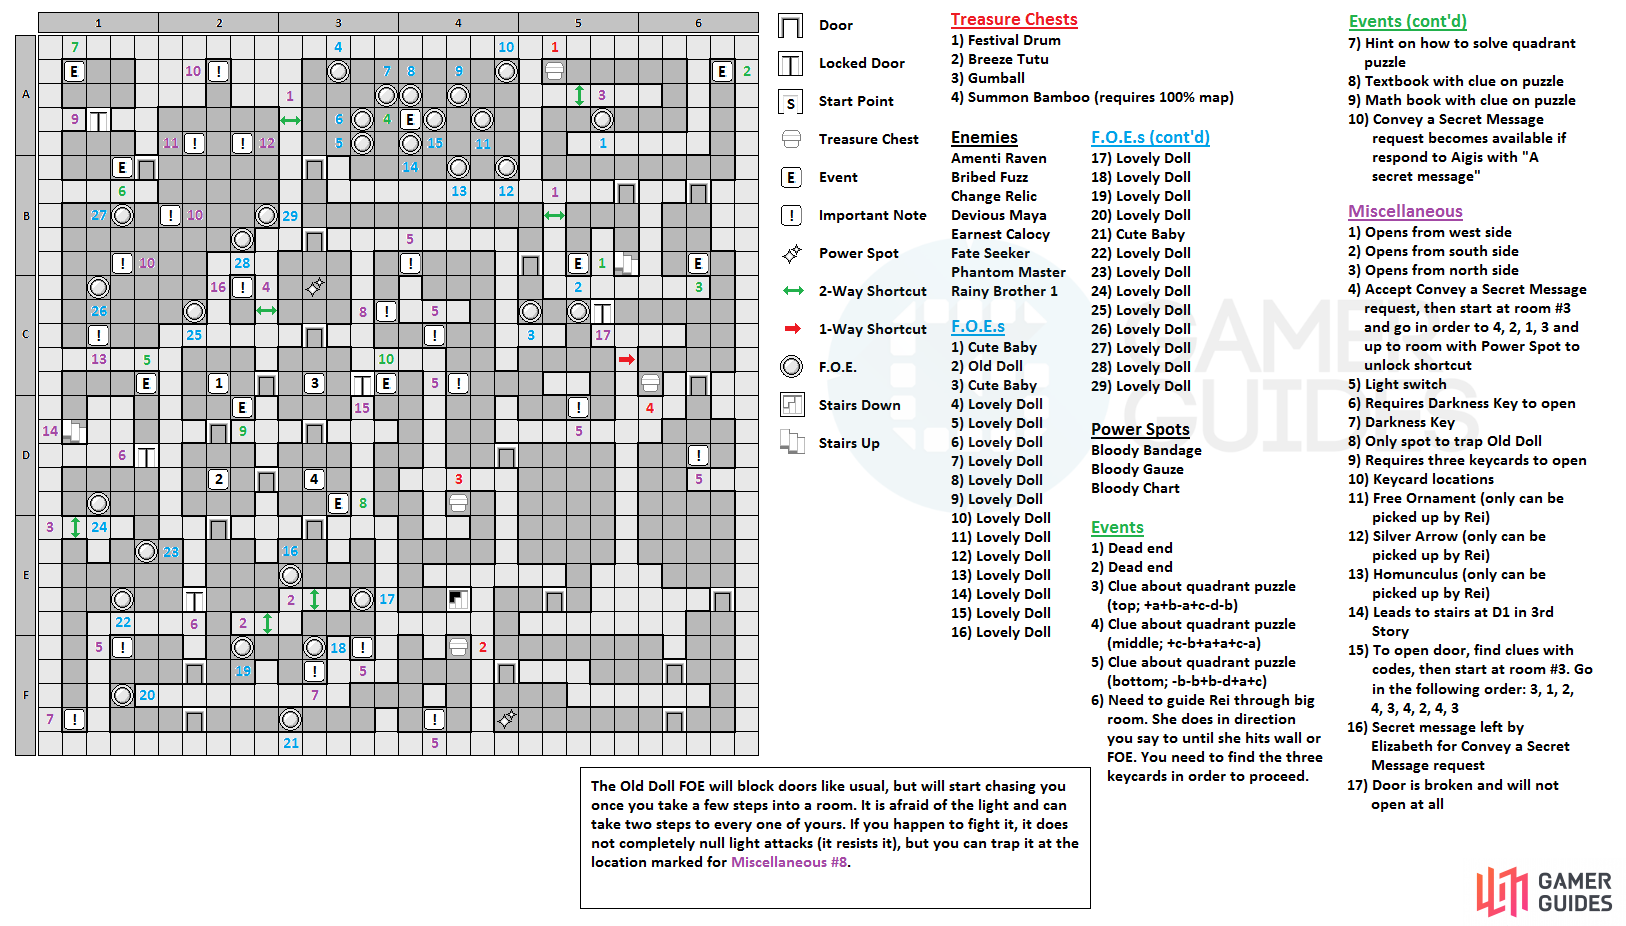
This is the last main floor of the Evil Spirit Club and it’s going to be the hardest due to a puzzle later on, as well as because of an annoying F.O.E. in the first part of the floor. There’s an event near where you start, but it’s nothing but a dead end. Go through the door and you can head either west or east, with west bringing you to a Cute Baby FOE and a chest that contains a Festival Drum accessory (use the shortcut to avoid the FOE). If head east from the fork before, going north leads to another dead end, but there will also be a door that goes south.
Straight ahead from the door is a note on the wall (says +a+b-a+c-d-b ) that will come into play in a puzzle later on the floor (it’s the top piece), so make a note and then continue. The door to the west is being blocked by that one FOE from previous floors, plus the door is broken anyways. There’s a small path next to the door south of you that houses the 100% map chest ( Summon Bamboo ), so ignore it for now and go through the door, only to have the FOE block the other side like before. Straight ahead will be a light switch on the wall and you will want to hit it, because as soon as you make your way through the rest of the room, the FOE will start chasing you.
This FOE, called the Old Doll, is similar to the Cute Baby ones, as they will chase you. How they differ, though, is that they will continue chasing you through doors (they only appear to be blocking it, but will continue the chase shortly after you venture into the room). Also, the Old Doll will move two spaces when it can, meaning that you won’t be able to outrun it in an open space with no lights. With the lights on, make your way through the room using the lights to keep the Old Doll away from you (they are afraid of the lights as are all FOEs in this dungeon). In the next room, you have one of two choices, either go through a northern door or a southern one.
The Old Doll will continually chase you throughout the first portion of this floor, but you can trap it in between two sources of light, as indicated on the map shown on the right.
If you hope to get away from the Old Doll without exiting the dungeon or fighting it, then you will want to take the southern route. There will be a Power Spot in the lower left corner of this room, so feel free to plunder it, then go through the door north of that. Go north and through the next door to be in a room with more lights. Here, you want to make it to the northernmost light in the room, with the Old Doll just south of you. This will allow you to move towards the door in the northwest without getting into fight with it. This is the room where you’ll be able to trap the Old Doll, but there’s a few things that need done first.
You’ll notice that the room is dark at first, so go north from the door three tiles and then west one to find a light switch on the wall, putting you in a light so the Old Doll won’t bother you (it should be right below you). Now, north of you is a loop and this is where you’ll be trapping the FOE, so take the southern path of the loop for now, ignoring the light switch you pass up. On the north end is another light switch, which you will want to hit, then backtrack towards the FOE to make it come to you via the same path you took, which is your cue to hit the northern light switch again to lock him on that path with no way out.
You should have noticed another branching path as you were trying to get rid of the Old Doll, which leads to another looping room and where you first saw the Old Doll on the map. As you use this path, a Cute Baby will fall down, blocking your progress. Use the loop nearby to slip past it and follow the path behind its initial location, passing through the door to escape. Make sure that you activate the shortcut that leads back to the entrance to this floor, which will let you bypass the Old Doll on subsequent visits. Follow this long hallway to find two doors, one going north and one going south. The northern one leads to a big room with a lot of Lovely Dolls, which act like a maze of sorts. In the middle of the room is a clue ( +c-b+a+a+c-a ) for the puzzle on this floor (it’s the middle piece).
Return back to the previous hallway and take the south door to a small room with a Power Spot. Below that is the puzzle room for the floor, but even if you know the solution, you won’t be able to solve it, as the door connecting to the room immediately to the west is locked electronically. Now, these are two in a series of four 3x3 rooms here, with the locked door being in the northeast room and two doors leading out of the southern two rooms (both to the same area). You aren’t able to do anything by going through the door in the southeast room, so use the one in the southwest room instead.

The three clues shown (in order) will provide you the necessary solution for the puzzle on this floor.
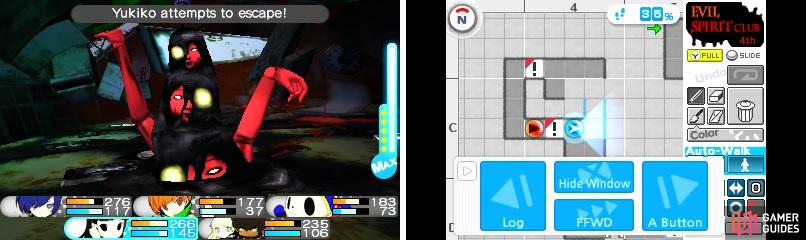
In this area, which is populated with Lovely Doll FOEs, go straight south and use the door in the southwest corner. This is another dark area, but there’s a light switch right there, so use it and go south, through the next door. As you go along this corridor, a Cute Baby will drop down and begin chasing you (like they always do). Your goal in this small area is to flip the light switch on the south side of the loop, but know there’s a chest in the northeast corner as well ( Breeze Tutu ). Hit the switch, lure the baby FOE to the right side, then tail it out of there via the left path. The light switch you just hit also lit up the big room with all of the Lovely Dolls, so you can explore the area now.
Head back there and open both shortcuts you find (both open from the south), then go to the southeast corner to find another switch. Hit it, use the shortcut to go north and through the door. Now you can go around to the other side, where you can use the western shortcut to access the area and pick up the Darkness Key, then go back through and unlock the locked door. Note that there’s FOEs here, but the light you hit to the south also lights up this room. The only thing you need to do here is open the shortcut along the west end, then go back and shut the light off, making it dark in this area.
Once you do that, you can head down the corridor to the southwest corner, pick up the Darkness Key and via the shortcut, open the locked door to the north. Along the way to some stairs, you will find the third (and final) clue for the puzzle you just passed by, which reads ( -b-b+b-d+a+c ). Take the stairs, which will put you back in the inaccessible area on the third floor. Go straight north and through the door there to find a chest with a Medical Kit in it, then open the southeast door to get a Syringe from the dead end (one of the four items for Zen’s second most powerful weapon).
Right outside of the northwest room, your support will mention they can’t search the room and that it’s harder to communicate with you. Step into the room and you will fall into the floor below, landing in front of a locked door with most of your friends behind it. To open the door, you’ll need three keycards, but they are in the area to the east. The only problem is that to open the door to the east, both you and Zen have to stand on the switches to keep the door open, meaning Rei has to go into the dark room by herself. This is sort of like a mini-game, where you will need to guide Rei by telling her which direction to go in, where she can only go straight and stops when she hits a wall or is about to run into a FOE.
Rei will pick up any objects as she moves, so she doesn’t need to stop exactly on the spot in order to pick it up. Follow the directions below to get the keycards and the items:
- Go left, left, and left once more to get the blue keycard
- Go right, right, right, right and left to get the yellow keycard
- Go left to get the Free Ornament accessory
- Go left, left, right, left, and left to grab the Homunculus
- Go left, right, and left to get the Silver Arrow
- From here, go left two times, right four times, left, right four times, and left to grab the red keycard
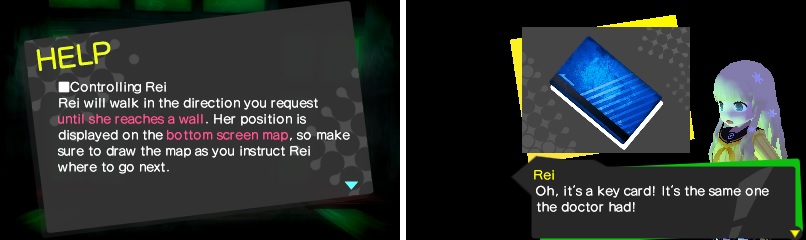
You will need to guide Rei through the darkness, in order to pick up the keycards (right) needed to unlock your trapped friends.
It’s not the most optimal path, but you should have gotten everything there is to get in this section. Note that if you just want to get the keycards, after grabbing the yellow one above, you can go right four times and left once to get to the red keycard. Use the cards to open the door and free everyone, then go into the room and to the northwest corner to find a hint for the fourth floor puzzle. Go into the large room and to the northeast corner to find a shortcut that leads back to the main section of the floor. Now you can go straight south to the puzzle rooms, with the one door finally becoming unlocked (you needed to do the stuff with Rei first).
To open the door and solve the puzzle, start in the northeast room and then follow the order given: NW, SW, SE, NE, SE, SW, SE, NE .
The door will now be open and you can go through it, with a short scene appearing as soon as you do. Answer Aigis with “A secret message” to get the Convey a Secret Message request to appear in the Nurse’s Office. Follow the path to the south, taking the eastern diversion to find a chest with the Gumball weapon for Zen, then continue to find the stairs to the final floor, where you’ll encounter the next guardian.
BOSS: Kind Doctor
Yep, it’s time to face the boss of the Evil Spirit Club and as you’ll notice, he has two helpers with him, the Caring Nurse and Calm Nurse. Calm Nurse, which is weak to ice, specializes in ailments and binds (Evil Smile, Muscle Down and Binding Cry), and also knows Diarama, which means you want to get rid of that one first to avoid it healing the boss. Caring Nurse, which is weak to fire, knows buffs and debuffs (Tarukaja, Rakukaja and Marakunda) and can be a problem only due to it using Marakunda, with can be devastating with the Kind Doctor’s attacks.
As far as the Kind Doctor goes, it is weak to wind and mostly uses physical attacks, which as mentioned before can be a problem if your party’s defense is lowered. In addition, the boss can use Power Charge, which is almost always followed by Drastic Measure, a Bash attack that can hit five times on random targets. That means if you see the boss use Power Charge, defend on the next round to minimize damage. It can also use Drastic Measure by itself, which can deal quite a bit of damage, so make sure you have some type of healing (whether Mediarama or Fuuka’s healing; Rei’s healing will work in a pinch but it only hits one row).
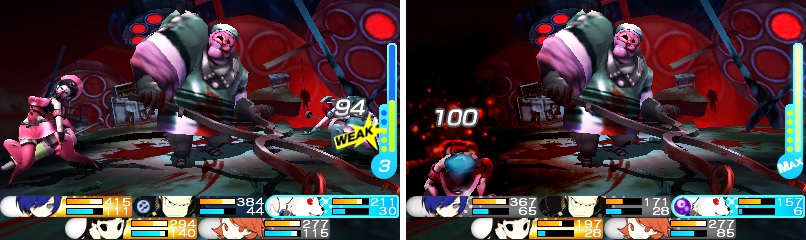
The best course of action is to defeat the two helpers before going after the Kind Doctor.
It’s been already mentioned, but you want to kill the Calm Nurse first to avoid it using Diarama on Kind Doctor (and the ailments/binds), which shouldn’t be too hard if you can inflict poison on it (all three can be poisoned) and it only has around 1600 HP. After that, concentrate on the Caring Nurse to avoid it using buffs on the boss, as well as the debuff on your party. With them both gone and as long as you keep your health fairly full, you shouldn’t have any problem with the Kind Doctor.
No Comments