
Defeat the Festival Dudes
- Available: Defeat the boss of Inaba Pride Exhibit
- Rewards: Purple Headband, 8000 EXP
The Festival Dudes, if you don’t remember, are the four enemies carrying around a portable shrine and can be found on the second and fourth floors of Inaba Pride Exhibit. Before heading out, there is a trick to this battle that will make it so the FOE doesn’t use its one annoying skill, Diarahan. That is to construct a party of only four male characters, with Ken, Koromaru and Zen not counting, so you have a choice between P4 Protagonist, P3 Protagonist, Kanji, Akihiko, Shinjiro, Junpei and Yosuke. That’s the only thing that happens if you do this, as it’s entirely possible to beat the FOE without utilizing this trick.
The FOE only has a few moves in its repertoire, but the most damaging one is Crazed Slash, which hits random members between 5-7 times for good damage (150-200 or so). Other than that, it has Maragidyne, Gigantic Fist (splash damage to either side) and Megaton Slam (physical with medium chance of knockdown). If you’re doing this battle the regular way, you want to get Magic Bind on it as soon as possible, so it doesn’t heal itself completely (ignore Magic Bind if you’re using the trick Elizabeth talked about). Strength Bind will also help, since all but one of its moves are physical based.
As far as weaknesses go, it is weak to ice and wind, but also resists bash, fire and all ailments/binds. With two weaknesses, it should be easy to get Boost on a good portion of your party members. For ailments, you might want to inflict poison on it, since 9800 HP is quite a lot and 710 HP loss every round while it’s poisoned is quite good. You could also inflict panic on the FOE, as this will eliminate all of its attacks and also get rid of Diarahan, if you’ve chosen the normal route. Once you’ve taken the FOE out and gotten the required item, return to Elizabeth to finish the request.
Bring Me Something Memorable
- Available: Check dead end at grid C4 in Clock Tower 1F
- Rewards: Rudra Ring (accessory), 7000 EXP
Elizabeth wants a platinum gear to go along with the rest of her collection and says to talk to Theo to learn more. He tells you that you can get the material from a Rampage Drive, which can be found on the first two floors (as well as the fifth and eighth, if you’re that far) of the Clock Tower Labyrinth. In order to get the item to drop, you will need to defeat it with either a light or dark attack (according to Theo), but only light ones will make the Shadow drop the H Drive Gear material. Once you’ve gotten the item, return it to Elizabeth to finish the request.
The Battle of Wits
-
Available: Inspect the locked chest in grid C3 of Clock Tower 1F
-
Rewards: Discount Ticket
There are three chests on the first three floors of Clock Tower, with one of them containing a nice prize and the other two containing a punishment. She gives you three hints, which are as follows: -
“Glasses” are A, “Lenses” are B.
-
“Spoons” are A, “Knives” are B.
-
“Carrots” are A, “Potatoes” are B.
The three clues you get from the treasure chests are Copper (1st floor), Mercury (2nd floor) and Lead (3rd floor), with you only able to open one of them. If you look at the clues, you’ll notice that the first word in each clue has a double letter (glasses has two S’s), while the second word does not have any. Looking at the clues from the chests, only one of them has a double letter, which is the first floor chest (Copper), so that chest is the correct one to open (contains a Balm of Life). Return to Elizabeth to finish the request.
Investigate Inaba Pride Exhibit
- Available: Enter Clock Tower 5F for the first time
- Rewards: Almighty Badge (accessory), 7500 EXP
This is the final spatial void that Elizabeth has detected, which is at the bottom of Inaba Pride Exhibit. As with the other ones, there is a powerful Shadow guarding it, which is the Guardian Machine. This is a pretty easy fight, with one exception, making it a great place to grind for experience. First of all, the Guardian Machine is weak to ice and doesn’t resist any other elements or physical attacks, so you’re free to use whatever you want. That said, it does resist all of the ailments (nulls sleep) and binds, so having Impure Reach or Binding Hands will help to make any you want stick.
The boss can attack up to twice per turn and mainly uses physical attacks at the beginning of the battle. These attacks, Charge Shot and Spin Slash, can hurt a bit (especially the latter as it hits everyone), so weakening its strength is a bonus. It isn’t until you see the message that “its eyes start shining” is when things can get hectic. When it does this, it will start using Mind Charge in tandem with Megidolaon, which can put quite a hurting on your party.
Landing Panic or Magic Bind on the boss makes it pretty harmless, especially if you can extend the duration of them with Stagnant Air. It’ll allow your attacks to hit the boss as well, if you inflict the former, and even make it hit itself with regular attacks, helping to deplete its health. To help even more, you probably have access to your upgraded Personas, so using Debilitate with something like Sukunda will likely most of its attacks miss your members.

Looking closely at the text provided by Elizabeth, you should notice the pattern used in The Battle of Wits request, which is required to open the correct chest.
Open That Treasure Box!
- Available: Check the locked chest at the dead end at grid B4 in Clock Tower 6F
- Rewards: Germanium Ring (accessory), 9500 EXP
There’s a treasure chest on the sixth floor of the Clock Tower labyrinth and Elizabeth made Theo make a key. The problem is that he made the key out of ice, but you get as many chances as you need to get the key to the chest. The keys are at the entrance of the first floor of the Clock Tower, but before doing that, go the sixth floor first. Once you’re there, you want to take the sole gondola and ride it east, then go around and move it south.
Return to the first floor (don’t exit the labyrinth or the gondola will reset) and grab a key, then take the elevator to the fifth floor. From here, take the shortcut and head straight to the stairs leading to the sixth floor. When you’re on the 6th floor, go through the shortcut on the north side of the first room, then ride the gondola north. Now you can reach the locked chest without having the key melt. Grab the item inside and return to Elizabeth to finish the request.
Obtain a Prosperity Shard
- Available: Check dead end at grid D6 in Clock Tower 8F
- Rewards: Chakra Ring (accessory), 7200 EXP
Despite the name of the request, you do not need a special drop from the Luxury Hand, the rare golden hand Shadow that can be found anywhere within the Clock Tower. All you need is the Luxury Piece it drops, so if you happen to get one to drop while going through the labyrinth, save it for this request. If not, then you’ll have to hunt down the Shadow first, which can appear on any of the nine floors in the dungeon.
Once you find it, you have to make sure it doesn’t run away, which is highly likely as the battle goes on. There’s two ways to do this, as you can inflict Panic on it or Agility Bind. The only problem with the latter is that the Shadow can dispel the bind with Mutudi. Of course, doing either of the two also prevents the Shadow from dodging all of your attacks. The Luxury Hand (as with all other rare Shadows) only has 5 HP, with all damage outside of criticals dealing one damage each, so it shouldn’t take long to defeat it. Once you have the Luxury Piece, bring it back to Elizabeth to finish the request.
Zen’s Inner Conflict
- Available: Look south on the tile just south of the piston in the northwest corner of Clock Tower 8F
- Rewards: Sacrificial Idol (accessory), 12000 EXP
It seems like something is bother Zen, so check out the new Stroll that appears and you find out that he saw a butterfly stuck in the spider’s web in the northwest room of the eighth floor of the Clock Tower. If you attempted to go straight there and free the butterfly, you’d have to fight the Capturer FOE first. Should you happen to want to do that, be prepared that it knows Stone Mist, Mahamaon and Mamudoon. It is weak to electricity and only nulls Poison, so you can use any other ailment or bind on it.
However, if you want to free the butterfly without fighting the FOE, you’ll have to go up to the ninth floor and move the piston in the northwest corner down to the 8th floor. Just make sure to be careful the Reaper in the room nearby when getting to the piston and remember that leaving the labyrinth will reset the piston.
The Power of the Wild Card
- Available: Reach level 55 with both Persona 4 Protagonist and Persona 3 Protagonist, then enter the Nurse’s Office
- Rewards: Adamas Steel, 12000 EXP
Margaret wants to fight you, but only those with the power of the wild card, meaning it’ll be just the two protagonists. The battleground will be the room near the end of Ch. 3 of You in Wonderland, south of the room with the three Painting Soldiers. Unlike other optional bosses, Margaret isn’t as challenging, due to only having two party members. That said, it will still be a difficult battle due to the same fact.
One of the first things you want in this battle is the ability to inflict Magic Bind, so if you have Binding Hands as well on the Persona, it will be a lot easier to make it stick. For the first part of the battle, Margaret will likely stick to physical attacks, both a normal one and Vorpal Blade. She only gets one attack per round, but if you have an ability that can lower her strength, do that (Tarunda). Poison, coupled with Impure Reach, will also help whittle down her around 4,000 HP (it will hit around 650 HP each round, so it will help in making short work of her).
Once she gets down to around 25% HP is when you definitely want to have Magic Bind on her, as she will start spitting out mid-level party elemental skills, such as Magarula and Mazionga, with each protagonist having a weakness against one of them. Of course, you can always fuse a Persona that has the Resist element on them, although it might be easier to just get Magic Bind on Margaret. Considering she has no weaknesses, resistances (ailments and binds excluded) and doesn’t null anything (besides the obvious light, dark and Down status), just hit her with your strongest attacks.
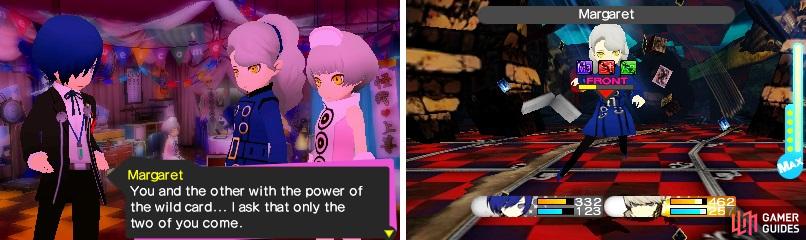
The Power of the Wild Card isn’t a difficult request, but it’s a fairly important one to do, as your Personas will be upgraded after finishing it, earning you some very powerful skills.
Defeat the Reaper
- Available: Complete the game and load a Cleared Save
- Rewards: Omnipotent Orb, 20000 EXP
The Reaper is a FOE that can be found as soon as Clock Tower 2F and can be quite the troublesome opponent. First, the Reaper is quick and can perform two actions per turn, which it will use to perform a bunch of skills. Amongst them are Mamudoon, Megidolaon, Silent Song (Magic Bind), Spiderweb (Agility Bind) and the Ma-dyne spells. It also has Mind Charge, as well as Power Charge, which it will couple with Myriad Arrows or Deathbound.
Since the FOE doesn’t have any weaknesses or resists (besides the obvious ailments/binds), you are free to choose how you want to attack the Reaper. Depending on which one you go after, you want to start the battle with an advantage, so you want to approach the FOE from the sides. This allows you to set up before the FOE even gets a chance to attack, as you will want to get Magic Bind or Panic on the Reaper ASAP (they are the two best to inflict), essentially stopping the Reaper from doing anything. Once you get one of the two on it, use Stagnant Air to extend their duration.
Once the Reaper gets to about 50% health, it will begin to try and inflict binds and ailments on you to prevent you from dodging, as it will being to try and pair its physical skills with Power Charge. That could spell trouble, especially for Myriad Arrows, as it hits random targets and could potentially down one or two of your weaker members. When it gets down to 25% HP, it will begin spamming moves like Mamudoon and other attacks that hit all your party members. Mamudoon is potentially the most dangerous skill it has, especially if you’re playing on Risky difficulty on the Persona 3 side, as the protagonist is weak to it.
Time for the Finale
- Available: Load a cleared save and do all requests with “Extra” after them; Also need access to Clock Tower 8F
- Rewards: Blessed Loincloth, 13000 EXP
This is the final solo battle against Elizabeth and takes place in the 3x3 room at the southern end of Clock Tower 8F. This boss fight is a little bit different than the others, which you will notice when you get there. Of course, the battle is made a little easier, as Elizabeth still follows a set order for her attacks. Note that she gains a resistance to electricity during the entire battle, but everything else is fair game (resistances to ailments/binds, as seems to be the usual with these boss battles). Elizabeth is quite quick and might go before your characters, so make sure you prepare for this by keep your party’s health high.
For the first part of this battle, Elizabeth’s order of attacks will be Rampage, Ziodyne, Maziodyne and Power Charge, before starting over from Rampage. And that’s where the problem lies, as Power Charge coupled with Rampage can definitely hurt. The good thing is that if you manage to get Magic Bind on her, then the only move you need to worry about would be Rampage, which is certainly a lot easier to handle when it isn’t beefed up with Power Charge. Just be careful about using Panic on her, as there’s a trigger that needs to go off for the second part of the battle.
Once Elizabeth gets to 25% HP, Elizabeth will use Diarahan to completely heal herself and start the second portion of the battle. She needs to do this in order for you to win, so inflicting her with Panic will prevent this for some reason (Magic Bind doesn’t). That means if you’re fighting her and she’s not getting defeated, let Panic run its course and wear off. The second “form” of this battle is made a little easier, since she has a set order in which her attacks will be played out, so you know what’s coming and when. Note that Elizabeth gets two actions per turn and she’s still just as quick as before.
The second set of attacks that Elizabeth will perform are as follows: Tarukaja, Power Charge, Rampage, Charge Shot, Silent Song, Muscle Down, Maziodyne and Megidolaon. As you can tell, there’s a lot more attacks to deal with, including the same Power Charge/Rampage combination, as well as the annoying Silent Song (Magic Bind) and Muscle Down (Strength Bind), and even Megidolaon. You’re free to use Panic this time, as well as Magic Bind again, which will get rid of all but two attacks.
When she reaches 50% HP on the second “form,” some new moves get added to her repertoire, including Elec Corrosion after Silent Song, Mind Charge after Muscle Down and Megidolaon being dropped for Keraunos. That move is equivalent to getting hit with something like Thunder Reign six times (it hits randomly) and that is definitely something you don’t want hitting you, especially with Elec Corrosion. That’s also why it’s important not to bring anyone with an electricity weakness into the battle, since they would be taking heavy damage.

Finishing the request that has you defeating The Reaper will get you one of the most powerful accessories in the game, the Omnipotent Orb! Just make sure to not use it on the ultimate secret battle!
A Family Affair
- Available: Have a save file where both P3 and P4 sides have been cleared
- Rewards: Adamas Bookmark, 25000 EXP
This is the final request in the game and it will have you facing off against Elizabeth, Margaret and Theo all at once. First and foremost, if you have the Omnipotent Orb equipped on any party members, take it off before starting the battle, as this will cause the trio to spam Megidolaon and cause 9999 damage to the entire party. None of the trio have any resistances for damage, and none null any ailments or binds, so you’re free to use whatever you want in regards to that. In fact, having a few party members who can inflict something like Panic or Magic Bind to the entire trio at once is recommended. Combine them with Stagnant Air to extend the duration and you have a winning formula.
Now, to get onto the actual fight, each of the three tend to learn towards a specialization of sorts. Elizabeth does single target elemental damage, as well as binds (she can use all three) and making it so you take more damage (Matarukaja and Marakunda). Theo mixes in physical skills with a support role, as he can remove binds and ailments from his sisters with Mutudi and Patra (only one at a time). He also has Matarunda and Marakukaja, making it so you deal less damage. Margaret can perform two actions per turn, usually using a Ma-dyne skill on the first and a regular attack on the second during the beginning of the battle. She also has other skills, like Crazed Slash and Megidolaon that she will use as the battle goes on.
In terms of the most dangerous, Margaret is probably it, although Theo can be annoying with Mutudi and Patra. However, if you keep inflicting ailments and binds, then you are going to keep Theo busy with removing them. It’s imperative that you cover any elemental weaknesses, especially with Margaret using Ma-dyne spells. The battle essentially comes down to managing buffs and debuffs, while trying to inflict as much damage as possible to all three at the same time. That’s why multi-hit skills like Myriad Arrows or Hassou Tobi are very good contenders to bring, although the latter is exclusive to Yoshitsune.
As already mentioned, having one or two people on ailment/bind duty is a good thing, while the other three members concentrate on dealing damage. Sometimes, if you don’t impede any of their actions for a few turns, Margaret will initiate an All-Out Attack on your party, which deals big Almighty damage to your entire group. This can be devastating, especially if you are in the groove of things. Also, if you’re unlucky, Crazed Slash might hit one of your members multiple times, likely killing them. That means it’s important to keep your health up, so don’t neglect to refresh Fuuka’s navi healing skills.
No Comments