
| Enemy Name | Weak | Resist | Null |
|---|---|---|---|
| Apostate Tower | Light, Dark | -- | -- |
| Fierce Cyclops | Light, Dark | -- | -- |
| Happy Gene | Dark | -- | Light |
| Indignant Machine | Elec | Light, Dark | -- |
| Iron Dice | Elec, Light | Cut, Stab, Fire, Wind | Dark |
| Mach Wheel | Ice, Dark | Bash, Wind | -- |
| Rain Leg Musha | Ice | Cut, Wind | -- |
| Valuing Nyogo | Elec | Fire, Ice | Light |
The first thing you should do is light the bonfire right in front of you, which you can do with the flame near the stairs on the second floor. There’s really nothing through the north door, as one of the extra rooms there is empty and the first area has an event where lower-leveled party members complain about not being used; you don’t get anything if they’re all the same level, though. Go through the sealed door and the 100% map chest will be right in front of you ( Radiant Halo accessory). There’s two paths here, with the north leading to a small area with a Power Spot.
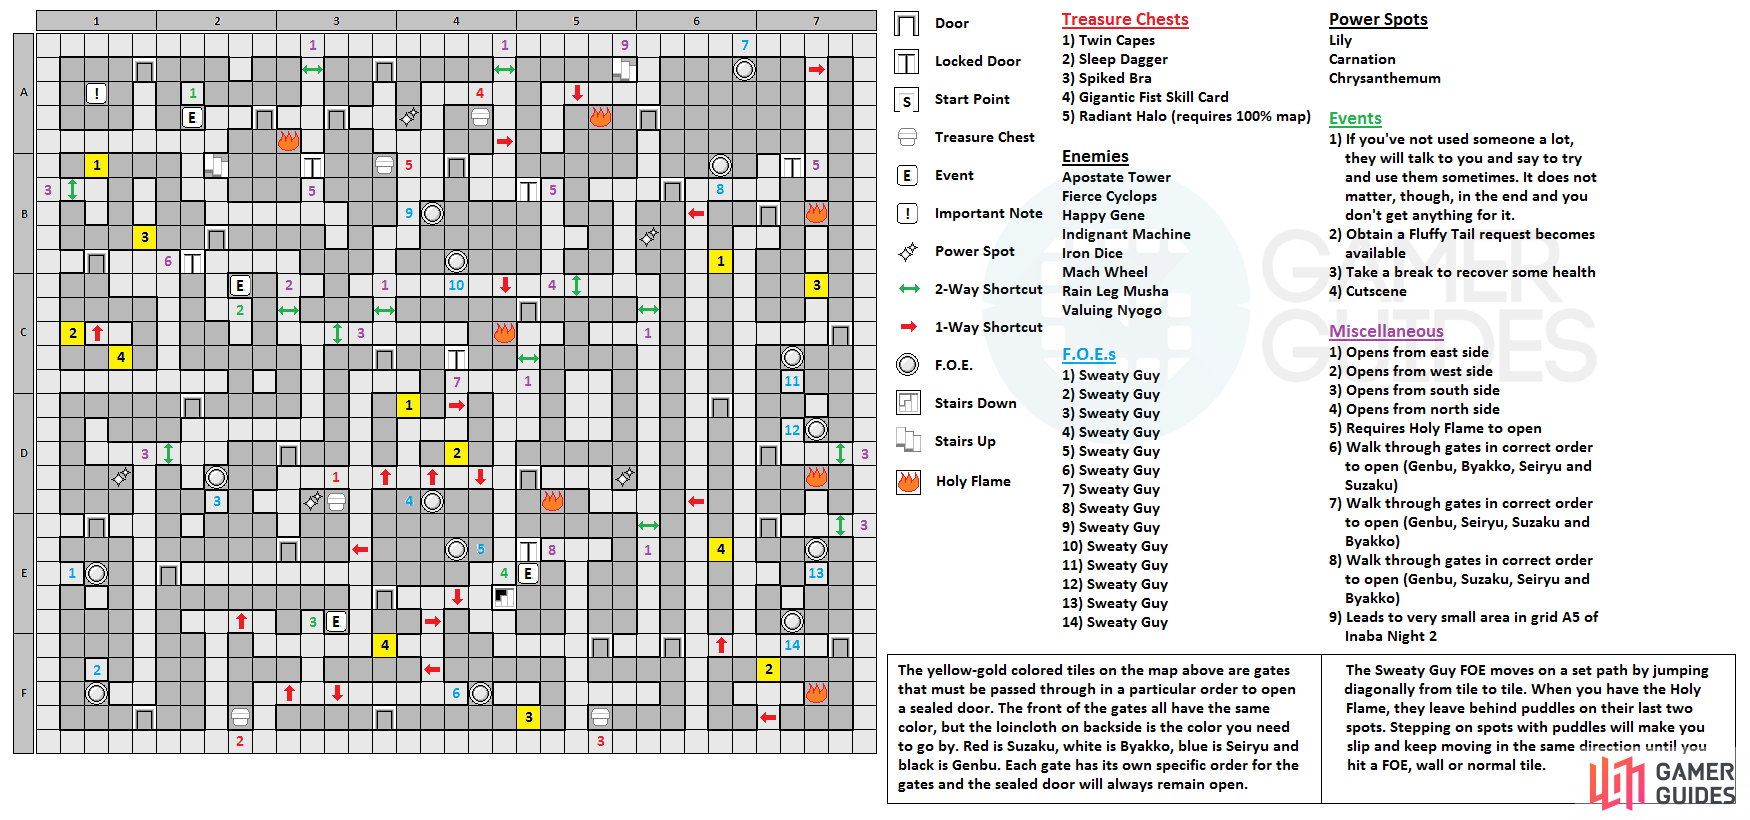
Go south and then east to come to another door, which will present the first puzzle of the floor to you. The sealed door next to you is different and is connected to four statues that you must pass under in a specific order. Checking out the door will tell you what order to walk under the statues, with the first one being Genbu, Byakko, Seiryu and Suzaku. Their corresponding colors are black, white, blue and red (respectively), but note that you can only really see the color via the loincloth from the rear of the statue, as the front is all the same color. Also, you will have to pass under the statues in a certain way, as you can’t pass through again or you’ll have to start over.
The door with the golden seal on it (left) will only unlock if you pass underneath four statues (right) in the correct order.
So, the first statue in front of you is Seiryu, so that will be the third one. Head north and west to find Genbu, which is the first statue, but going under it from the east side will place you in the corner with no way out. Instead, go south of it to find a shortcut on the other side of the wall, allowing you to go through the Genbu statue. Now, head through the southern door and you’ll see the next statue, which is Byakko. Pass under it from the north, then use the one-way shortcut to get back north without passing under the other statue (which is Suzaku and the fourth one).
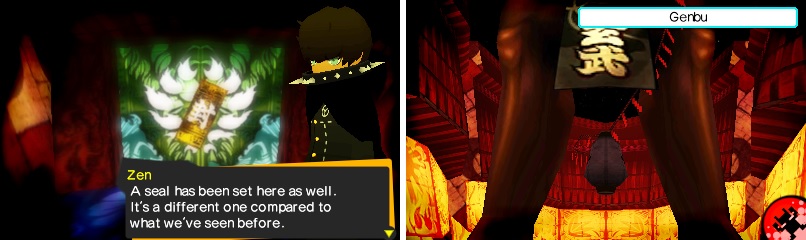
Return to the third statue in the northern section, pass under it, then go back south and under the fourth statue. Make sure on your return to the sealed door that you don’t pass under other statues. Once you’re through the sealed door (this one remains open, unlike the Holy Flame ones), go south and around the eastern side, where you’ll get the Obtain a Fluffy Tail request from the dead end right by the shortcut that goes back towards the beginning area. Go through the door in the southwest and you’ll eventually come to a room with a new type of FOE, the Sweaty Guy (there’s a Power Spot in the room just prior). This FOE moves around in diagonals, although it moves along a fixed pattern.
There’s two Sweaty Guys in the room and it’s not too hard to pass them up, with the door to the next area in the southeast. In here, go north to the door, but don’t pass through it yet, as there’s an event at the end of the path to the east (choose to take a break to recover some health). Head back and through the door to find another Sweaty Guy FOE, with a shortcut back to a previous area straight north. There’s a door in the southeast in this room that leads to a Power Spot, as well as a chest with a Twin Capes inside of it. Back in the room with the FOE, go to the northeast corner to find the door to continue.
After opening the shortcut back to the beginning area, you’ll find another sealed pilgrimage door in the next room, meaning it’s time for more statues. These ones aren’t as close to each other like the previous set, so it will take some more time. The order for this door is Genbu, Seiryu, Suzaku, Byakko, meaning it will be black, blue, red and white. Note that this entire area for these statues is filled with one-way shortcuts, meaning you have to be mindful of when you go through them. The first statue (which is Genbu) is right south of you, but you can’t go through it from this side, so take the one-way shortcut just east of it.
The second statue (which is Seiryu) is in this area, so keep that in mind and go through the shortcut that goes south to end up in a room with two Sweaty Guy FOEs. Head to the northwest corner of the room and take the shortcut leading north to end up on the southern side of the first statue. Go under it, then head back into the FOE room, taking the shortcut along the north wall in the middle of the room so you can pass under the second statue. Back in the FOE room, there’s a door in the southwest corner, but that leads to the fourth statue, so ignore it and take the shortcut in the southeast.

The Sweaty Guy FOE moves along a predetermined path in a diagonal fashion.
You’ll be in a room with a single FOE, as well as the third statue on the southern end. Since there’s no way to cut down the middle without confronting the FOE, you’ll have to go east and around to pass under the third statue. Exit the room to the west, then take the shortcut leading north at the end, which will put you in a room with a chest ( Sleep Dagger ) and another shortcut to the north. Now, head all the way back to the room with the two FOEs and take that door, putting you just north of the fourth statue. Pass under it, then take the shortcut leading south in the southwest, going all the way back to the sealed door, which is now open.
There’s a bonfire here, but it isn’t lit, so don’t worry about it for now and open the shortcut to the west to provide a path back to the beginning. Go through the door right next to the unlit bonfire, then head south to find a Power Spot in the southeast corner, as well as another door in the southwest corner. This will bring you to third (and final) sealed pilgrimage door on this floor, with the order being Genbu, Suzaku, Seiryu and Byakko (black, red, blue and white). Go east and then south through the door to a new area, with a chest at the dead end to the south ( Spiked Bra ). Take the other door to this area to find a very long corridor that leads north, with a few shortcuts going west along the way and a Power Spot before the next door.
There will be two Sweaty Guy FOEs here in this big room, as well as sealed flame door in the southeast, a normal door along the western portion and a one-way shortcut in the northeast corner. For now, go through the normal door to find an unlit bonfire and open the shortcut at the end of the southern path here. There’s also a sealed flame door here in the southwest corner, but ignore it and take the stairs you find along the northern path, which will bring you back to the second floor. Head through the shortcut, light your torch and back to the third floor.
As soon as you’re back on the third floor, go west one step, then south through the one-way shortcut, where you can light the bonfire here. With your torch lit, head through the sealed door to the southwest and you’ll be in a room with two FOEs. You will notice that the Sweaty Guy FOEs are behaving strangely, as they leave behind a puddle when you’re carrying the Holy Flame. If you step on one of these puddles, then you will continue moving forward. Using this knowledge, get to the door in the northwest, which will lead to a room with a treasure chest ( Gigantic Fist Skill Card ).
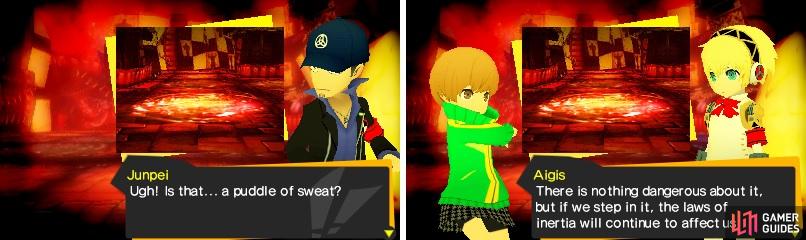
When you are carrying the Holy Flame, the Sweaty Guy FOE will leave behind a puddle. If you step on it, you will continue moving in that same direction.
Use the one-way shortcut in the same room to return to the bonfire and get on the east side of it. Light your torch and go east into the room with the FOEs you passed by earlier. Once again, use the puddles to get to the southeast corner and go through the sealed door, bringing you to the main area for the four statues. You’re going to need the flame still lit, though, as there’s a bonfire right inside the room that you need to light. Once you do, go through the west door next to you and south through the first statue. Keep going south until you come to a one-way shortcut before the next statue you see (which is #4).
Return to the room with the two Sweaty Guys and instead of using the sealed door, go to the northeast corner and take the shortcut there. Light your torch as you go south and ignore the statue, as it is the third one, entering the next room. There will be two more FOEs here and your goal is the southwest corner, where there’s a door to another room with a bonfire you can’t light yet. Beyond that is yet another room with two more FOEs, with the goal here being the northeast corner, where you’ll find a two-way shortcut leading north. Take this one and the next two-way shortcut, then head back to the area with the third statue, as you’ll be relighting your torch.
It may take a few tries to get the next part right, as the FOEs to the south might play against you. With the torch lit, you want to go straight south and through the first two-way shortcut, where you can light the torch there. From there, with a relit torch, continue south and to a room in the southeast corner, where you can light one last bonfire. The second statue is also here, but you have to pass under it from the west side, so go to the southern end of the small room and pass through the one-way shortcut there. Now you can pass through the second statue and then go all the way north past those two rooms with FOEs again.
Once you reach the third statue, pass through it and use the torch to enter the big room with FOEs to the north. Take the shortcut in the northeast corner and yet again, trek all the way south to the room with the second statue (no need for the Holy Flame this time). Go through the shortcut to the west side of the room, then take the other shortcut you see to end up just south of the fourth statue. Pass under it, then use the one-way and two-way shortcuts nearby to end up back near the sealed door. Watch the following cutscene, then take the stairs to the fourth floor.
No Comments