
| Enemy Name | Weak | Resist | Null |
|---|---|---|---|
| Battle Wheel | Ice, Dark | Bash | -- |
| Beastly Gigas | Wind | Cut, Stab | -- |
| Happy Gene | Dark | -- | Light |
| Inviting Nyogo | Fire | Elec, Wind | -- |
| Shallow Okina | Elec | Fire, Ice | -- |
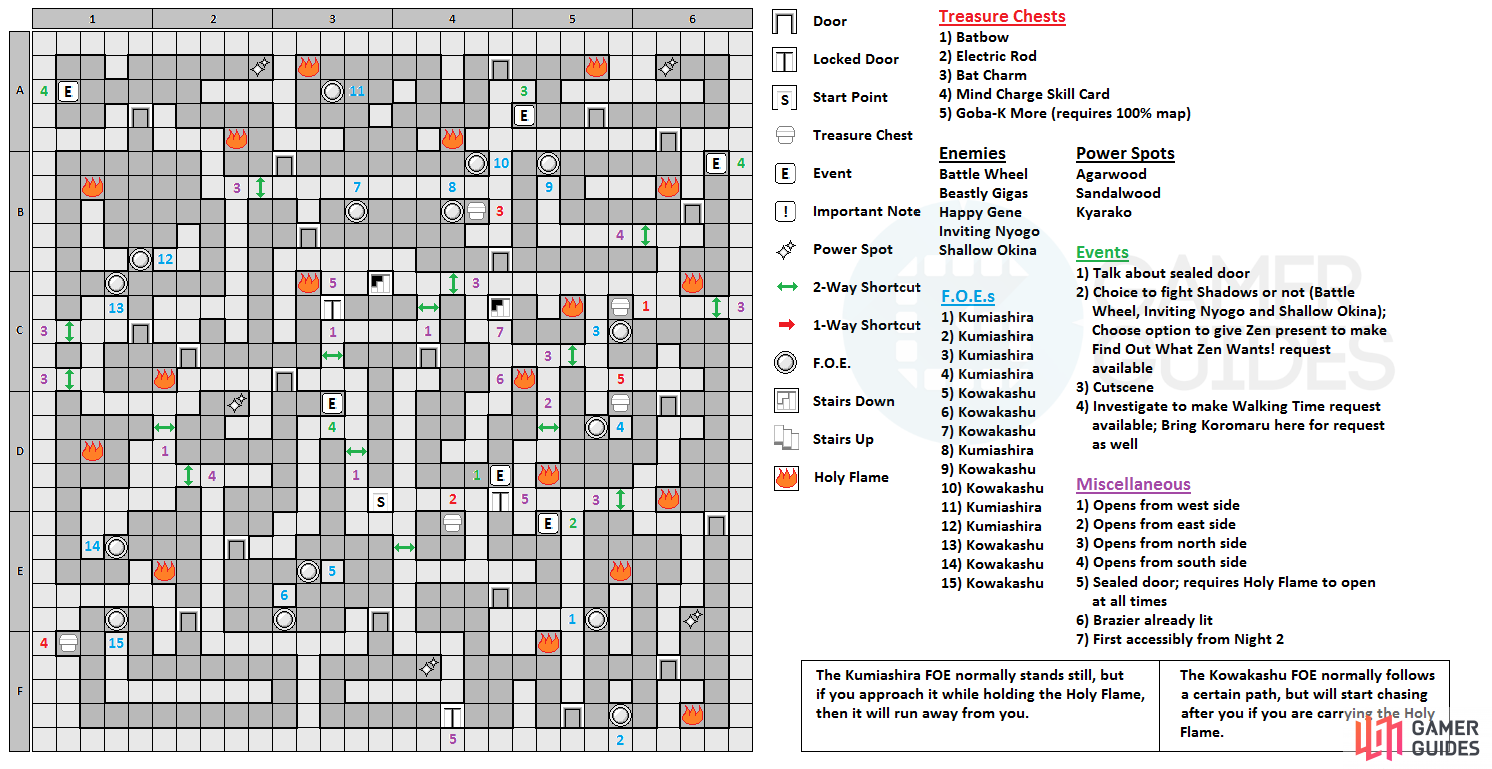
Welcome to the first floor of the Inaba Pride Exhibit, which you will find out is modeled after a traditional Japanese festival. First and foremost, the shortcuts in this labyrinth are designated as a pinwheel spinning on the wall. There’s only one path to follow for now, since any shortcuts need to be opened from the other side, so keep going until you come to an event with a door that has a seal on it. These doors remain locked unless you have something special on you, which you will find out shortly. Go to the dead end just north of you to find a bonfire with a flame, which is the Holy Flame , an important mechanic for this labyrinth.
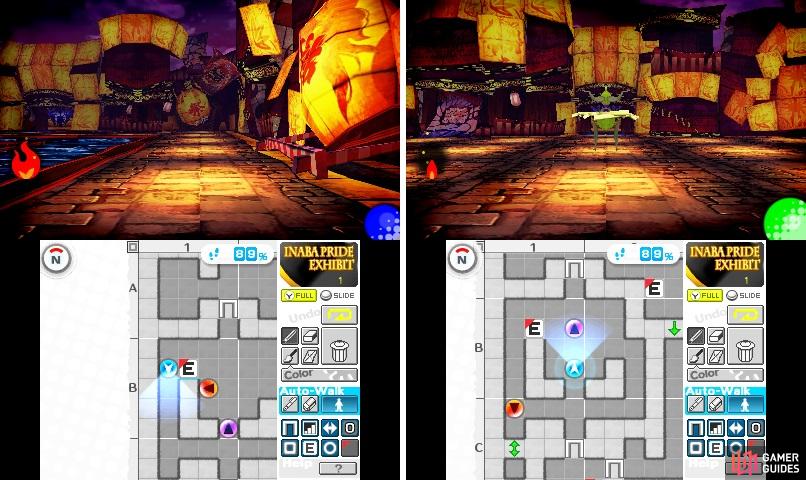
After everything is in order, you can now carry the Holy Flame with your homemade torch and you can open the door with a seal on it while holding the torch with the flame. This flame is shown in the bottom left corner of your screen and you will notice it getting smaller and smaller as you take more steps, until it eventually disappears (10 steps). Just around the corner from the sealed door will be an event where you can choose to fight Shadows or not. Choose to fight them, then choose the dialog choice of “That’s not true” and “Why don’t you give him a present?” after the battle to make the Find Out What Zen Wants request available in the Nurse’s Office.
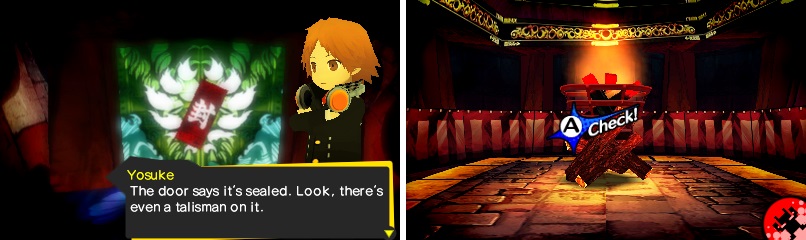
The sealed doors will require you to have the Holy Flame with you in order to pass through them.
For now, continue through the dungeon until you happen upon another sealed door and the nearby bonfire isn’t lit, so you won’t be able to open it at the moment. This brings to light the gimmick of the labyrinth, as the first bonfire you encounter is the only one lit, meaning you’ll have to carry the torch to each unlit one to set it ablaze. Unfortunately, you can’t reach this unlit bonfire with the torch before it goes out, so go through the door just south of it to encounter one of the FOEs of the dungeon, the Kumiashira . As you will find out, this FOE stands still, so you’ll be fine as long as you don’t run into it. Towards the north of the room will be another unlit bonfire, so ignore it and go through the door on the east side.
There’s a Power Spot just north of you, as well as another unlit bonfire on the south end of the room, and there’s another bonfire in the room north of that one. Also in that same room is a chest ( Bat Bow ) on the north end, but it’s guarded by a Kumiashira, so you won’t be able to get it right now unless you fight and defeat the FOE. Go through door that leads west in the middle portion of the room, where you’ll see 100% Map Chest right in front of you. There’s bonfire in the southwest corner, a Kumiashira FOE and three shortcuts all in the same room. The one on the north end can’t be opened from this side, but you will need to open the shortcuts on the western and southern sides.
When you have opened the two shortcuts mentioned above, go through the west one and light the torch with the Holy Flame, then return through the same shortcut and light the bonfire in the bottom left corner of the room. With the torch at full flame again, go through the southern shortcut and light the bonfire there in the vertical room with two FOEs. As you probably found out, carrying the torch with the Holy Flame will make the Kumiashira FOE run away from you when you get within one tile of it. Now, there will be two bonfires you need to light from the one in the room with two FOEs. To get the one to the southwest of you, stand on the east side of the flame and light your torch, then go south and through the middle path, going up to push the FOE into the top of the room.
With the FOE out of the way, you can stand on the west side of the bonfire, light the torch and make your way straight south, through the door and north to light the bonfire, which will allow you to go through the sealed door nearby. Before you do that, however, go back to the same bonfire as before (east side) and head straight south to the door and to the bottom right corner to light the bonfire there. From this one, you can head straight north, through the door at the top of that room and light the bonfire on the other side of the door. When you’ve done that, it’ll be all you can do with the Holy Flame for now, so return to the sealed door with the torch in hand and walk through it.
Before the door will be a Power Spot at the dead end and in the next room will be a new kind of FOE, the Kowakashu . This enemy moves in a set pattern, like the Card Soldier in You in Wonderland. Ignore them for now and go to the northeast corner to find a shortcut that leads to an isolated room with a treasure chest ( Electric Rod ), as well as the dead end on the north end of the room to find another that goes right back to the starting point of the floor. Make your way past the two Kowakashu and through the next door, where there’s another door at the north end, as well as a Power Spot on the path that leads west and a new request on the eastern path ( Walking Time ).
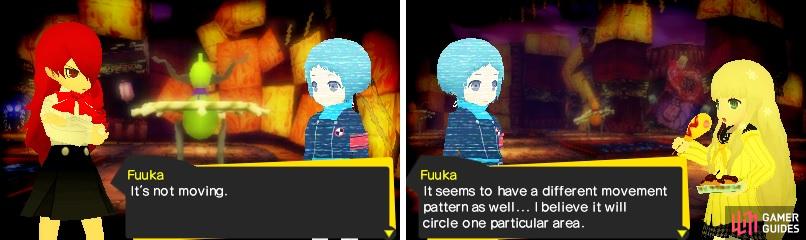
The Kumiashira (left) and Kowakashu (right) are the first two FOEs you’ll encounter in this labyrinth. The former stays still, while the latter will patrol set areas.
In the next room, you’ll see another sealed door, which will lead you to the stairs to the next floor, as well as bonfire that isn’t lit. The problem is that there’s not a single spot nearby that will allow you to bring the torch in time to light it. West is a small room with another unlit bonfire and a room to the north of that has two FOEs (one of each kind encountered so far) on the southern end, blocking your progress that way. Head back to the room with the sealed door and take the long path to the north that leads to a room with a Kowakashu moving around, as well as a Kumiashira standing in front of a chest ( Bat Charm ). Ignore them and continue into the next room, where there’s a Kowakashu FOE roaming in the north.
This FOE is blocking the path there, but if you head to the south end of the room, you’ll find a shortcut that opens from the south, letting you use the middle path just below the FOE. You can now go through the door to the east, where you’ll find a dead end to the north ( one of the three spots for Walking Time request ), as well as an unlit bonfire and shortcut to the south. Go through the shortcut and to the south end of the room, where you should have lit the bonfire earlier. From the bonfire, go east one tile and then north all the way, through the shortcut, where you will just make it to light the bonfire there.
From here, you can make it to light the bonfire in the next room and also find out the secret to the Kowakashu. This FOE will aggressively chase after you if you have the Holy Flame on you, which you will use right now to get past it. It helps to exit the room to the east to reset the FOE, then re-enter to make it acting normal again (make sure you run the torch out before entering the room again). What you want to do is as soon as entering the room, light the torch and then use the shortcut to go on the southern path. Keep moving left and right on this path to lure the FOE over and once the torch goes out, use the shortcut to go back and move to the northern path before the FOE blocks it.
Once through the door, you’ll find a Power Spot on the dead end and a cutscene at the shorter dead through the western door. There’s another unlit bonfire in the same room as the cutscene, so go back and use the previous one to light it, then use that newly lit one to go and light the one in the next room. You should see a Kowakashu on the southern end of the room pacing back and forth, along with a Kumiashira on the west side near another unlit bonfire. The Kowakashu will likely follow you around the eastern side of the gaps in the floor, so you should be able to easily light the northwest bonfire. While the moving FOE is stuck, stand on the east side of the lit bonfire and light your torch again.
From here, move one space east and go south and west to the door, then one space north to light the next bonfire. Here, there’s another Power Spot north of you, as well as a dead end room to the west ( one of three spots for the Walking Time request ). Stand on the north end of the bonfire you just lit and light your torch, then move to the door and go through it. As soon as you do, go west one space and south one to light the bonfire. There’s one of each kind of FOE in this room, with the Kumiashira blocking the middle path and the other patrolling the southern path. If you head to the southwest corner, you’ll find a shortcut that leads to another shortcut, which leads to another unlit bonfire.
Lure the Kowakashu over to the left side (left) and go down and up to push the Kumiashira (right) out of the middle. This lets you go through the door to the south with the Holy Flame.
To get the Holy Flame here, return to the previous room and use the flame to lure the Kowakashu to the north part of the room. Once you manage that, get on the western side of the bonfire and you will be able to go straight south, through both shortcuts and light the bonfire in the room below. From here, lure the Kowakashu in the room to the north part, while you loop around counterclockwise to the west side of the bonfire. Now you can follow the path to the south and to another unlit bonfire, with you barely making it to light it. Open the shortcut to the north of you, then head back to the bonfire, getting on the east side of it.
The goal now is to get the chest in the next room, which has a Mind Charge Skill Card in it, but it’s being guarded by a Kowakashu FOE. You want to lure the FOE around two to three spaces away from the door before exiting back and replenishing the Holy Flame. If done right, return to the room and follow the path east and around to the west side, with the FOE on your tail. Grab the chest and return all the way to the last room with the two FOEs, as it’s now time to get onto the next floor. You need to be careful here, as you want to move the Kumiashira out of the way, but you don’t want to make it so that it blocks the southern door.
Once again, it’s best to lure the Kuwakashu to the northern part of the room, then light the torch again and go down the west side of the room, going underneath the Kumiashira to push it upwards one or two spaces (preferably two). By this time, the torch probably went out and the other FOE is moving back to its initial path, but you’ll need to lure the FOE on the west side of the room, which will give you easier access to the middle path. When you’ve done that, stand on the east side of the bonfire, light the torch, move one space east and head straight south to the door. Light the bonfire there, then rekindle your torch and make your way to the bonfire that’s right next to the sealed door, lighting that one, too. Now you can go through the sealed door (open the shortcut right by the stairs) and down to the second floor.
No Comments