
The more you play through Lords of the Fallen, the more you realize the different amount of build you conjure up. One of these builds is what’s known as an Umbral build which utilizes both the Radiant and Rhogar variants of magic to create the unique magic school, Umbral Magic. Umbral Magic scales from both the Radiance and Inferno attributes which increases the power of any Umbral Magic spell you use. If you’re looking for a powerful Umbral Magic build, look no further!
Using Umbral magic in Lords of the Fallen is just one way to play the game.
What Starting Class to Pick for an Umbral Build?
There isn’t a standout starting class to pick unless you have finished the game once with the Umbral Ending as that will unlock the Putrid Child Class which is specifically designed for an Umbral build. Otherwise, choose Condemned for min/maxing, or choose either the Orian Preacher, or the Pyric Cultist, and level up the other stat to match the other. For example, if you take Orian Preacher, it comes with 18 Radiance, so level up Inferno until it hits 18 then alternate between the two attributes.
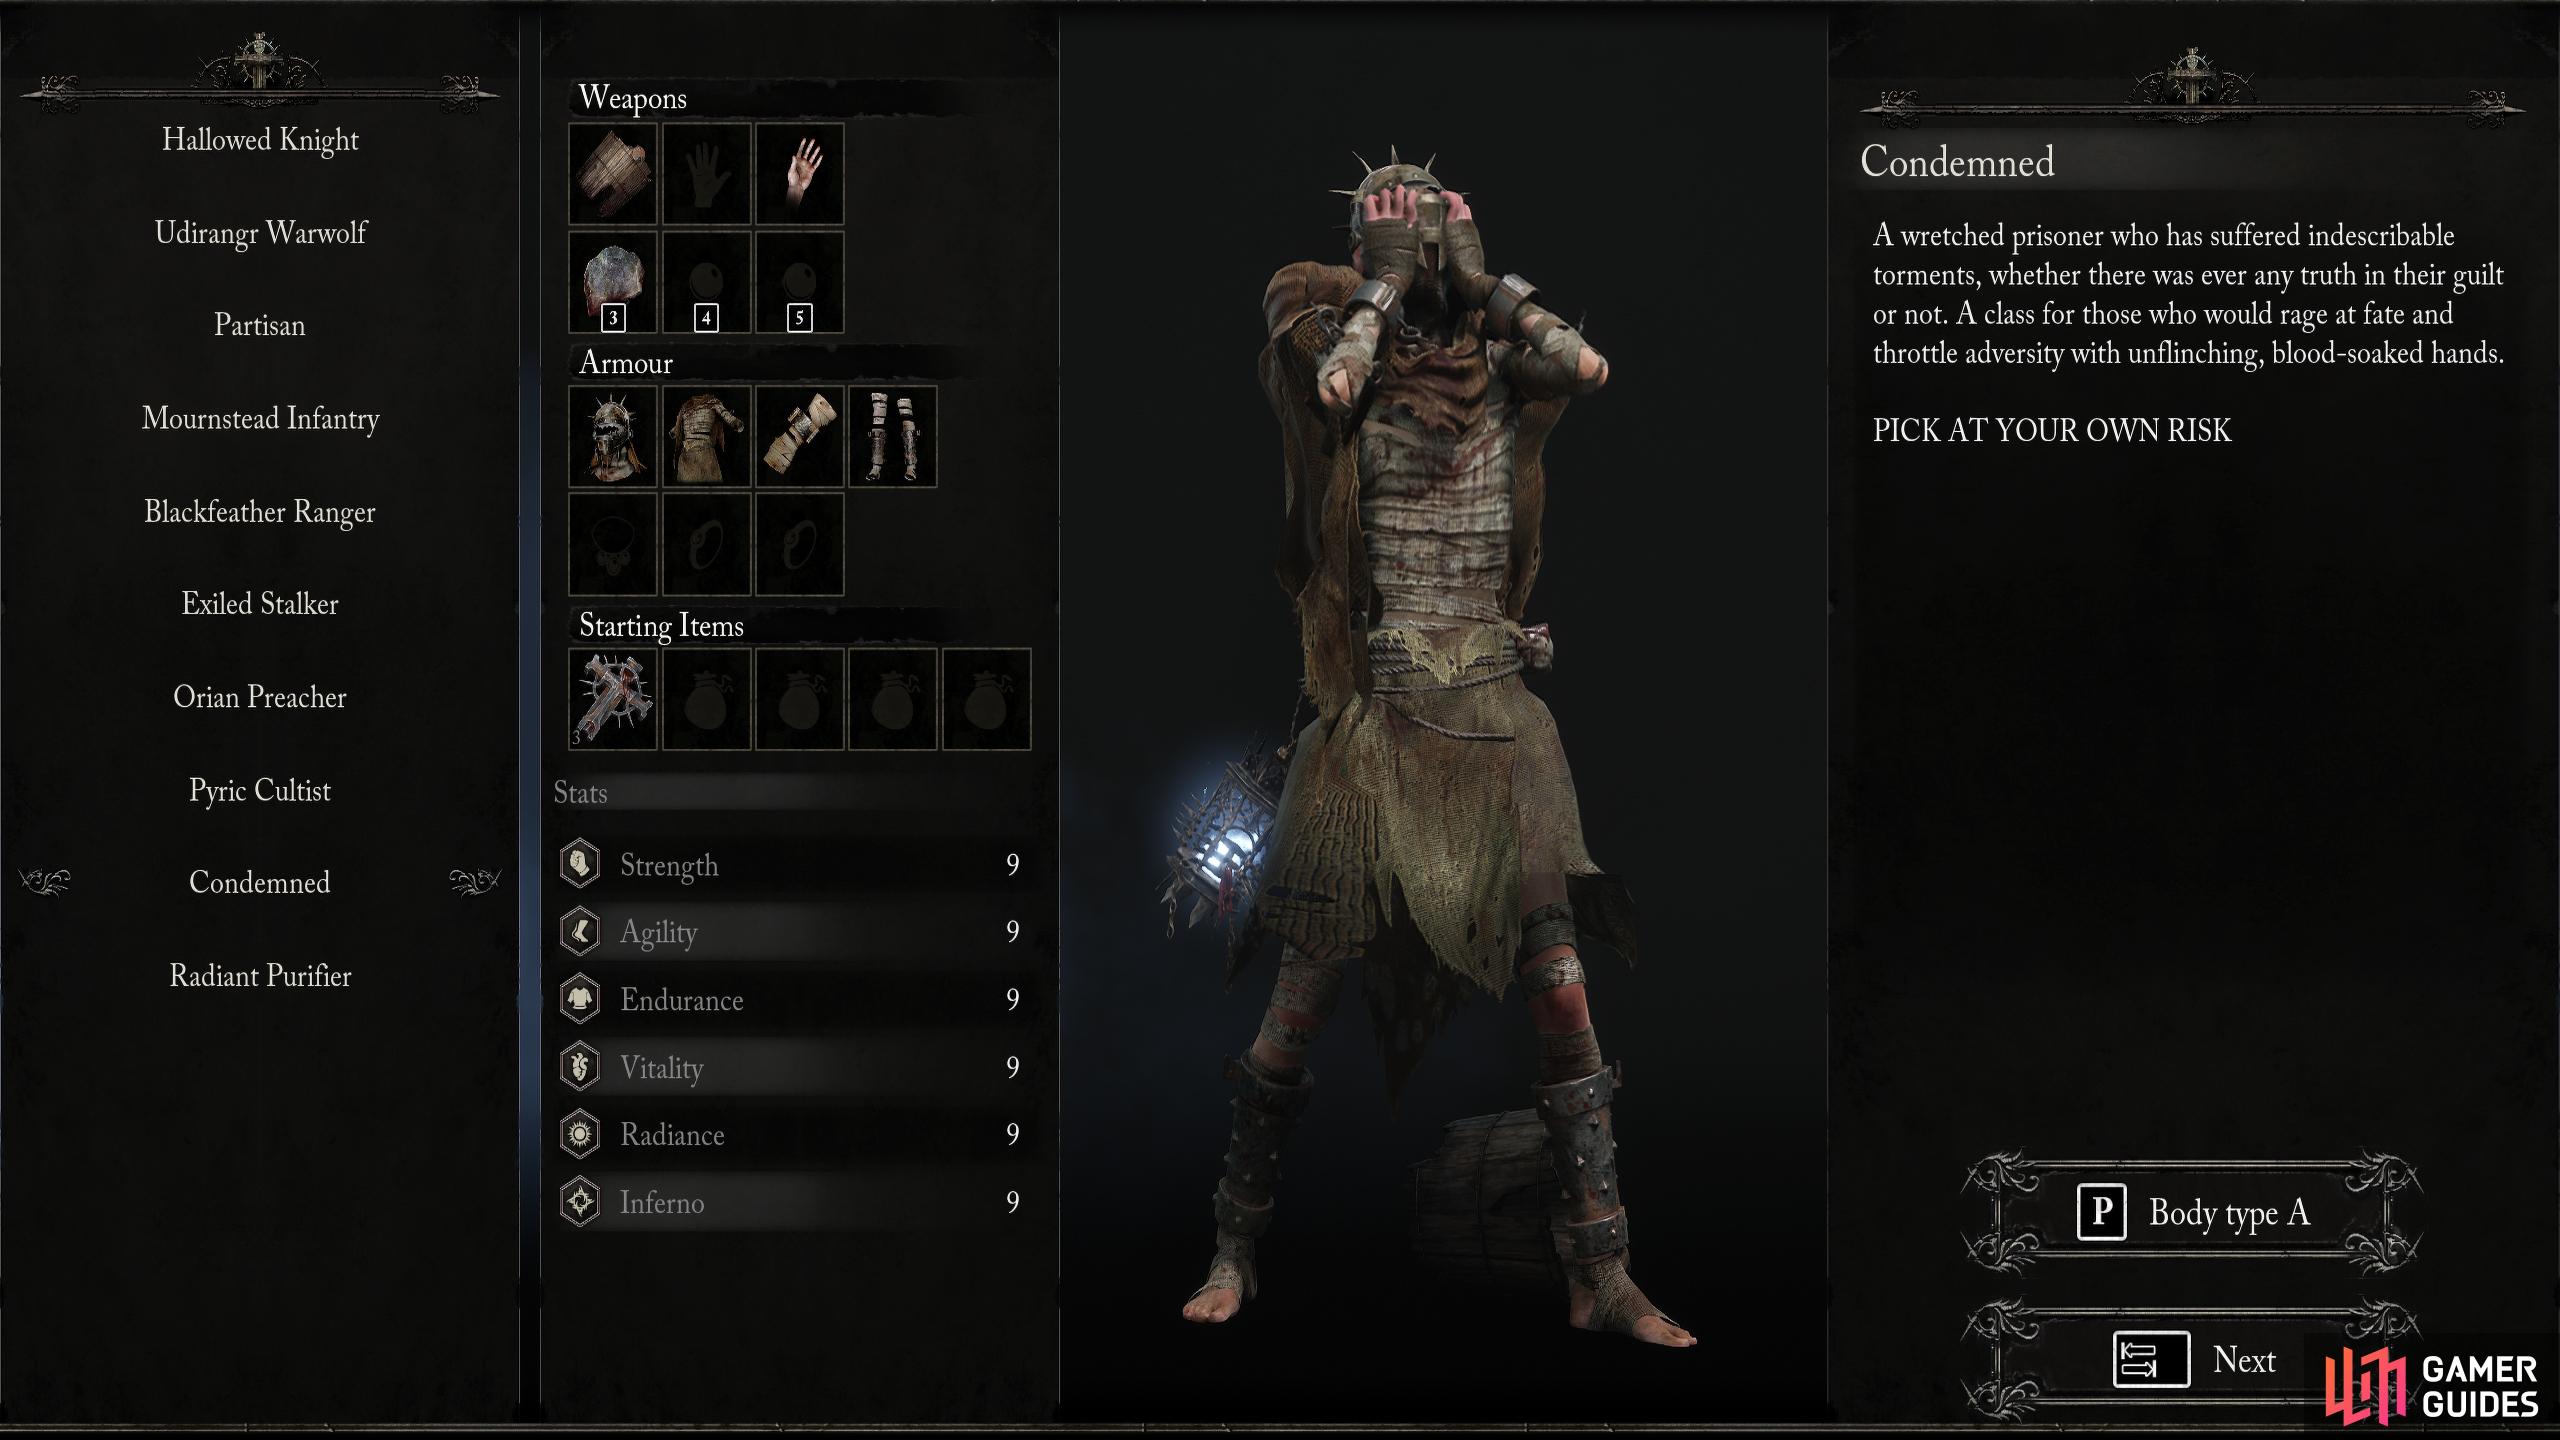
If you want to min/max the build, you’ll want to pick the Condemned class.
Umbral Magic Build Attributes
The way you decide to level up your attributes depends on what playstyle you want to use. Do you want to sit back, and hurl spells? Focus purely on Radiance and Inferno. Maybe you want to be a strong knight that utilizes Umbral Magic in tandem with powerful weapon attacks? In that case, you’ll want to put some points into Vitality, Endurance, and either Strength or Agility depending on whether you want a Grand Sword and Hammer or Dagger and Spears on top of Radiance and Inferno.
Then, you need to have a specific level you want to reach. In Soulslike, the community normally put a cap on the level to keep things balanced. As of right now, there isn’t one from what we can see, so we’ll put a cap on there ourselves at level 100. If you want to level beyond that, you can do so by placing points into Radiance and Inferno until you reach the Soft Cap of 50, or Hard Cap of 70. Then, you may as well begin to throw points into Vitality and Endurance which have Soft Caps at 20, and 40 with 60 being the hard cap.
For this specific build, we take points into Strength, so you can equip the Grand Hammer, ![]() Crushing Gaze. This weapon hits like a truck sitting at 853 Attack Power at max upgrade (+10) and has an A in both Radiance and Inferno. Now, if Grand Hammers isn’t your playstyle, you could equip the
Crushing Gaze. This weapon hits like a truck sitting at 853 Attack Power at max upgrade (+10) and has an A in both Radiance and Inferno. Now, if Grand Hammers isn’t your playstyle, you could equip the ![]() Putrid Child Sword,
Putrid Child Sword, ![]() Rosamund’s Sword,
Rosamund’s Sword, ![]() Veil Piercer, and
Veil Piercer, and ![]() Nohuta Polearm which all scale relatively high to Radiance and Inferno, although not as high as the Crushing Gaze.
Nohuta Polearm which all scale relatively high to Radiance and Inferno, although not as high as the Crushing Gaze.
Stat Spread
Now these stats are flexible as you only need 25 in Radiance and Inferno to use all spells, so you have some wiggle room. Also, if you choose not to use Crushing Gaze, you can remove the points from Strength. Vitality is at 30 as there will be some melee play in this build among other reasons, and Endurance is at 20, so you can swing your weapons more than twice (plus spells cost a bit of stamina).
| Attribute | Levels |
|---|---|
| Strength | 15 |
| Agility | 9 |
| Endurance | 20 |
| Vitality | 30 |
| Radiance | 40 |
| Inferno | 40 |
Umbral Build Equipment
As we mentioned above, you can exchange the weapon for any of the above, but we’ll put Crushing Gaze here. For armor, we’ll be at medium weight, so you still have good defense, but you can still effectively dodge. With the Catalyst, use and upgrade the starting one ![]() Charm of Fortune’s Sight until you can get the Lord Berescu’s Catalyst then use that. Note, the latter catalyst only shines the higher your Radiance/Inferno is, so if you keep them around the 25 mark, there are better catalysts.
Charm of Fortune’s Sight until you can get the Lord Berescu’s Catalyst then use that. Note, the latter catalyst only shines the higher your Radiance/Inferno is, so if you keep them around the 25 mark, there are better catalysts.
Finally, with Accessories, we take the Pendant of Atrophy as this allows you to cast spells at the cost of health when you run out of mana. This is another reason why Vitality is at 30. The Rings are a bit more flexible, but we like ![]() Ring of Night’s Fire for the increased Fire and Wither damage and either Ring of Gnawing for the extra bit of mana you get back when you kill an enemy, or
Ring of Night’s Fire for the increased Fire and Wither damage and either Ring of Gnawing for the extra bit of mana you get back when you kill an enemy, or ![]() Vessel Root which gives you a bit more mana. If you want to play more defensive, Ring of Shelter for increased Elemental Defense, and
Vessel Root which gives you a bit more mana. If you want to play more defensive, Ring of Shelter for increased Elemental Defense, and ![]() Defiance Ring for Status Defense is a good shout, or you could use the Lucent Sword Ring which will increase your physical damage when at full health if you will melee more.
Defiance Ring for Status Defense is a good shout, or you could use the Lucent Sword Ring which will increase your physical damage when at full health if you will melee more.
| Slot | Name |
|---|---|
| Weapon | |
| Shield | Pale Eye Shield / |
| Catalyst | Lord Berescu’s Catalyst or |
| Head | Cursed Helm |
| Body | Cursed Armor |
| Arms | Cursed Gauntlets |
| Legs | Cursed Leggings |
| Pendant | Pendant of Atrophy or |
| Ring 1 | |
| Ring 2 | Ring of Gnawing / |
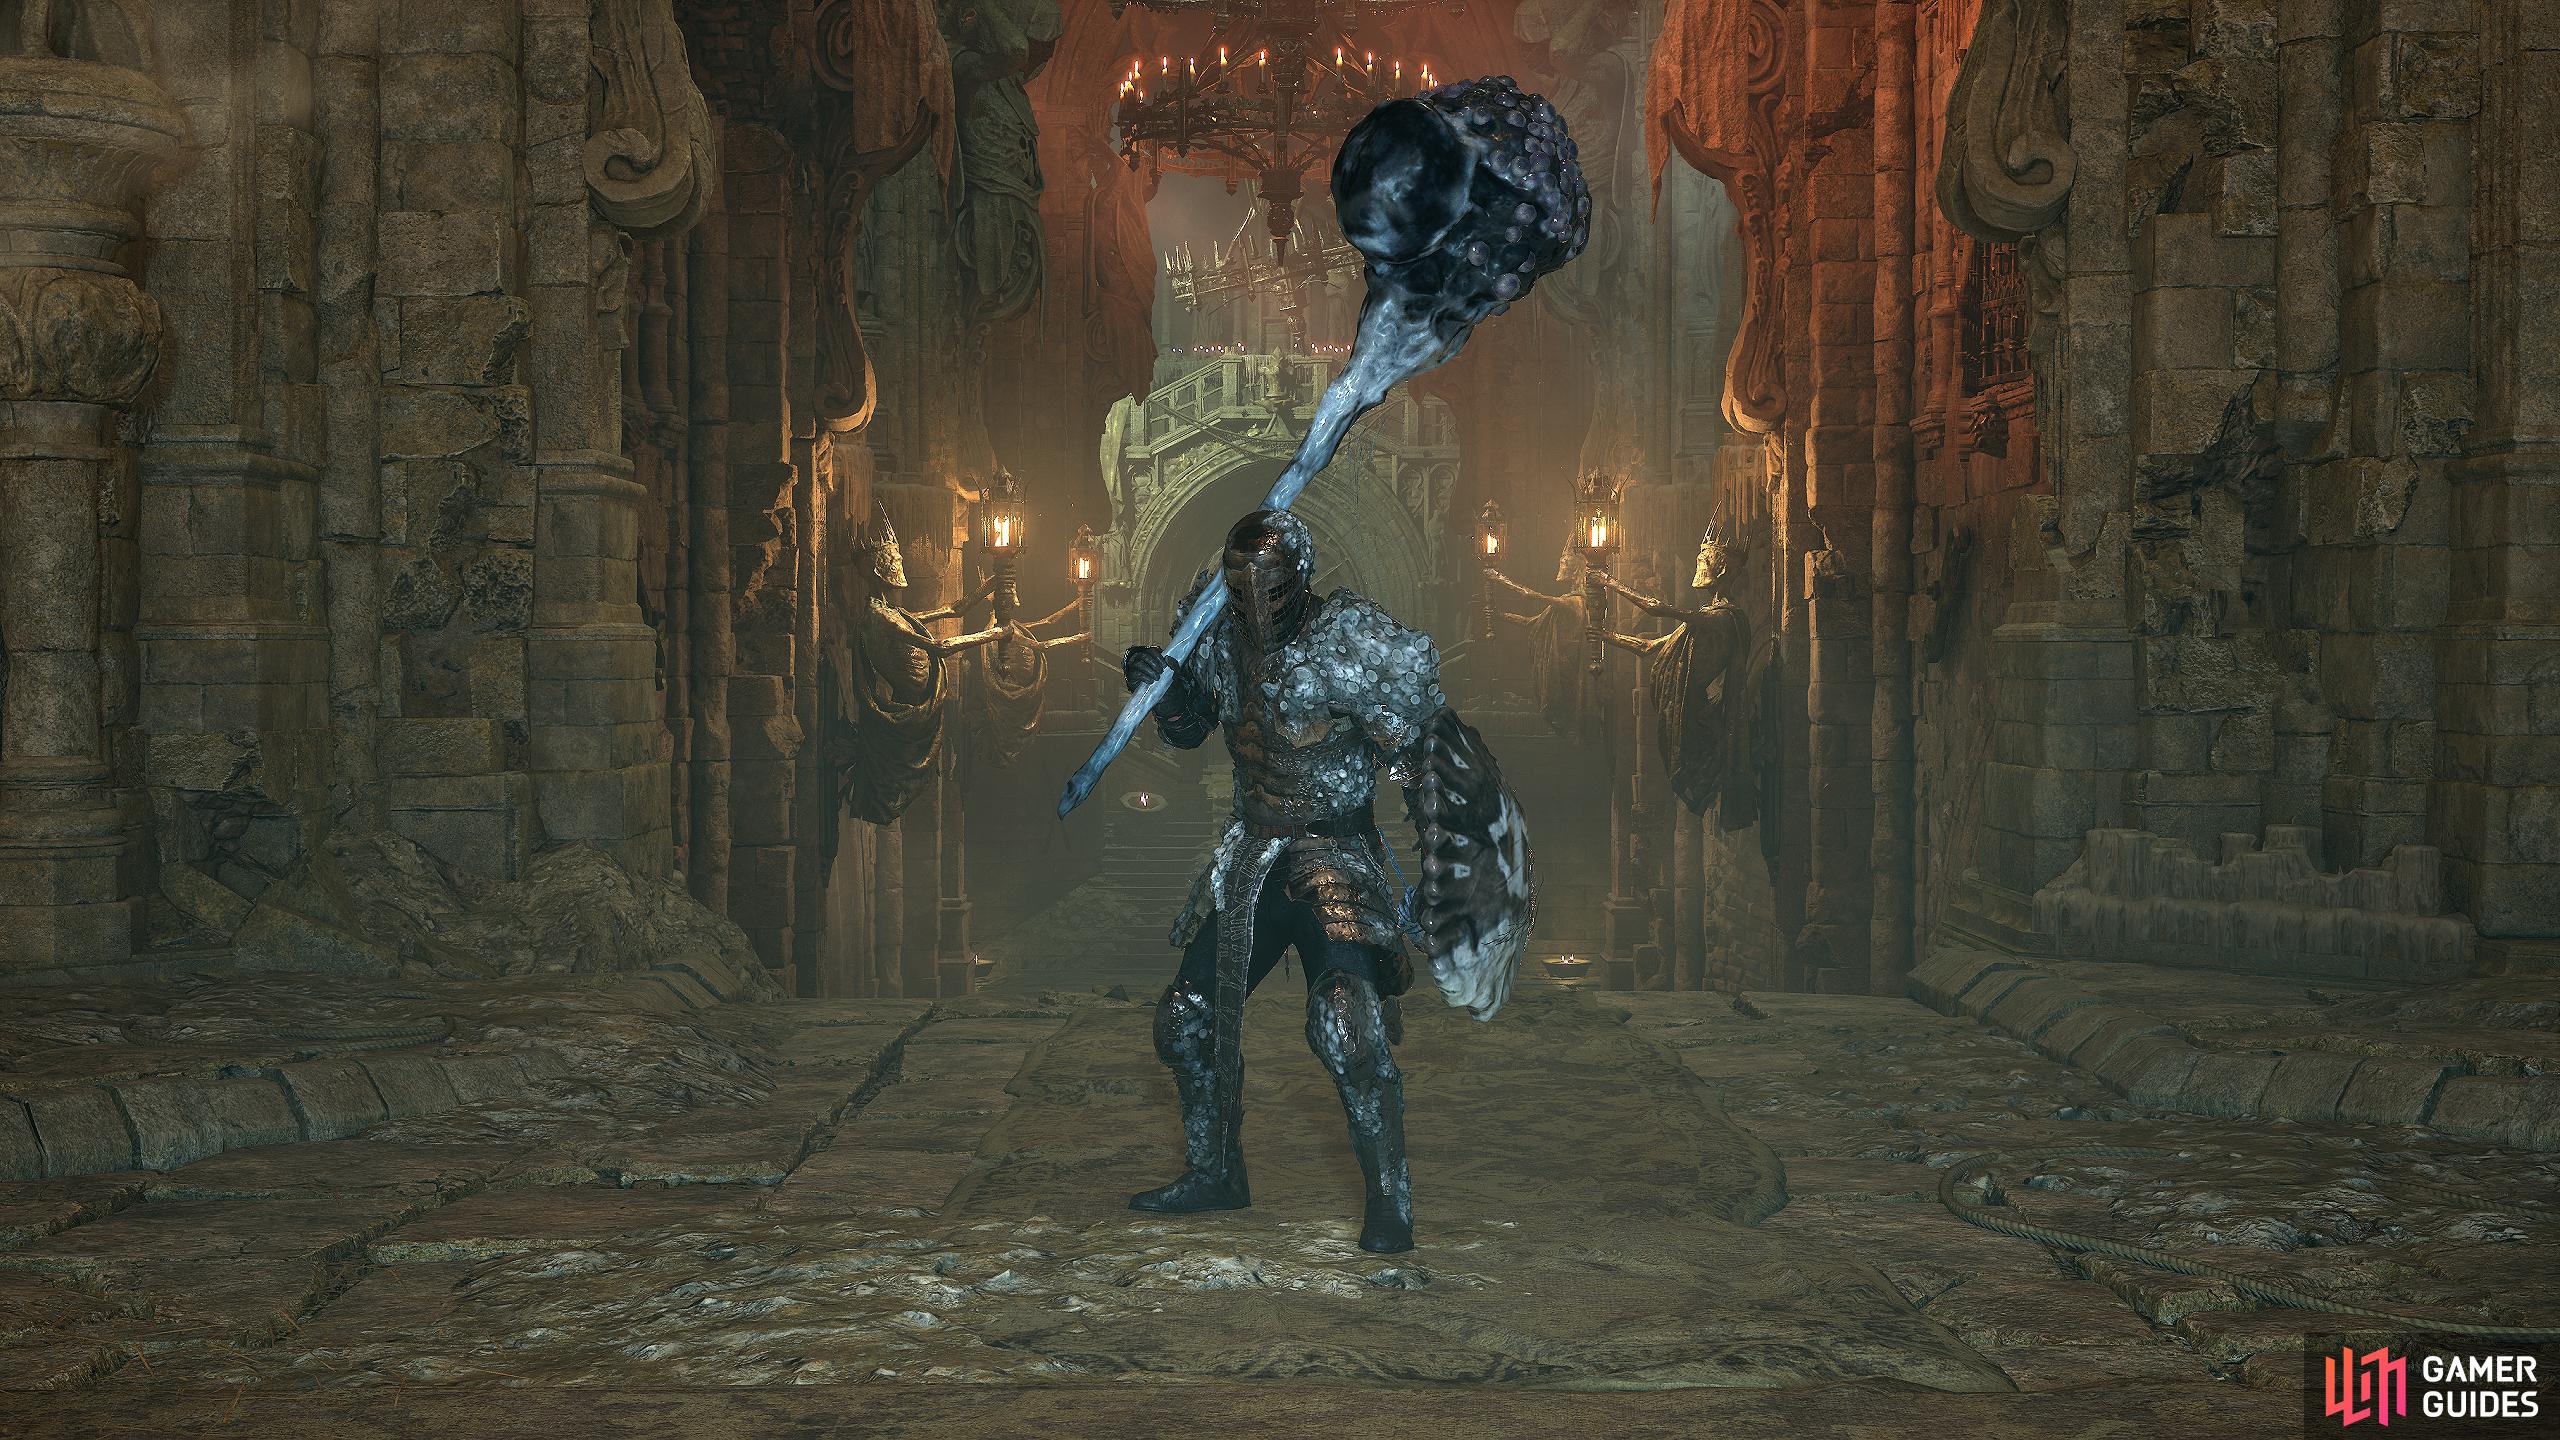
This is what your character will end up looking like, not bad if I do say so myself.
Where to Get the Umbral Build Equipment
-
Crushing Gaze Location: Calrath: When you enter the area where the Enchantress is, there is a gap in the fence. Switch to the Umbral Realm, and follow the path left which goes across the archway then drop to the other side to find an Umbral Belly; Soul Flay it to get the weapon.
-
Pale Eye Shield Location: Pilgrim’s Perch: From the Vestige of Chabui, head down the stairs to go outside. Take a left up the stairs then immediately turn right and drop onto the beam. Enter the Umbral Realm, and follow the beam onto the large hand. Follow this around until you find the Umbral Belly to Soul Flay which will have the shield.
-
Lord Berescu’s Catalyst Location: Revelation Depths: This can be found in a small encampment hidden behind a breakable barricade. Just beyond the barricade are a lot of enemies which includes two Holy Bulwark enemies. Inside the encampment is a hole leading to a darkened area which has an Umbral Belly you can Soul Flay which contains the catalyst. This encampment is in between the imp room (past the bridge shortcut), and the main boss of the area. About 3/4 through the area.
-
Cursed Armor Set Location: Manse of the Hallowed Brothers: From the Ferrer’s the Charred Vestige, enter the main compound via the ledges on your left. When you reach the area with the Holy Bulwark, and Marksmen, take them out, and enter the Umbral Realm. This will unveil an Umbral Entity, destroy the two veins connected to it, and head over the newly formed bone bridge. Follow the rickety stairs to the end where you’ll find an Umbral Belly that will contain the entire set. Unfortunately, there will be a Bringer of Stillness (Reaper) here, so either fight it, or quickly Soul Flay the belly, then run.
-
Pendant of Atrophy Location: Revelation Depths: From the Vestige of Lost Berescu, head back on yourself, and take the wooden stairs up then climb the ladder. Now, climb the next ladder leading up, and run past the numerous enemies until you reach the end where you’ll find another ladder leading into an encampment. Turn right, and run past the enemies then roll through the barricade which leads to a bridge. Turn right again, and head into the lit-up tunnel. Follow this until the end and it’ll lead to the shortcut bridge. Take a left before the bridge (where the invisible enemy is), and head up the tunnel on your left. Enter the Umbral Realm, and Soul Flay the Umbral Belly halfway up on your right, and go through the doorway. Follow the small tunnel to the end where you’ll find another Umbral Belly which contains the pendant.
-
Ring of Night’s Fire: Fitzroy’s Gorge: From the Calrath Vestige of Sebastian, backtrack to Fitzroy’s Gorge via the house, and you’ll end up in the courtyard with the Fire Swordsman (Proselyte Knight). Defeat him, and head through the archway to your left where you’ll be in a small graveyard with a few fire-breathing dogs. Head right toward the iron gate, and you’ll find the ring.
-
Ring of Gnawing: Skyrest: Purchase from Molhu after reaching the Abbey of the Harrowed Sister’s area. May have to defeat the boss for it to appear.
If you need to find any other rings or catalysts, click on the pages below:
Umbral Build Rune Setup
At the maximum upgrade level, your weapon and shield will have three slots each. Now, there are a few good runes to go for, but we like the following:
You can find the location of these, and all runes in the game at our All Rune Locations page.
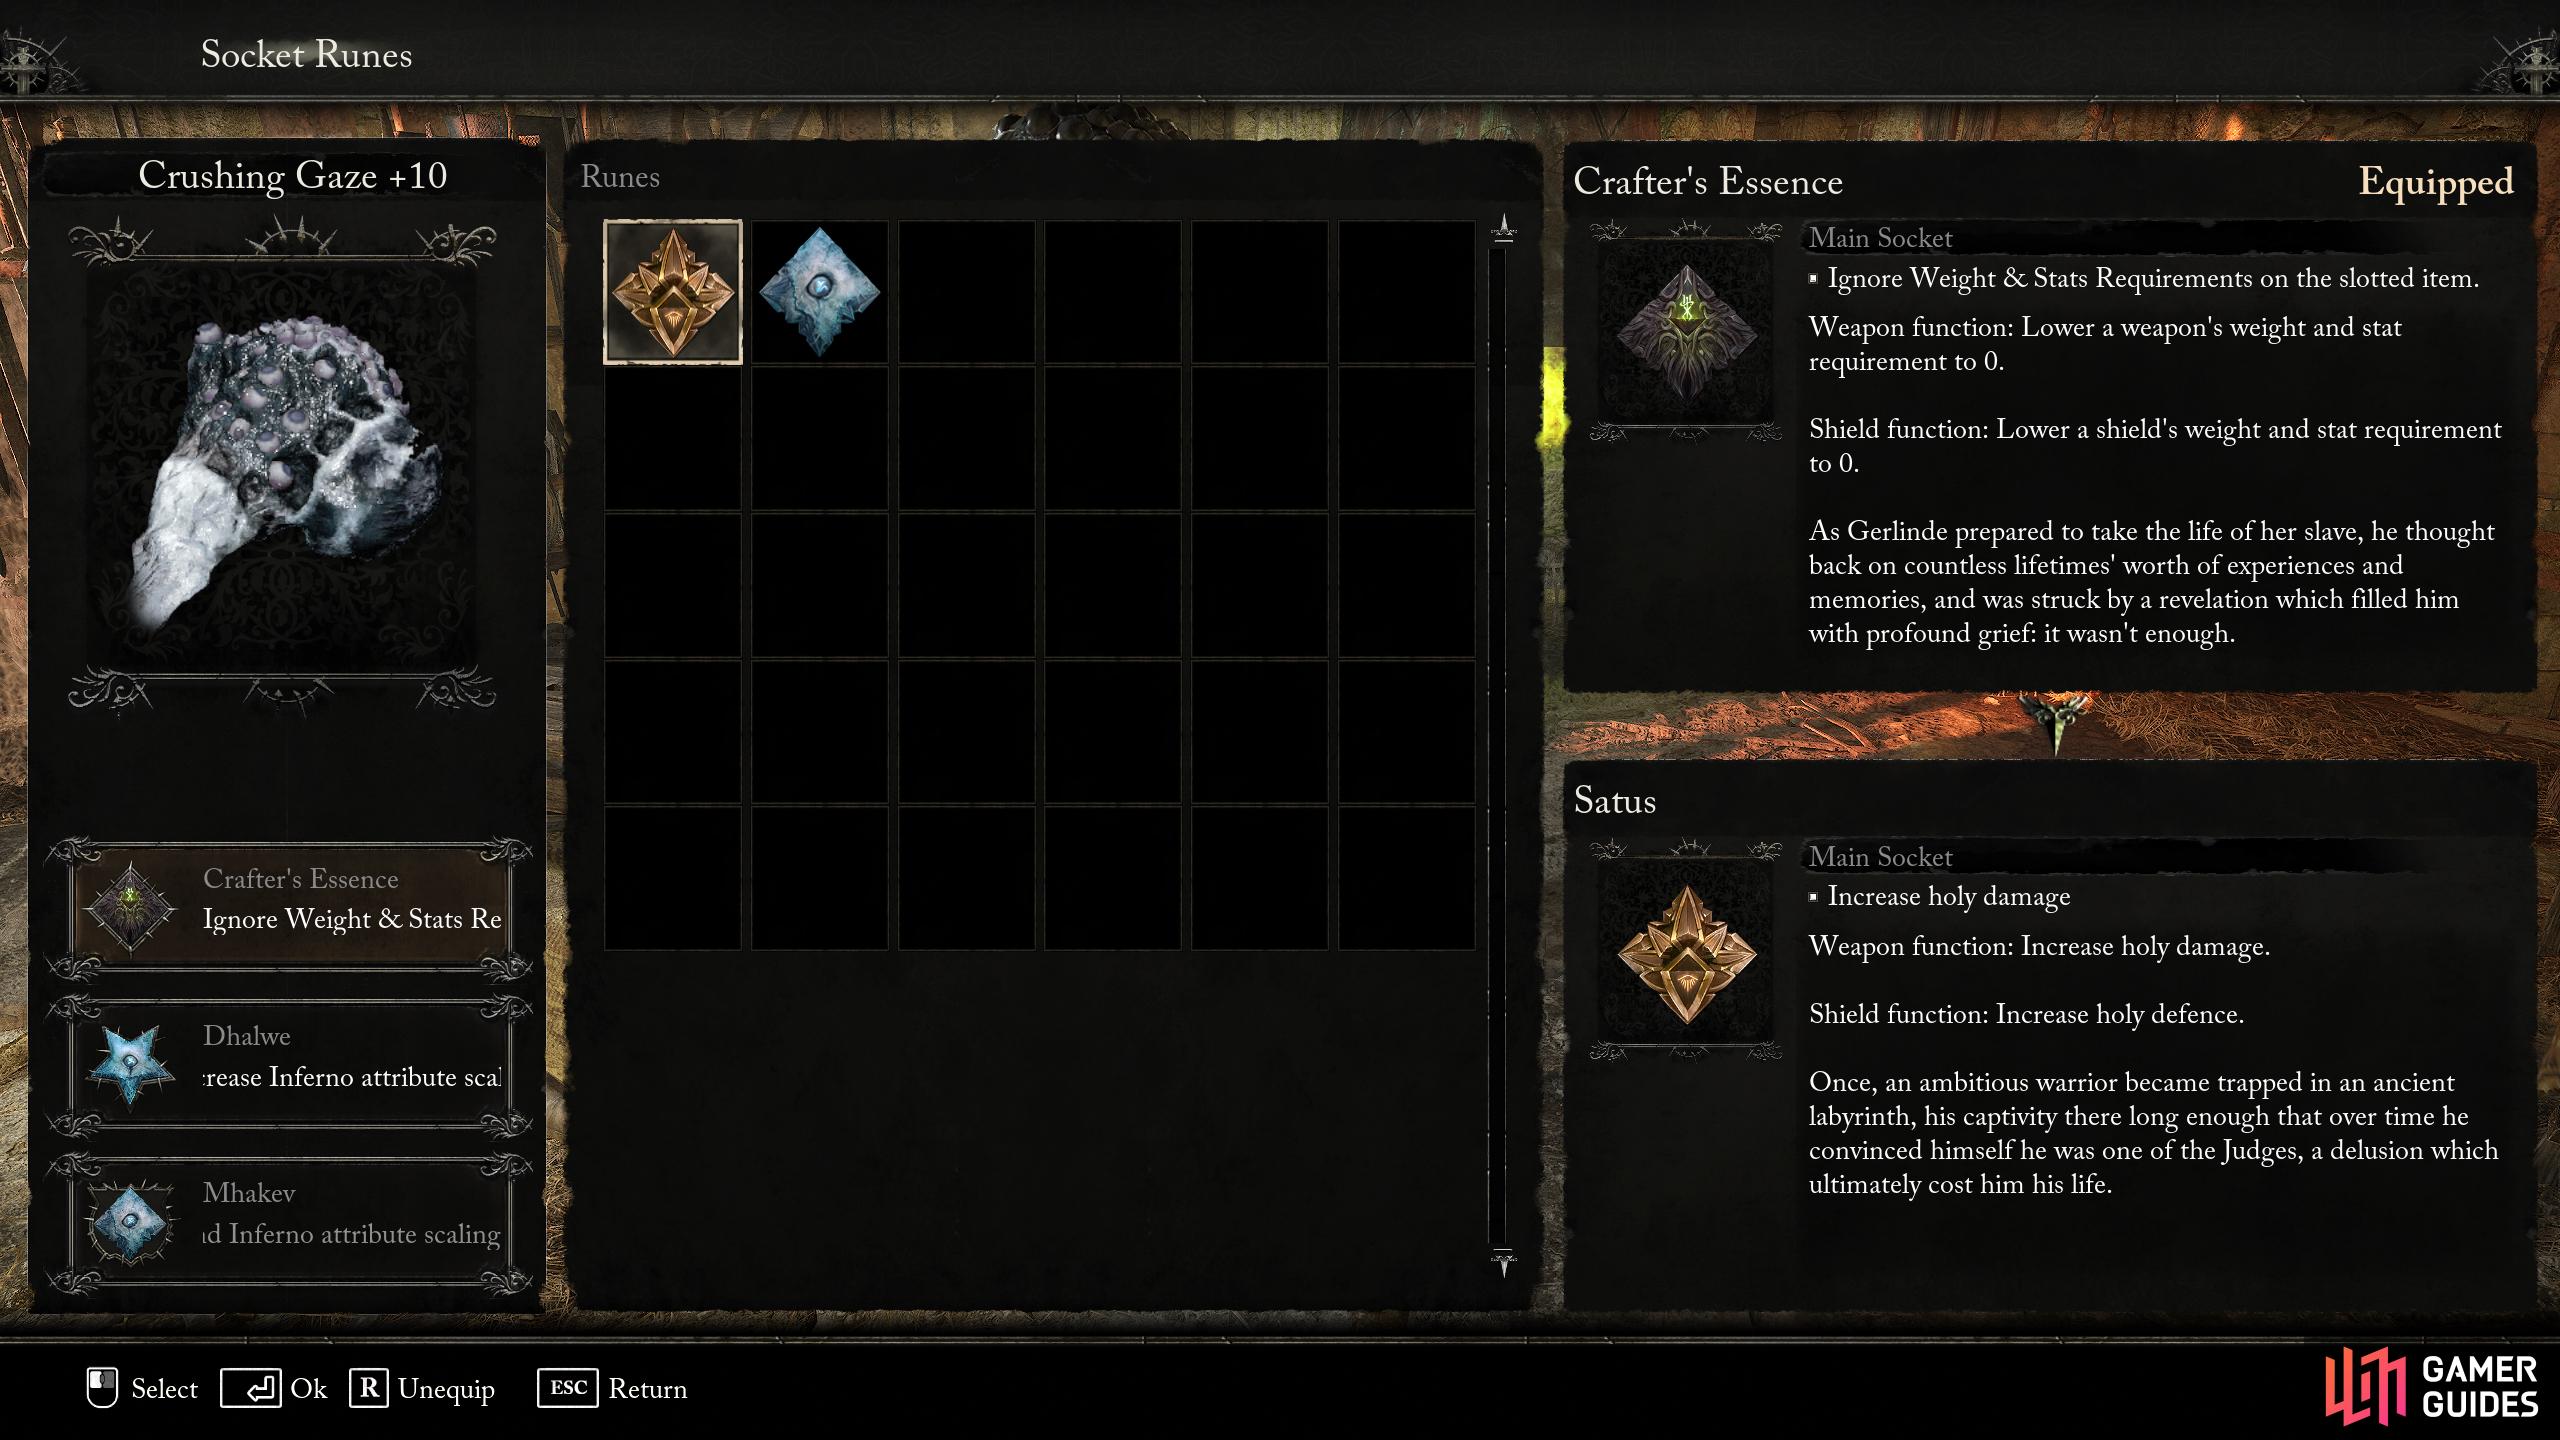
This is the rune setup for the Crushing Gaze.
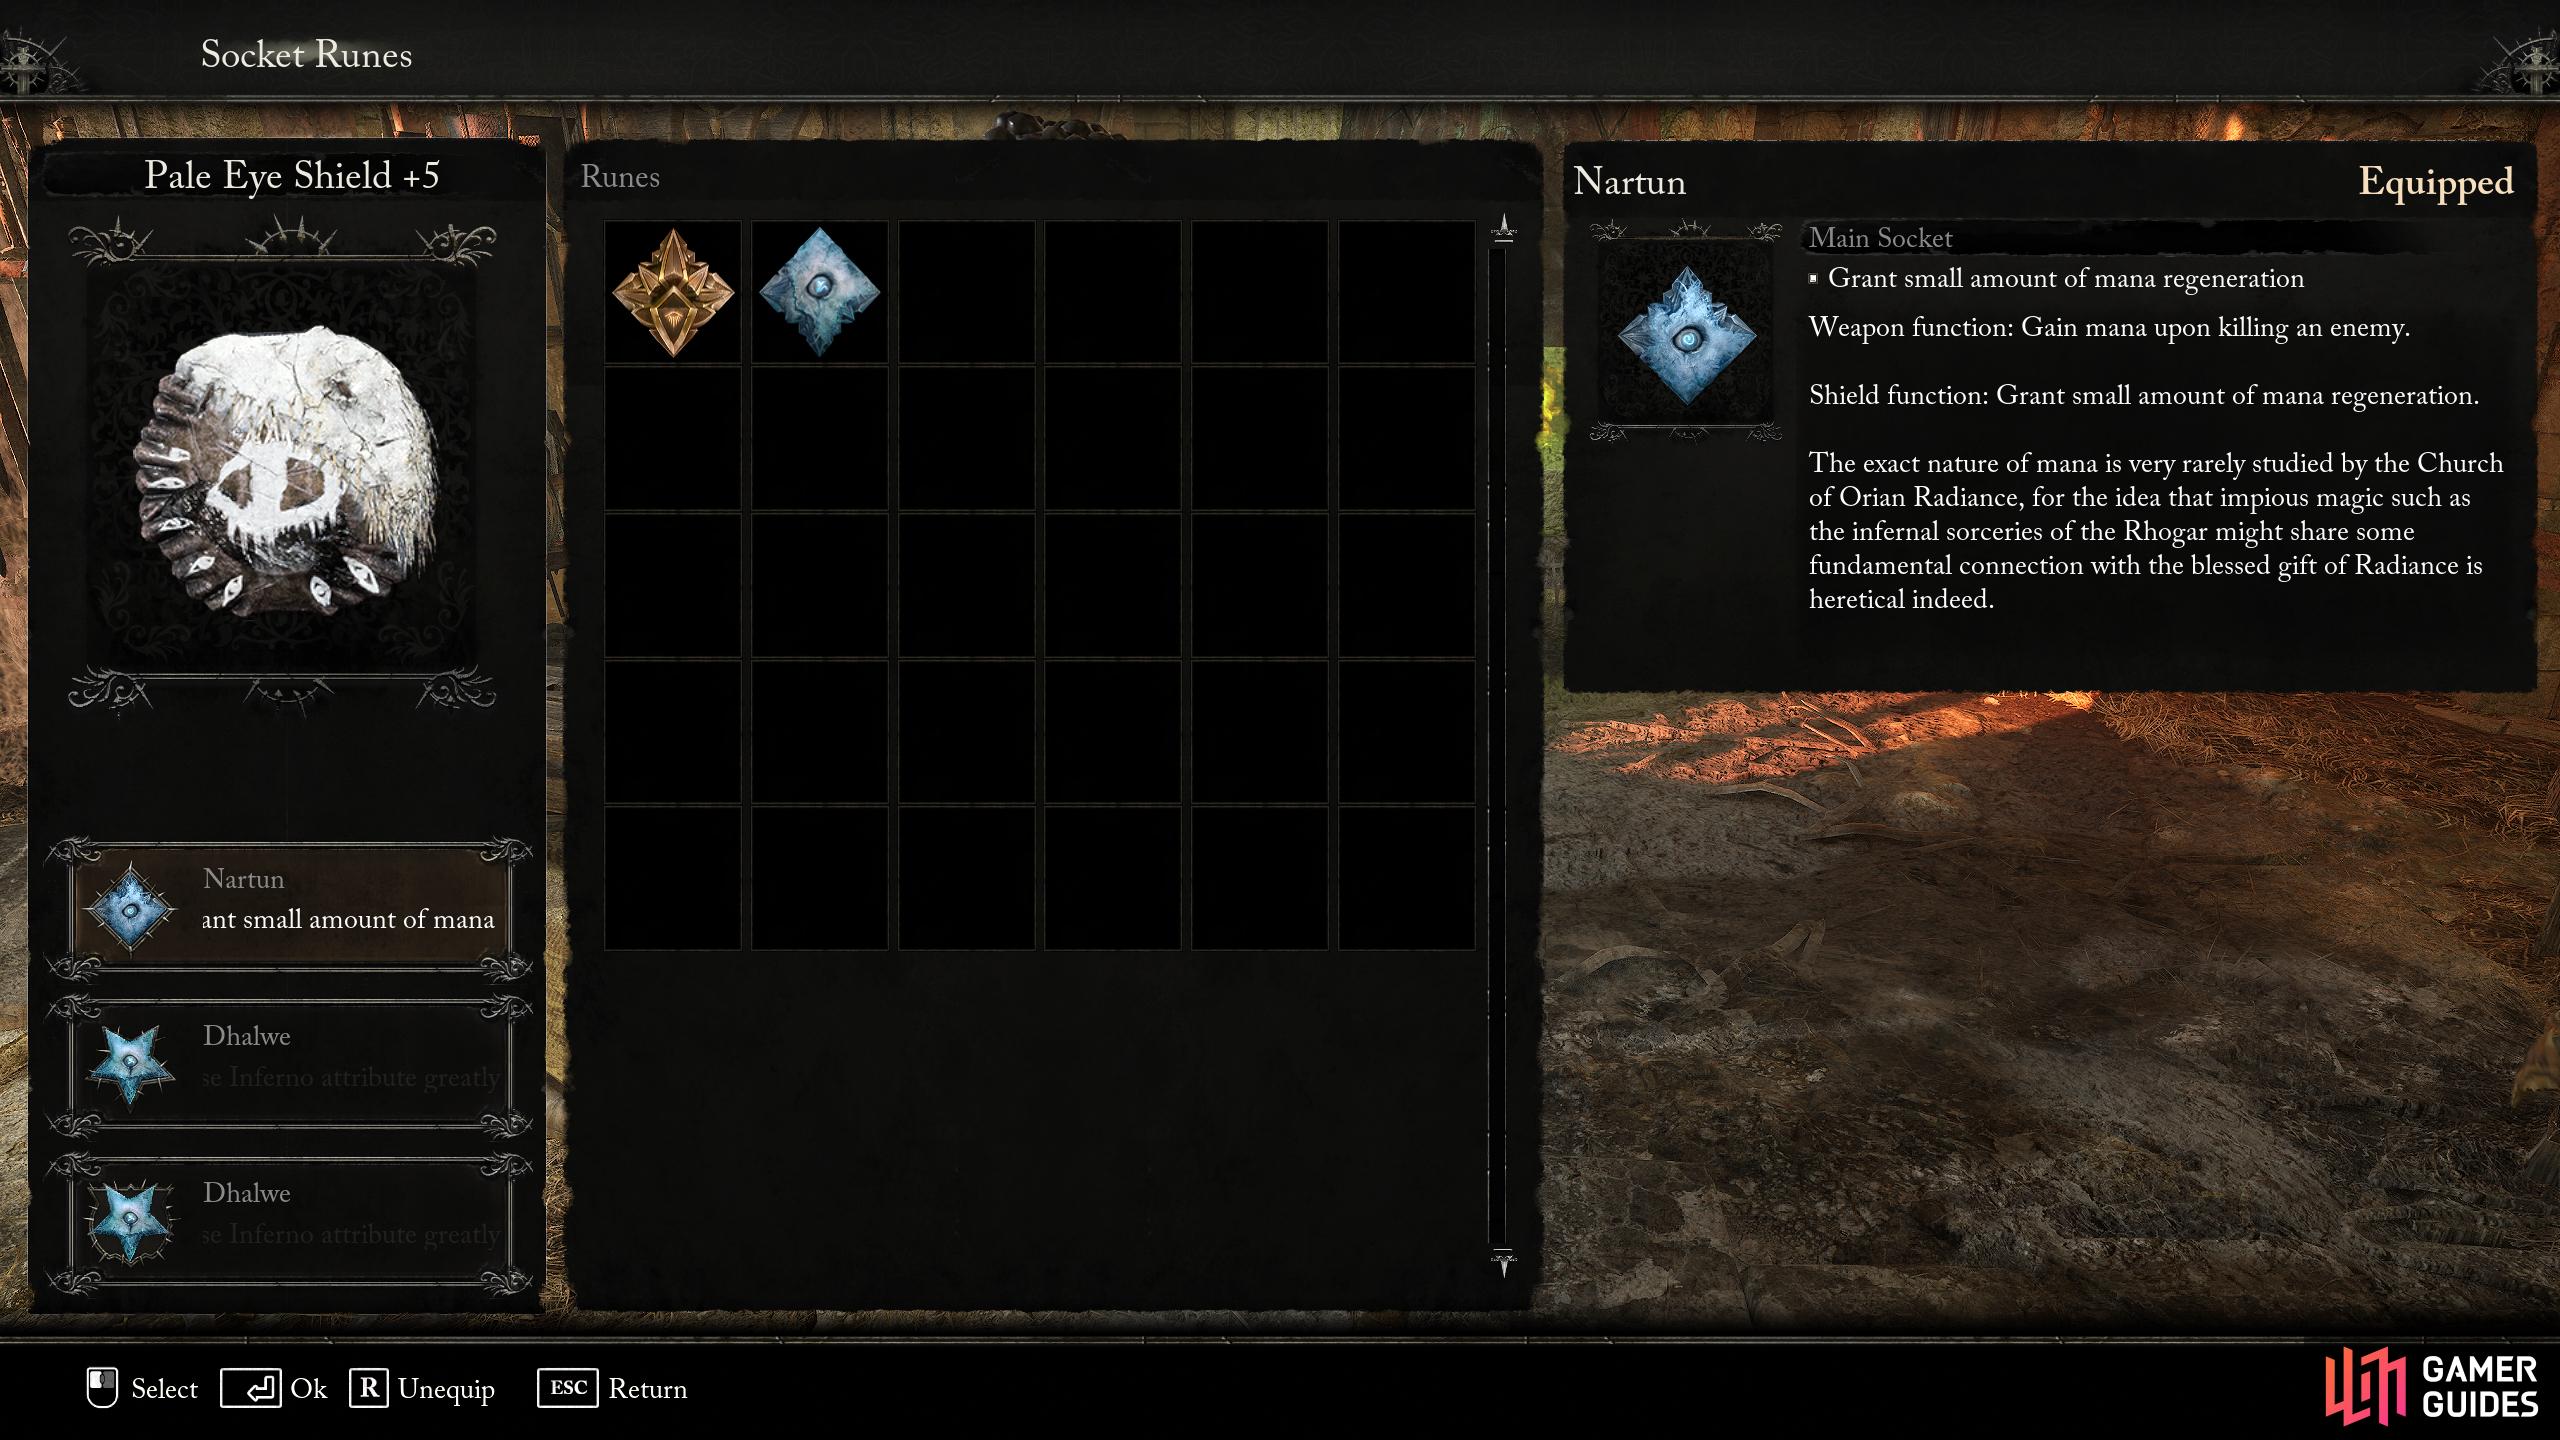
While this is the setup for the shield. Replace a Dhalwe with a Shon.
Umbral Build Magic Spell Setup
The Lord Berescu’s Catalyst allows you to equip five spells, so we will list the five that this build will use. If you’re using a Catalyst that only has access to three or four spells, then just switch the other ones in whenever the need arises.
| Number | Spell Name | Description | Information |
|---|---|---|---|
| 1 | Latimer’s Javelin | Hurl an exploding javelin of Putrid Magic. | Arguably the best Umbral spell in the game. It has range and damage and even has a small area of effect. All at a modest mana cost. This can be purchased from Molhu (remembrances) after defeating The Hushed Saint boss. |
| 2 | Barrage of Echoes | Launch several orbs of Umbral Magic which explode upon impact. | This is a ridiculously strong spell…if all the orbs land near the feet of the enemy, if they don’t, it becomes a semi-decent area-of-effect spell. We use this as a boss-killer; run next to the boss’s feet, and repeatedly use this spell. If you’re lucky, this can make most bosses trivial. |
| 3 | Umbral Weapon | Imbue your weapon with Umbral Magic. | This is great to increase your damage with your weapon. Use this whenever you’re going to fight in melee range. |
| 4 | Putrefaction | Summon a mist that poisons enemies caught within it. | Some bosses are weak to poison, and this is the best way to put it on them. Throw a couple of these in the arena, and the boss will be poisoned in no time. You can use this spell against Crimson Rector Percival, poison him, then go AFK why it kills him. |
| 5 | Any | Change the spell on the situation. | This last spot can be used for anything. Use Umbral Guardian if you want some eyeballs following you, or you could equip Umbral Orb, so you have a cheap spell to use to lure an enemy. |

Here is the spell setup. From left to right: Umbral Weapon, Latimer’s Javelin, Umbral Orb, Putrefaction, and Barrage of Echoes.
Conclusion
There you have it, a powerful Umbral build that is capable of decimating foes from afar or going toe-to-toe with the most difficult enemies. If you have access to it, you could exchange the weapon for the dark version of ![]() Pieta’s Sword, but this requires a lot of work to get it, especially if you’re unlocking the weapon quest for it.
Pieta’s Sword, but this requires a lot of work to get it, especially if you’re unlocking the weapon quest for it.
No Comments