There are a total of eight bomb delivery challenges in Sunset Overdrive and they are fairly short and simple. To begin each challenge, the game will highlight a series of 4-5 points of interest that players will need to reach, place a bomb at and move on. There is a time limit, so efficiency is your best friend and often times, finding the correct route makes a massive difference in your completion time and chance of successfully earning those pesky gold medals.
Below you’ll find a list of the challenges in the game and some short hints and tips as to how to approach each one to get the best possible score.
Bomb Delivery #1
The first bomb delivery challenge is incredibly easy and you will probably earn a gold medal on your first attempt. Use this challenge as an opportunity to learn how long it takes to plant bombs, time bonuses for completing bomb placements and the kind of routes available between points of interest.
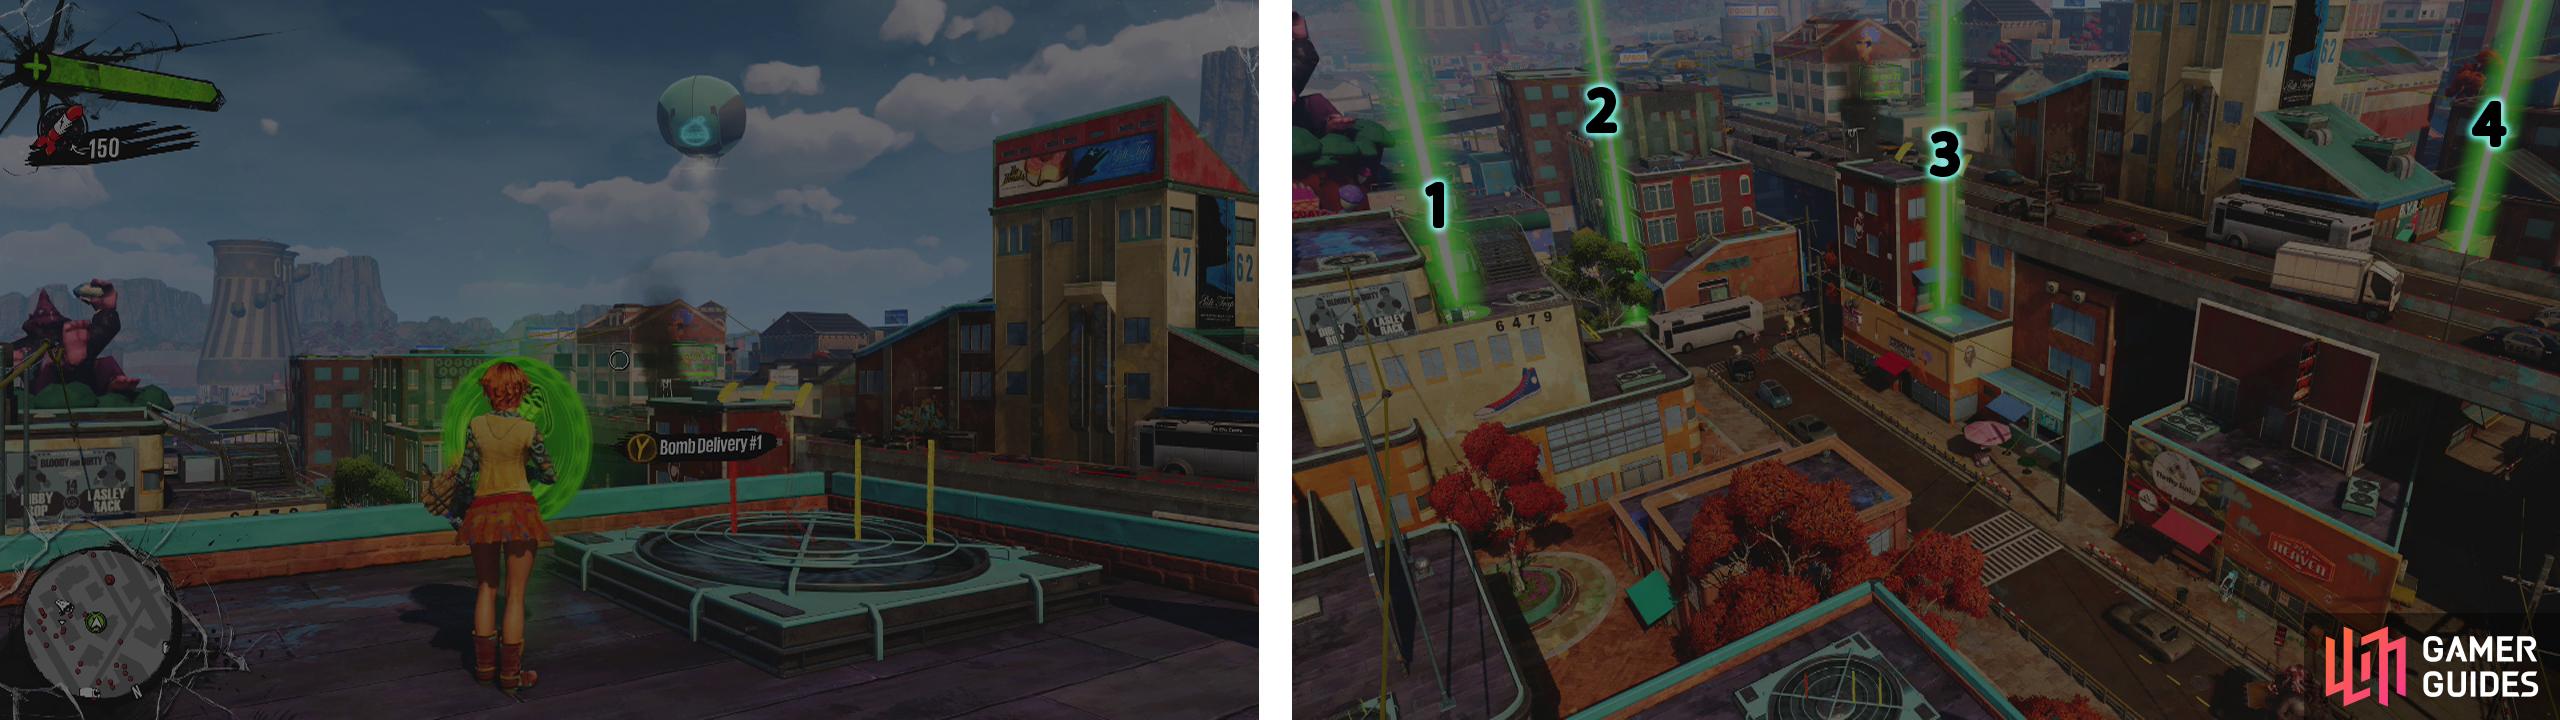
You can begin the challenge here (left). Here is our suggested route through the checkpoints (right).
| Medal | Score | Reward/s |
|---|---|---|
| Bronze | 40 | $ 200 |
| Silver | 2,500 | $ 800 |
| Gold | 3,500 | 1,000 x Overcharge |
| Clothing: Street Rings |
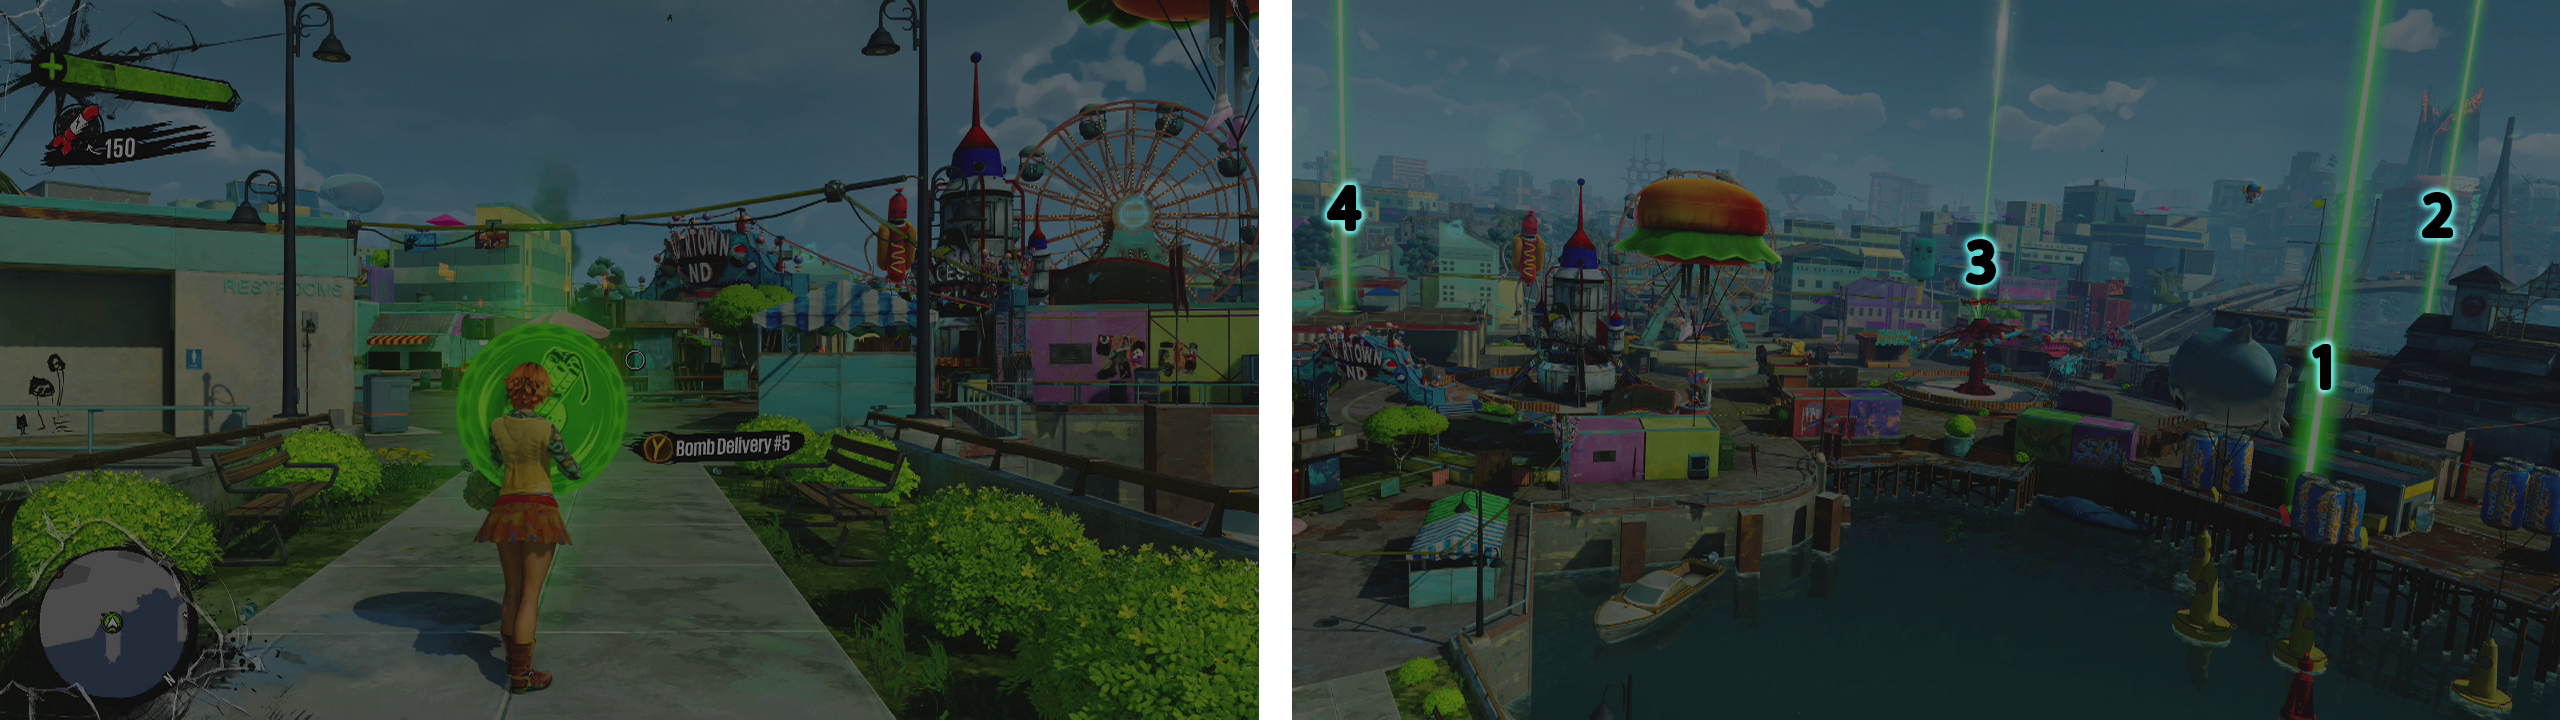
Bomb Delivery #2
This bomb delivery challenge is a little trickier than the first as it requires a bit more finesse when it comes to making your way between locations.
Although the green beam on the left looks closest, the first location you’ll want to hit in the challenge is the closest one on the right from the starting position. From here, use the pipes to grind over to the second location on the left. We do it in this order as time is a factor and it is much faster to drop down to a lower level, rather than doing it in reverse and attempting to climb up.
From the second location, drop down to the ground level to hit the third location in the distance and then bounce your way up to the final location above.
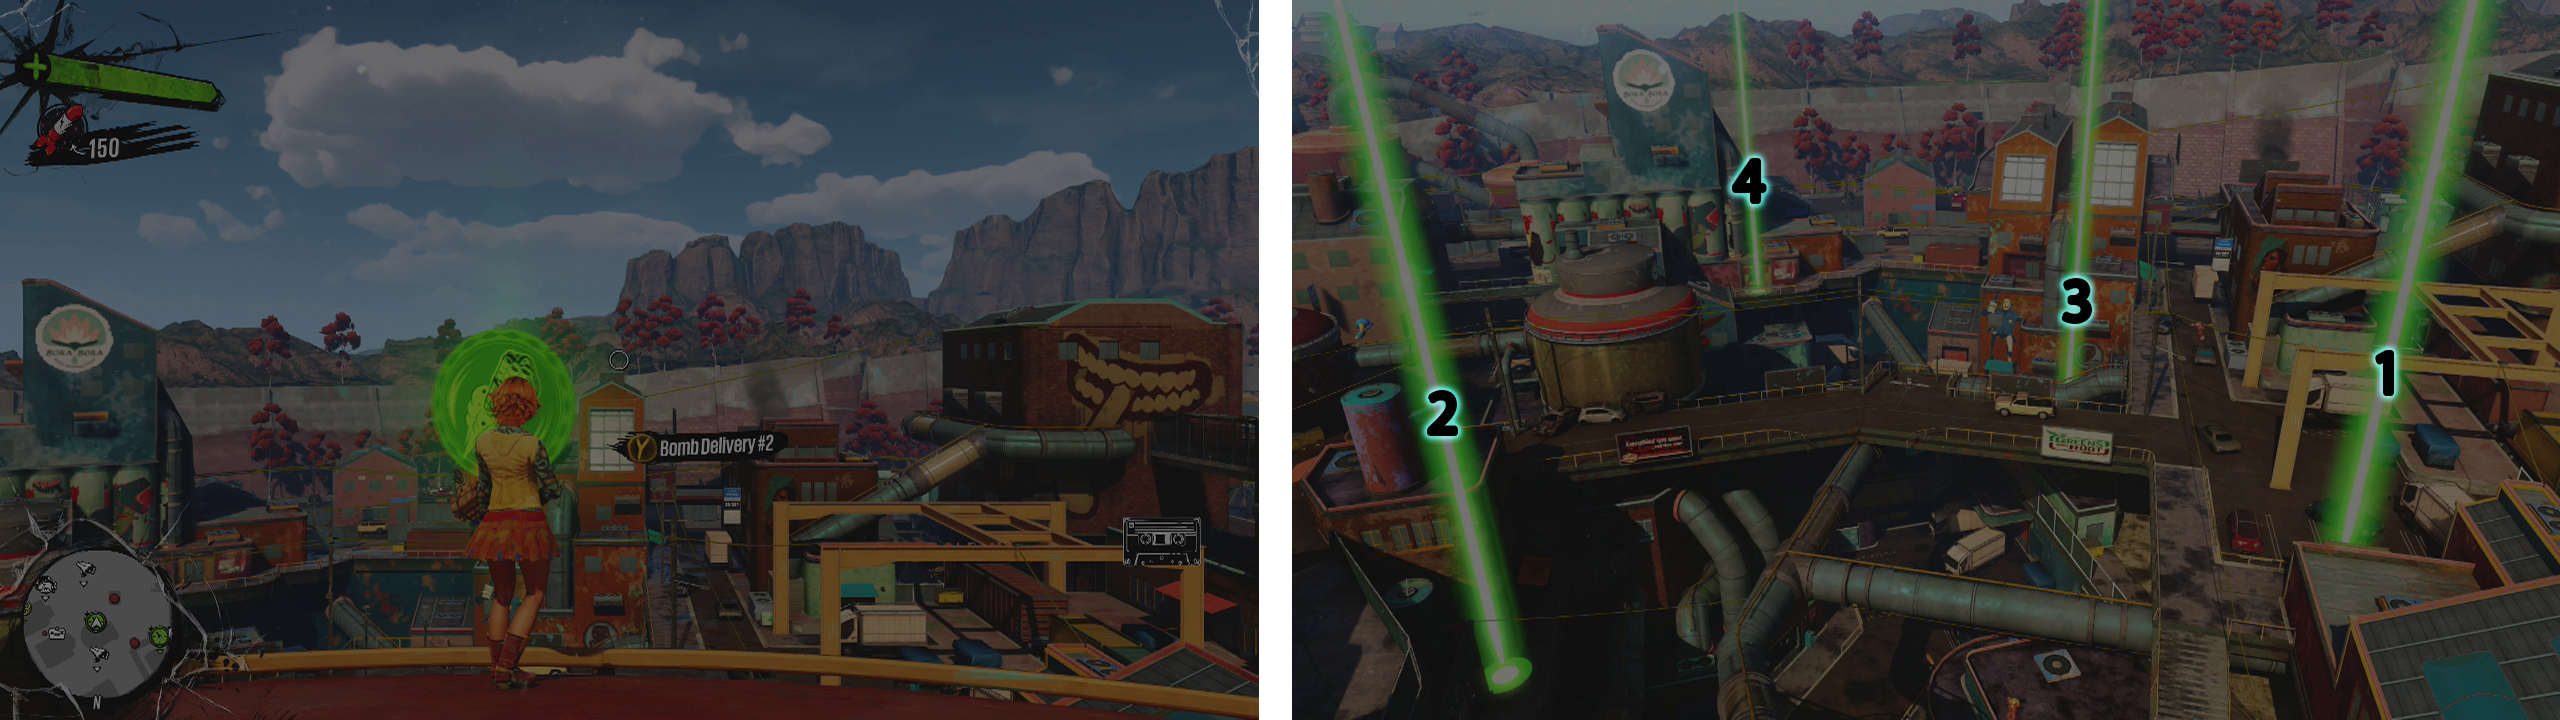
You can begin the challenge here (left). Here is our suggested route through the checkpoints (right).
| Medal | Score | Reward/s |
|---|---|---|
| Bronze | 40 | $ 300 |
| Silver | 2,000 | $ 1,000 |
| Gold | 3,000 | 1,000 x Overcharge |
| Clothing: Gas Mask |
Bomb Delivery #3
This challenge is fairly simple and the order of locations straight forward. The key issue here is time and as the game does not give you very much to work with, you need to be extremely efficient if you want to escape the challenge with the gold.
From the start, you’ll want to air dash and drop down to the first location on the roof below. Quickly do the same once again to hop over the swimming pool to reach the second location. Climb the wall immediately behind the second location and bounce your way up using the parasol and vent to reach the third location.
From here, we’ll see the final location on the other side of a glass roof panel. Air dash to the train tracks, perform a quick grind and then quickly air dash again to reach the far end of the glass. Drop down to reach the final destination.
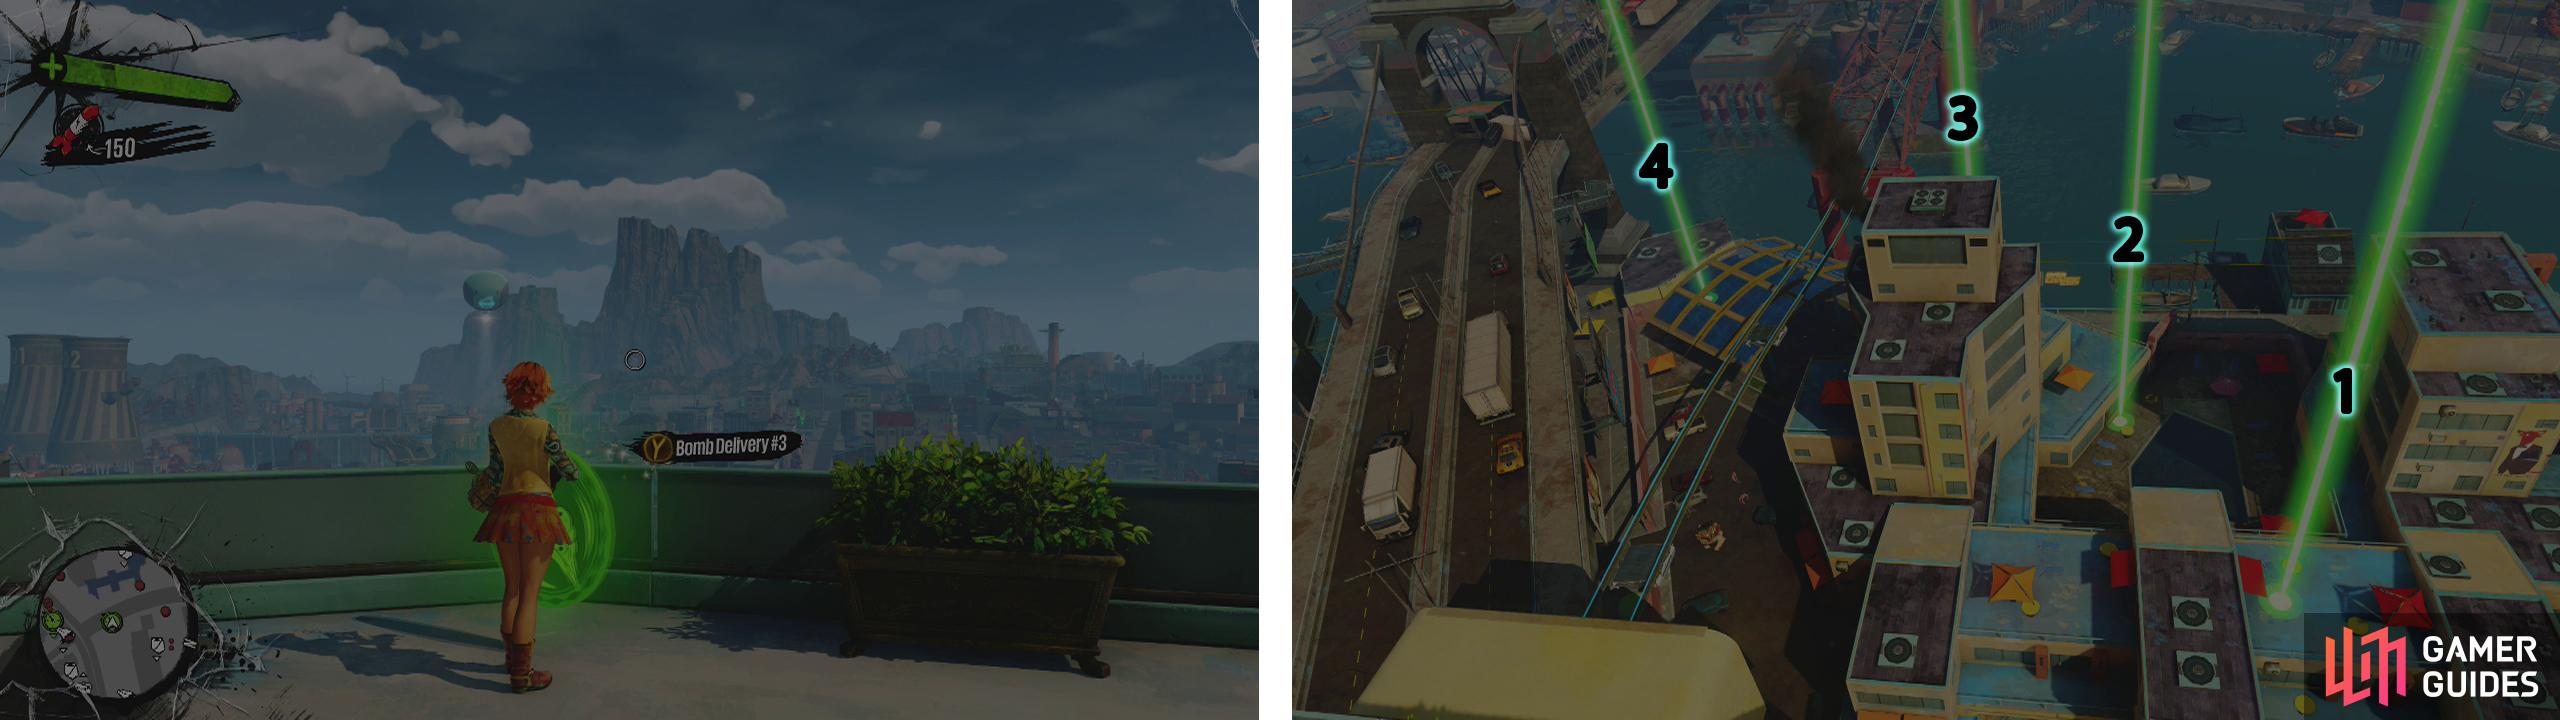
You can begin the challenge here (left). Here is our suggested route through the checkpoints (right).
| Medal | Score | Reward/s |
|---|---|---|
| Bronze | 40 | $ 400 |
| Silver | 800 | $ 1,500 |
| Gold | 1,400 | 2,000 x Overcharge |
| Clothing: Skateboard Shoes |
Bomb Delivery #4
This is one of several challenges that are extremely lenient on time and as long as you maintain a good flow, you can grab the locations in almost any order and still manage to snag the gold.
Although it is a lot more efficient to go from left to right, it requires a bit more skill in terms of traversal. Instead, I found it easiest to ignore the location on the left to begin with and instead hit the closest location on the right first. From here hop across to the next building and grind along the rail and over the small footbridge to the second location on the right before backtracking.
Use bounceables nearby to get up high and then use an air dash or two to launch across the street to reach the third location (the one on your initial left). Finally, hop onto the power lines in the centre of the road and grind them all the way up to the final location.
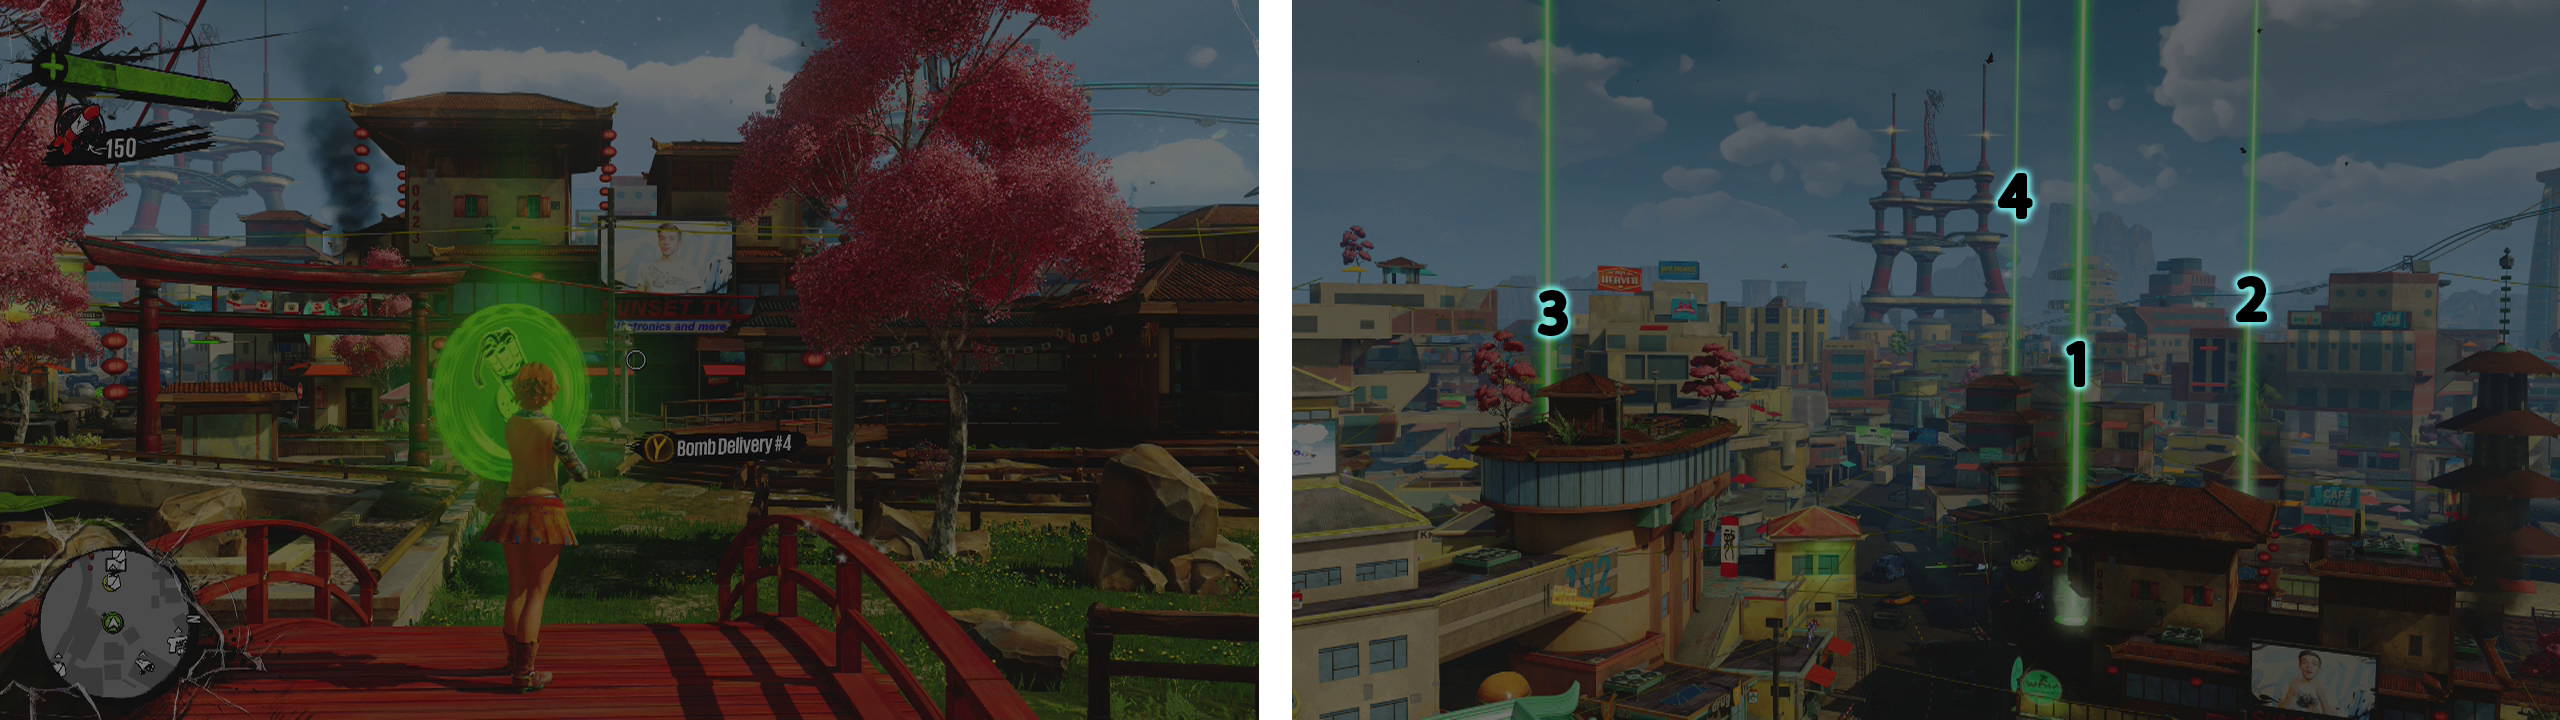
You can begin the challenge here (left). Here is our suggested route through the checkpoints (right).
| Medal | Score | Reward/s |
|---|---|---|
| Bronze | 40 | $ 300 |
| Silver | 3,500 | $ 1,000 |
| Gold | 4,000 | 2,000 x Overcharge |
| Clothing: Sleeveless Hoodie |
Bomb Delivery #5
This one can be quite tricky until you learn the best route and to ignore the order in which the game points out the target locations at the start of the level.
To begin, you’re going to want to turn to the right and air dash and water dash across the water here to reach the first location. Hop up to the roof of the building behind this and air dash and bounce your way over to the next location by the large building directly behind the first location.
From here, do a 180 and hop up onto the roof to the right of the short fence. Grind your way over to the next building and drop down to grab the third location. Climb back up to the roof and grind your way along the wires to the rooftop with the final target location.
You can begin the challenge here (left). Here is our suggested route through the checkpoints (right).
| Medal | Score | Reward/s |
|---|---|---|
| Bronze | 40 | $ 500 |
| Silver | 1,000 | $ 2,000 |
| Gold | 1,500 | 3,000 x Overcharge |
| Clothing: Ripped Jeans |
Bomb Delivery #6
This bomb delivery challenge is extremely straight forward and by following the order that the game points out the target locations during the introduction, you will likely race through and grab the gold on the first attempt.
To begin, we’ll bounce over the fence in front and dash our way over to the first location directly in front. After activating it, turn right and dash across the water, bounce up to the wire above and grind over to the second location.
Use the railings or wires to traverse quickly up the street to reach the third location. Then climb the building behind it and air dash across to the wires behind. Use these to grind over to the final location.
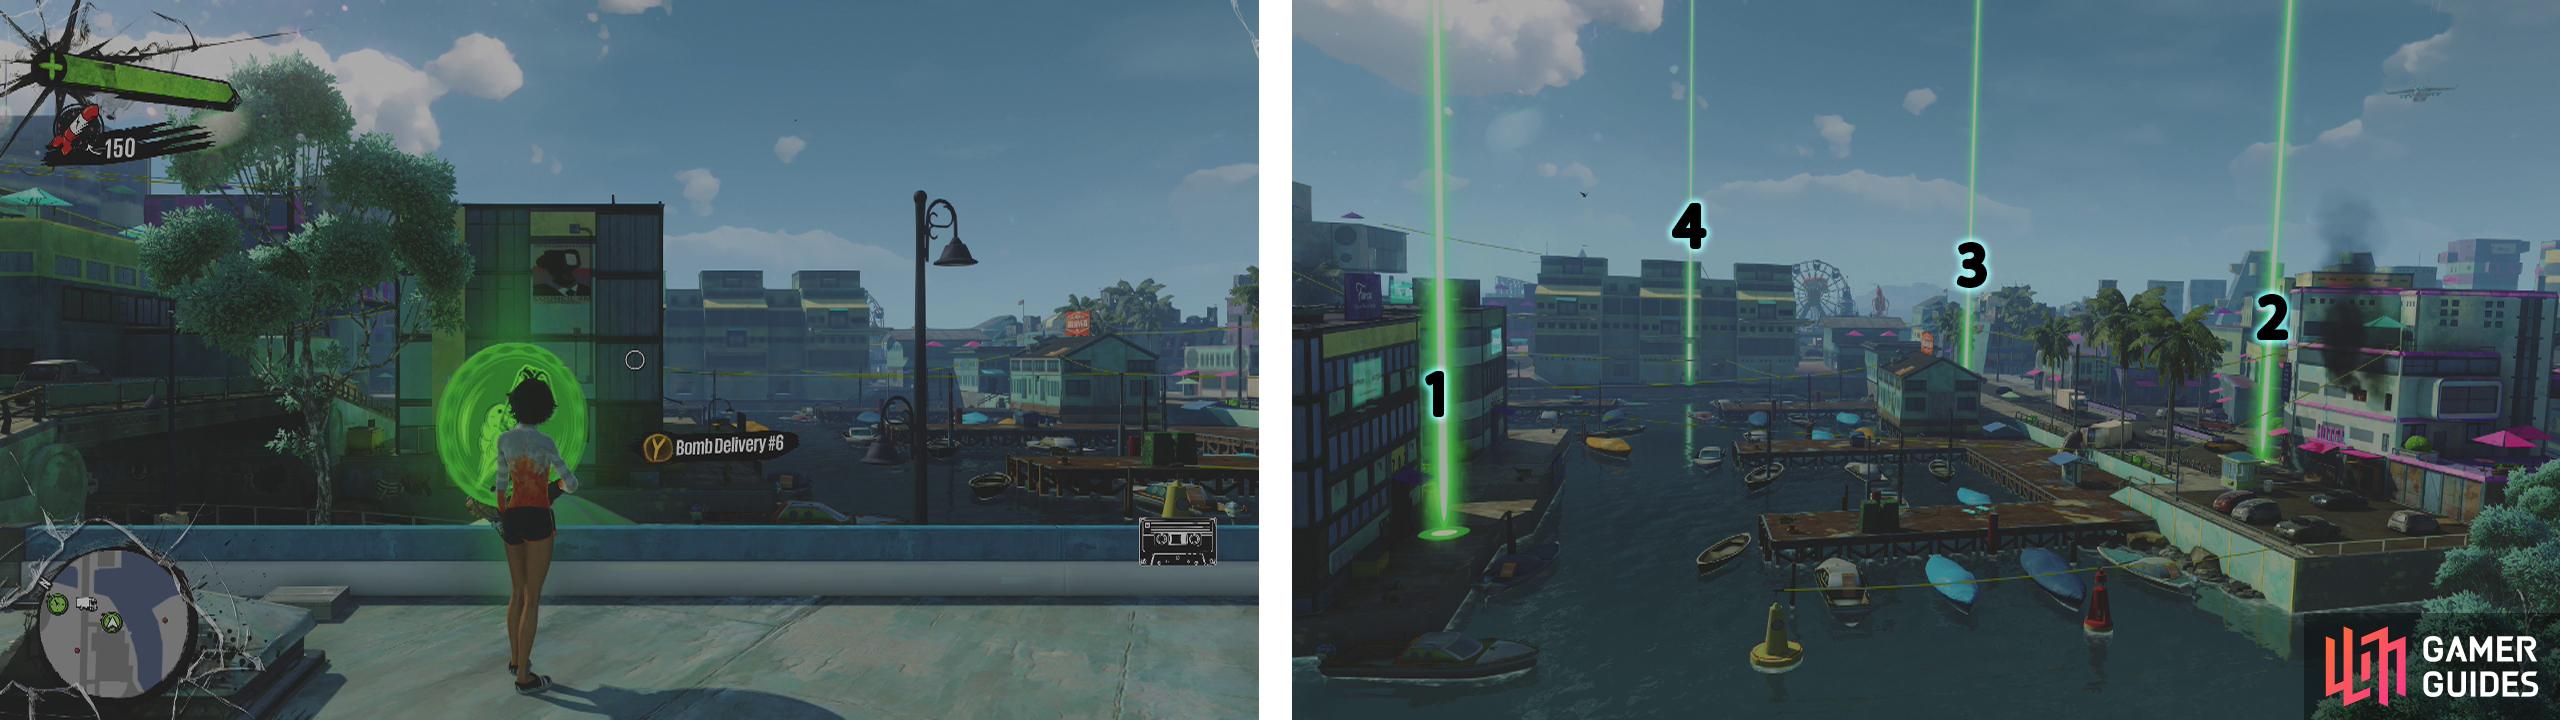
You can begin the challenge here (left). Here is our suggested route through the checkpoints (right).
| Medal | Score | Reward/s |
|---|---|---|
| Bronze | 40 | $ 500 |
| Silver | 1,400 | $ 2,000 |
| Gold | 1,600 | 3,000 x Overcharge |
| Clothing: Leather Fingerless Gloves |
Bomb Delivery #7
This is by far the trickiest of the bomb delivery challenges. Not only does it have five locations to visit instead of the usual four, its location on top of a series of buildings makes it very easy to mess up and fall down to the ground below. Some advice – be patient, you won’t get it first try, but once you have a route down, it’s only a matter of time before you pull it off.
Ignore the order in which the game points out the target locations at the start of the level. From the start, drop down to the lower roof on your left. Grind the wire across to the next building to reach the first location. From the nearby corner, jump down and land on the wire below to grind over to the second location on a lower balcony.
Turn around and bounce and air dash directly across the street. Use the bushes at the far end of the roof to bounce up and wall run or air dahs along the left wall. Drop all the way down to the third location on the walkway below (try to avoid landing on one of the shades to save time). From here, bounce up to the top of the wall behind it and use the bushes on the left to jump up to a higher platform with a wire attached to the corner.
Grind the wire and when it reaches a junction, continue to ride it up to the right to find the fourth location. From here, jump back onto the wire and jump and air dash down to the final location on the platform far below when you get into range.
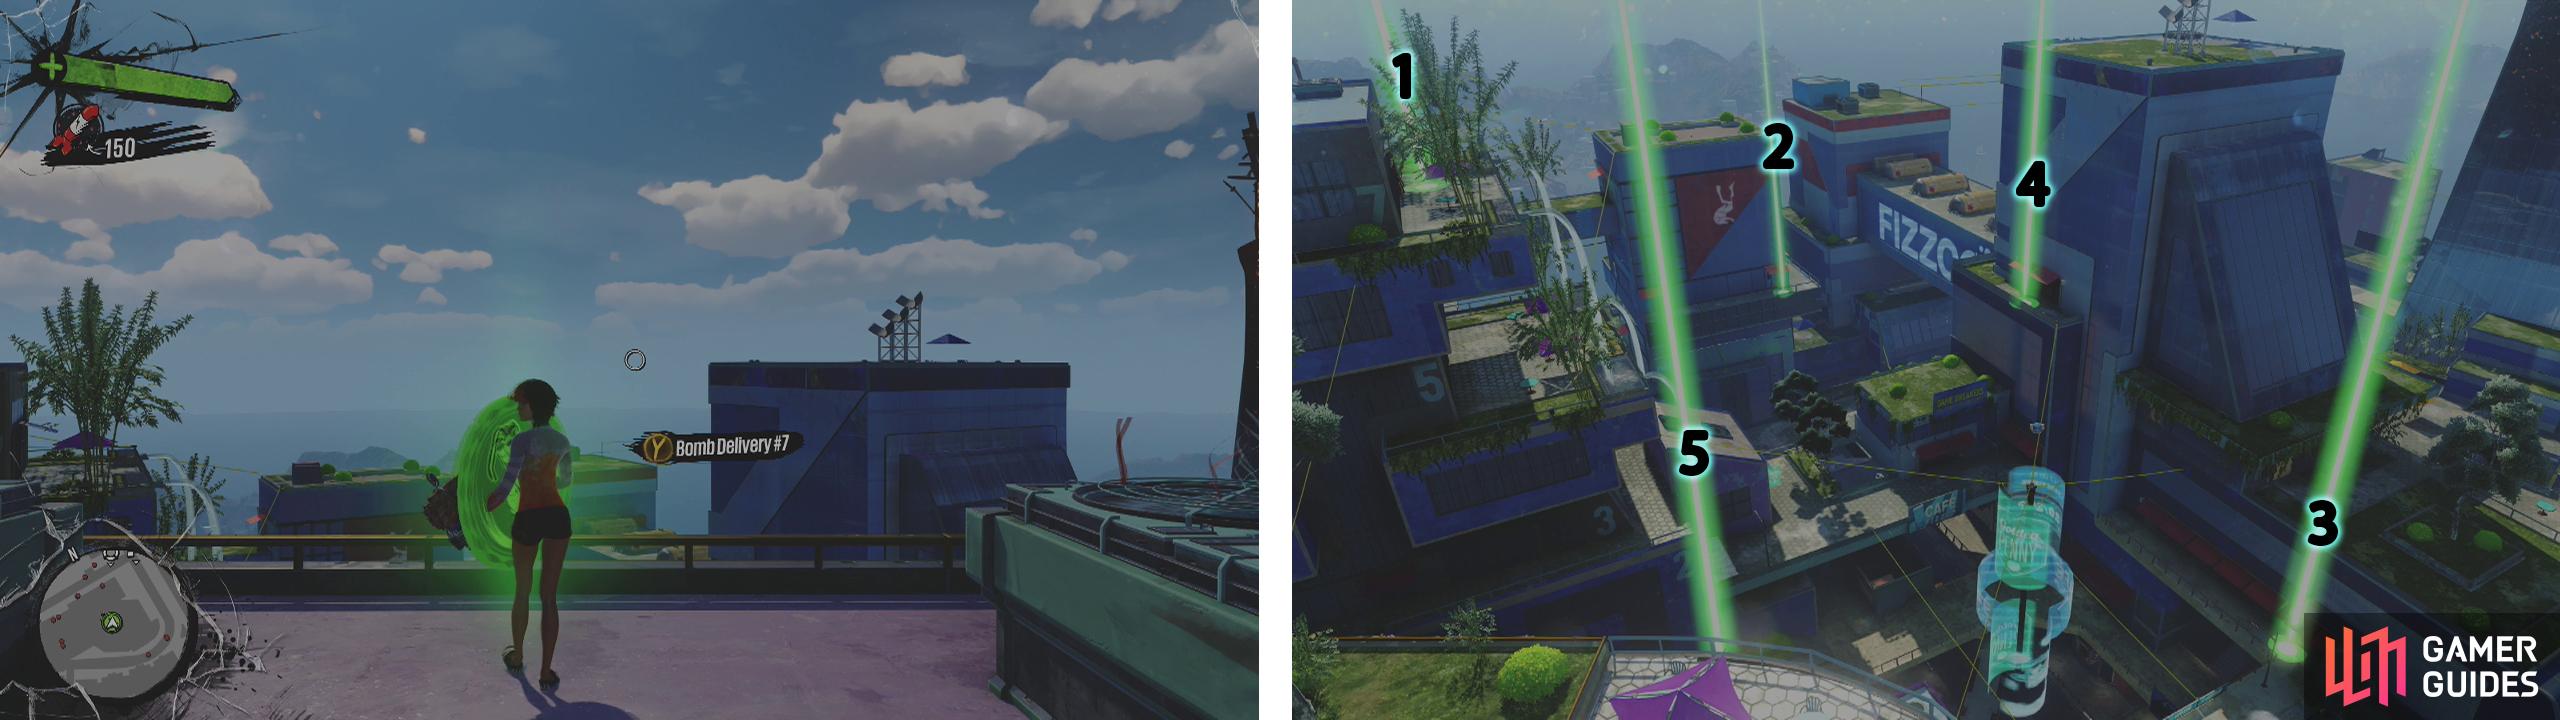
You can begin the challenge here (left). Here is our suggested route through the checkpoints (right).
| Medal | Score | Reward/s |
|---|---|---|
| Bronze | 50 | $ 550 |
| Silver | 1,500 | $ 2,000 |
| Gold | 2,000 | 3,000 x Overcharge |
| Clothing: Balaclava |
Bomb Delivery #8
This challenge is fairly simple and the order of locations straight forward. The key issue here, as with the third challenge, is the par time as the game does not give you very much in terms of buffer time to work with.
From the beginning, you are going to have to hop on the vent and air dash across to the first location on the balcony across the street. Use the sail behind this and then the parasol above to bounce over to the billboard to the left. Grind this across to the next platform with the second location.
Use a parasol on this balcony to reach the roof above and grind the wire across the street and use the railing to the right to traverse over to the third location.
Climb the wall behind this and use the car to bounce up to the wall, wall run to the right and jump up to the small balcony area near the corner. Bounce to the roof of the building, and then make a short jump to the balcony of the adjacent building which houses the final location.
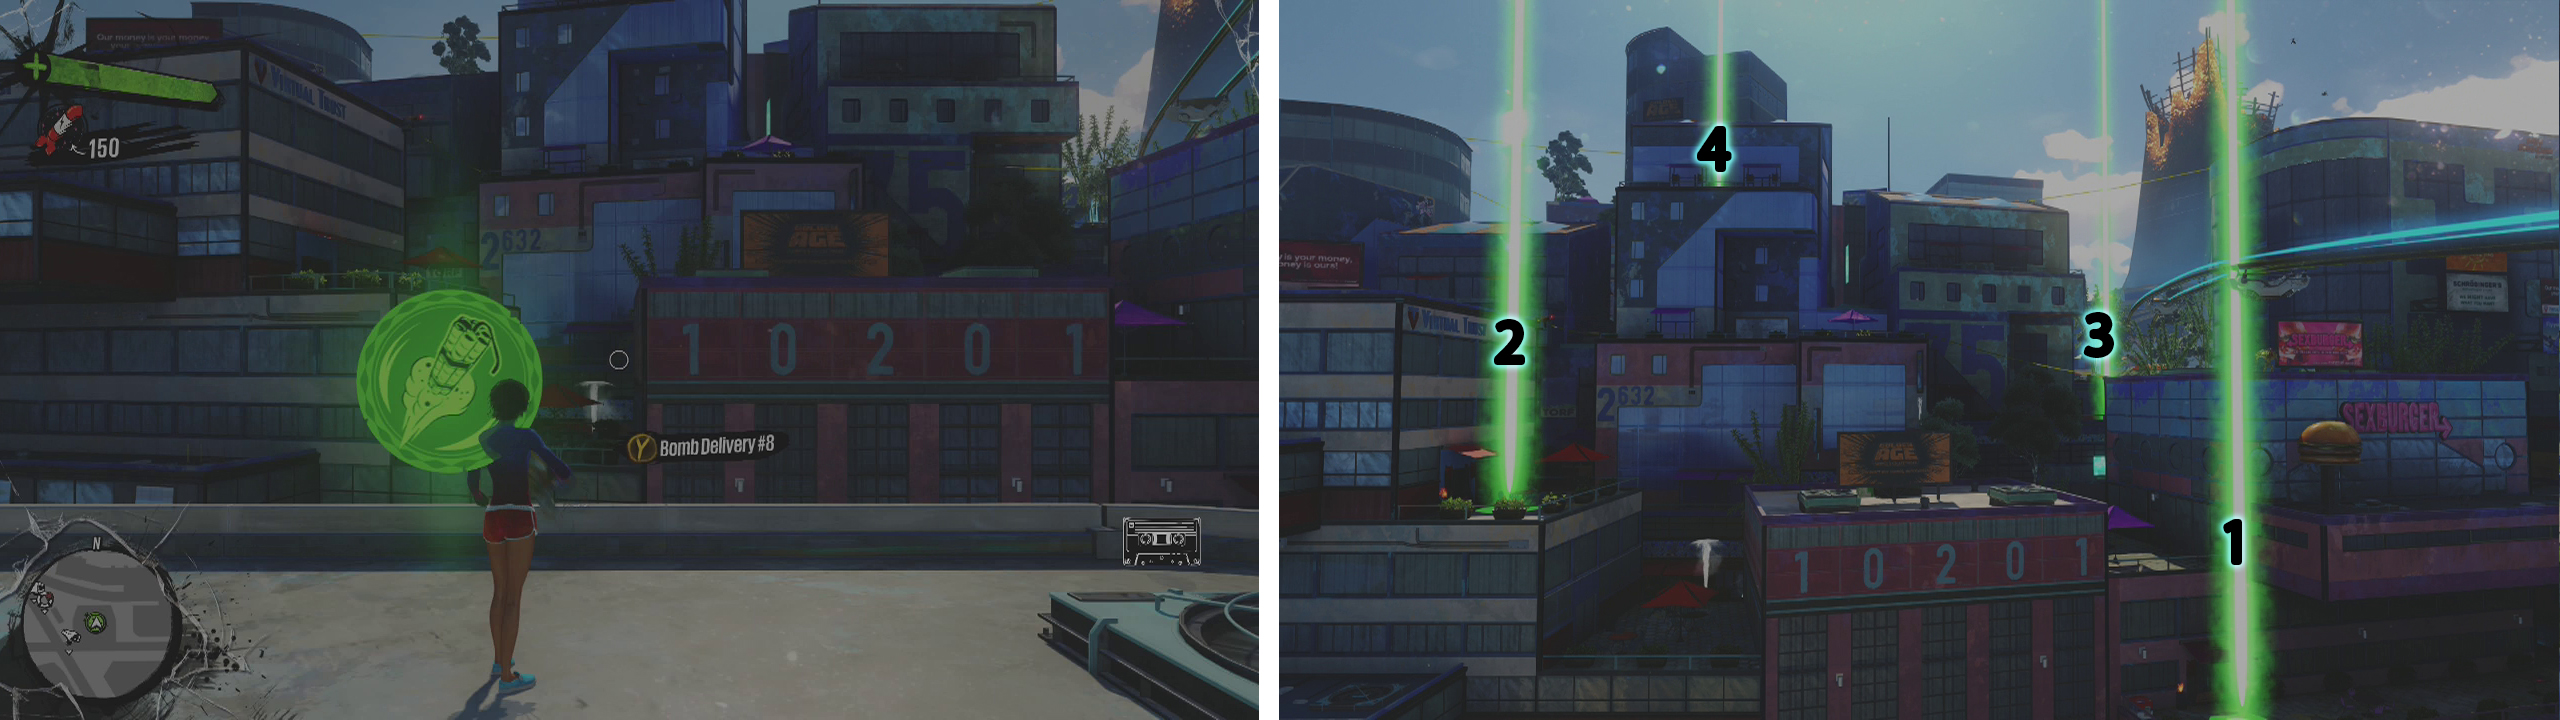
You can begin the challenge here (left). Here is our suggested route through the checkpoints (right).
| Medal | Score | Reward/s |
|---|---|---|
| Bronze | 40 | $ 550 |
| Silver | 2,000 | $ 2,000 |
| Gold | 2,500 | 4,000 x Overcharge |
| Clothing: Angry Mob Shirt |
No Comments