

Driving the Regalia
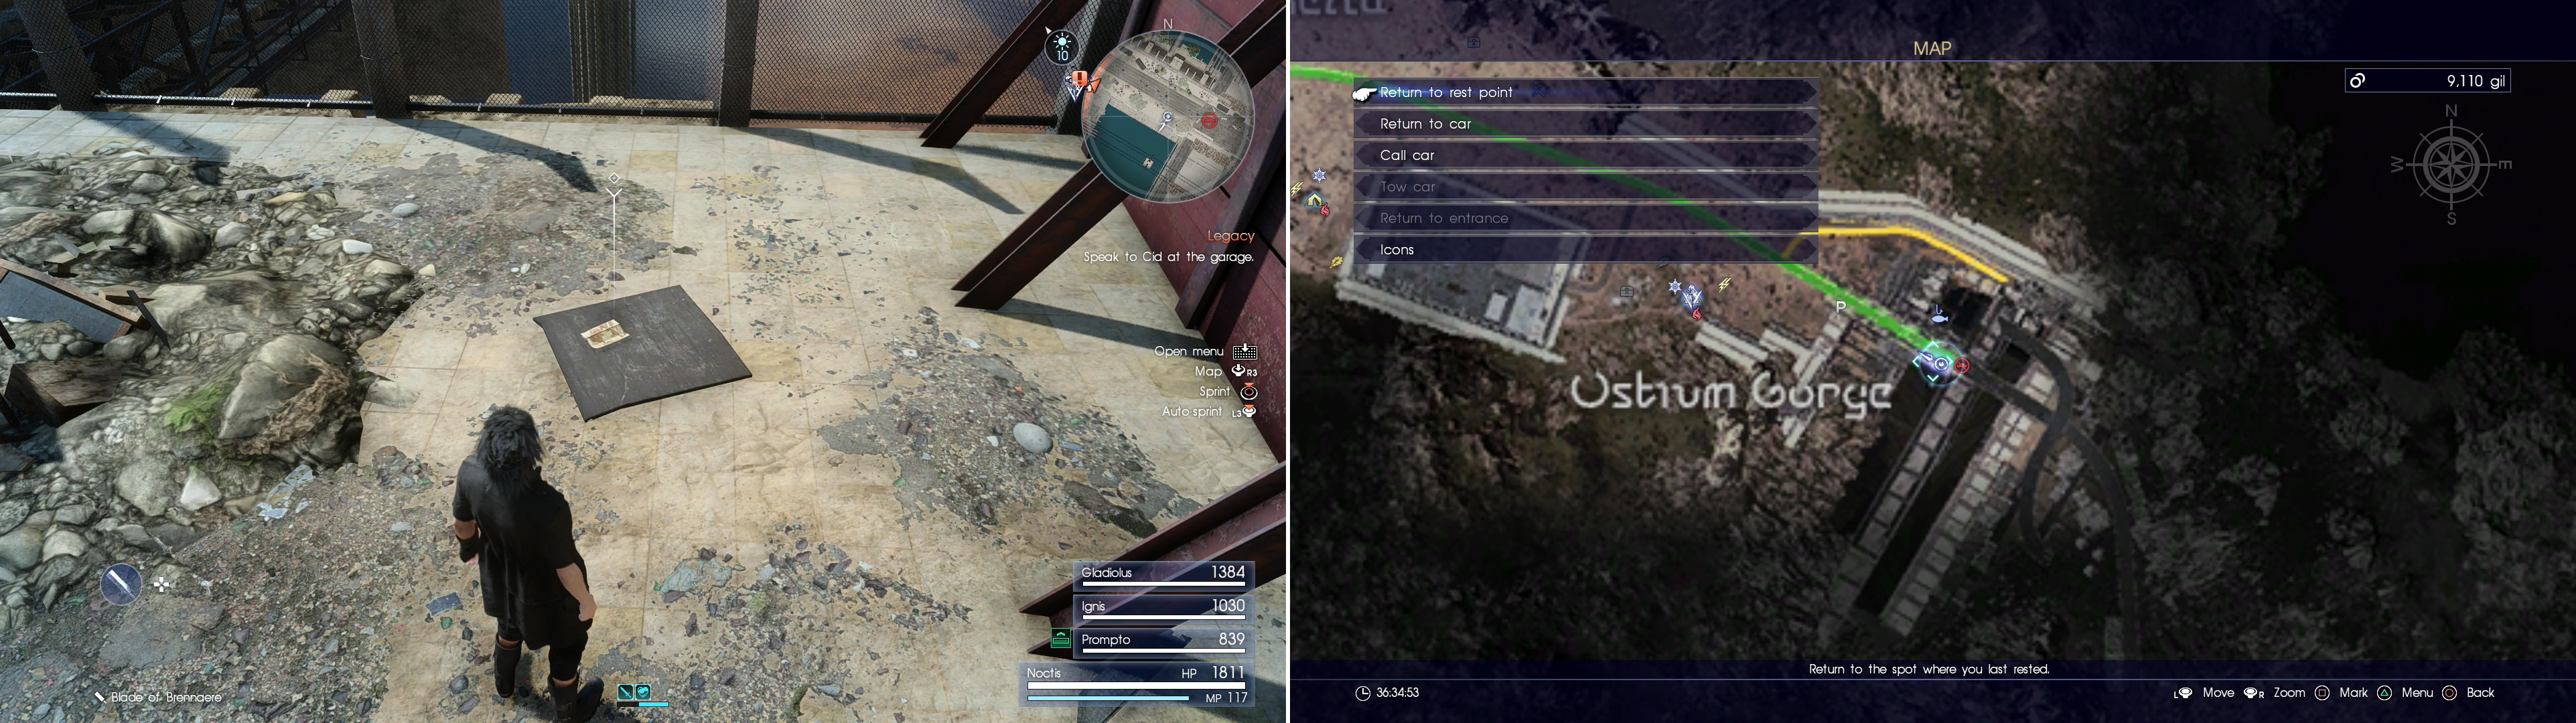
Hop into the Regalia and pick the “Manual” option, then drive the vehicle down the highway to the east, south-east. Don’t worry, this isn’t Grand Theft Final Fantasy - your driving options are incredibly limited (you can’t go off-road or run over some poor unsuspecting person on the sidewalk). Your goal is a Parking Spot north of the “Ostrum Gorge” text on your map.
Now seems like a good time to point out some things about the Regalia, which will become your primary means of long-distance transportation from here on out. First, enjoy this moment of freedom while you have it. Ignis will soon - but briefly - be taking over driving duties until the end of Chapter 1, after which you’ll be able to choose to drive (Manual) or allow Ignis to drive for you (Auto).
When Ignis is driving you’ll get the option to fast-travel to your destination for 10 Gil. If you decline this fee, you’ll get a scenic drive, instead. As for destinations, you can choose between three location categories for Ignis - Parking Spots, Quest Locations and Map Points. Ignis will not, however, drive at night, and this is more for gameplay reasons than anything else, as Daemons and other as of yet un-encountered nuisances will force you to stop the car and deal with them before you continue on.
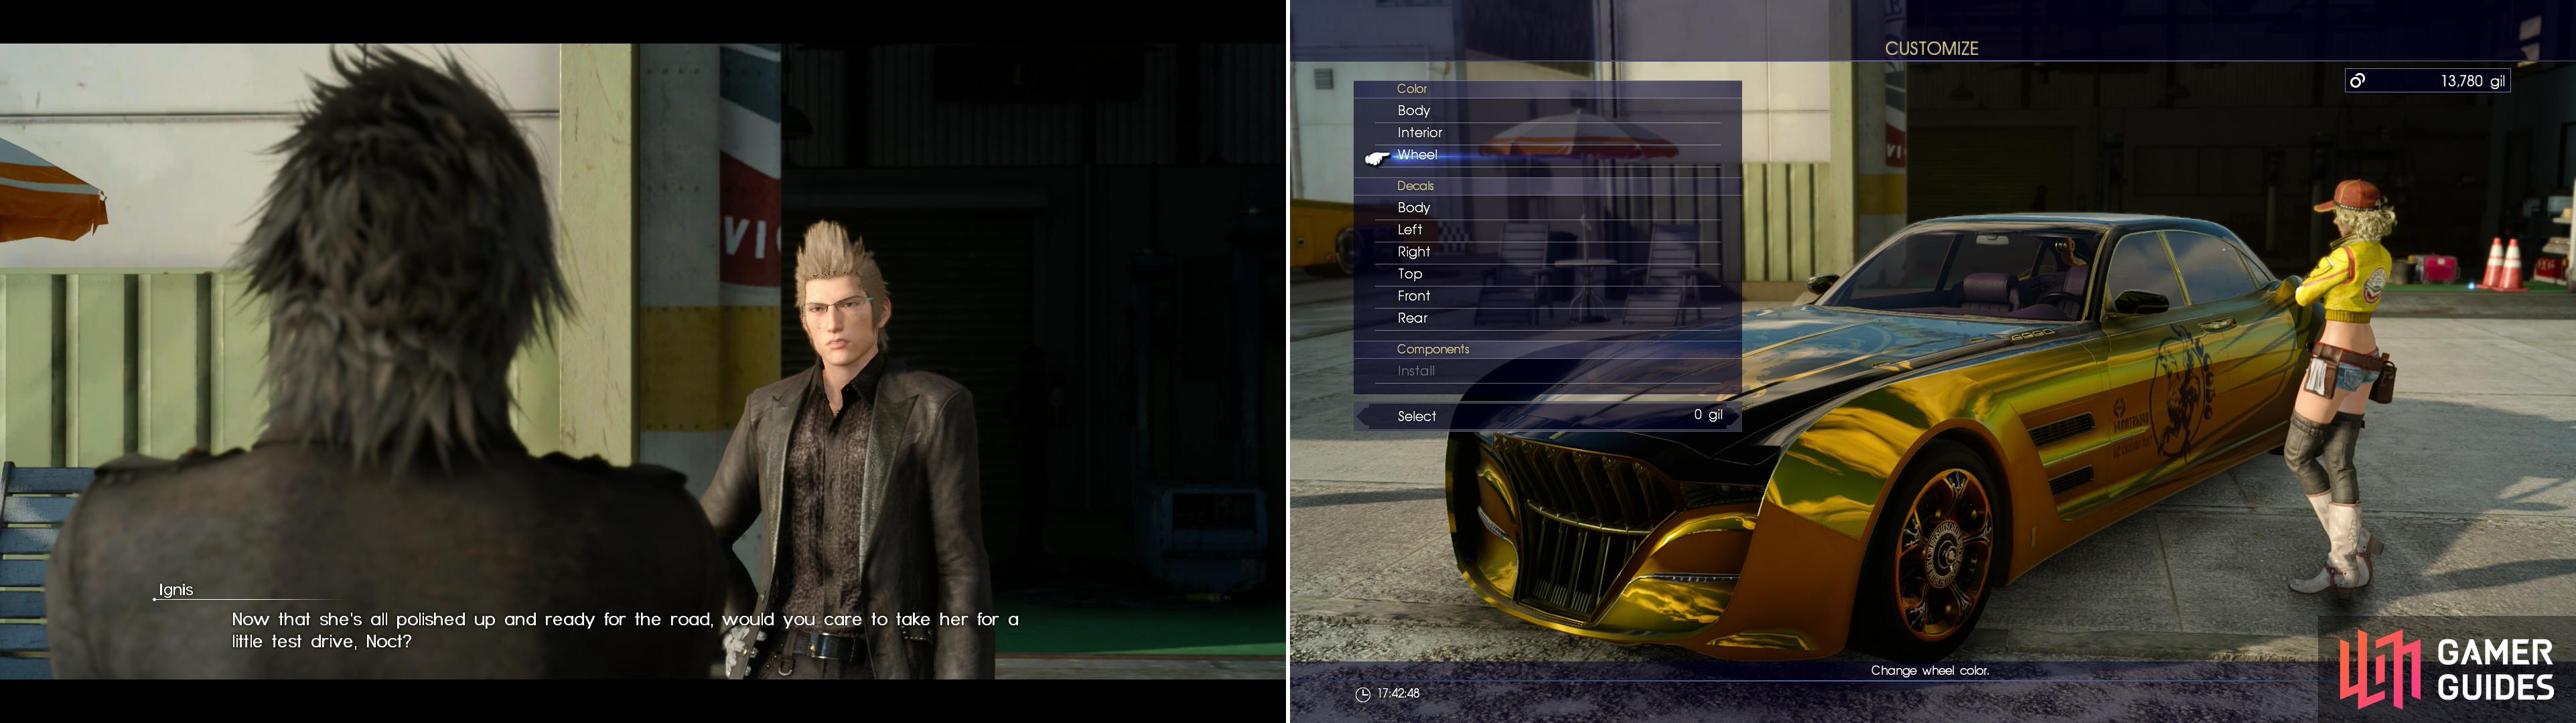
Now that the Regalia is repaired, Ignis is willing to temporarily give you the keys (left). You can customize the Regalia by bringing it back to Cindy (right).
Speaking of that, Daemons are kind of powerful, so if you’re forced to leave the Regalia somewhere, you can summon it to you (at a cost of 100 Gil) by entering your map screen and picking the “Call Car” option. Alternatively, you can have it towed to the Hammerhead outpost (again, for 100 Gil) by picking the “Tow Car” option. So, say you get ambushed by Daemons at night and your only recourse is to flee on foot, well, that’s one way to get the vehicle to you without having to run back.
Last and not least, you can go shopping while interacting with the Regalia - presumably ordering things over phone? However it’s done, pick the “Shop” menu to access this store. Right now the goods aren’t terribly impressive, but stocks will expand as you play. This is especially useful if you need some resources quickly while out in the field.
Regalia (Chapter 1) Items
| Item Name | Price |
|---|---|
| Potion | 50 Gil |
| Hi-Potion | 100 Gil |
| Elixir | 400 Gil |
| Hi-Elixir | 800 Gil |
| Phoenix Down | 1,000 Gil |
| Antidote | 10 Gil |
Accessories
| Item Name | Price |
|---|---|
| Bronze Bangle | 500 Gil |
| Soldier’s Anklet | 1,000 Gil |
Ingredients
| Item Name | Price |
|---|---|
| Gighee Ham | 30 Gil |
| Luncheon Meat | 100 Gil |
| Birdbeast Egg | 20 Gil |
| Sheep Milk | 10 Gil |
| Anak Meat | 80 Gil |
| Leiden Potato | 40 Gil |
| Funguar | 80 Gil |
| Chocobean | 100 Gil |
| Leiden Pepper | 20 Gil |
| Sweet Pepper | 50 Gil |


Now that the messy tutorial business is out of the way, continue your journey to the Parking Spot at the Ostium Gorge. Once there, park the car and continue down the road to the east, south-east, through the abandoned Insomnia checkpoint, noting the car graveyard the place has become. There are a few bits of loot lying around, but the one thing here worth getting is near the barricade blocking the road. South-west of this gate is a red wall, behind which is a trash pile, whereupon you’ll find an Iron Bangle - a handy little accessory that boosts its wearer’s maximum HP by 100.
Mystery Map IV
That’s not all that’s in here, however. Search the north-western end of this walled-off area to find a dark square of… wood? Metal? Whatever it is, it’s got a Mystery Map on it, so search it to start “ Scraps of Mystery IV “. The suggested level on this quest should tell you quite clearly that you’re not doing it any time soon.
If you leave the enclosure where you found the Mystery Map and the Iron Bangle and run north-west along the fence to the south-west, you’ll find a doorway you can go through. If you head down several flights of stairs you’ll reach a ladder leading down into the Cresholm Channels , which starts a quest by the same name. You don’t want to go down there, however, as the monsters in these depths are overwhelmingly powerful.
Find Mystery Map IV (left) at the marked location (right).
Fishing Tutorial
Return to the road and follow it north-west, keeping an eye on a fence north of the highway. When it terminates, turn north-east and jump over a concrete barrier and off a ledge, then turn south-east down three flights of stairs to reach a humble dock, off which is the Crestholm Reservoir - a Fishing Spot where Noctis can practice his favored hobby. Even better, along the way you’ll find some unmarked loot spots where you’ll find some Spider Silk and a random lure - basic fishing gear that you’ll need to replenish as your lines wear out and lures are lost. Note that most Fishing Spots in the game have a line and a random lure near them, but to really stock up on fishing supplies you’ll need to locate a bait shop.
To fish, go to the end of the dock and press X/A, where Noctis will abuse his royal powers by summoning up a fishing rod. Move the Left Analog to set where you’ll cast the line and note the dots on your fishing map, which indicate fish. Yellow dots on your map indicate food fish (which yield edible ingredients when you catch them) while blue dots indicate fish that give other, non-edible (although still potentially valuable) components. If the dots are flashing, they indicate a breed of fish you haven’t yet caught. Once the line is cast, use the Left Analogy to steer your lure, and the R2/RT buttons to reel it in. The fishes’ awareness meter is the same red bar used for enemies on land, and once sufficiently enticed you’ll have to perform a QTE by moving the Left Analog stick in a specific direction to hook the fish, after which the real fun begins.
As the fish struggles and stresses the line, you’ll be prompted to move the Left Analog stick in a specific direction to reduce tension. As you reel the fish in it’ll also apply tension to the line, so you’ll have to stop reeling occasionally to let that source of stress die down, as well. As tension is applied to your line, it’ll take damage, and if it breaks, you’ll lose the lure as well as the line. That being the case you’ll want to pay attention to your line’s durability first and foremost, and focus on reeling in your catch (R2/RB) only when the tension prompt isn’t on the screen. When a line’s durability is compromised you can press the Touchpad button to swap it out with a new line… at least, between catches. Also keep in mind that not all fish are attracted to all lures: sometimes you’ll want to change those out, too. If that’s not complicated enough, however, know that different types of fish are only active at certain times of day, so if a different lure isn’t working, you might just have to come back at another time… or wait.
Fish as much as you care to now; it’s a fine time to stop and learn the basics, but, as should be expected from an early-game fishing spot, the critters you can catch here aren’t too impressive.

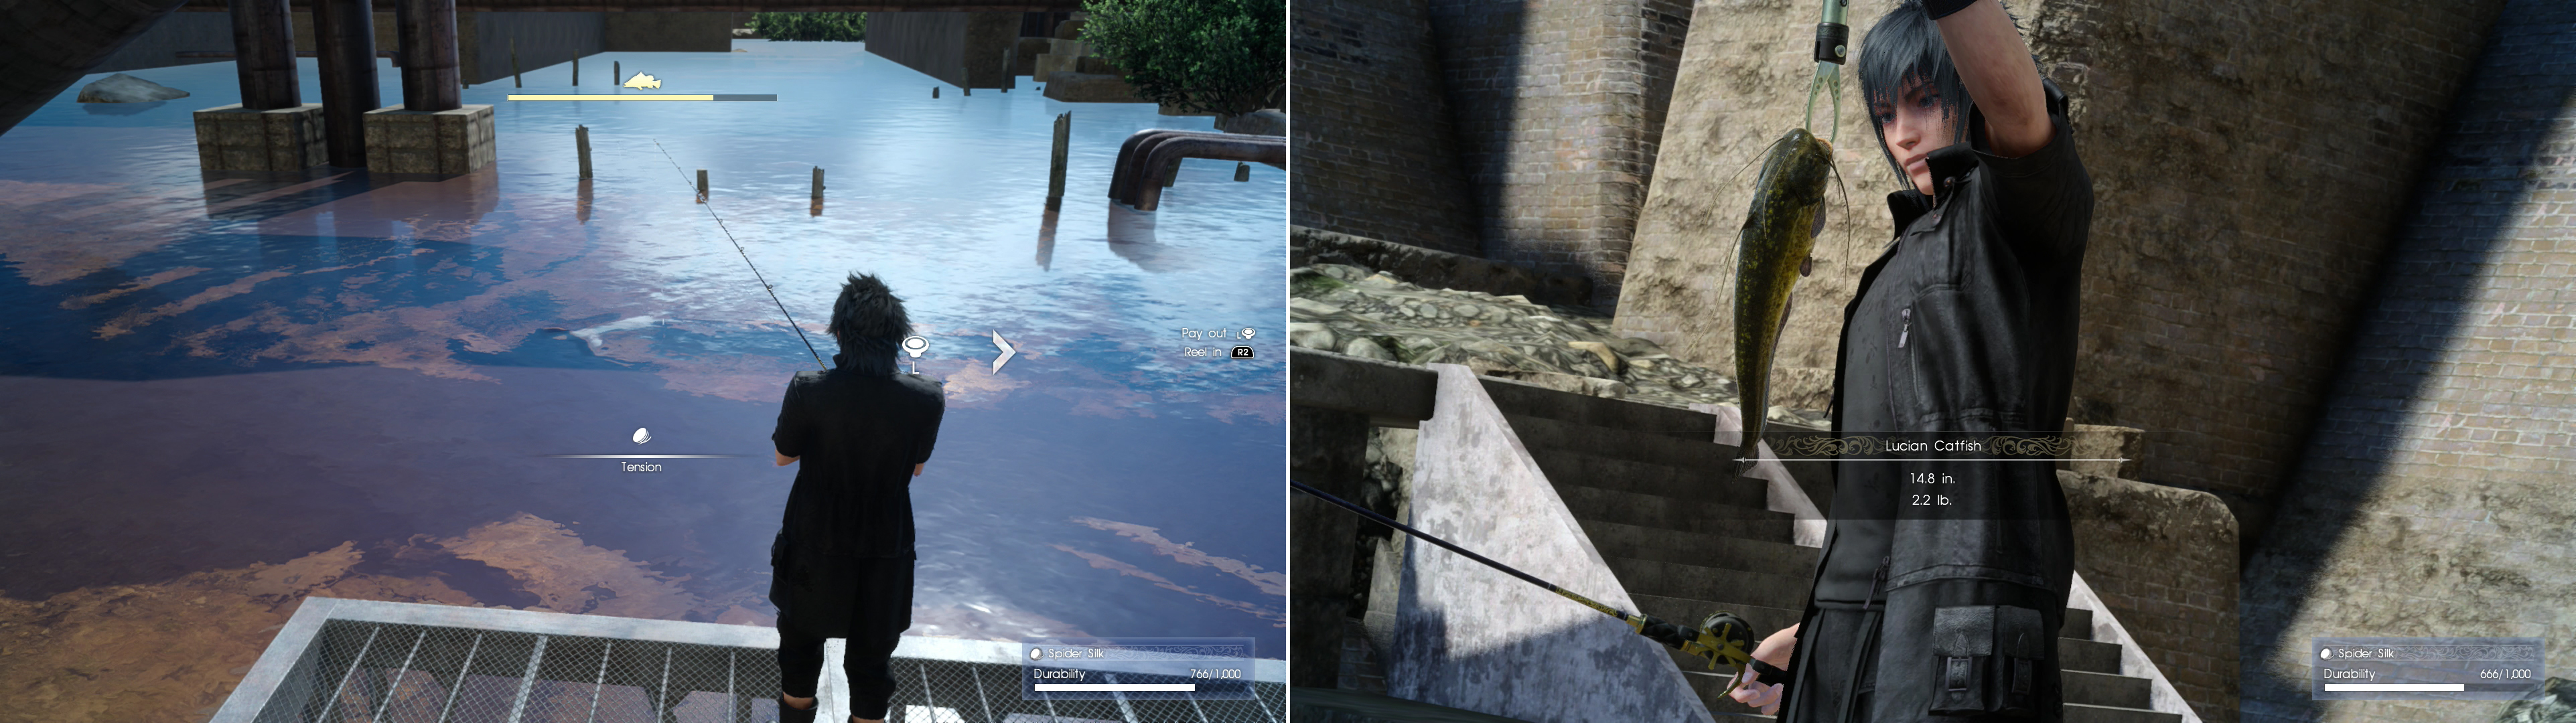
Reel fish in while moving your rod in the direction of the fish and being mindful of tension on your line (left). You can gather all kinds of useful resources by fishing (right).
Hill Overlooking Insomnia
There’s one more thing worth grabbing before you head off towards the next outpost. Leave the fishing area and head back up the three flights of stairs, after which, turn north until you find a road. Follow it east until you find some ruins. Hooray for urban decay! Make your way up some stairs and through the ruins until they give way to a natural crevasse. Follow the linear path to the east until it opens up onto a ledge overlooking Insomnia. Aside from the great view, you can find a Bulletproof Vest along the south-eastern edge of this overlook. Nice!
Once you’re done soaking in the grand view of your home city in all its splendor, it’s time to return to your car and turn your attention to the west.
No Comments