

Now that the Daurell Caverns have been explored, it’s time to turn your attention back to Leide for the next two dungeons, starting with Balouve Mines. If you’re looking to explore this optional dungeon, then you will need to first head to Longwythe Rest Area and spot the yellow road on your map that is slightly southeast of it. This will bring you to the Balouve Mines parking spot and the entrance to this dungeon is just a little jog southeast of there.
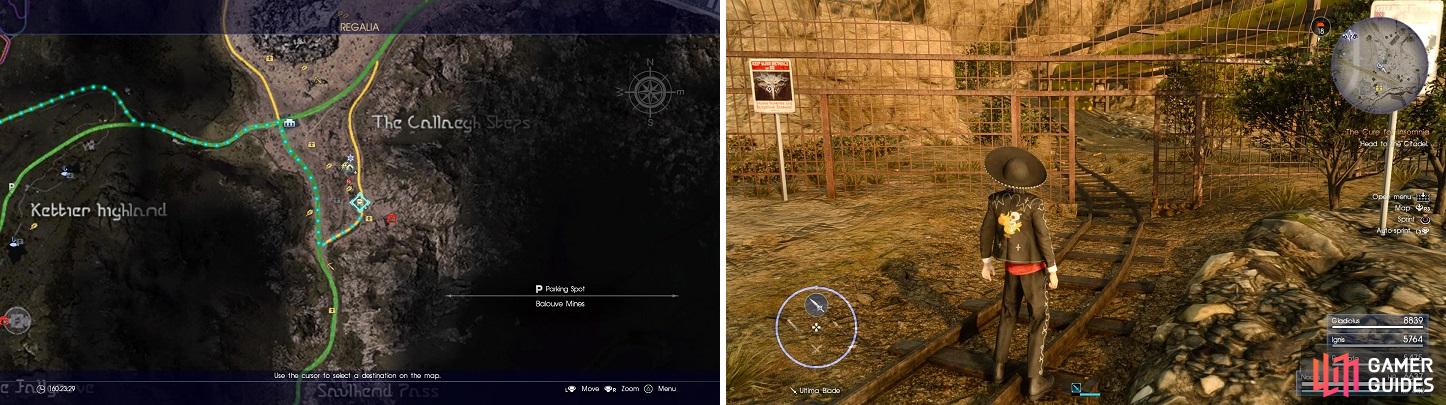
The location of Balouve Mines, both on the map (left) and in-game (right).
Upon entering the place, look for the elevator right in front of you and take it deeper into the mines. Exit the elevator at B1F and look in between the containers nearby to find some Iron Shavings . A little further down the tunnel, you will happen across a dead end, where you will find a Rainbow Pendant . As you venture west, there will be a Rusted Bit on the ground and you’ll hear something rumbling. Quickly turn around and eventually, the minecart you saw will come barreling towards you, so get off of the tracks before it smacks into you.
Keep going west and another minecart will be speeding towards you, this time from the front. Just past that will be another minecart blocking the track, which when approached, will run you over and some Goblins will pop out. If you’re doing this dungeon in the postgame, like in this guide, then the Goblins will die in one hit, since they’re only level 7. Kill them and follow the track to a dead end, with another item ( Silver Ore ) laying on the ground. Back in the main hallway, there will be a path going down to the next level by where you find a fire-elemental deposit.
The tunnel here is linear, with some Goblins dropping down to give you a little frighten, until you get to a fork, where some more Goblins will take a joyride on a minecart to play a little game with your party. You will find a Chrome Bit if you should decide to head east at the fork, which will also bring you to the elevator shaft. That’s all you’ll find this way, so return to the split and take the other path now, popping the Goblin that jumps out of the one minecart, until you get to a bridge.
Before stepping out onto the bridge, you should look closely to see a shadowy figure standing on the middle of it. This is the sole reason this dungeon has a recommended level of 50, and you will see why shortly. Step out onto the bridge and the samurai-looking enemy will disappear when a minecart approaches from behind. The bad thing here is that he’ll reappear and attack you, knocking you down below with only a singular HP left and there’s nothing you can do about it, as this event is scripted. The biggest problem is that a bunch of Goblins will be waiting for you below, so quickly pop an Elixir and take care of the small fry.
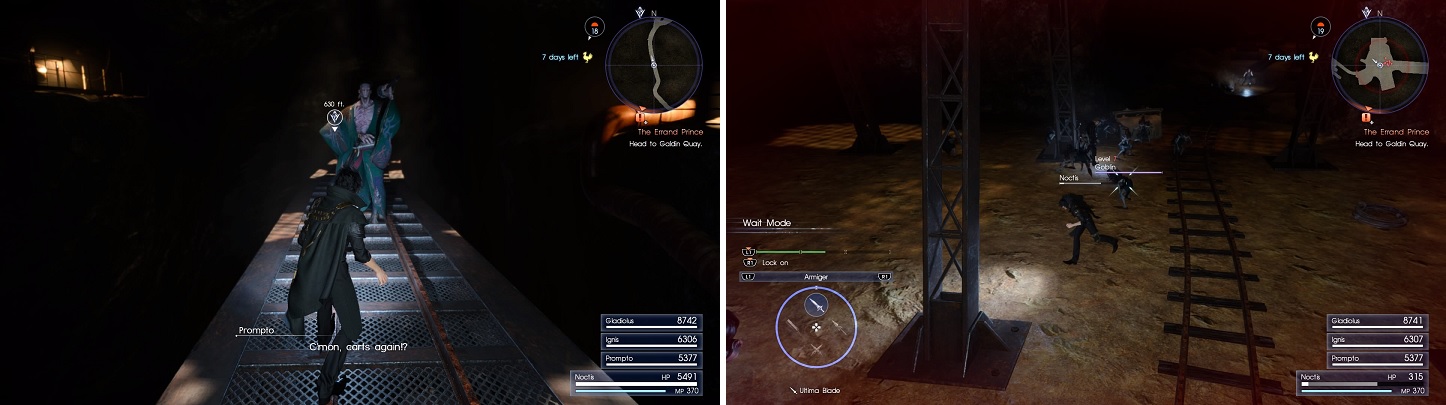
The Aramusha will attack you, leaving you for dead (left). He will knock you below to let the Goblins finish you off (right).
Whew, that was dangerously close, although if you’ve been following this guide, then the Goblins are nothing you can’t handle, even if there are ten or so of them. Go to the north end of the big room to find an Elixir , then climb the stairs nearby to find another item ( Megalixir ) at the end of the one catwalk. You now have two ways to go, east and west. Start by going east and you’ll run into more Goblins, as well as another split in the road. Go south to find even more Goblins, as well as a path to the elevator, with another Chrome Bit on the way. The other path in this eastern area leads to an incline and as you get close to the item, another minecart will come barreling down on you.
Dodge it, pick up the Silver Ore and keep climbing to the top. Follow the path west, stopping at the first detour you see to encounter more little nuisances and grab an Elixir. Back on the main path, there will be a lightning-energy deposit a little further west and yet another split, with some Goblins harassing you with another minecart. There will be a Gold Ore just around the corner to the north and some stairs, so take those up to a larger room with an item in the middle, which will prompt some more Goblins to appear.
Take them out and pick up the Iron Shavings , then return to the split, as the current journey will bring you to the final area, but there’s a bit more to explore first. Back at the fork, go south to return to the bridge where you will “coerced” to the bottom by the Aramusha earlier. Drop off and take the western exit this time, where you’ll come to a door. Open this up to find a series of catwalks and a Mythril Shaft by some fans, along with more Goblins. At the end of one of the catwalks will be a Circlet , so snatch it and look for the ladder to get to an area below.
You’ll have a few ways to go after opening the door, although you’ll be attacked by some Goblins before you can move. Northwest will put you in the final chamber of the dungeon, so do not go there yet. Return to the fork and look for the ice-elemental deposit not far from it, and take the south of the two paths there. You’ll find some Goblins annoying you along the way and at the end, you’ll find the elevator, along with a Friendship Band on the side of it. Use the detour nearby to get onto the other path you didn’t take before ( Elixir on way back) and some Goblins will run away from you near the deposit, locking the gate behind them, trapping you here.
So, what does that mean for you exactly? It means that you can now go after the main boss of this dungeon, so go back to the elevator and take it back up to the second floor (B2F). Remember that spot in the northwest corner that lead into a big room that was mentioned to be the boss room? Yep, run your butt off to there and climb the two sets of ladders to start the encounter with the Aramusha, who is at the very bottom.
Boss Battle: Aramusha
You’ve likely fought a bunch of these enemies prior to exploring this dungeon, so you know what they entail. However, despite being only level 52, the Aramusha can still pack quite a punch. It has around 175,000 health and is weak to swords, daggers, lightning and holy, while being strong against only fire. If you’re doing this in the postgame, then utilize Ignis’ Enhancement technique to pile on the damage. Also, using swords is ideal, as there are a lot of opportunities to parry the enemy’s attacks, which can lead to Linkstrikes (daggers can’t perform Linkstrikes).
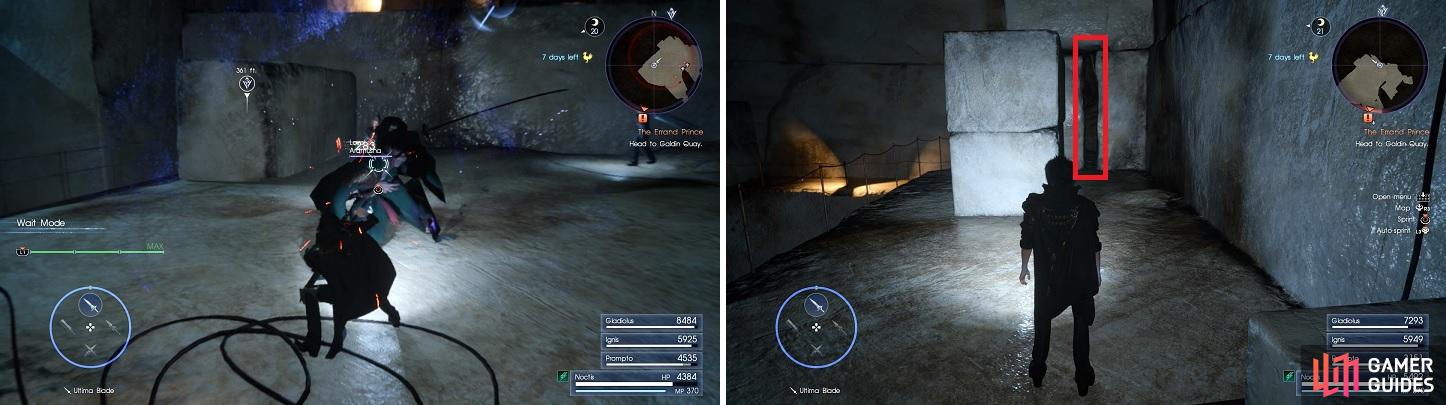
Parrying is one of the easier ways to fight the Aramusha (left). The gap in the wall that will lead you to the Royal Tomb (right).
There will also be a bunch of Goblins that spawn in and join the fight, although they only complicate things by making it hard to target the Aramusha. After the battle is over, pick up the Oracle Ascension Coin at the ground level, then use the stairs to find some Prismatic Dust next to a large tank. The one tunnel leading out of this area is where the Goblins from earlier locked the gate, so go and unlock it, then come back to the big room. Climb the stairs right by the exit, then go down the next set to find a Hi-Potion at the opposite end.
You will find one more item in this room, which is up the final flight of stairs, leading you to the spot where you dropped down the second ladder; it’s a Prismatic Dust and it’s in the corner past the ladder. Now, finding the entrance to the Royal Tomb is a bit difficult, as it’s not exactly well-advertised. From where you can climb the ladder, go towards the Prismatic Dust and look for a crack in the wall on the northwestern side. Squeeze through to not only find the Royal Tomb, where you can get the Bow of the Clever , but you will also find the locked vault door that will be needed later.
| Objective | Reward |
|---|---|
| For exploring Balouve Mines | EXP 10,000 / Bow of the Clever |
No Comments