| Location | Objective |
|---|---|
| Castle Krakenburg | Rout the enemy. |
| Enemies |
|---|
| Samurai |
| Oni Savage |
| Ninja |
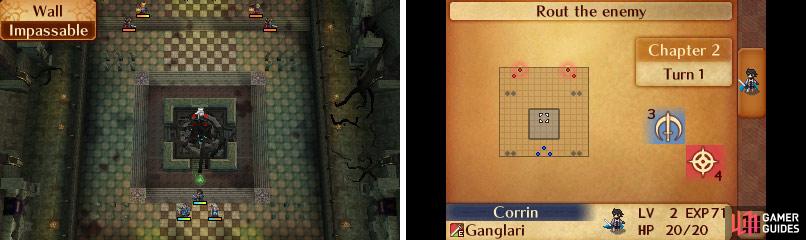
Map of Chapter 2.
Anyways, it’s time for the first real fight of the game. First off, take note of the green glowing spot. That is a Dragon Vein! Yes, they take many forms. Go ahead and use your avatar to step on the spot to reveal a place to heal. Any unit with a crown next to their name will be able to make use of the Dragon Vein, so this isn’t exclusive to your avatar. All of this is covered in a tutorial at the beginning of the battle (25. Dragon Vein).
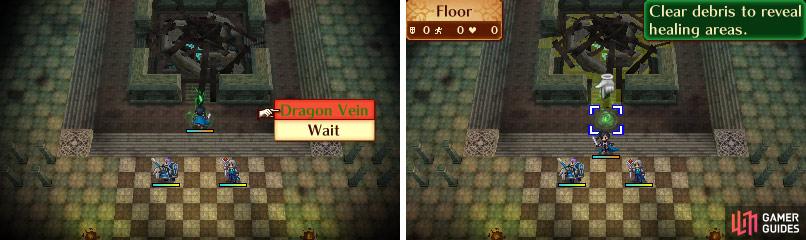
Use the Dragon Vein so that you can hide inside.
There are many Samurai scattered around who will try to close in on you. Avoid defeating them using Gunter! In Fire Emblem: Fates, characters have different classes (for example, Jakob/Felicia, the Butler/Maid, can use staves to heal, and attack with shuriken). Once at max level (20), the characters can promote to a new class that is basically an upgrade to their base class. Gunter is in such an upgraded class, meaning he has heightened power and gains less experience. Do not let Garon take all of the experience. Focus on Jakob/Felicia and the avatar.
As the cutscene suggests, your best tactic is to hide in the healing fortress in the middle of the map. When you select Gunter he’ll bring up yet another tutorial (14. Losing Units) that merely tells you that if units have their Hit Points reduced to zero, they die. In Classic Mode, death is permanent, and if your protagonist falls, you get a big, fat game over.
At the beginning of the second turn you’ll get a proper tutorial on the Weapon Triangle (11. Weapon Triangle), which, in case you forgot, is the rock-paper-scissors system of strengths and weakness weapons have. Red weapons (swords/spellbooks) are strong versus green (axes/clubs/bows), but weak versus blue (lances, spears, throwing weapons). Green is strong versus blue, but weak versus red. Blue is strong versus red, but weak against green. It’s important stuff, and worth rehashing again. For this battle, your protagonist has a red weapon, while Jakob/Felicia and Gunter have blue weapons, which are strong versus green and red, respectively. On the other side, Rinkah has a green weapon, Kaze has a blue weapon and the two Hoshidan Samurai have red weapons. Your protagonist will be strong versus Rinkah, neutral versus the Samurai, and weak versus Kaze, while your companions will be strong versus the Samurai, neutral versus Kaze and weak against Rinkah.
Finally, when this tutorial ends, you’ll get yet another tutorial, this time on tag teams (18. Tag Team). Remember in the first mission when your protagonist and Takumi attacked together? That’s what’s being covered now. To recap, if you and an adjacent ally can both attack the same enemy, they’ll boost in each other in combat, and the passive character (the one who isn’t actively attacking) will get a free attack. After this, at some point you should get another tutorial (10. Help at a Touch), which just tells you that you can use the touch screen to find out more information about characters, stats, and icons.
During the battle at some point you should also get a tutorial on healing staves (9. Staves). Simply put, healing staves are weapons with a limited number of charges that can be used to heal adjacent units. The charges do not replenish; if you run out, you’ll have to buy another staff. Fortunately, they’re not terribly expensive, but it will be a while before you get the opportunity to buy one, so don’t go using Felicia/Jakob’s twenty charges up!
Now, a quick run-down of this fight is in order. If you occupy the central healing field (leave Gunter out if you’re confident in victory and don’t want him stealing XP, and stay away from the northern wall, as Kaze can attack through the wall!), by two turns the enemy should have moved down to flank you on either side of the structure. At this point you can have your protagonist move left to (but not attack!) one of the Samurai, then have Felicia/Jakob move behind you and initiate a combo attack with your protagonist by using their Iron Dagger. This should kill - or nearly kill - one Samurai, who will likely commit elaborate suicide next turn by attacking your protagonist.
During some point in the battle, you’ll undoubtedly be damaged by Kaze, which will prompt the tutorial (13. Status Effects). Simply put, shurikens and daggers will lower the stats of targets struck (even if they don’t take any damage!). Just one more thing to watch out for…
After weathering the first turn, finish off Rinkah with your protagonist (red beats green) and have Felicia/Jakob attack Kaze, if your protagonist isn’t too hurt. Both sides will take a beating, Kaze should get himself healed on his next turn (and will probably continue to target your protagonist with a ranged combo/Samurai support). On the next turn you can finish up by knocking out the Samurai (who likely took a lot of damage on his turn when he broke off from Kaze to attack) with Felicia/Jakob. Just move your domestic down one square away from the Samurai to provide a space for your protagonist so they can move in, and together you can tag team Kaze.
Once the board is cleared, more chatter will ensue, which will reveal the characters of both your protagonist, your father, and some of your siblings. Nope, no choices for you yet.
No Comments