This is a fairly long chapter with quite a lot of options, so read on for a simpler breakdown for the choices you can make to complete the flowchart. It’ll take more than one playthrough, but remember to stick to the recommended good choices first.
We’re hunting for parts to help repair members of Jericho in this chapter, so from the start you’ll automatically climb on to the dock, and then proceed to follow North as she leads you and a few others through a container yard.
Almost Spotted: There’s a section with two guards on patrol, standing to the far left. North and the others cross to the other side first, and Markus must move left towards the guards (this will unlock the node on the flowchart) to have North tell him to return to the group. Continue to follow your crew and climb the containers.
Progress Toward CyberLife: After jumping across more containers you’ll be faced with two choices, both of which unlock a separate node on the flowchart.
– Follow North: North will tell you to follow her by jumping on the crane.
– Follow Simon: You can follow Simon instead by jumping over the containers.
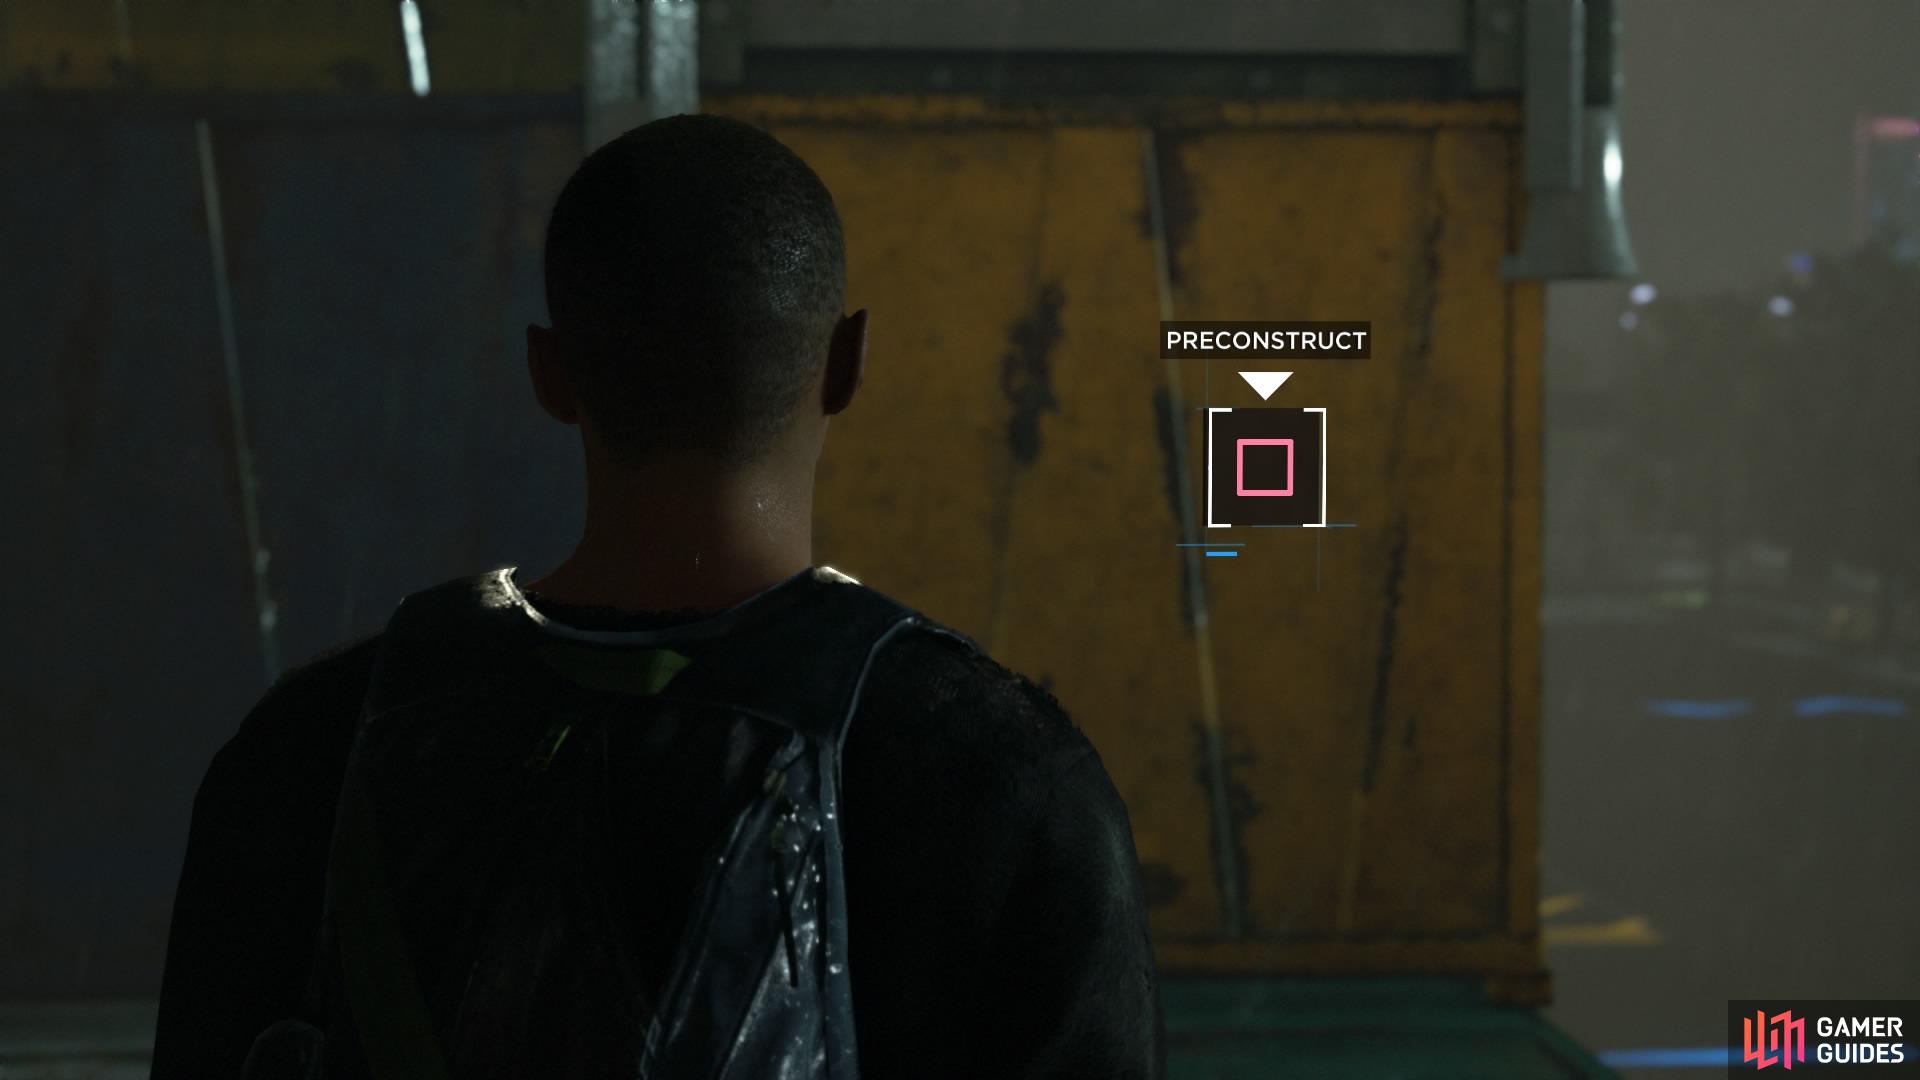
Begin a preconstruction
Find the right path to take out the drone
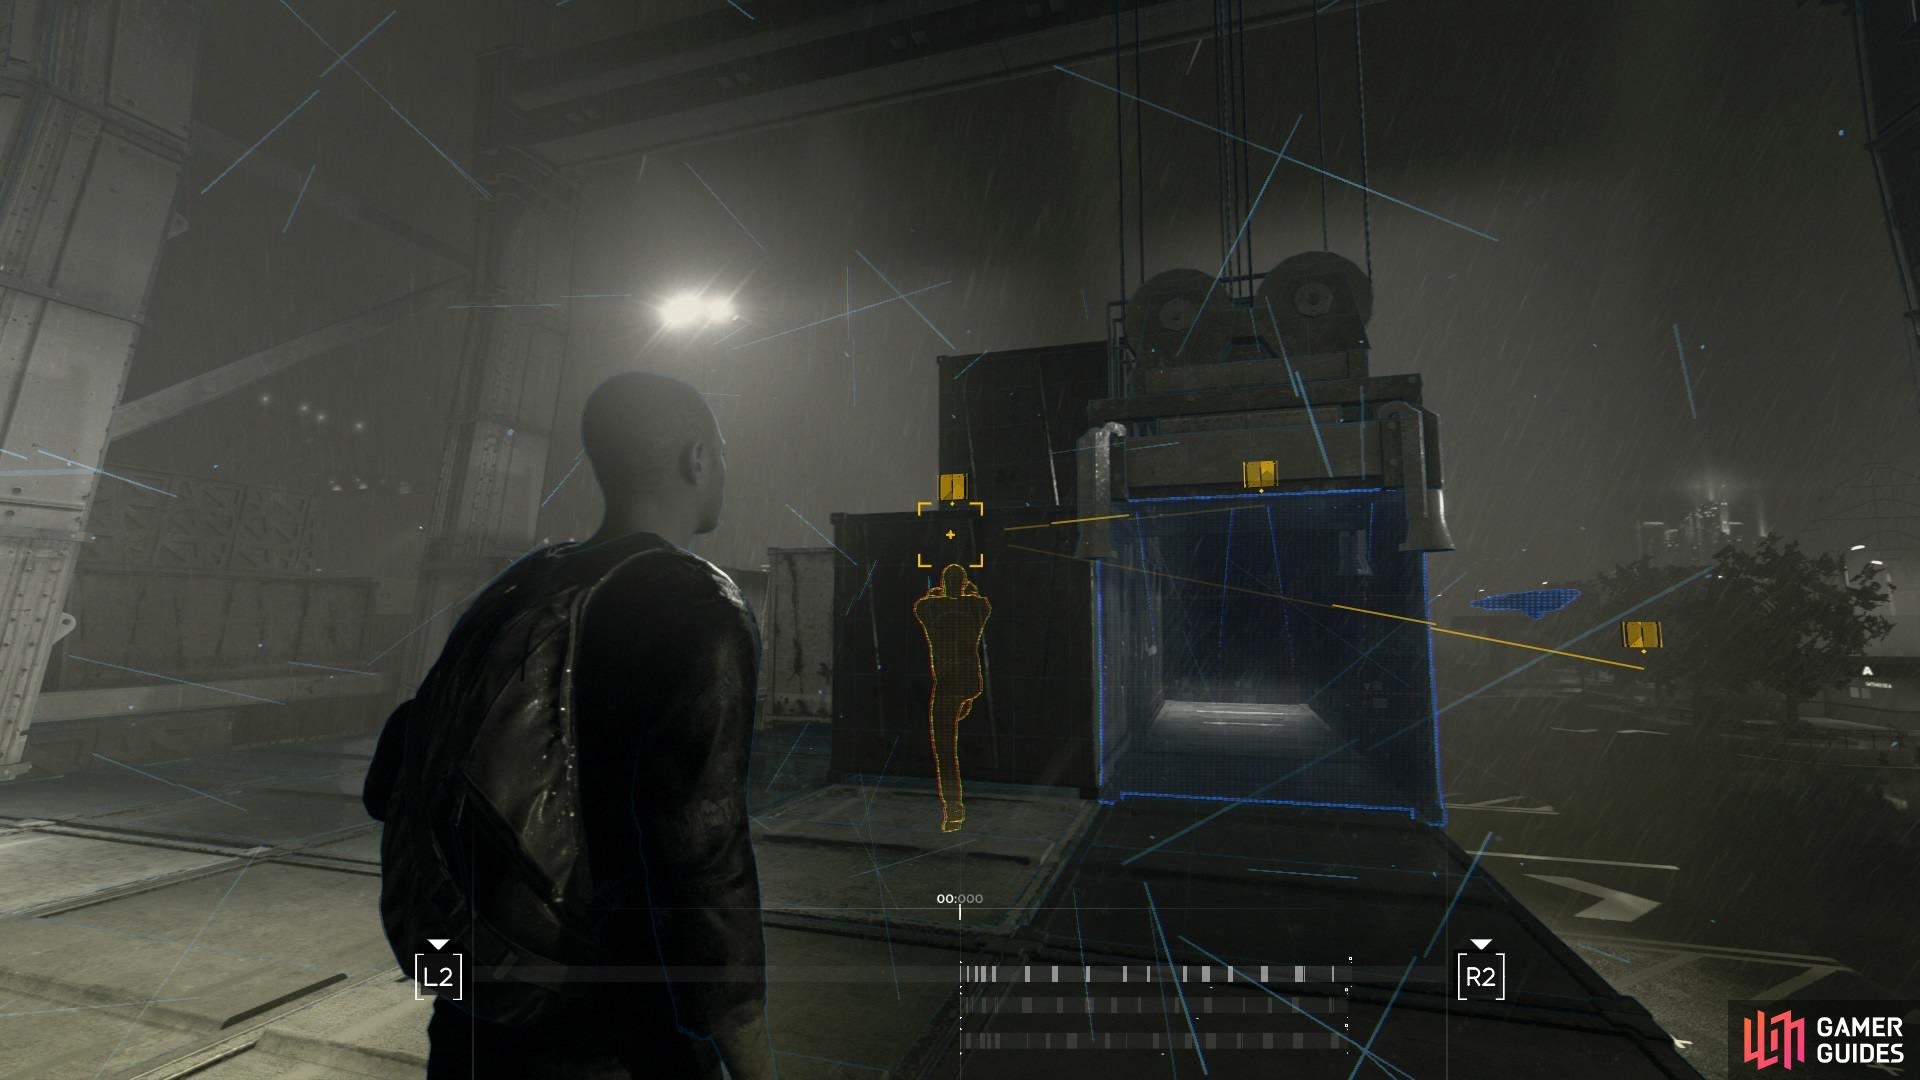
Drone Blocks Path: You’ll have to take down a drone scouting the area from above, so construct a path once prompted to figure out how to get rid of it.
Neutralise Drone: Once you’ve made a path, choose from two options.
– Markus Unharmed: Press the buttons quick enough to successfully destroy the drone without getting hurt.
– Markus Damaged: Fail to press any buttons while jumping on to the drone to get hurt in the process.
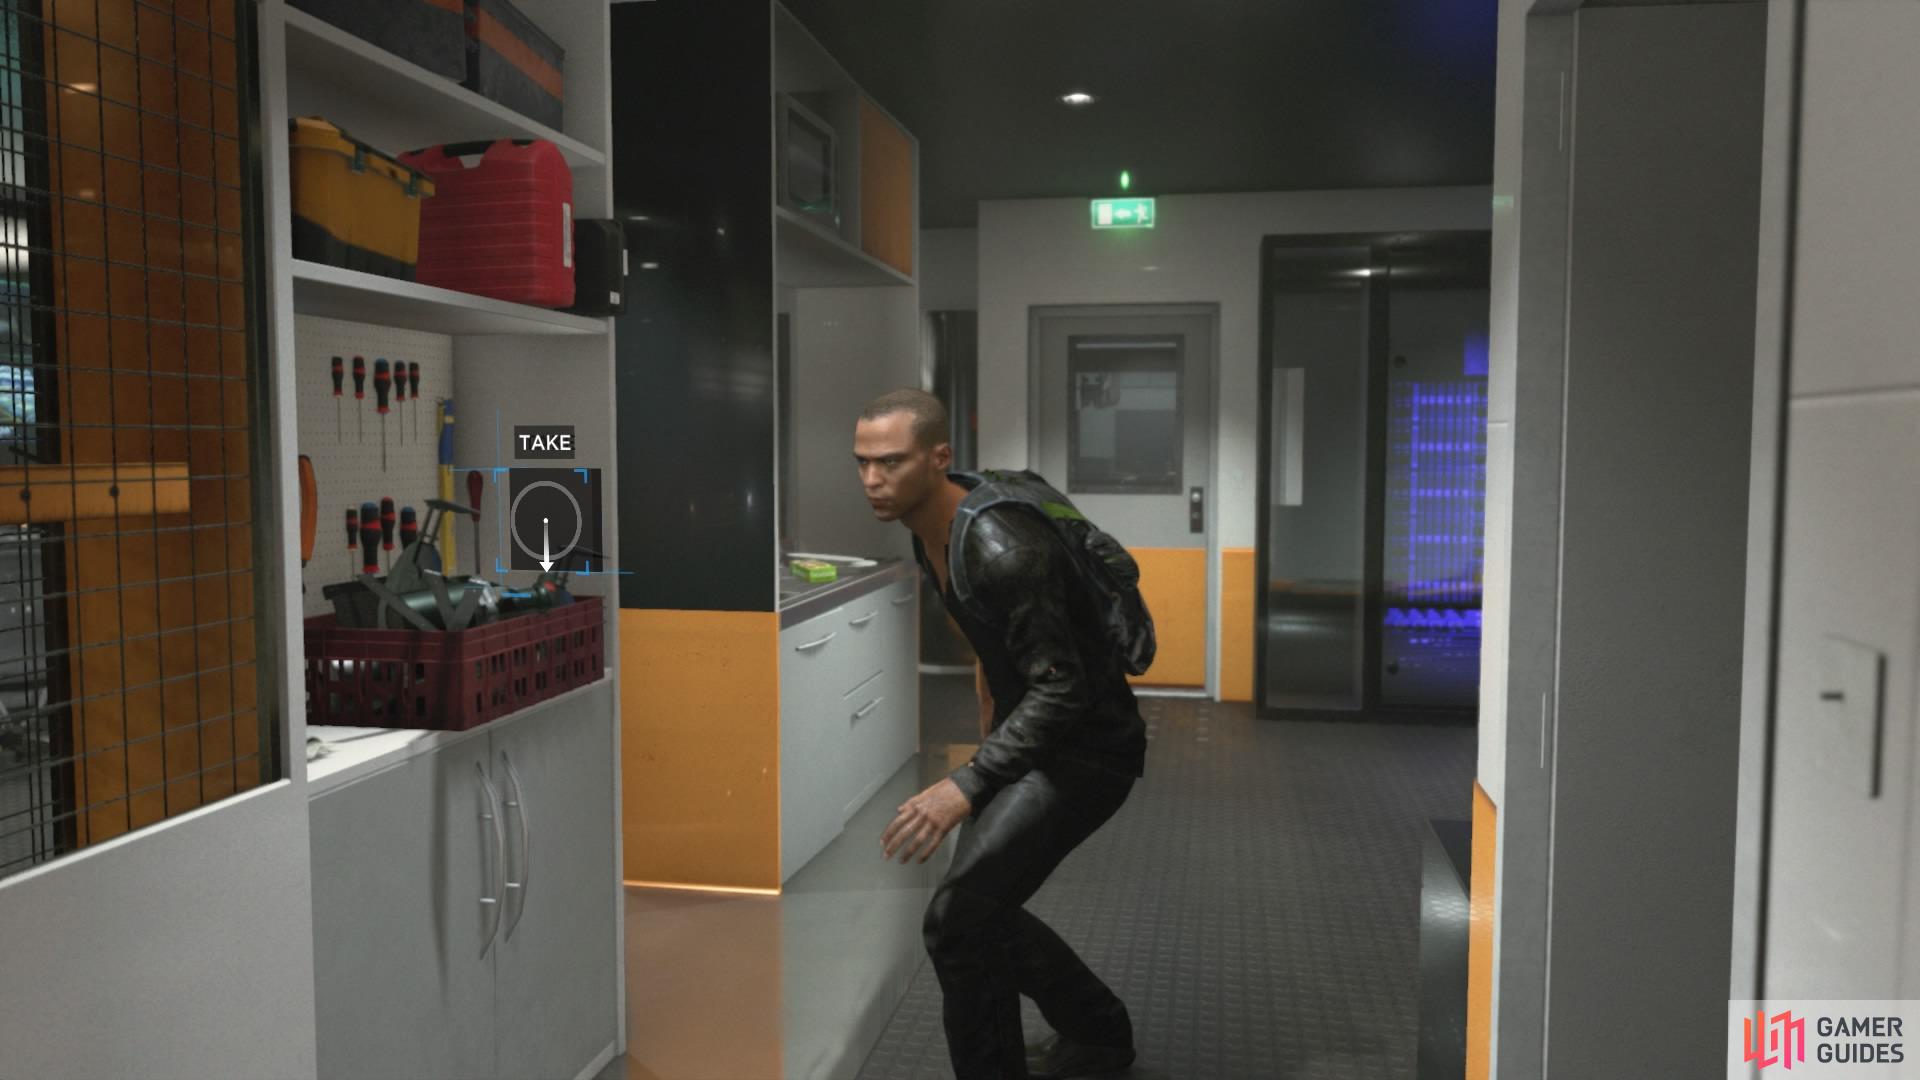
After this, you’ll reach the CyberLife storage area and begin to gather the spare parts you came for. This is unmissable, so proceed to open the containers and take the parts.
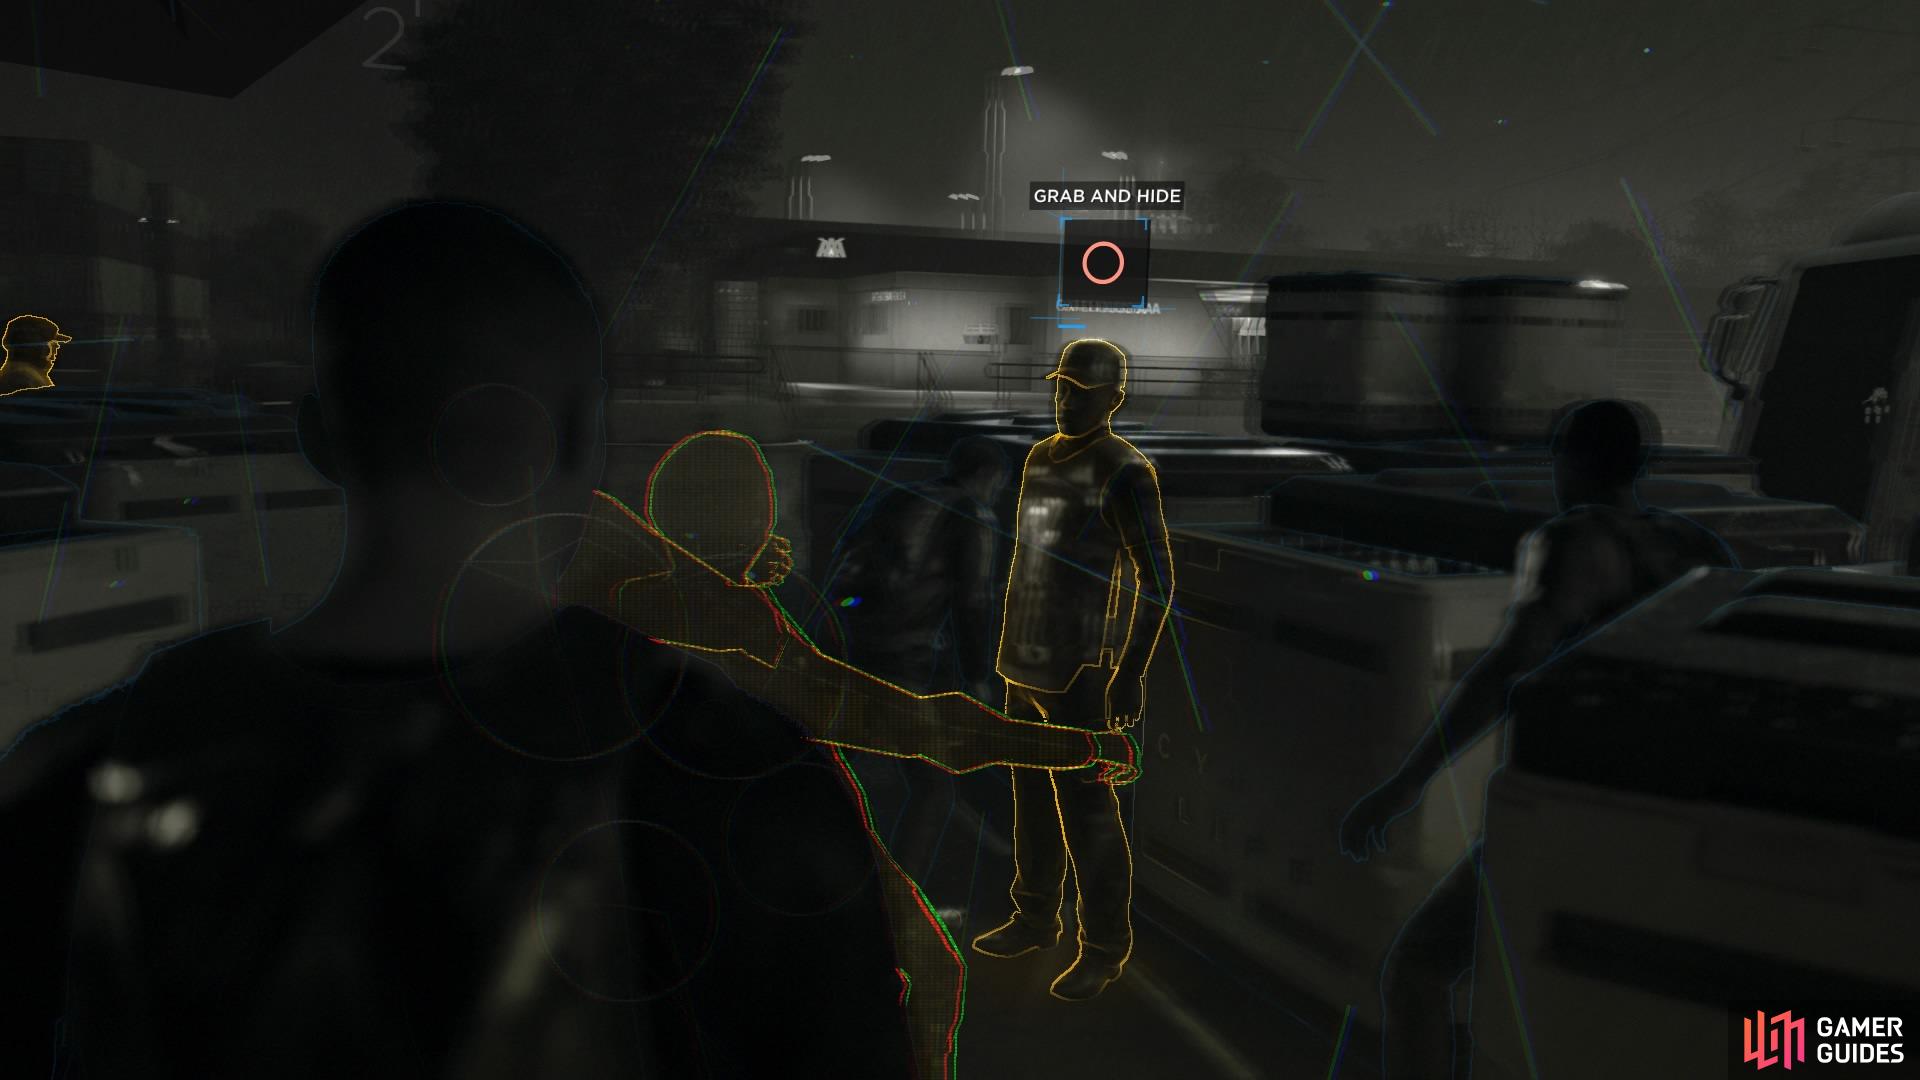
Grab and hide the android
Convert him and release him
Security Android: A security guard will appear while you’re searching the containers, and a human guard will come looking for him.
– Attack: This will kill the guard.
– Grab Android and Hide: You can grab the first android and hide behind the containers. Then you can follow up by asking the android for his help. When you let him go, he will cover for you and make the human guard go away. This is the best option and will result in no casualties.
– Run Away: Doing this will end the mission early, and your reputation with Jericho will decrease.
– Hide: This will have the same result as running away. Hiding will get you caught and end the mission early with everyone running away.
Android Guard Becomes Deviant: By using the Grab Android and Hide option above, the android guard, John, will become deviant.
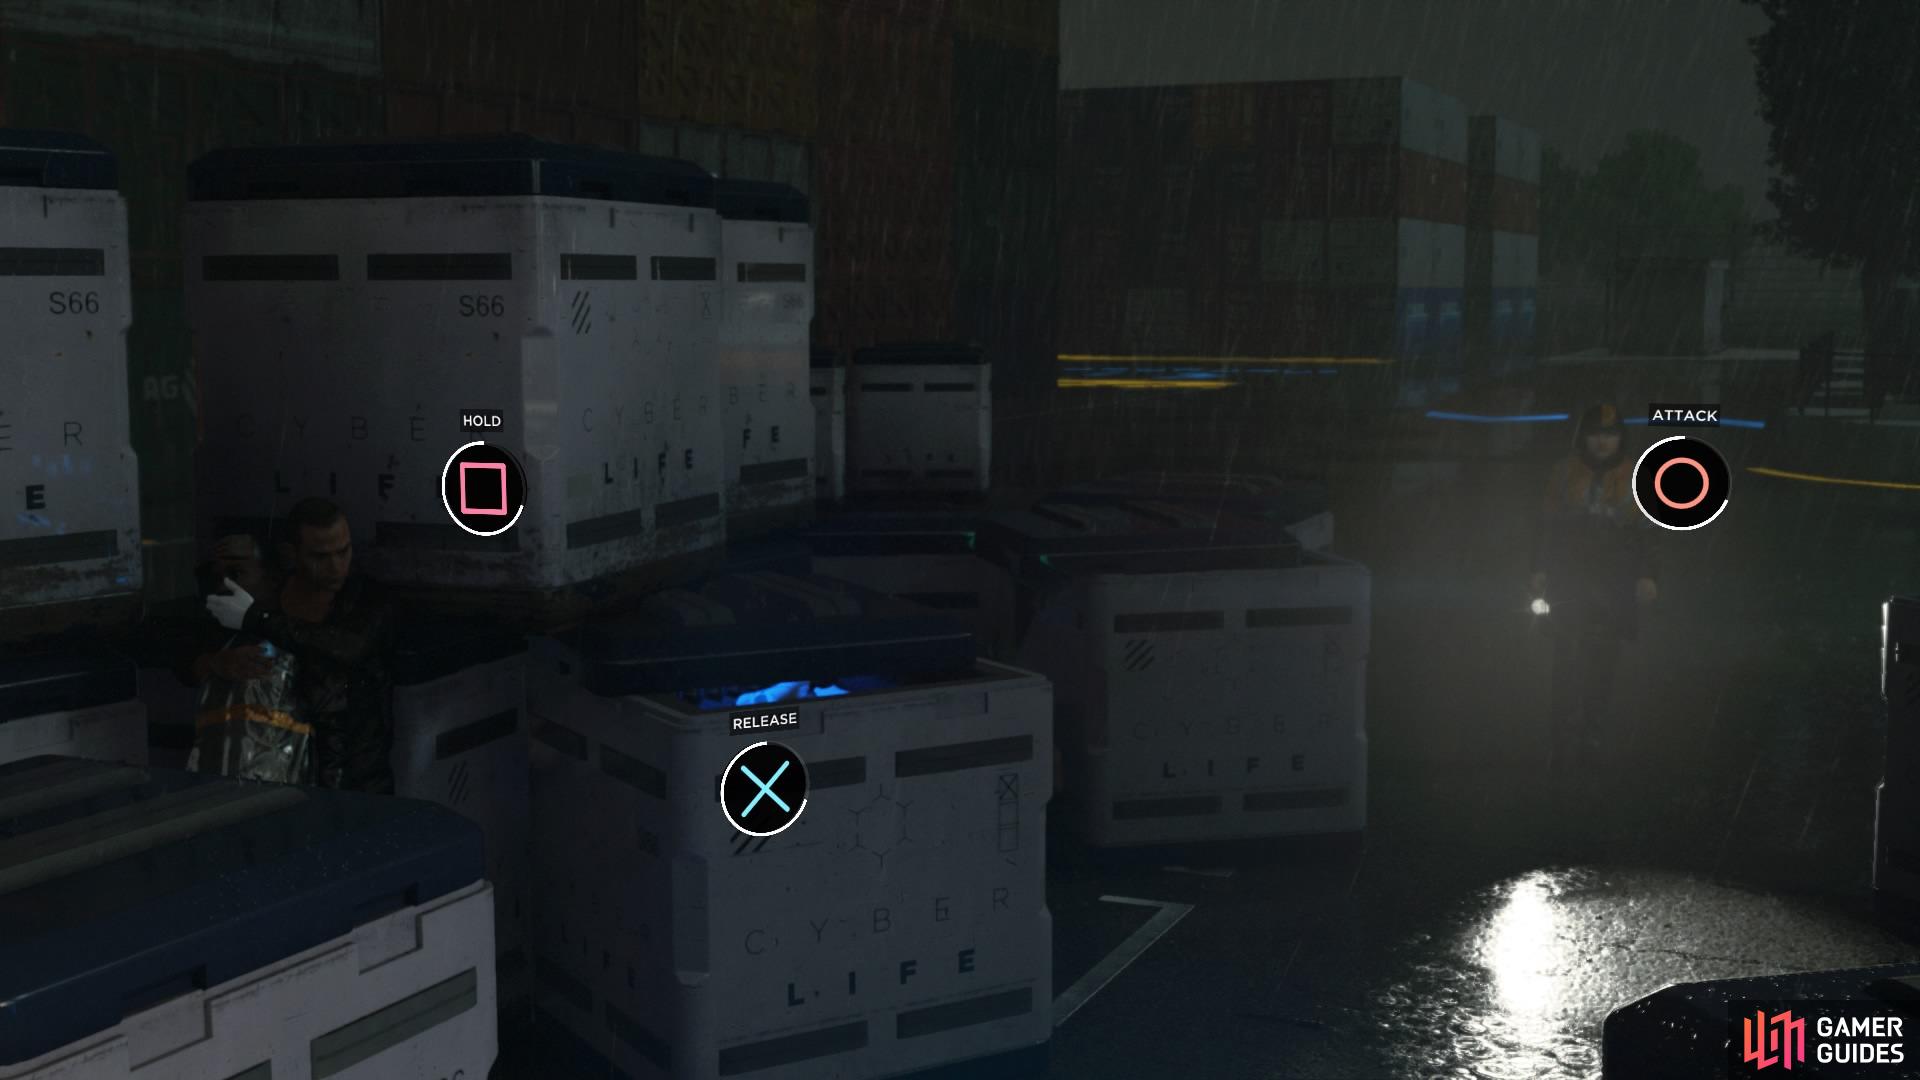
Guard Searches for Android: Again, choose Grab Android and Hide to trigger this node. The human guard will come looking, but John will tell him everything is fine and make him go away. You have a few choices, but regardless, the android will turn deviant.
– Attack: This will kill the human guard.
– Release: Let John go so that he can make the human guard go away.
– Hold Position: Stay hidden and don’t release John.
Markus Spills Blood: This will be the result if you choose to ‘Attack’ in any of the prompts given. Markus and his crew will kill the human security guard.
Human Guard Leaves: You’ll get this result on the flowchart if you use John to make the human guard leave without suspicion. We recommend getting this result so that you don’t end the mission early.

Find the large crate on the upper platform

Choose to free them or leave them behind
Resume Search: Once you have dealt with the human guard, you can continue searching the containers for everything you need to take back to Jericho.
Find Crate of Androids: If you climb on to the upper platform, you’ll see a tall crate. Open it to find some androids inside and choose from two options.
– Free Them: The best option here is to free them so you can boost your reputation with North, Josh, Simon, and Jericho.
– Leave Androids: If you leave them where they are and close up the crate, it’ll have no effect on anything.

Accept John’s proposal to join you
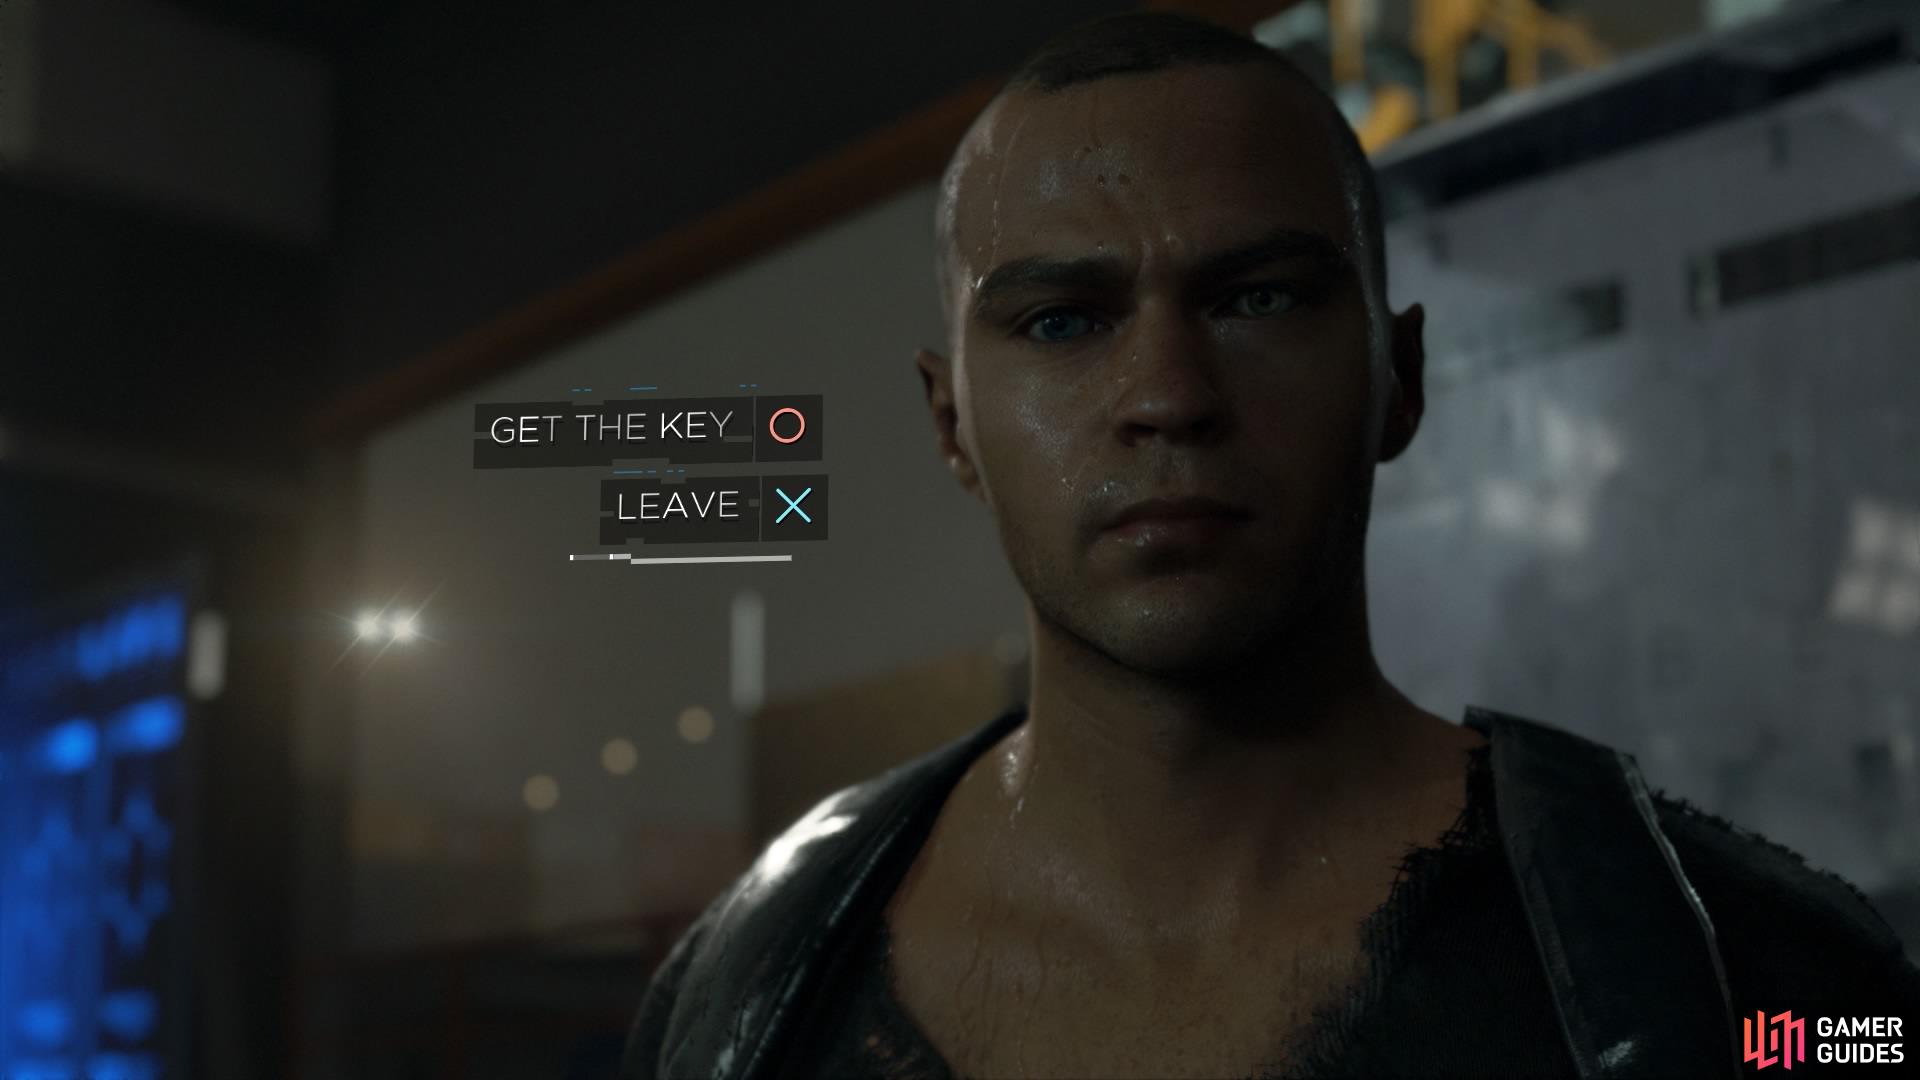
This will grant you access to more biocomponents by choosing to get the key
John Asks to Join You: The android security guard wants to come with you, but North will argue that it’s a bad idea. Now you need to make yet another choice.
– Accept: If you choose to take John with you, he’ll tell you about a truck full of supplies that will help Jericho greatly, and will even boost your reputation with them and your crew. John will also sacrifice himself for Markus later in the game.
– Refuse: If you decide not to let him join you, he won’t tell you about the truck and the mission will end early, which also keeps later flowchart nodes locked. However, this can also be beneficial for a second playthrough to work towards the ‘I’ll Be Back’ trophy – you can let Markus die during the freedom march because John won’t be there to save you.
John Mentions a Key: If you agreed to take John with you, he’ll give you the location of the key to the truck full of supplies.
– Accept: Agree to retrieve the key and unlock the following flowchart steps.
– Refuse: Don’t retrieve the key and end the chapter early.
The recommended course of action for this playthrough is to accept John’s proposal to join you and go after the key to the truck. By doing this, you’ll activate the next objective, so make your way towards the control room.
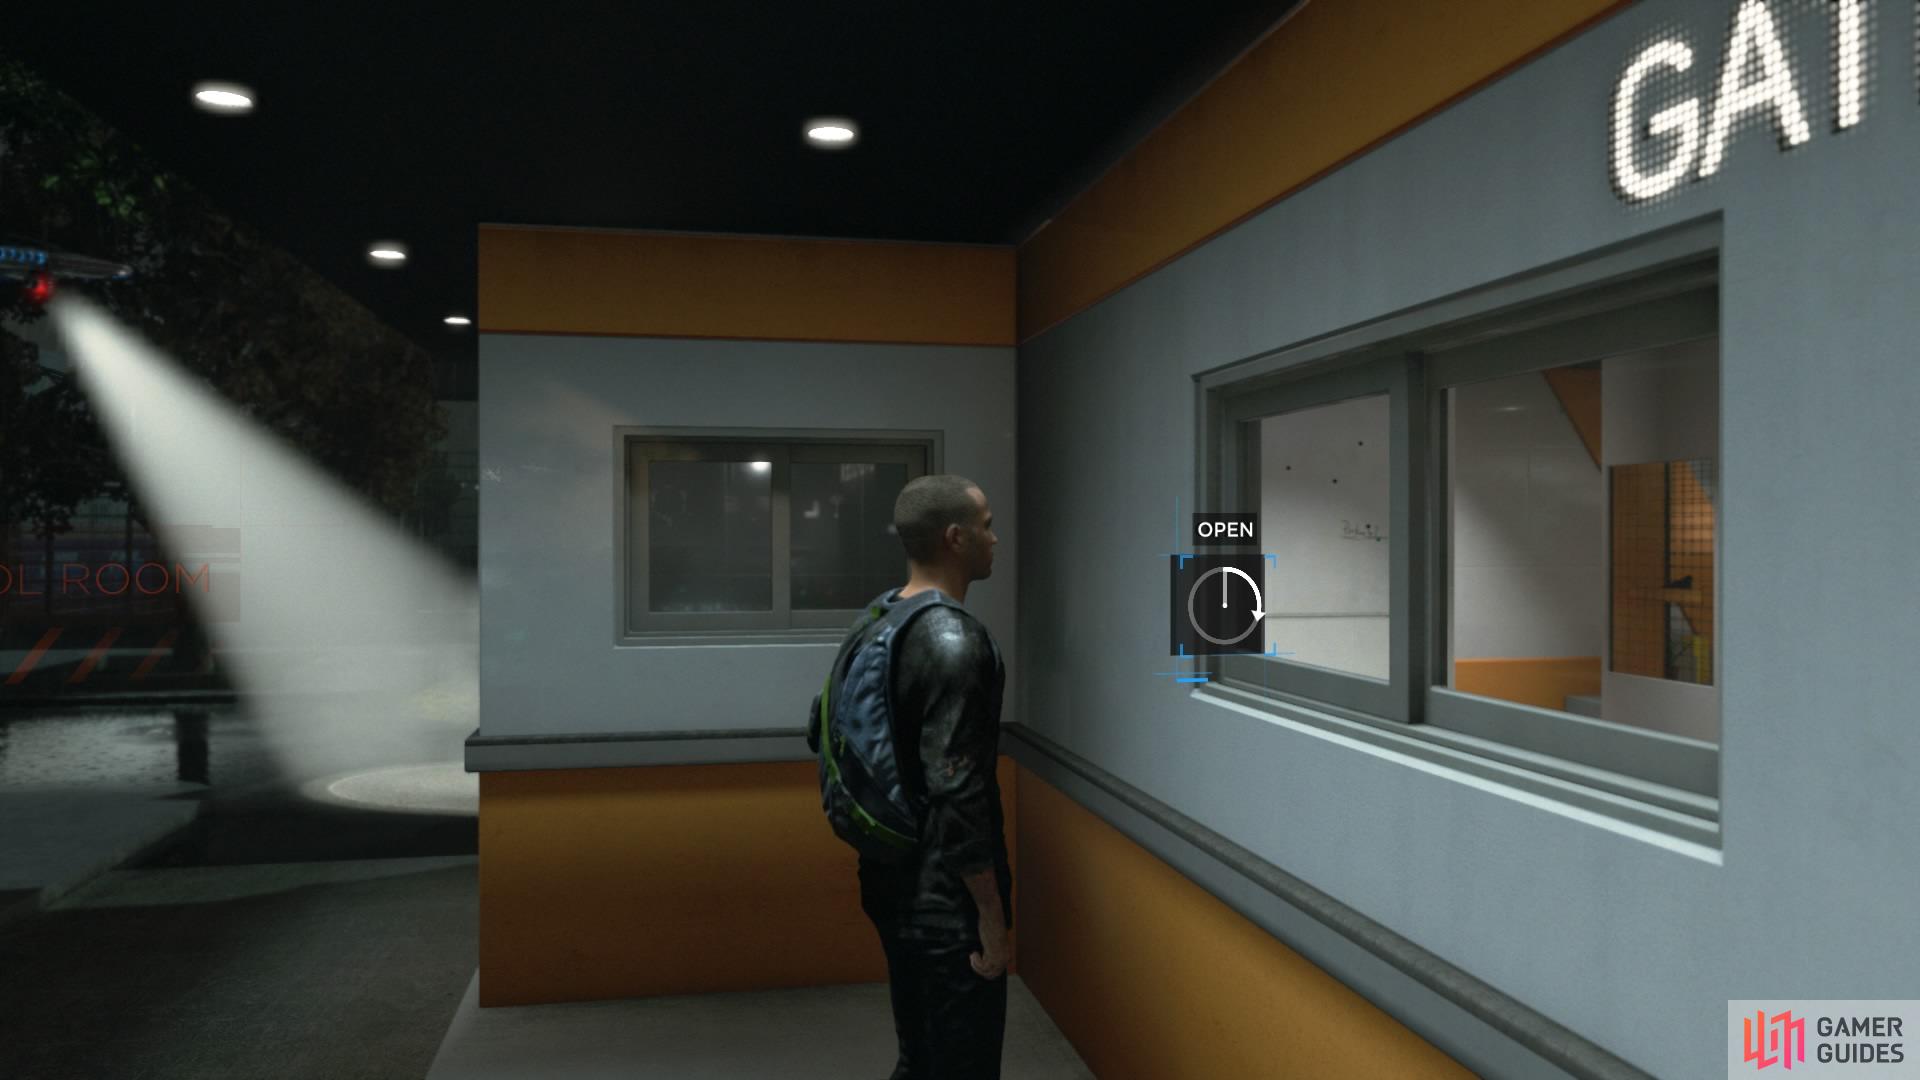
Head to the control room windows
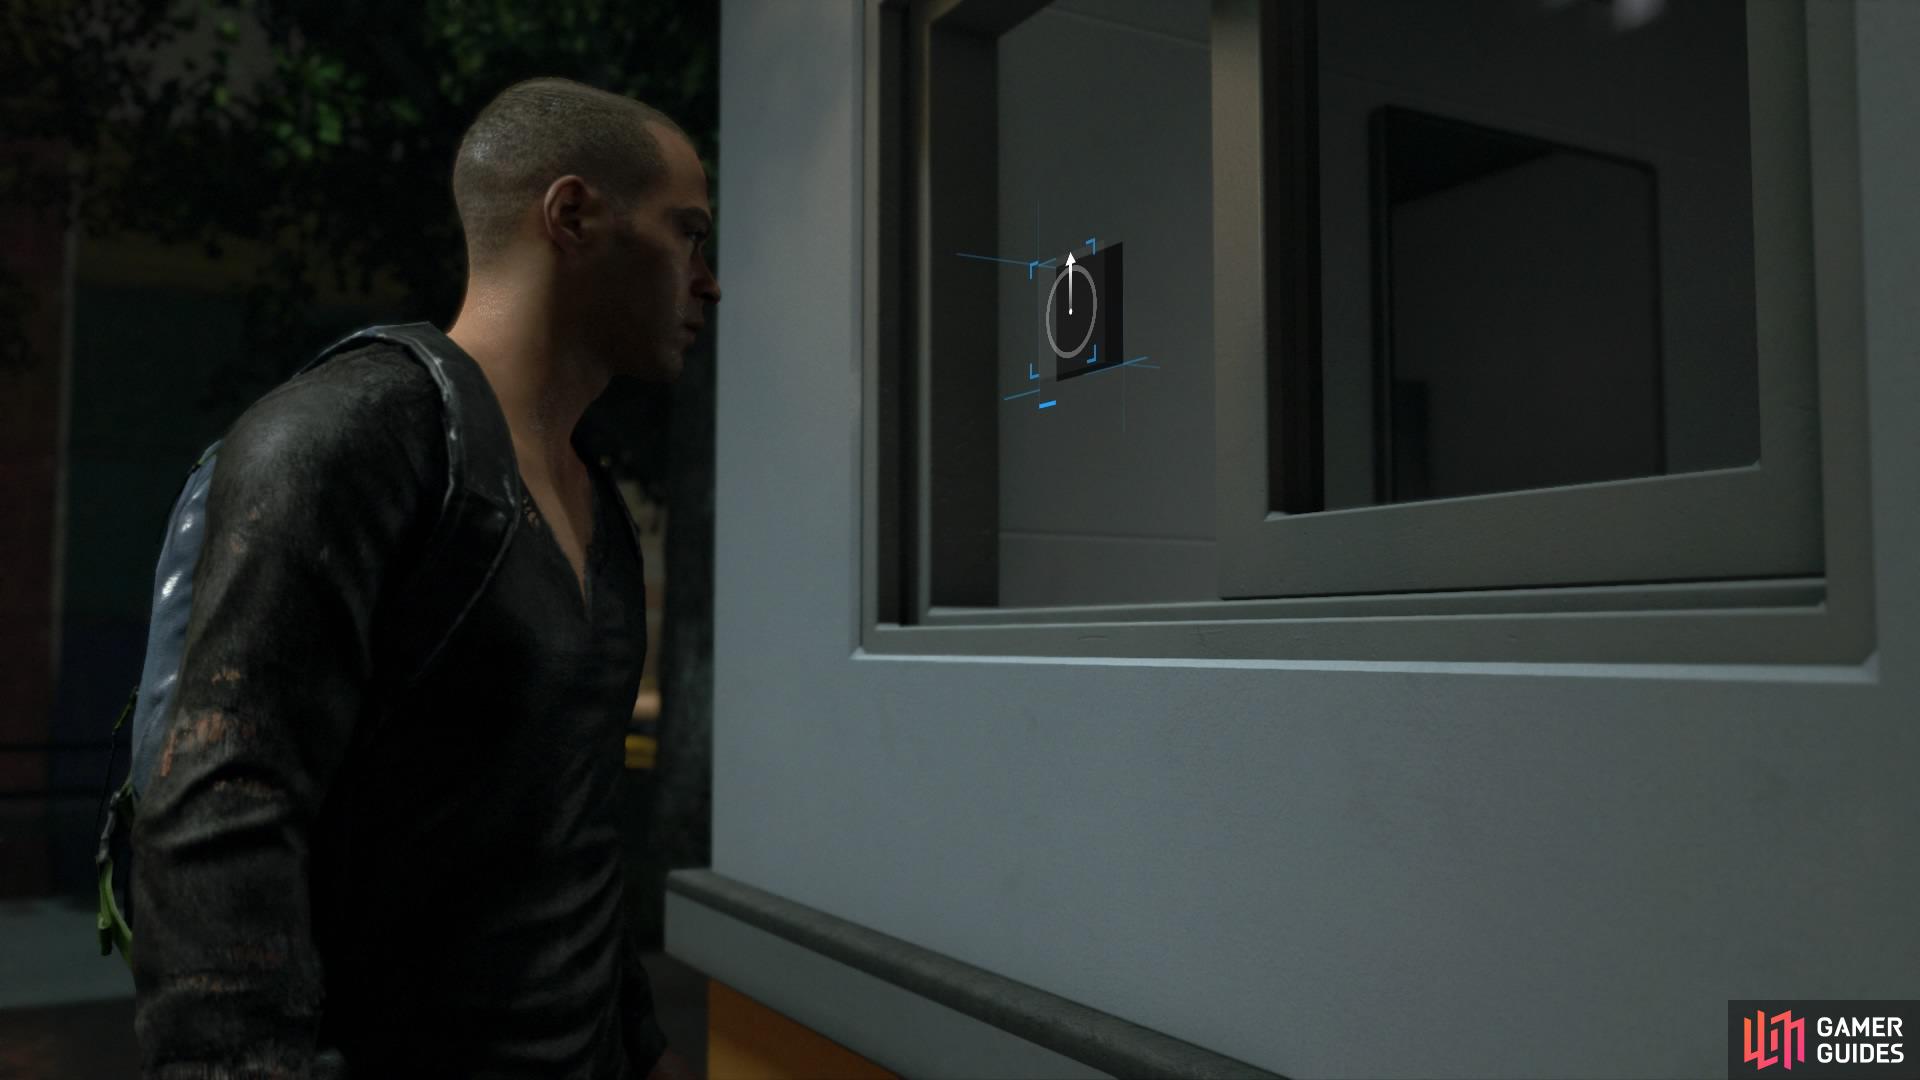
Hop through the smaller, back window
Find Key: Simply press L1 to locate the key inside the control room.
– Threaten Guards: While moving through the room, grab the gun from the case behind the guards while they’re not looking.
– Kill Guards: You’ll get into a scuffle with the guards. Press all the button prompts correctly to win the fight until, eventually, one of the guards points a gun at Markus. Throw one guard into the other and Markus will shoot him. Doing this will get the Markus Spills Blood result.
– Incapacitate the Guards: Win the fight against them without shooting them.
– Trigger Alarm: If you don’t press any of the button prompts during the fight against the guards, they will activate the alarm.
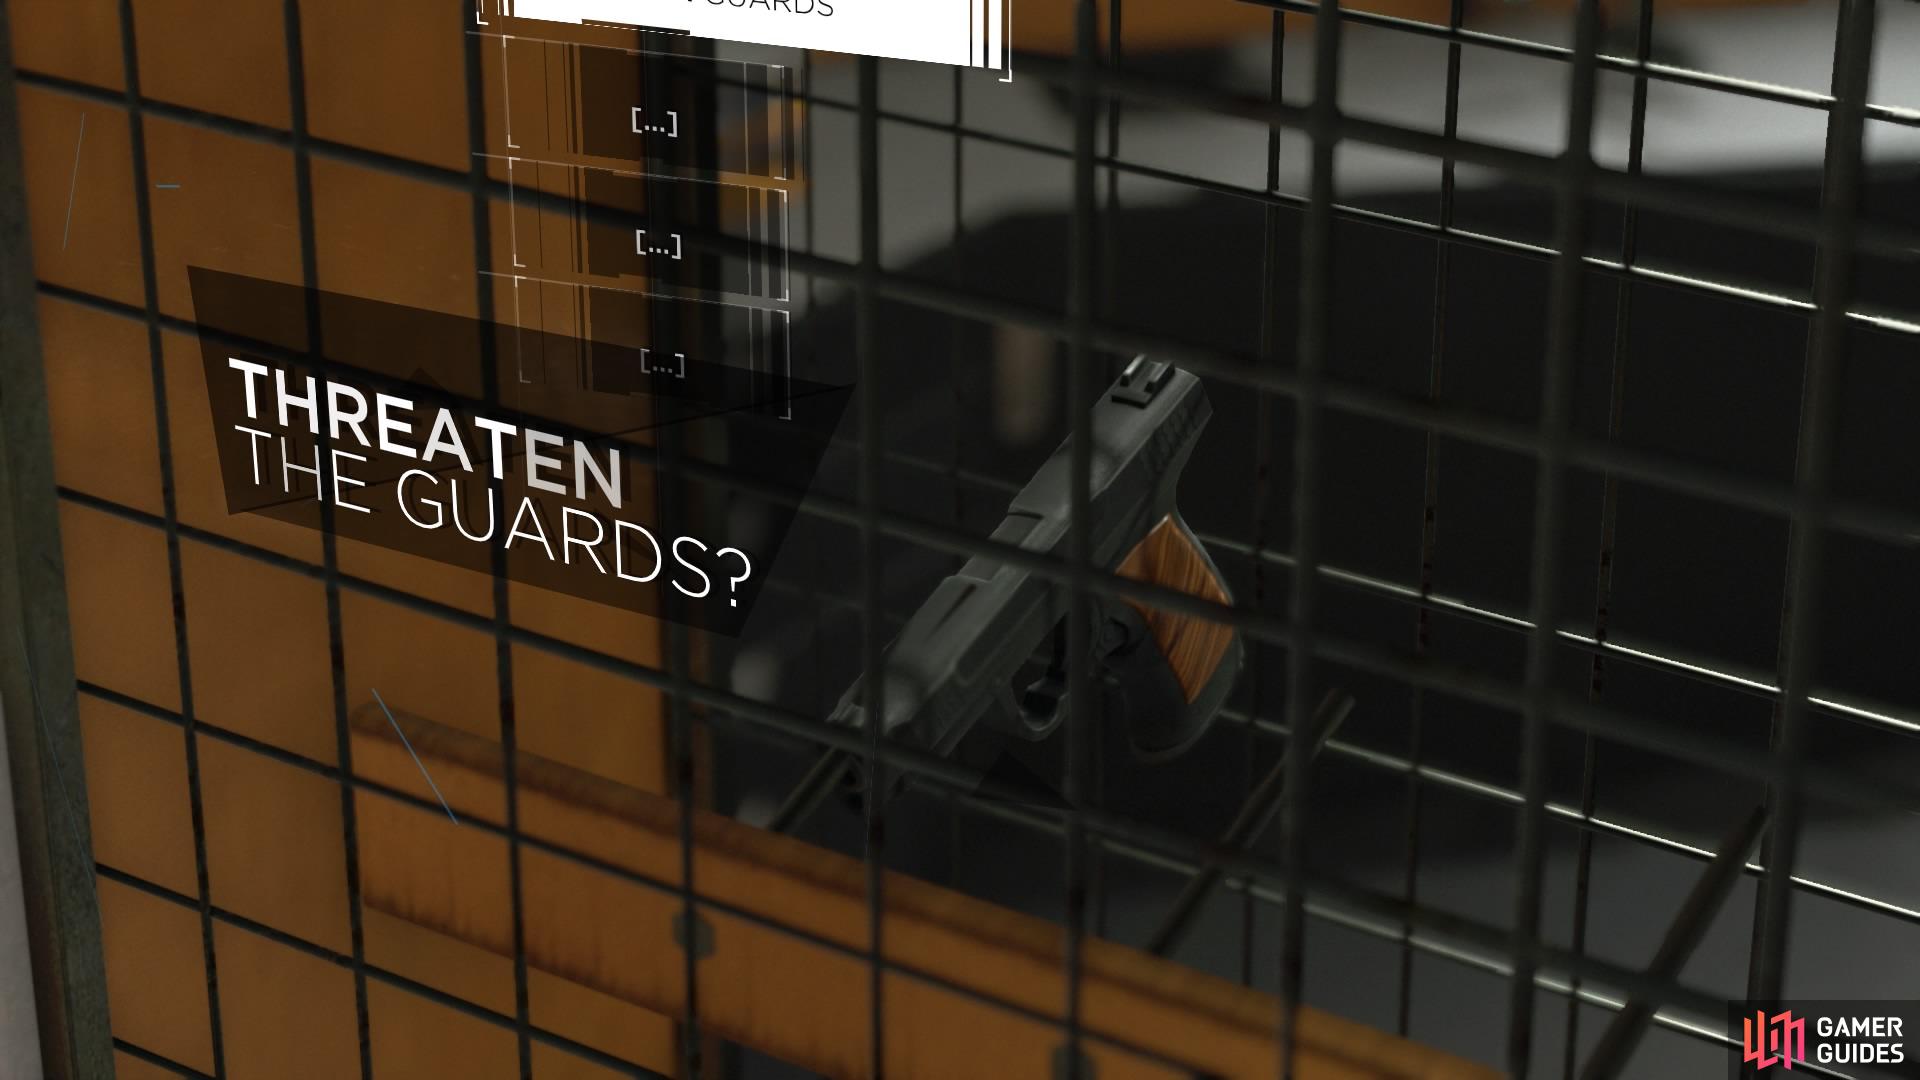
Choose to threaten the guards by taking the gun from the case

Or choose to cause a blackout using the control panel on the right side of the room
Lure Guards: To do this, you need to look out of the window at the back of the guard house with L1, and Markus will spot some barrels that he can use to make noise.
– Avoid Guards: Go to the barrels and kick one to make noise. The guards will go out to investigate, allowing you the chance to slip inside through the window and grab the key. Then jump back outside before they return without getting caught.
– Fail to Avoid Guards: Get caught on purpose by waiting for the guards to return inside and spot you. You can also do this during Create Blackout if you let the guards see you while investigating the room.
Create Blackout: The third option here is to go inside the control room and look at the server by the door with L1. You can pick up a screwdriver by the gun case and use it on the server to cause a blackout. You have to look at the server first before you can be prompted to pick up the screwdriver.
Take a screwdriver from the shelf
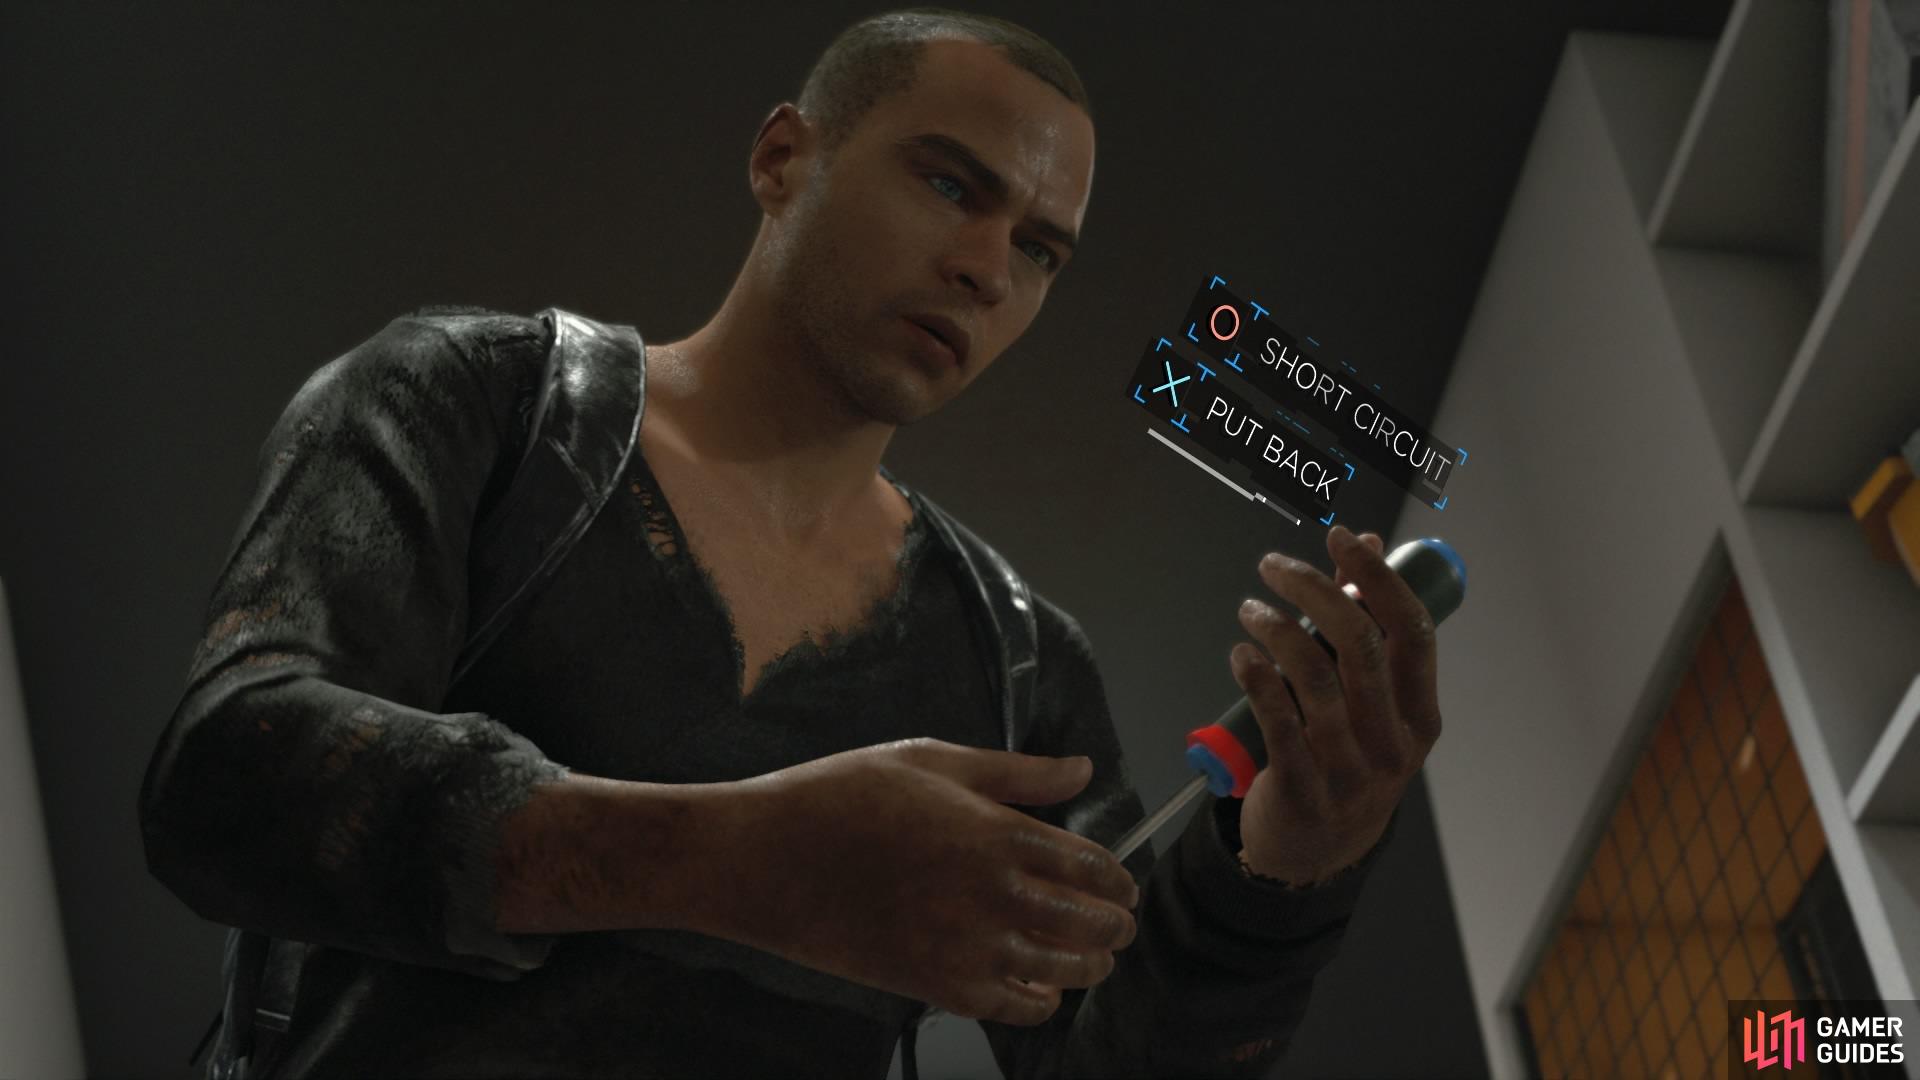
Use it to cause a blackout
Markus Gets Spotted: Do nothing from the above options. Just walk straight up to the guards and let them see you so they can sound the alarm.
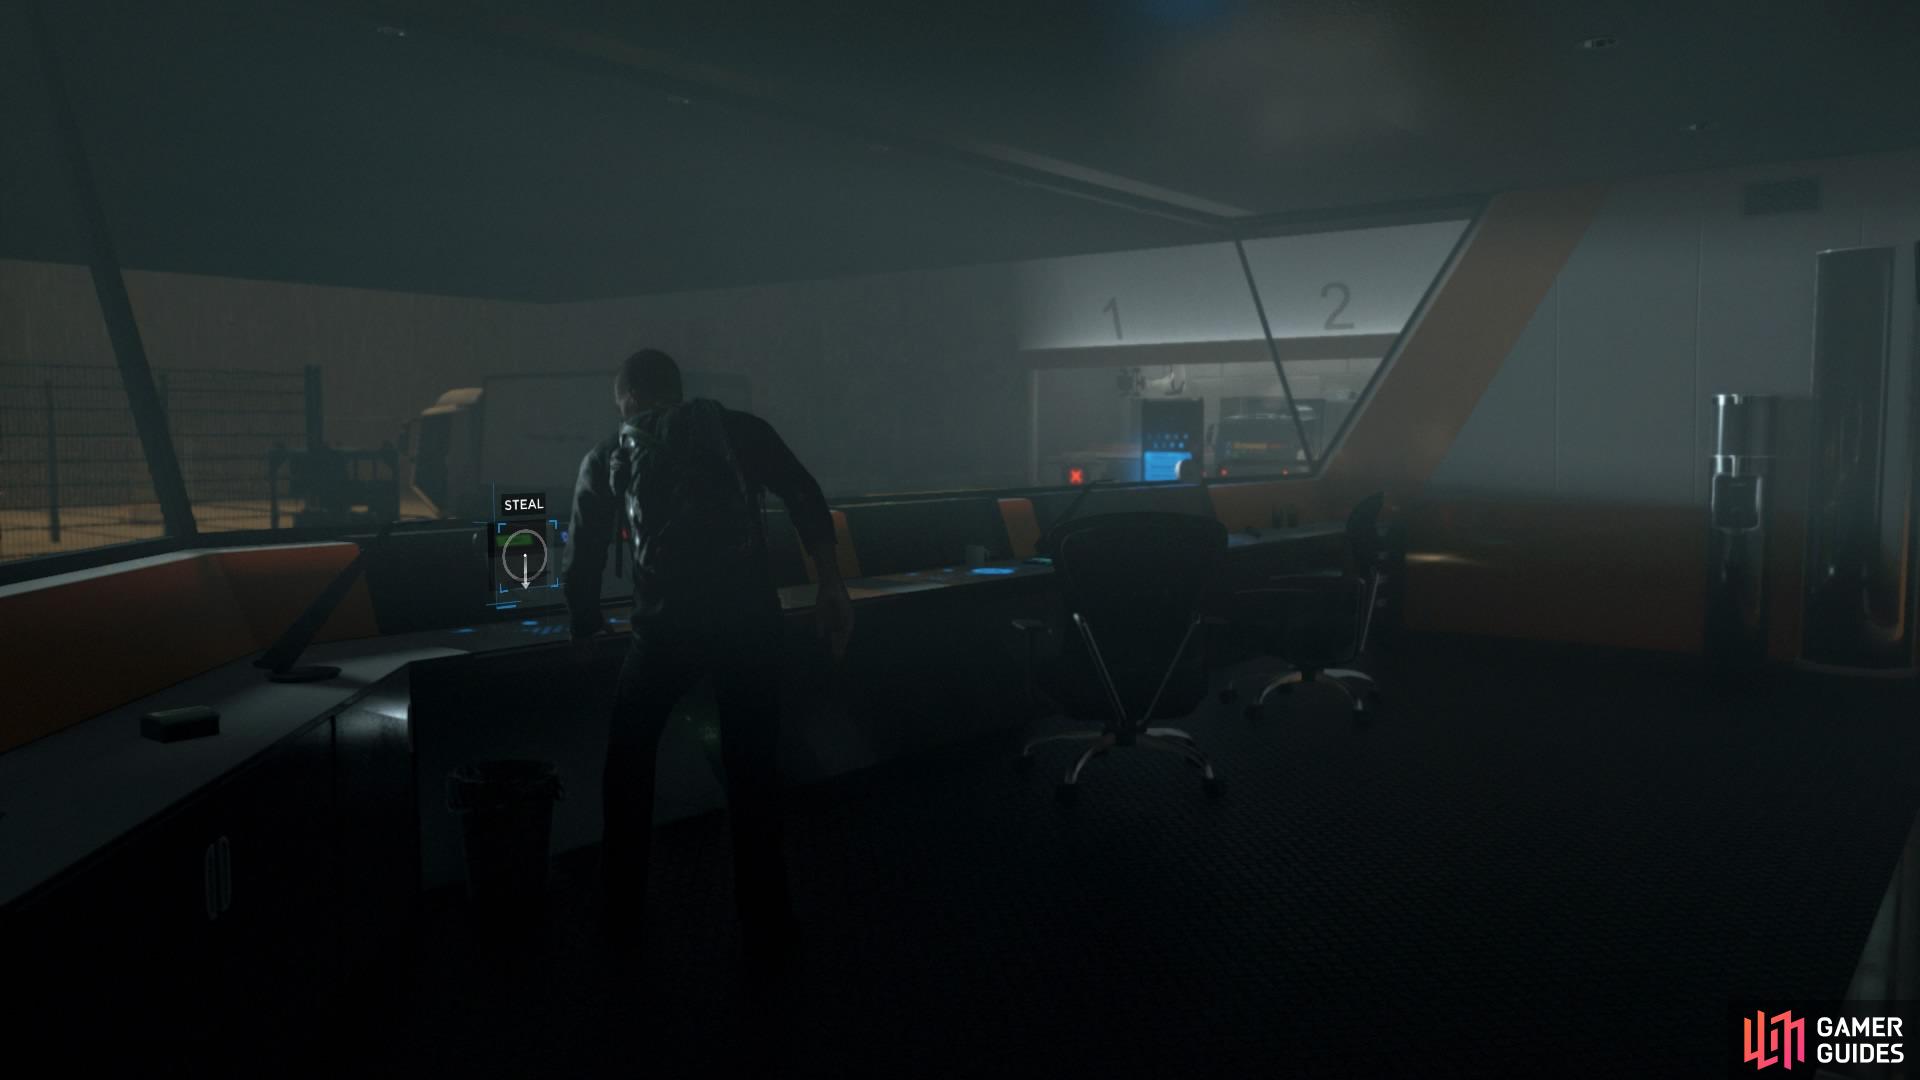
If Markus Stole the Key:
– Steal Key: If you threatened, distracted, or caused a blackout, you can steal the key from the control room easily.
– Leave with Truck: When you have the key, return to your crew and use it to steal the truck. This is the best outcome and increases your reputation with North, Josh, Simon, and Jericho.
Successfully steal the key while the guards are distracted
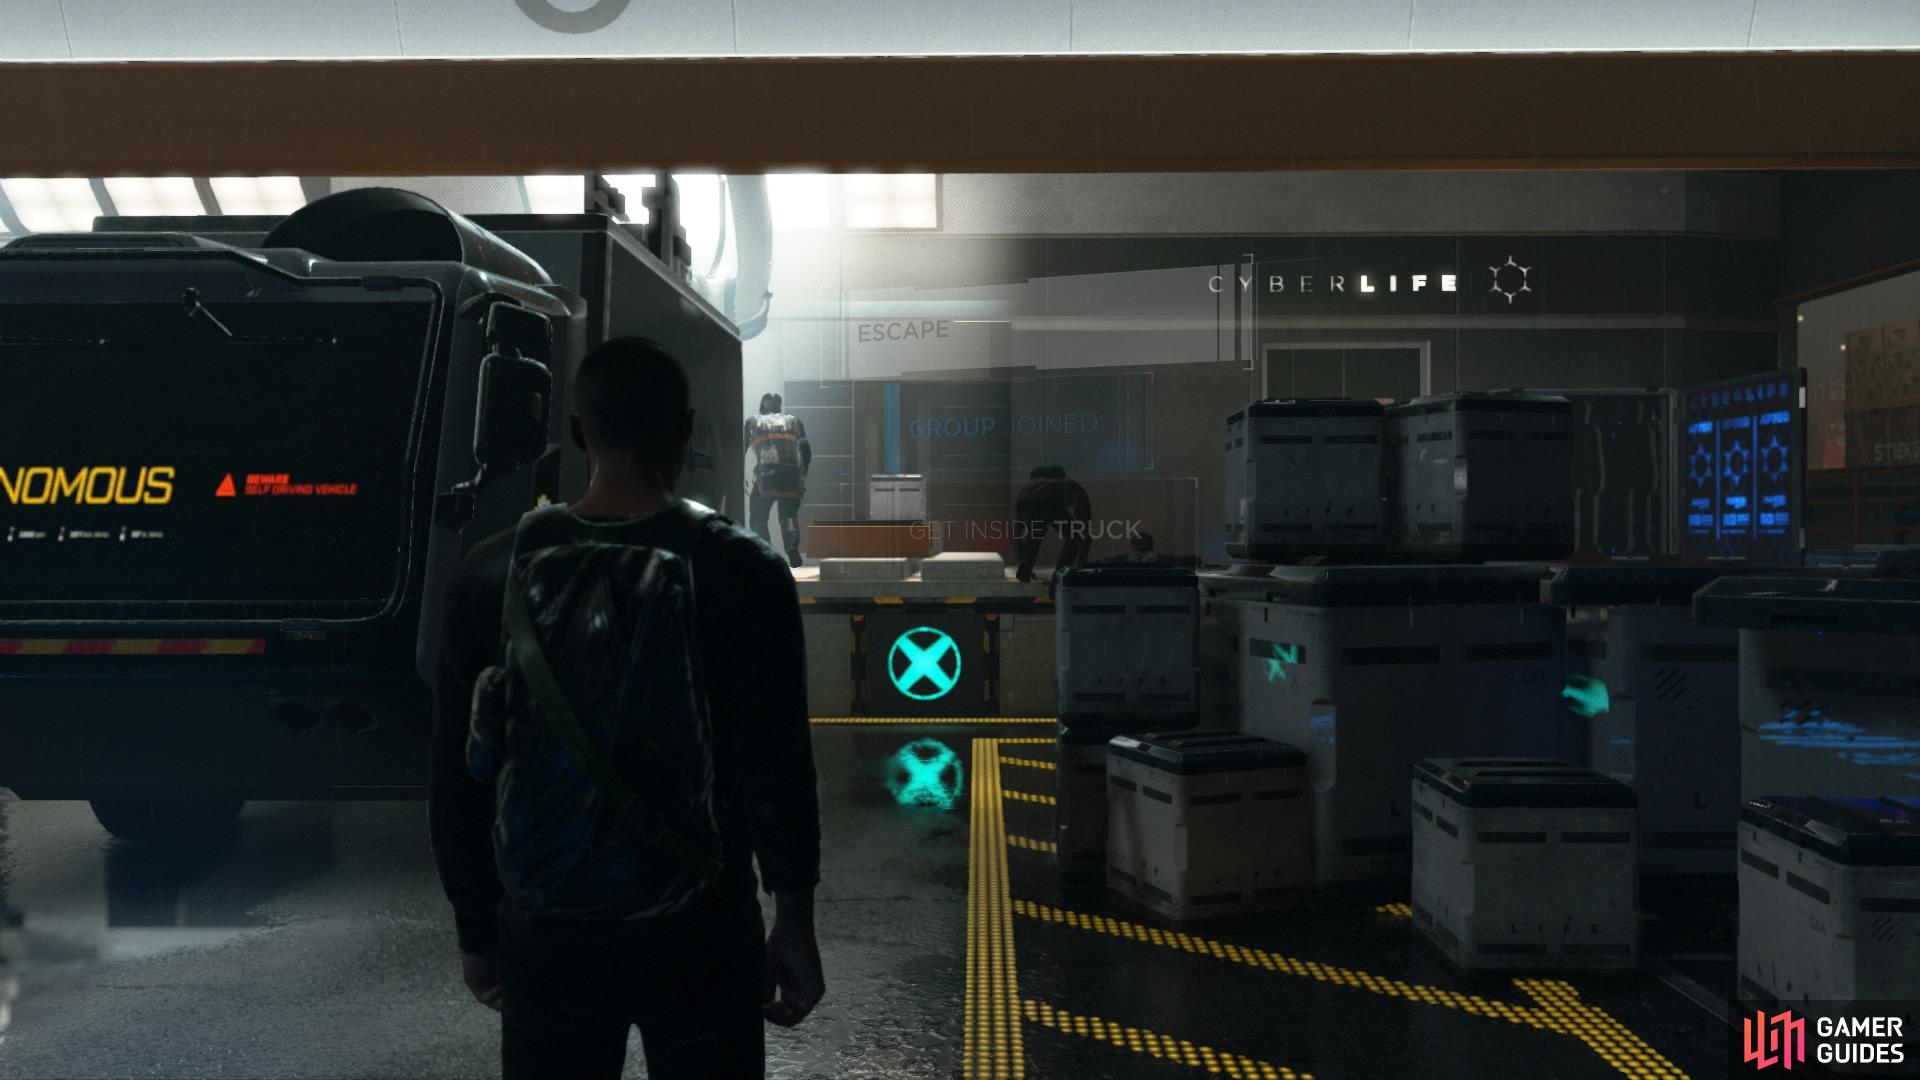
Return to your crew to steal the truck and end the chapter
If Markus Got Caught:
– Alarm Sounds: You can trigger the alarm at any point during the mission by getting caught by the guards, or even earlier on while investigating the crates for supplies. This will make you Run to the Fence.
– Dogs Maul John: If you let John join you earlier, he’ll get attacked by dogs when you run for the fence to escape. If you leave him, he dies.
– Get Hurt Reaching the Fence: If you do nothing, the dogs will catch up to you and hurt Markus. Or you can go back to help John and fail the button prompts.
– Back to Jericho: You’ll successfully jump the fence and return to Jericho unharmed.
Overall, there are three main outcomes to unlock on this chapter’s flowchart.
– Markus Stole the Truck: To do this, allow John to join you so that he tells you about the truck of supplies. Then successfully obtain the key without getting caught and drive the truck out of the compound.
– Group Returned with Supplies: To do this, get rid of the human security guard while you’re checking the containers. Then you can loot another crate for more supplies before you leave.
– Group Failed: To do this, just fail to grab enough spare parts or leave some stuff behind. When the human security guard shows up, choose to run away.
And that ends the chapter!
No Comments