
You’ll need to use your noggin to get through here.
Wild Pokémon
| Pokémon | Type | Location | Chance (%) |
|---|---|---|---|
 Jynx Jynx |
Ice/Psychic | Cave | 14 |
 Dewgong Dewgong |
Water/Ice | Cave | 5 (unknown), 10 (unknown) |
 Seel Seel |
Water | Cave | 20 (unknown), 15 (unknown) |
 Slowbro Slowbro |
Water/Psychic | Cave | 5 |
 Slowpoke Slowpoke |
Water/Psychic | Cave | 20 |
 Golbat Golbat |
Poison/Flying | Cave | 20 |
 Zubat Zubat |
Poison/Flying | Cave | 16 |
 Squirtle Squirtle |
Water | Cave | Rare spawn |
 Cloyster Cloyster |
Water/Ice | Water’s surface | 1 |
 Tentacruel Tentacruel |
Water/Poison | Water’s surface | 9 |
 Shellder Shellder |
Water | Water’s surface | 30 |
 Tentacool Tentacool |
Water/Poison | Water’s surface | 30 |
 Magikarp Magikarp |
Water | Water’s surface | 30 |
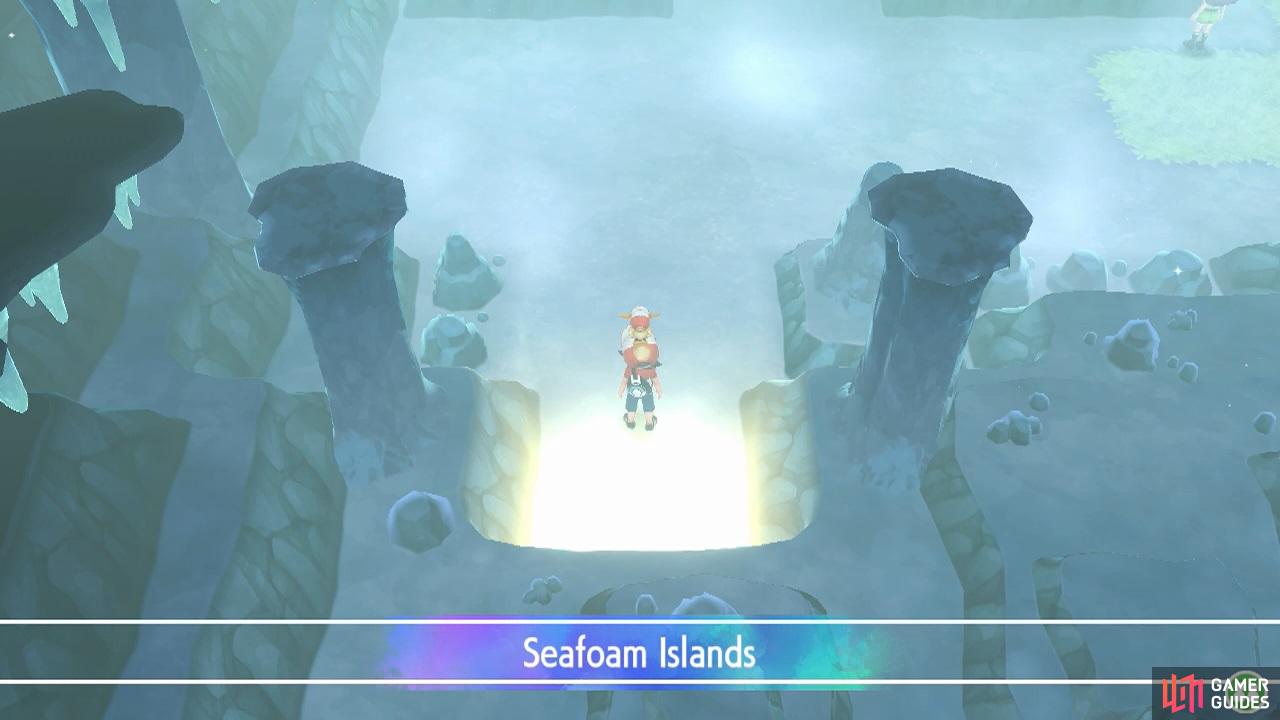
This chilly dungeon divides Route 20 into two. They say a Legendary Bird Pokémon has made its nest here. We can vouch for that.
Floor 1F
As you arrive from the Fuchsia City side, you’ll start near the south-west corner. Head east to begin with. You’ll go past a Picnicker who’s just here to offer some advice. To her north-east is a stone block next to a hole in the floor. Face the block from the left side, then use the Strong Push Secret Technique to push it into the hole.
If you accidentally fall through the hole, don’t worry. In fact, if you’re in a hurry, you can purposely jump into the hole after you’ve pushed the block through. Otherwise, stay on this floor so we can have a look around. Return towards the entrance, then proceed north, up the slope to higher ground. Grab the Ice Heal to the left.
Just ahead is a ladder going down to B1F. Ignore it for now. If you’re in a battling mood, go to the north-west corner. Over here, there’s a Coach Trainer.
Coach Trainer Yas
Yas has got all the  Eevee evolutions found in Kanto.
  Jolteon has exceptional Speed, so don’t be alarmed if it outspeeds you. It can use Thunder for heavy STAB damage, Double Kick to hit Rock-types etc. and Quick Attack to go first. Ground-types are obviously the safest choice.
 Vaporeon has formidable special bulk, so physical attacks are recommended. It has a similar moveset as Jolteon, but replace Thunder with Hydro Pump. As such, Grass-types are the way to go if you want to minimize damage.
Finally, he’s got a  Flareon that’s geared towards physical attacking. This one also has Double Kick and Quick Attack, but has Flare Blitz for STAB. Water and Rock-types are advised to reduce the damage from Flame Blitz. Unless you’re confident you can outlast it.
Emerge victorious and you’ll be given 5 Rare Candies. Moving on, head east for a while. Along the way, pick up the Escape Rope. If you get lost here, you can use that to make a timely escape. At the end of this higher ground, there’s a kind man who will refill your Poké Balls if you’ve ran out. Head down the nearby slope.
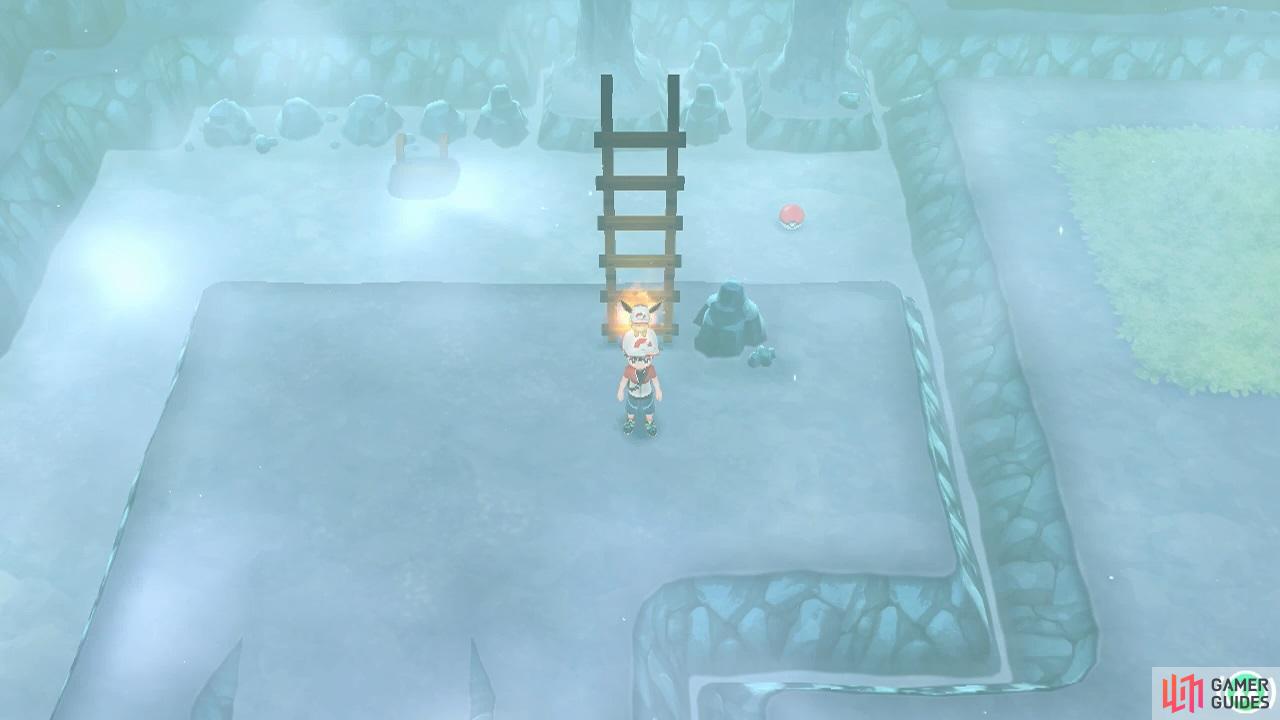
Over in this corner, there’s another stone block near a hole in the floor. Approach the stone block from above or below, then push it down or up one space. Next, push it left three spaces. Finally, shove it towards the hole. After that, you can jump into the hole or go down the nearby ladder like a normal human being.
Actually, before going downstairs, search the rocks directly above the ladder. You should find a Heart Scale.
Floor B1F (north-east)
Downstairs, grab the 5 Great Balls from the floor. Next, approach the stone block from its right side and shove it through the hole on the left. If you want, you can jump through the hole to reach B2F. However, you might notice that there isn’t a ladder going back up. So instead, we recommend going back up to Floor 1F. But it’s up to you.
Once you’re upstairs again, head back to the north-west corner and go down the ladder that you walked past.
Floor B1F (main)
These caves run quite deep.
You’ll start left from the center, on a section of higher ground. Go south, down the slope. Keep going until you reach the wall along the bottom, then go up the slope on the right to reach another area of higher ground. Grab the Super Repel to the left of the slope. Up ahead, there’s a ladder going down. Go past it, towards the east.
Down the next slope, you should reach the first stone block that you pushed–the one nearer the west side. If you jumped from the hole, you’ll also land here. In any case, shove the stone block into the hole on the right. Afterwards, you may follow it down the hole. Or you can go back and head clockwise from the first ladder on this floor.
In the north-west corner, there is a ladder going down. Before going down the ladder, grab the Max Potion to the right.
Floor B2F (north-west)
After going down the ladder, search the rocks near the bottom-left corner. You should find another Heart Scale. Hang onto this for later. Next, go east. Over here, there’s the first stone block again. Use Strong Push to nudge it into the hole directly to its right. If you’re courageous, you can jump into the hole after doing so.
However, this time, it’s a bit riskier. If you fall through this hole, you’ll end up plunging into water on Floor B3F. If both of the stone blocks from 1F haven’t reached B3F, the rapid currents will push you towards the north-east corner of B4F. Instead, we recommend going back to Floor B1F. Then go down the ladder near the center.
Floor B2F (main)
You’ll arrive near the center. Head south-west, down the left hand side slope, towards the far corner. There’s a ladder here that you can use to continue downstairs. By the way, if you go east from here–or south east from where you arrived–you’ll come across a ladder that goes upstairs. But right now, you’ll find nothing if you go that way.
Floor B3F (main)
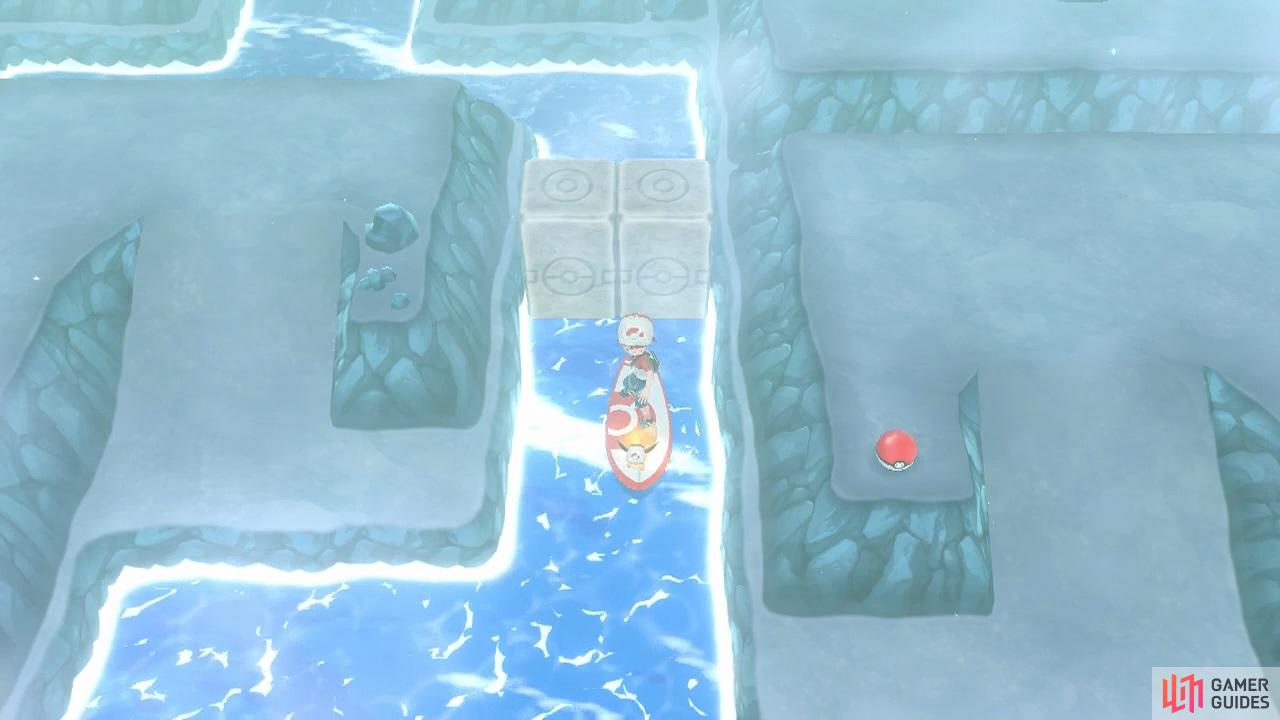
Man, how far do these caverns go? When you come down the ladder, there’s an X Speed nearby to the left, below some rocks. Also, search the top of the rocks for a hidden Revive. There’s a ladder and an item further north, but feel free to ignore them for now. Instead, hurry east. You may spot the first stone block, which is now half-submerged.
Go down the slope towards the south-east. Grab the Hyper Potion next to the slope, then go down it. Here, there’s a stone block puzzle. There will be two stone blocks side by side, a stone block above a hole, and a stone block to the left of a different hole. Go over to the left-most stone block. Being very careful not to fall into the two holes.
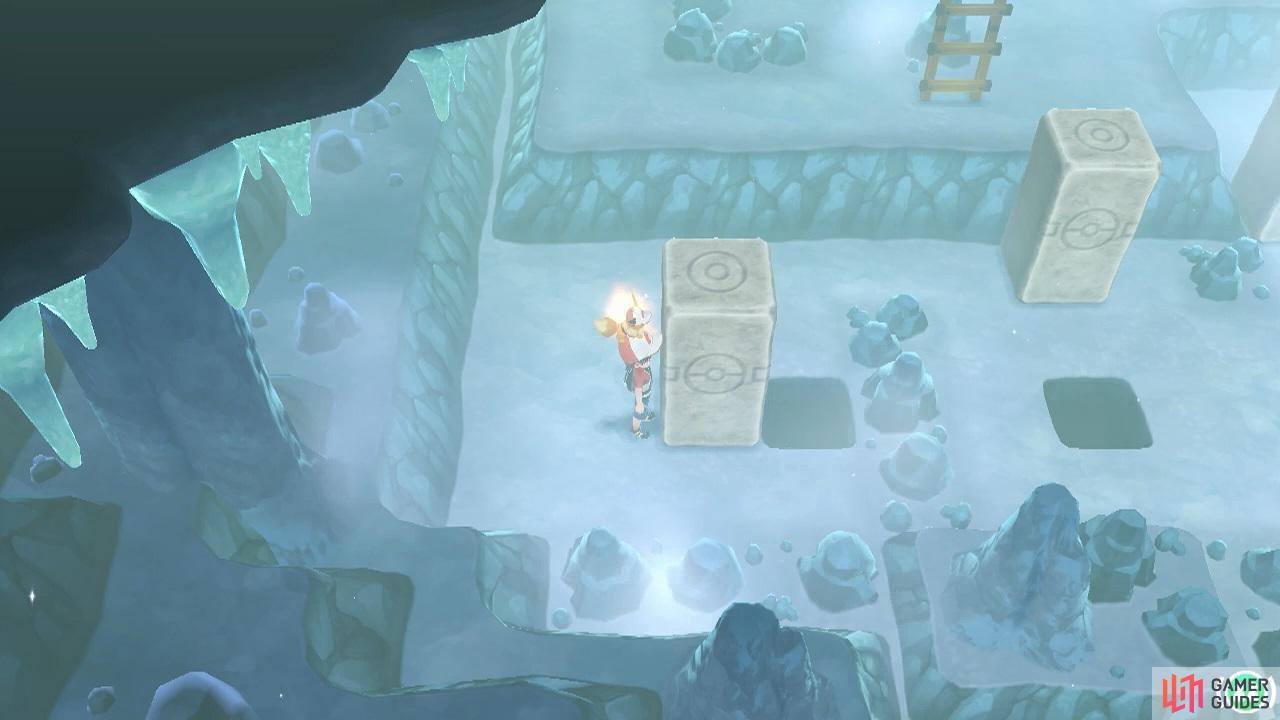
If possible, try to start with the easiest step.
Use Strong Push to push this stone block into the hole on its right. Now go and push the next stone block to your right about two spaces to the left, so it’s out of the way. Next, go over to the pair of stone blocks. Push the right-most block two spaces up, to make space. Then approach the remaining block and push it two spaces down.
Now go over to the block’s right side and push it left 3 spaces so it’s just above the hole. This is the important bit. Go clock-wise around the hole to reach the top of the stone block. Then push the stone block down so it falls through the hole. If you accidentally fall through the hole before doing this, you’ll fall and get pushed away by the rapid currents.
Should this happen, don’t worry. Simply go up the nearby ladder to return to Floor B3F. You’ll then arrive near the north-west corner. After that, go south-east to return to the stone block puzzle. You may need to repeat some of your moves though. Anyway, after pushing both blocks into the holes, you can safely jump into the holes if you want.
Or if you feel like it’s safer, you can go towards the north-west corner, grab the Super Lure that you saw before, then go down the ladder to B4F that way.
Floor B4F (main)
If you jumped down the holes near the south-west corner of B3F, you’ll land in the chilly water near the south-west corner of this floor. However, if you failed to push both of the stone blocks through, the rapid current will automatically push you north-east. From there, you’ll need to climb back up the ladder to finish off the job.
Otherwise, if both stone blocks fell through, they will block the flow of water, so you can travel freely. From this corner, swim directly north. Alternatively, if you came down the ladder like a sensible person, go down the slope below, picking up the Big Pearl next to the water. Then Sea Skim onto the water and travel north from there.
You should reach an isolated island near the north-west corner. After landing, pick up the Big Pearl on the left. At the top of the slope is the first of the Legendary Bird Pokémon: the Ice-type  Articuno. If you’re ready, go up to it and interact with it to trigger a battle.
Legendary Pokémon Articuno
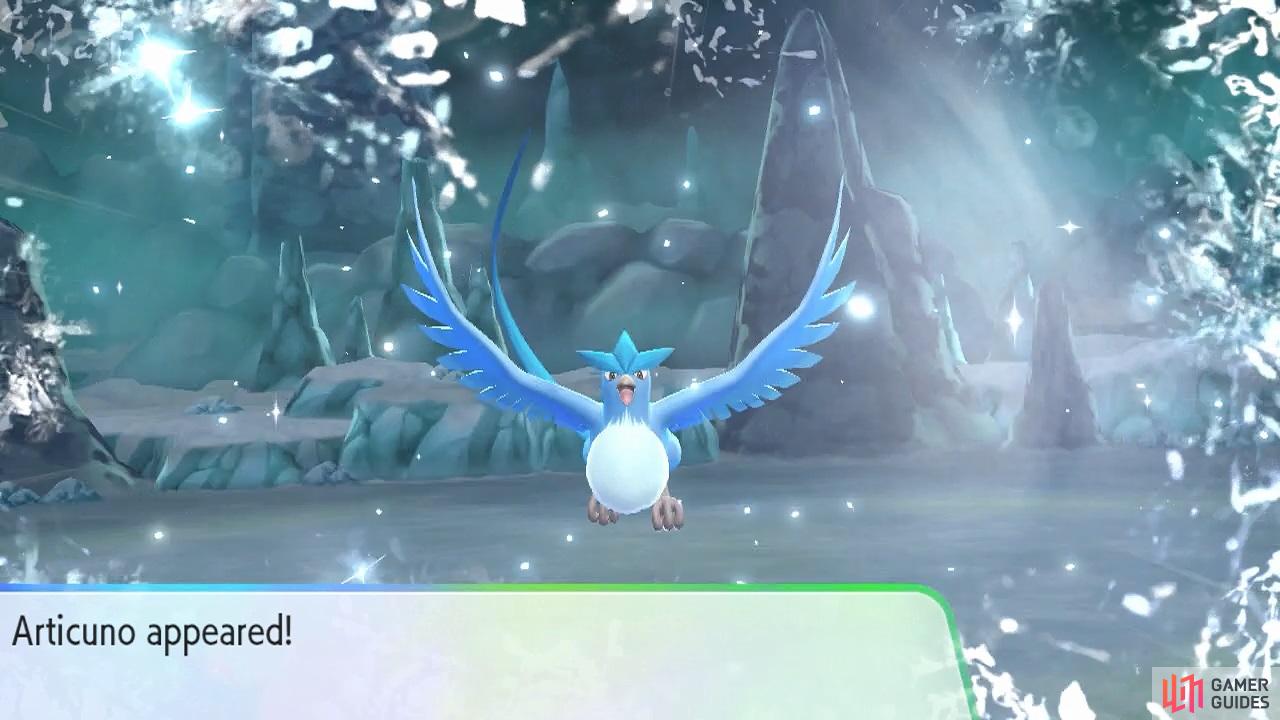
| Pokémon | Level | Type |
|---|---|---|
| Articuno |
50 | Ice/Flying |
Like  Snorlax, you need to KO Articuno before you can catch it–and you’ve got 5 minutes. At the start of battle, all of Articuno’s stats will rise. Ideally, you should lead with a super-effective type. Rock-types are great since they do 4x damage, but be careful if they’re Ground as well. A capable Fire, Electric or Steel-type should be sufficient.
Compared to the other Legendary Birds, Articuno is more defensive than offensive. At the same time, it suffers from having a pretty bad Type combination. Which works in your favor right now. So you probably don’t have to worry too much about doing enough damage or surviving, unless you’re severely underleveled.
For attacks, Articuno primarily relies on its STAB Ice Beam. Try to avoid using special attacks, since it can use Mirror Coat to inflict double the damage back. Rock and Steel-types are generally physical attackers, so they’ll be safe from this. But it can use Reflect to weaken physical attacks. Finally, it has Agility to raise its Speed.
Once you’ve KO’d Articuno, the battle isn’t over just yet–you can now try and catch it. As you can imagine, Legendary Pokémon aren’t going to be easy to catch. To start with, their catch rate is very low, so definitely use Ultra Balls and use Razz Berries if you have to. Also, don’t be ashamed to summon Player 2, even if you have to control both.
Because Articuno is airborne, expect it to fly around every now and then. As far as we can tell, it doesn’t run away. Or at the very least, it won’t run away for ages. So if it flies left or right–and you’re not good at throwing in those directions, try to wait until it flies back near the center. Then it’s just a case of trying to get Great or Excellent throws.
Having caught Articuno or otherwise, return towards the center of this floor. Then head over to the north-east corner. You may have noticed a path leading south near the center. If you want, you can take a look, but there doesn’t seem to be much there, besides a signpost with a hint that you no longer need.
Over in this corner, there’s a ladder going up. Go down the nearby slope and grab the Big Pearl to the left. By the way, if you fell into the water towards the north-east corner of B3F and got carried by the rapid currents, you’ll eventually arrive here. Climb up the ladder to the next floor.
Floor B3F (north-east)
Here, you’ll be in a pretty small area. Retrieve the Super Repel from the top-right corner, then climb up the nearby ladder to continue.
Floor B2F (north-east)
Go down the slope below. To the left, there should be the second stone block that you missed. If you leapt down the hole near the north-east corner of B1F, you’ll end up here. Obviously, use Strong Push to knock the stone block into the hole to its left. Now if both of the stone blocks have reached B3F, you can safely jump down this hole.
If the first block hasn’t reach B3F, you should use the ladder to return all the way back to B4F. Then figure out what you need to do to get that block down there.
Floor B3F (main; again)
This is the final step to reach the exit.
Hopefully you’ve pushed both of the stone blocks from the first floor (1F) to B3F. In doing so, you’ll stop the rapid currents in the north-eastern waters of this floor. After jumping down from B2F, you’ll arrive just below the two stone blocks. Return to dry land on the right. On the other side, scoop up the 3 Ultra Balls above the slope.
Then head south towards the ladder near the south-east corner.
Floor B2F (south-east)
Upstairs, you’ll be in another tight space. In the top-left corner, there’s an Ice Stone up for grabs. After stuffing it in your bag, climb up the next ladder.
Floor B1F (south-east)
We’re almost there! In this next area, go left and pick up the Super Lure behind the stone pillar. Then go up the ladder in the bottom-left corner.
Floor 1F (south-east)
Can you smell the warm, ocean air again? Head south-east to exit this frosty cavern.
No Comments