
| Important Items in this Area |
|---|
| Bahamut Materia |
| Luck Plus Materia |
| Mind Source |
| Nail Bat |
| Princess Guard |
| Ribbon |
| Rocket Punch |
| Silver Rifle |
| Trident |
| Trumpet Shell |
| Work Glove |
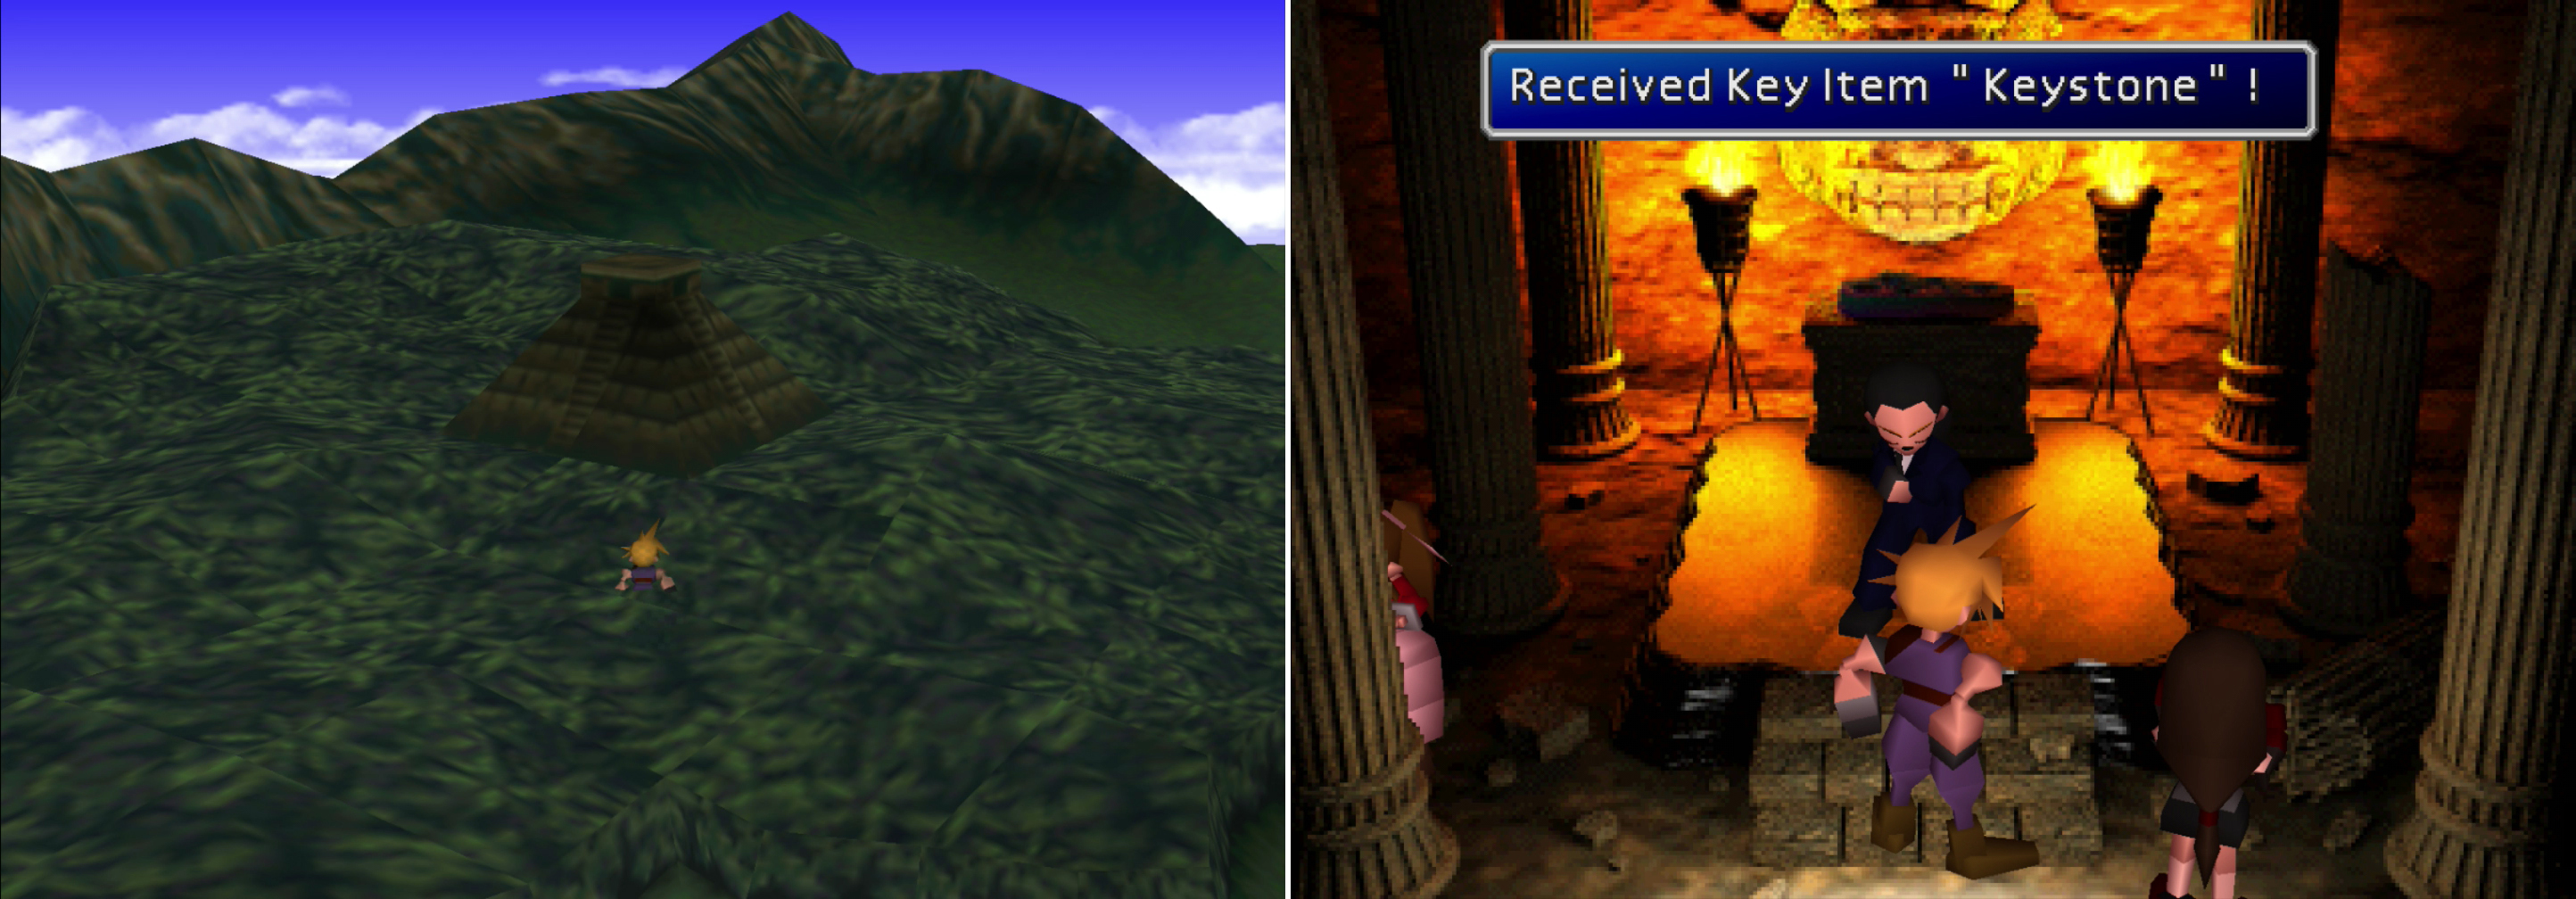
The Temple of the Ancients can be found in the midst of a jungle on an island south of Junon (left). Inside, an injured Tseng will hand over the Keystone, and reveal that your nemesis is inside (right).
Temple of the Ancients
On this small island you’ll find a stepped pyramid in the midst of some woods. Approach it and cross a bridge and Aeris will try to communicate with the spirits lurking here. Afterwards, head up the stairs and talk to the black-cloaked figure who collapsed outside. Seems like Sephiroth’s minions are already here, and are searching for the Black Materia. Head inside the temple and you’ll find Tseng, who is in no condition to oppose you. Shinra beat us here too, which was expected, and they don’t seem to be getting along with Sephiroth, which is also not unexpected. After a conversation with the wounded Turk you’ll regain the Keystone. Place it on the altar near which Tseng was sitting to gain access to the depths of the temple.
Stairs, ladders and vines. Oh boy. After some chatter head north-east, then go up a small flight of stairs to the north-west. Ignore the stairs up and instead make your way down some stairs, head under an arch to the north-east and climb down some vines. Pass beneath some stairs in the foreground and loot a chest to obtain a Trident , then head down some stairs to the south-east and climb some more vines. Once atop the ledge the vines lead to, ignore another arch (which is magically sealed) and head up some stairs to the north-west to scare off a strange, bearded critter. Chase it up some vines, grab a pink vial (a Mind Source ) then head some stairs and go through an archway to the north-west.
Cornered, you’ll be able to approach the bearded critter, which Aeris identifies as the spirit of an Ancient. After failing to communicate with the spirit the party will reform. Talk to it again and it’ll allow you to rest, save your game, and even sell you items. Why does it need Gil? Why would it sell you a tent when it’s offering to let you rest? Ancients clearly weren’t very bright, and they were greedy, to boot. Planet is probably better off without them. Anyways, buy what you wish, rest, and save, loot a chest for a Silver Rifle , then return to the labyrinth.
Item Shop
| Item | Gil |
|---|---|
| Potion | 50 |
| Hi-Potion | 300 |
| Phoenix Down | 300 |
| Ether | 1500 |
| Hyper | 100 |
| Tranquilizer | 100 |
| Maiden’s Kiss | 150 |
| Tent | 500 |
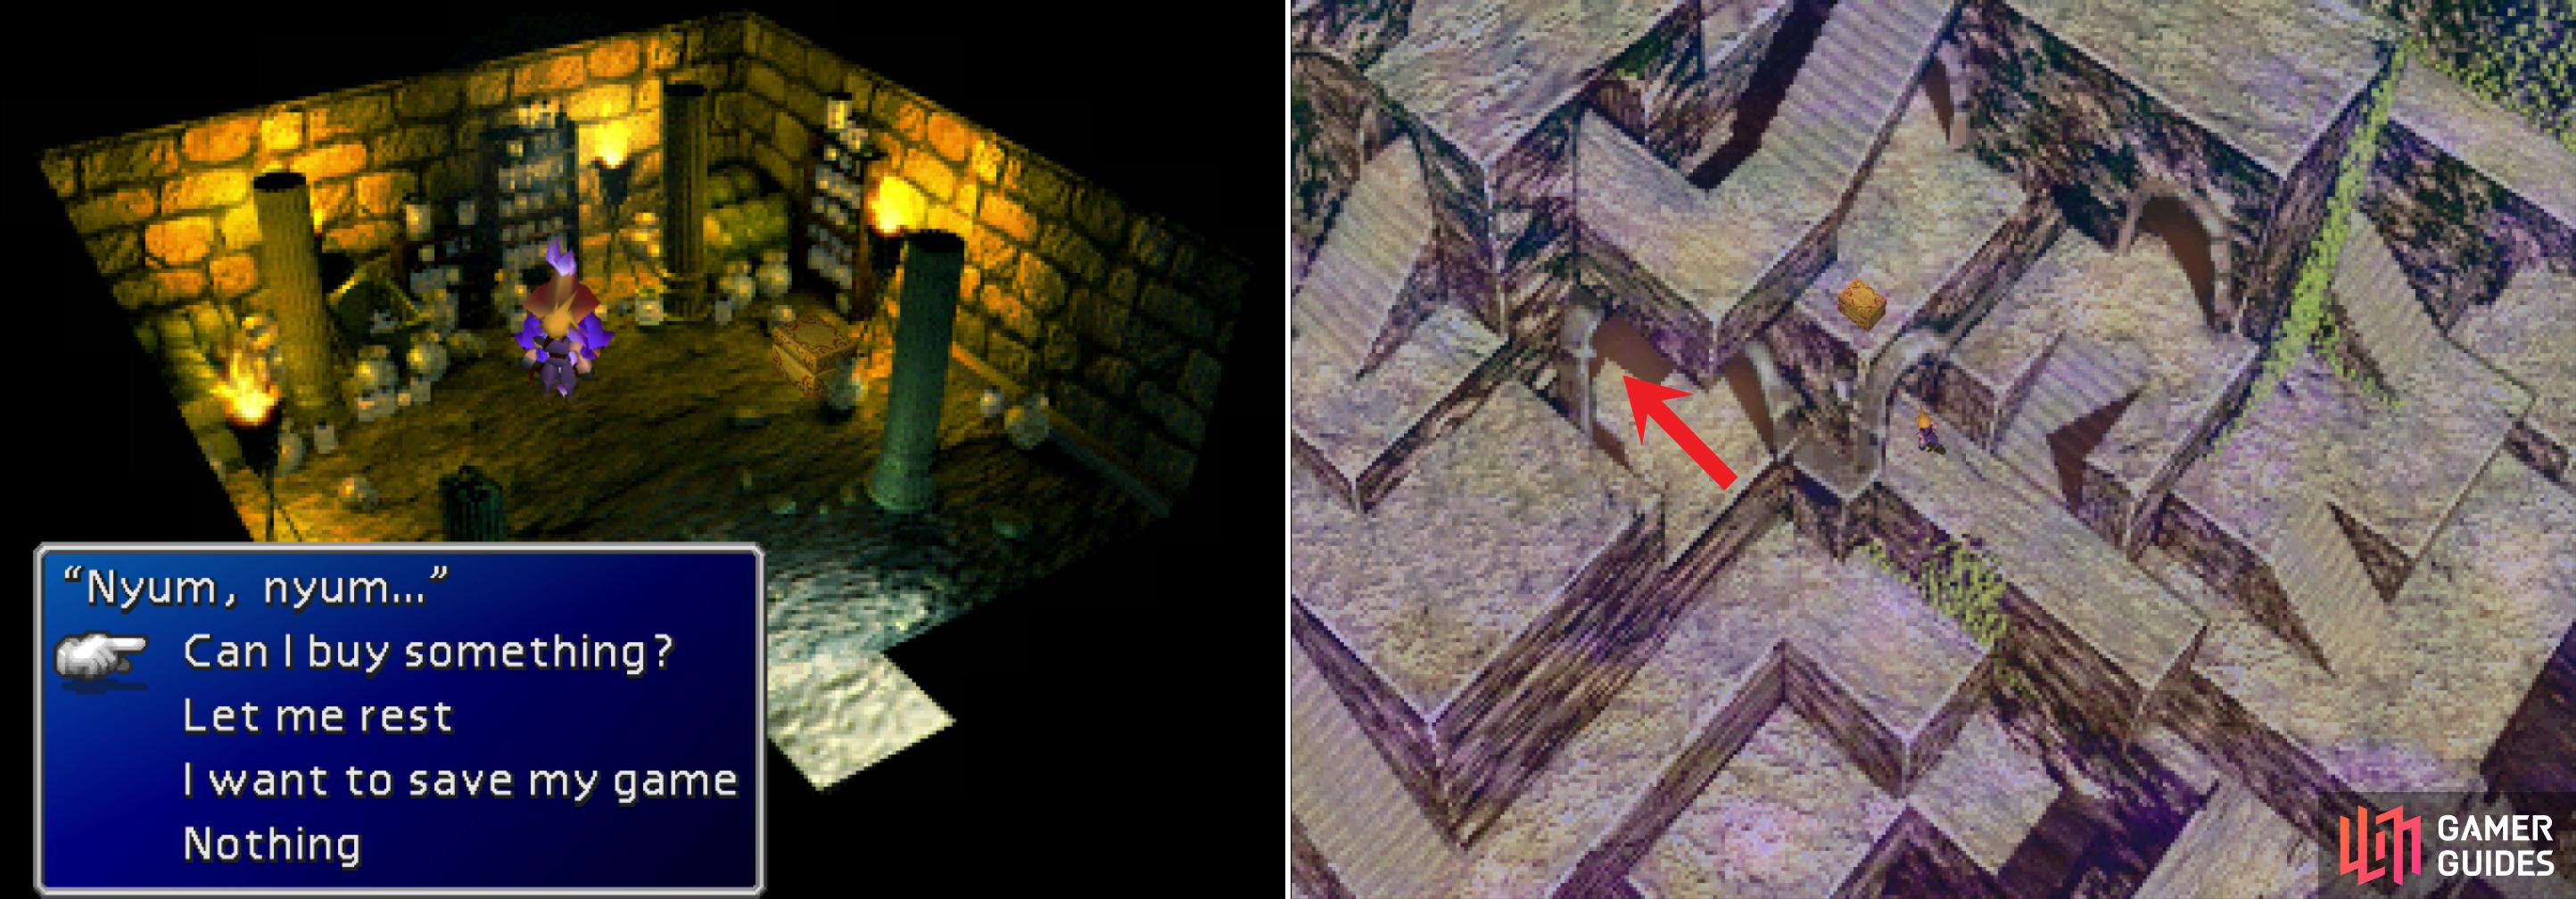
Chase down the Ancient spirit and it’ll provide a few basic - but useful - services (left). Make your way through the labyrinth to find the next area (the area transition is marked by the big red arrow!) (right).
Return upstairs and climb down some vines, then go south-west through an archway. Grab a teal vial ( Turbo Ether ), then go down two flights of stairs to the south-west, one long, one short, then continue in that direction until you find some more vines to crawl down. Loot a chest containing a Rocket Punch , then go down another flight of stairs, turn north-east, and climb some more vines. Ascend some stairs and go through an archway to the north-east and make your way south-east down some stairs, although you’ll be obscured by the foreground the entire time. Climb some vines and head under some stairs to find a piece of Luck Plus Materia . Backtrack to the south-east and descend the vines, then head up the stairs to the north-west, maneuvering behind the foreground to exit out the archway on the platform below where the Luck Plus Materia was. Head back down a short flight of stairs to the south-west then turn north-west, head through another archway and continue north-west to reach the next area.
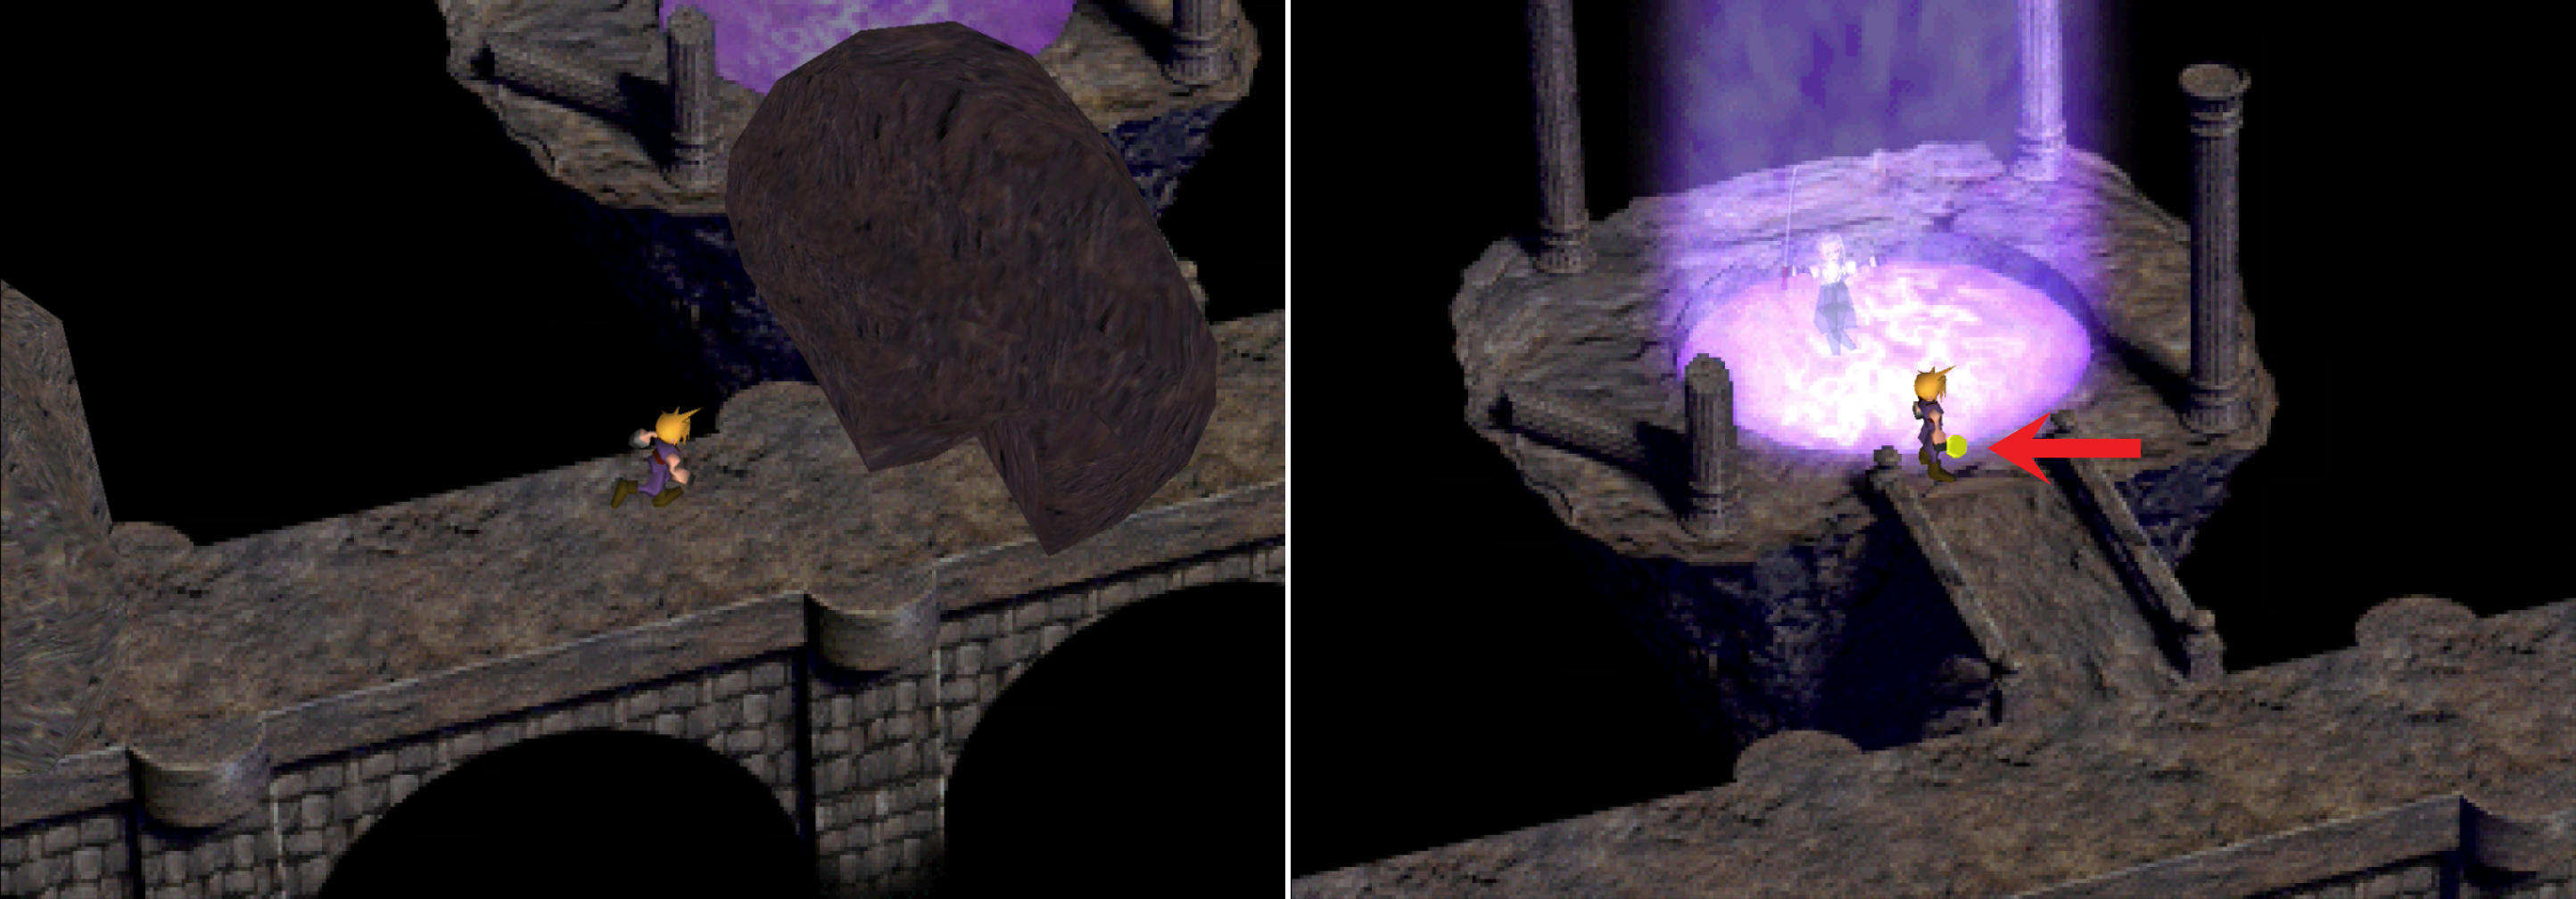
Run under each of the rolling rocks, using the hollow to your advantage (left). After wtinessing a scene, grab the Morph Materia near the vision pool (right).
Ascend some stairs to the north and you’ll spot a stone walkway leading to the north-east. Unfortunately, it’s not as simple as just walking down the walkway, as a number of cylindrical boulders will fall regularly, and if they clip you, they’ll knock you back to the beginning of the walk way. Fortunately, there’s enough space under each one to accommodate you if you time things right. Sprint north-east along the walkway, passing under the boulders until you reach the end, at which point the boulders will cease falling and the way will be clear. After some chatter the group will backtrack and witness what transpired with Tseng and Sephiroth earlier in the temple. After the vision, Sephiroth will bask in the knowledge of the ancients, absorbing it. All you can do is grab the Morph Materia near the pool before continuing on. Another Ancient will be standing by, and will allow you to save your game and rest, should you need to.
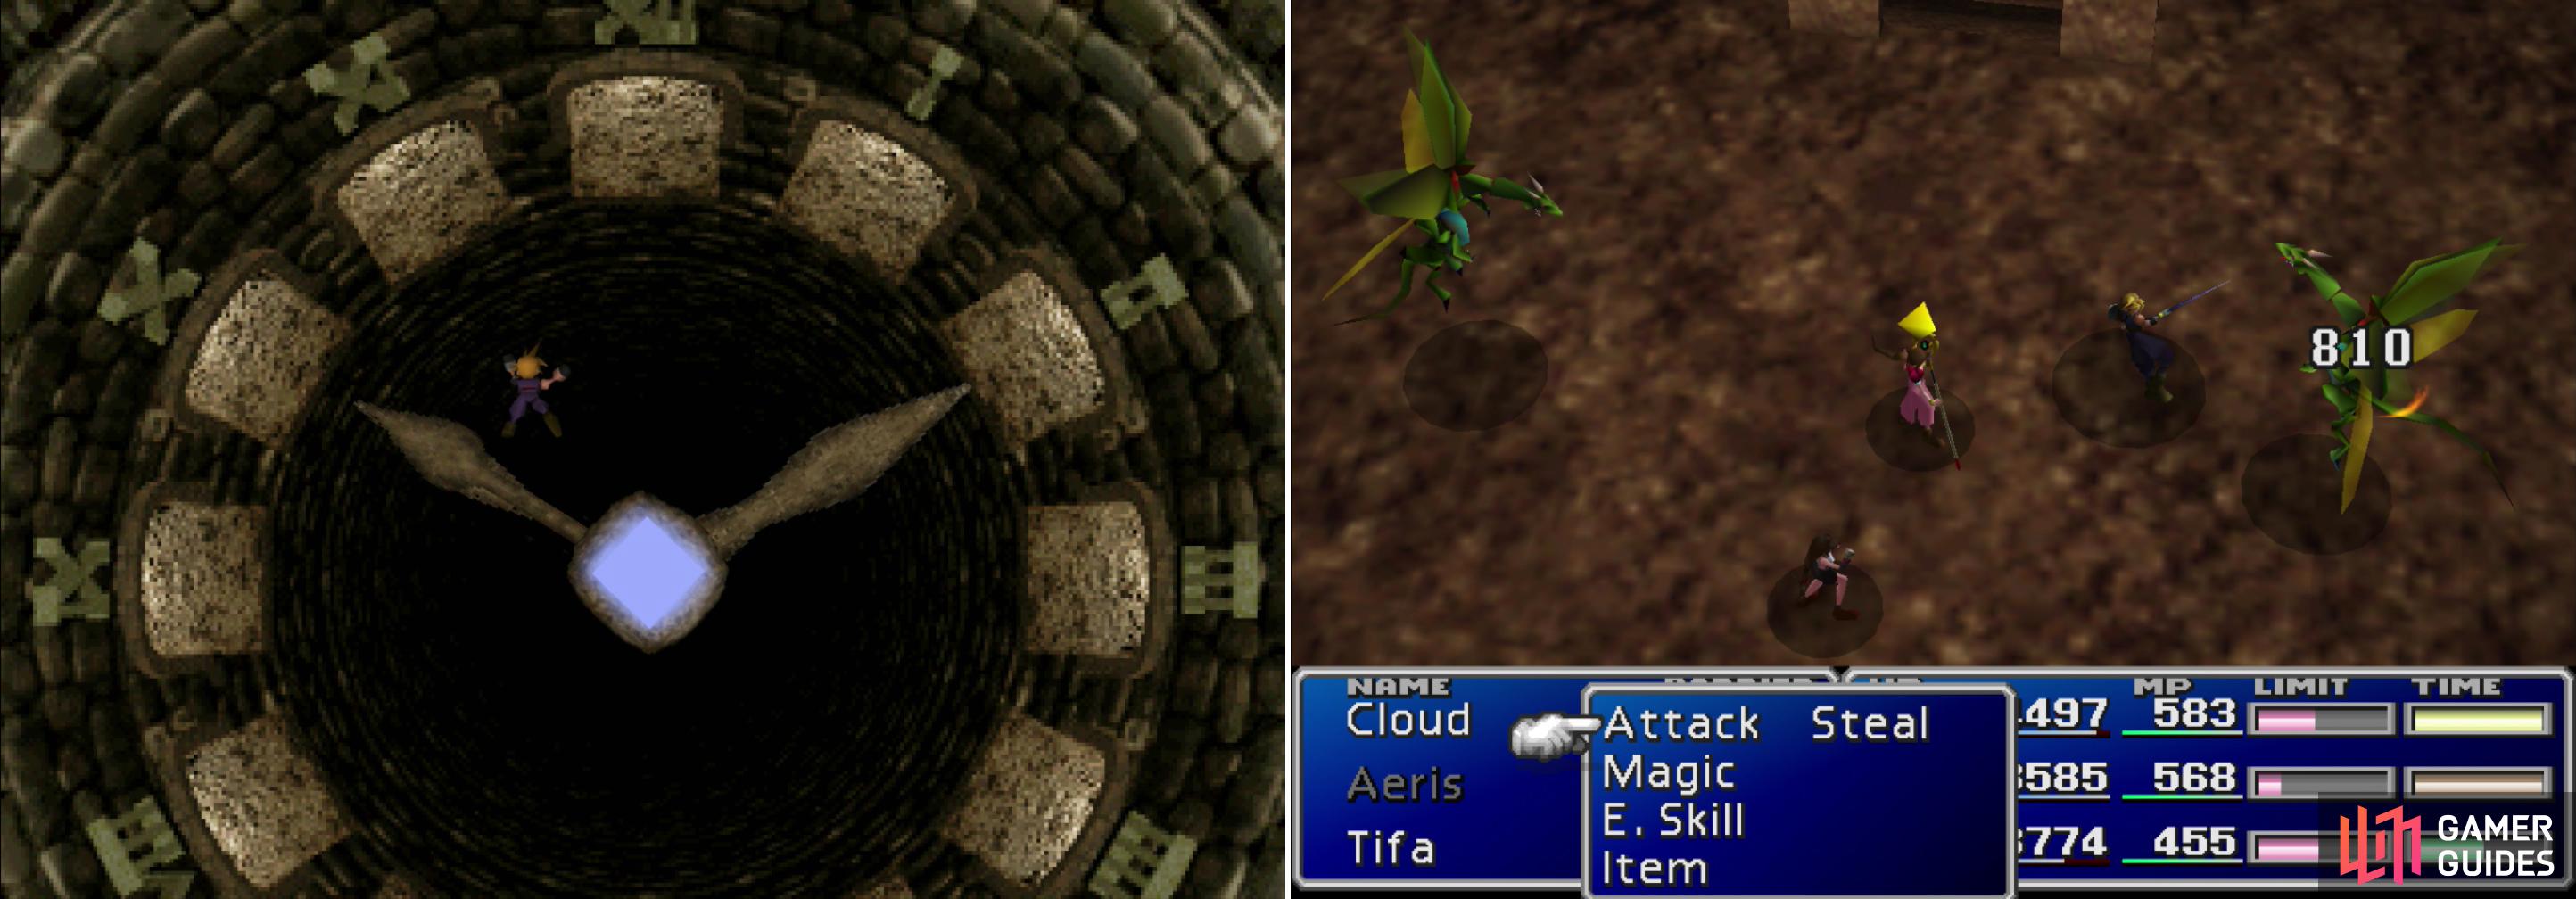
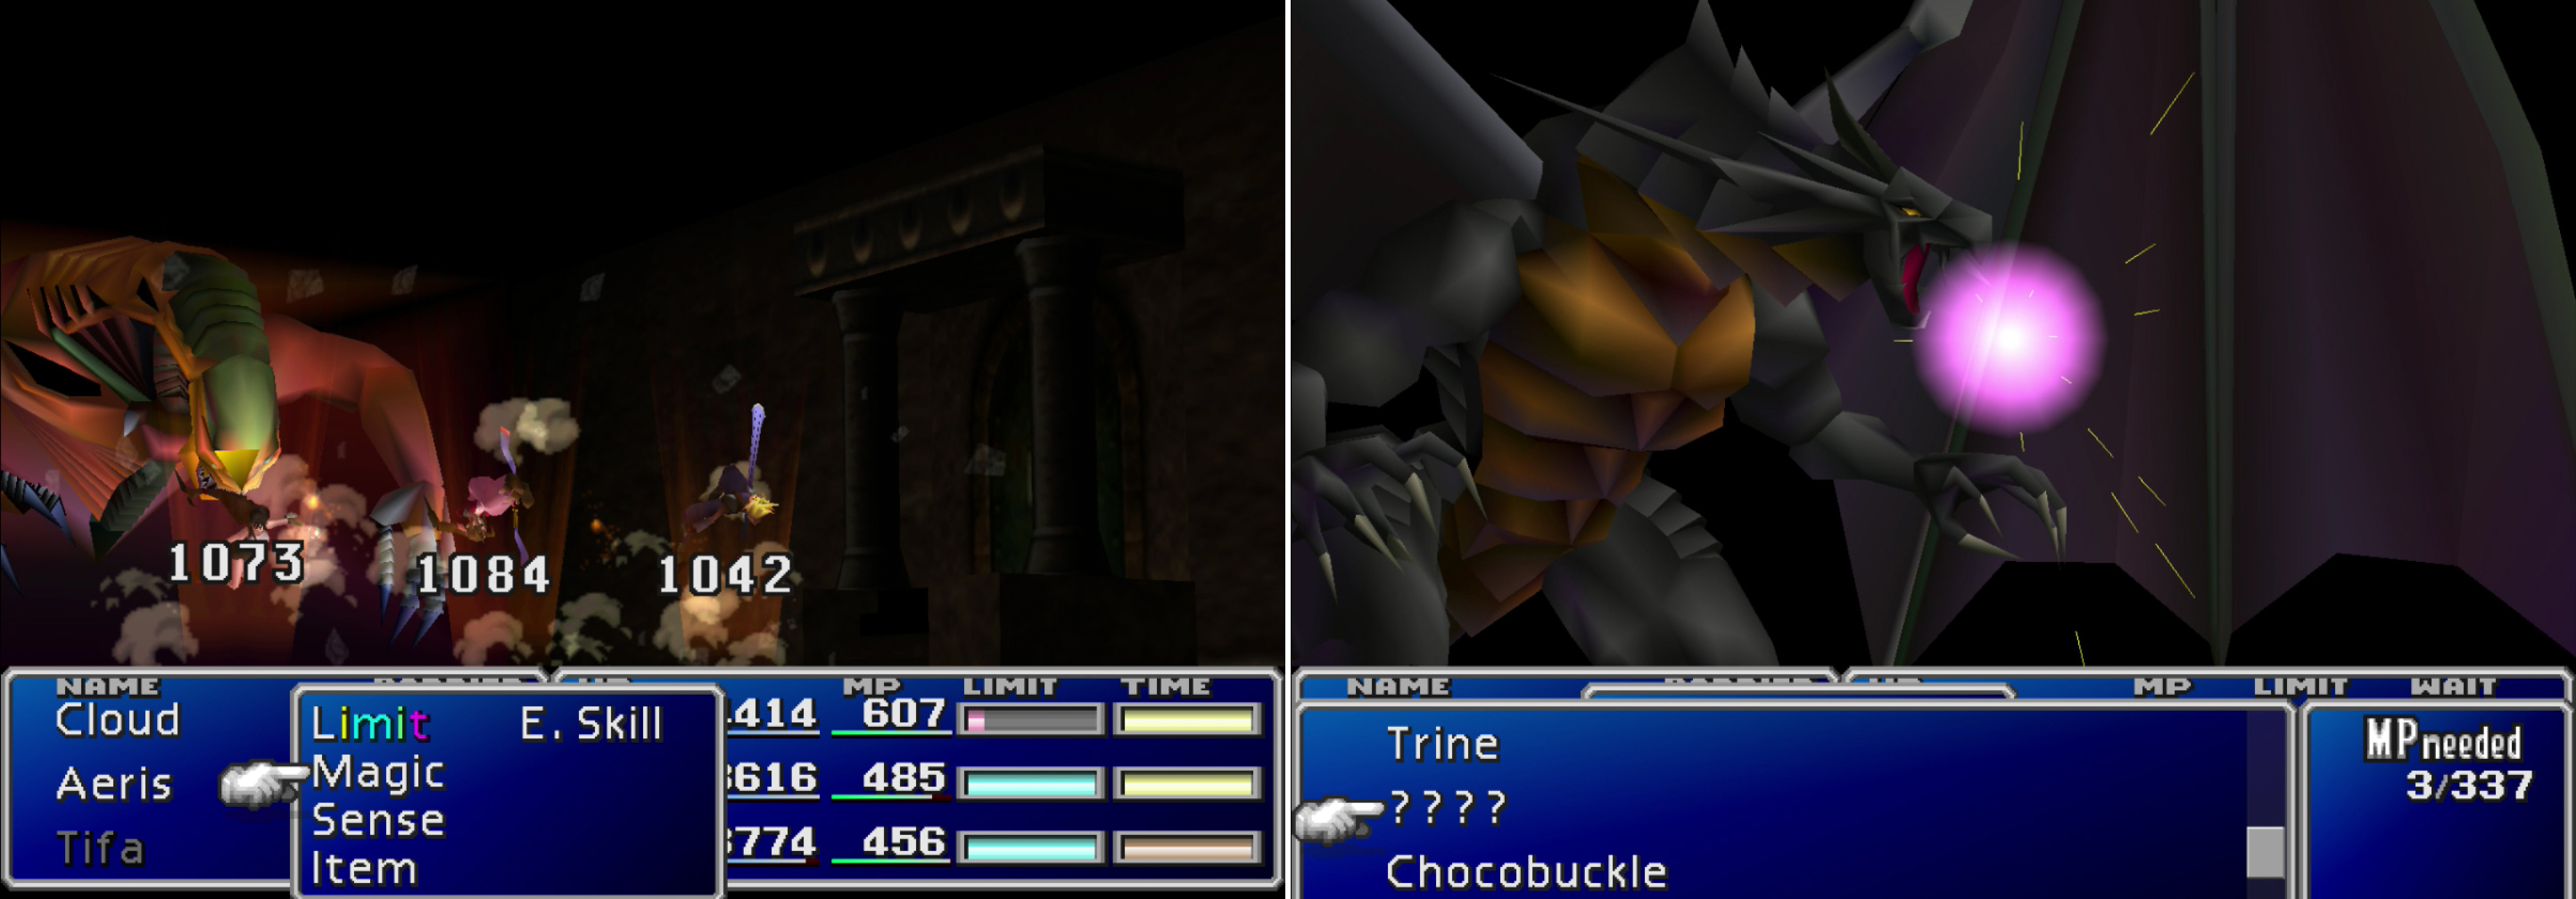
If you get clipped by the second hand, you’ll fall from the Clock Room (left) and have to fend off two Ancient Dragons, who are less fearsome than their names imply (right).
Behold, the clock room! The platform in the middle of the clock will decide to spawn a mouth and creepily explain the “puzzle” to you. Simply put, you need to move the minute hand (which only selects hours, mind you) so that the minute hand and the hour hand form a bridge you can walk on to the various rooms. The second hand only serves as a foil, potentially knocking you off the puzzle and into a chamber below. This is worth doing, even though it’ll force you to fight a pair of Ancient Dragons, who aren’t quite as dangerous as their name suggests. After the battle loot a chest near a dinosaur relief to obtain the Nail Bat . You’ll back to backtrack through the labyrinth (you’ll appear at the magically sealed archway), but it’s a minor nuisance at worst. The contents of the various chambers you can enter are listed below:
| Time | Chamber Contents |
|---|---|
| I | Chest (Toxic Frog x2 and Jemnezmy) |
| II | Dead End |
| III | Chest (8 Eye x2) |
| IV | Chest (Princess Guard) |
| V | Labyrinth (Ribbon) |
| VI | Room With Many Doors |
| VII | Chest (Trumpet Shell) |
| VIII | Chest (Megalixir) |
| IX | Dead End |
| X | Spirit Pool Area |
| XI | Dead End |
| XII | Exit (Currently Locked) |
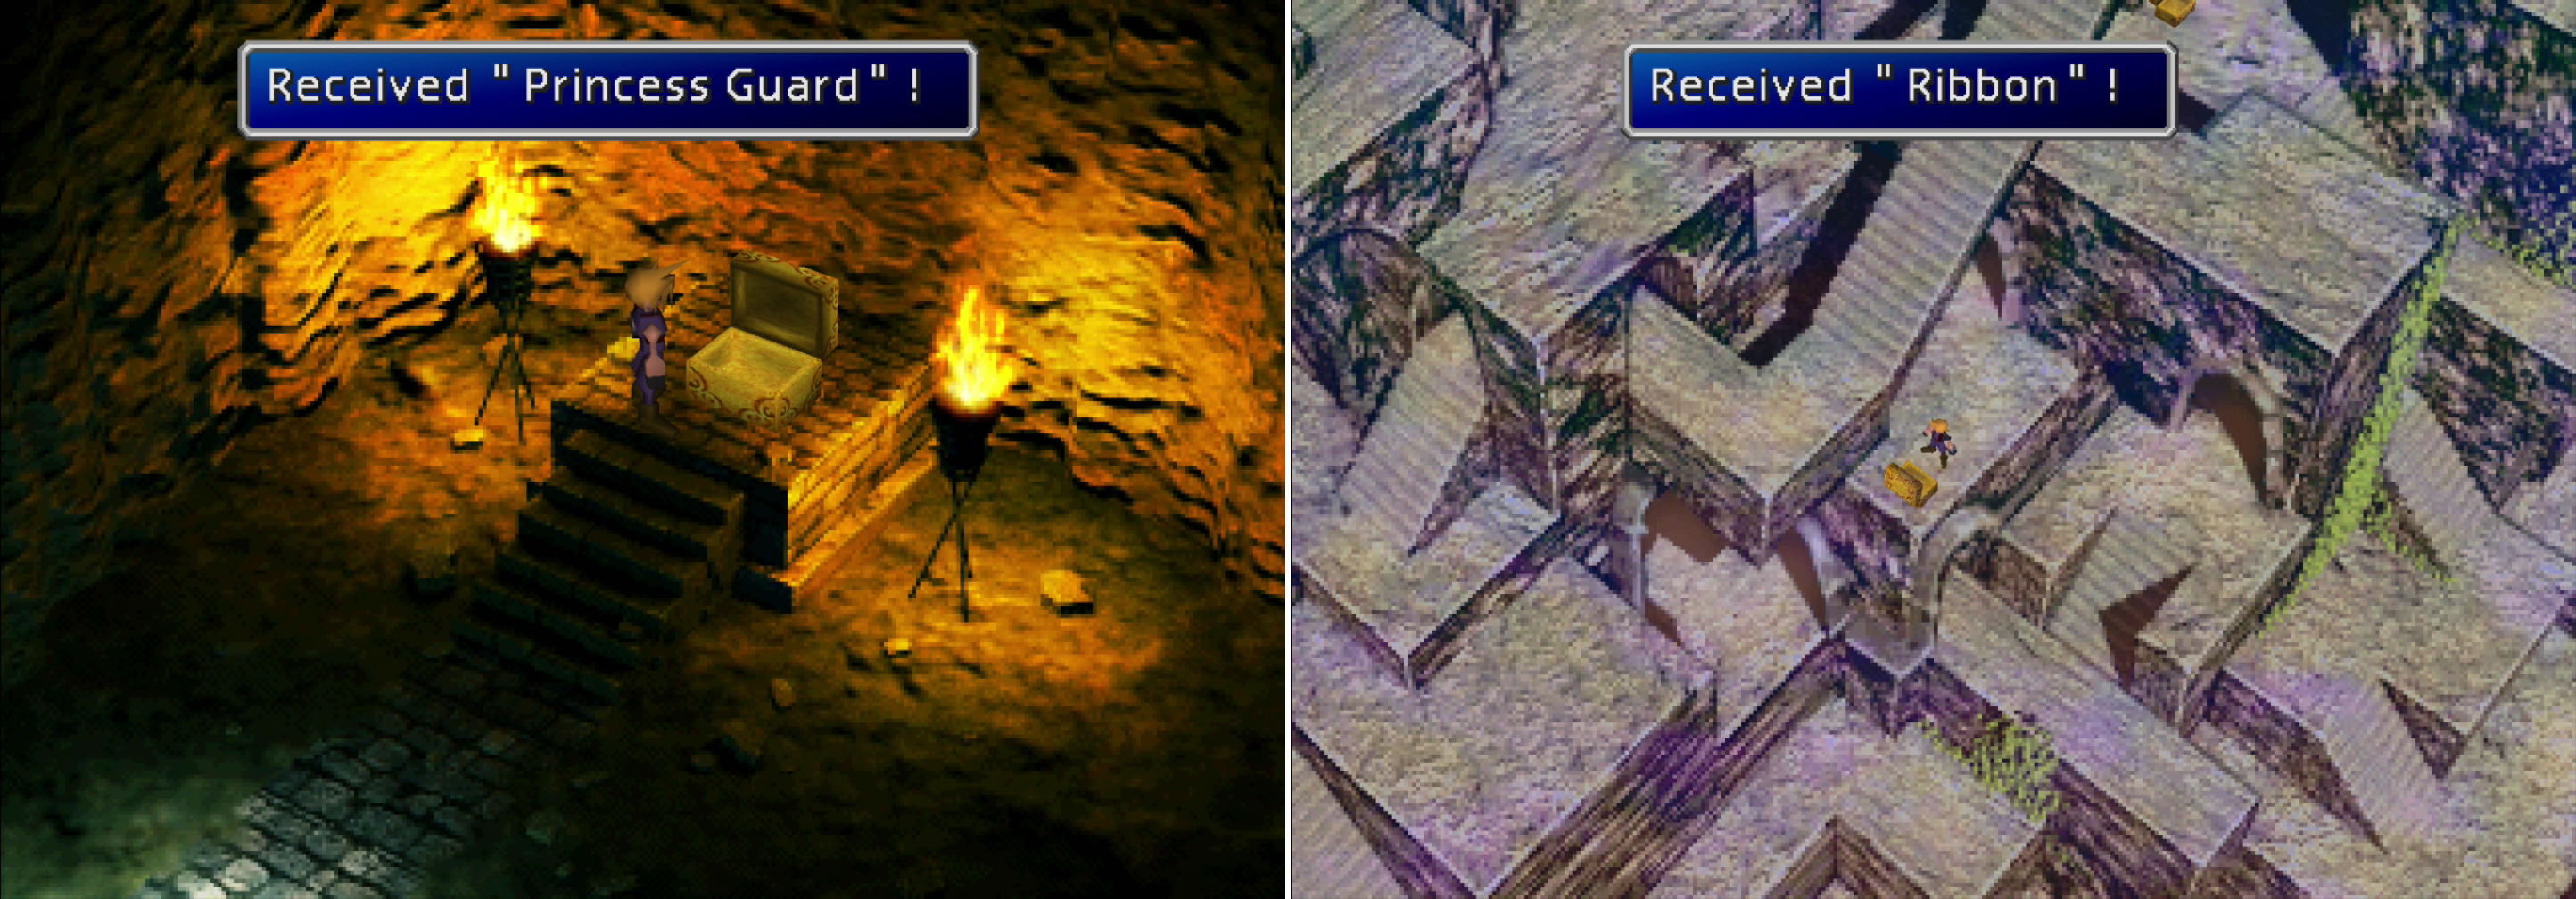
Explore the different hour rooms to claim the Princess Guard at IV (left) and the Ribbon at V (right).
The chests at I and III will trigger random encounters when tampered with, although neither groups of foes are terribly challenging. In area IV you’ll find the Princess Guard , which is Aeris’ ultimate weapon, suspiciously early in the game… You absolutely must make your way to area V and grab the Ribbon , which is in a chest in the labyrinth area that otherwise couldn’t be reached. It’s an indispensable accessory that grants its wearer total immunity to most every status effect in the game. You’ll be able to get another one… fairly soon, in the grand scheme of things, but after that you won’t be able to get another one until very late in the game, and having two Ribbons is a very good thing. Area VII holds a chest which contains a Trumpet Shell , and the chest in area VIII will yield a Megalixir . When you have all that loot, enter area VI to reach the “Room With Many Doors”.
An Ancient will run off and Aeris will investigate a door, only to come to the conclusion that the Ancient ran off with the key. Behold a silly puzzle right out of a Scooby-Doo cartoon. Various doors line three levels (two on the first floor, four on the second and third floors). The doors link to other doors, and you have to head off the Ancient by going through through a doorway that leads to the doorway the Ancient is about to emerge from. As the game will tell you, you can leap to the level below you by heading to the left of each level. For the sake of planning things out, let’s number the doors, starting from left to right, moving down each level, so level one has doors #1 (the western-most door) and level two has doors #2, #3, #4 and #5 while level three has doors #6, #7, #8 and #9. Based on that, consult the table below to find where every door will take you:
| Enter | Exit |
|---|---|
| #1 | #4 |
| #2 | #7 |
| #3 | #9 |
| #4 | #2 |
| #5 | #6 |
| #6 | #3 |
| #7 | #8 |
| #8 | #5 |
| #9 | #1 |
So, if you go into door #1 (the western-most door on the first level) you’ll exit out door #4 (the third door from the left on the second level). The Ancient follows a simple pattern (see table below), all you need to do is note what door it goes in, then head in the door that it will come out based on that. Or, just drop down to the second level at the beginning and go in door #4 first. Once you catch it the door will be unlocked. Grab the chest on the third level to score the Work Glove , then head through door #9 to return to the top level. Go through the unlocked door to reach the room with the murals, where the villain will generously explain his plans to us. Cloud will start acting strange after the encounter, but Aeris will snap him out of it, just in time to fight a boss.
| Comes Out | Goes In |
|---|---|
| N/A | #1 |
| #4 | #2 |
| #7 | #8 |
| #5 | #6 |
| #6 | #9 |
| #1 | … |
Boss Battle: Red Dragon
If you fought the Dragons in Mt. Nibel, you’ve fought this thing. Sure, it’s stronger (and red!) but its attacks are nothing new. Its “Red Dragon Breath” can deal over 700 damage, its tail swat deals over 500, and its bite can hit for over 1000. They’re all single-target attacks, however, and while that damage can hurt, it’s just nothing that should phase a moderately powerful party anymore. Cast “Big Guard” at the start of the battle for some defense and Haste, then pummel away on the Red Dragon with whatever attacks you wish to use… except fire and gravity-based attacks. If a character gets injured, consider casting “????” on the Red Dragon, as this attack can deal quite a bit of damage depending on how hurt you are.
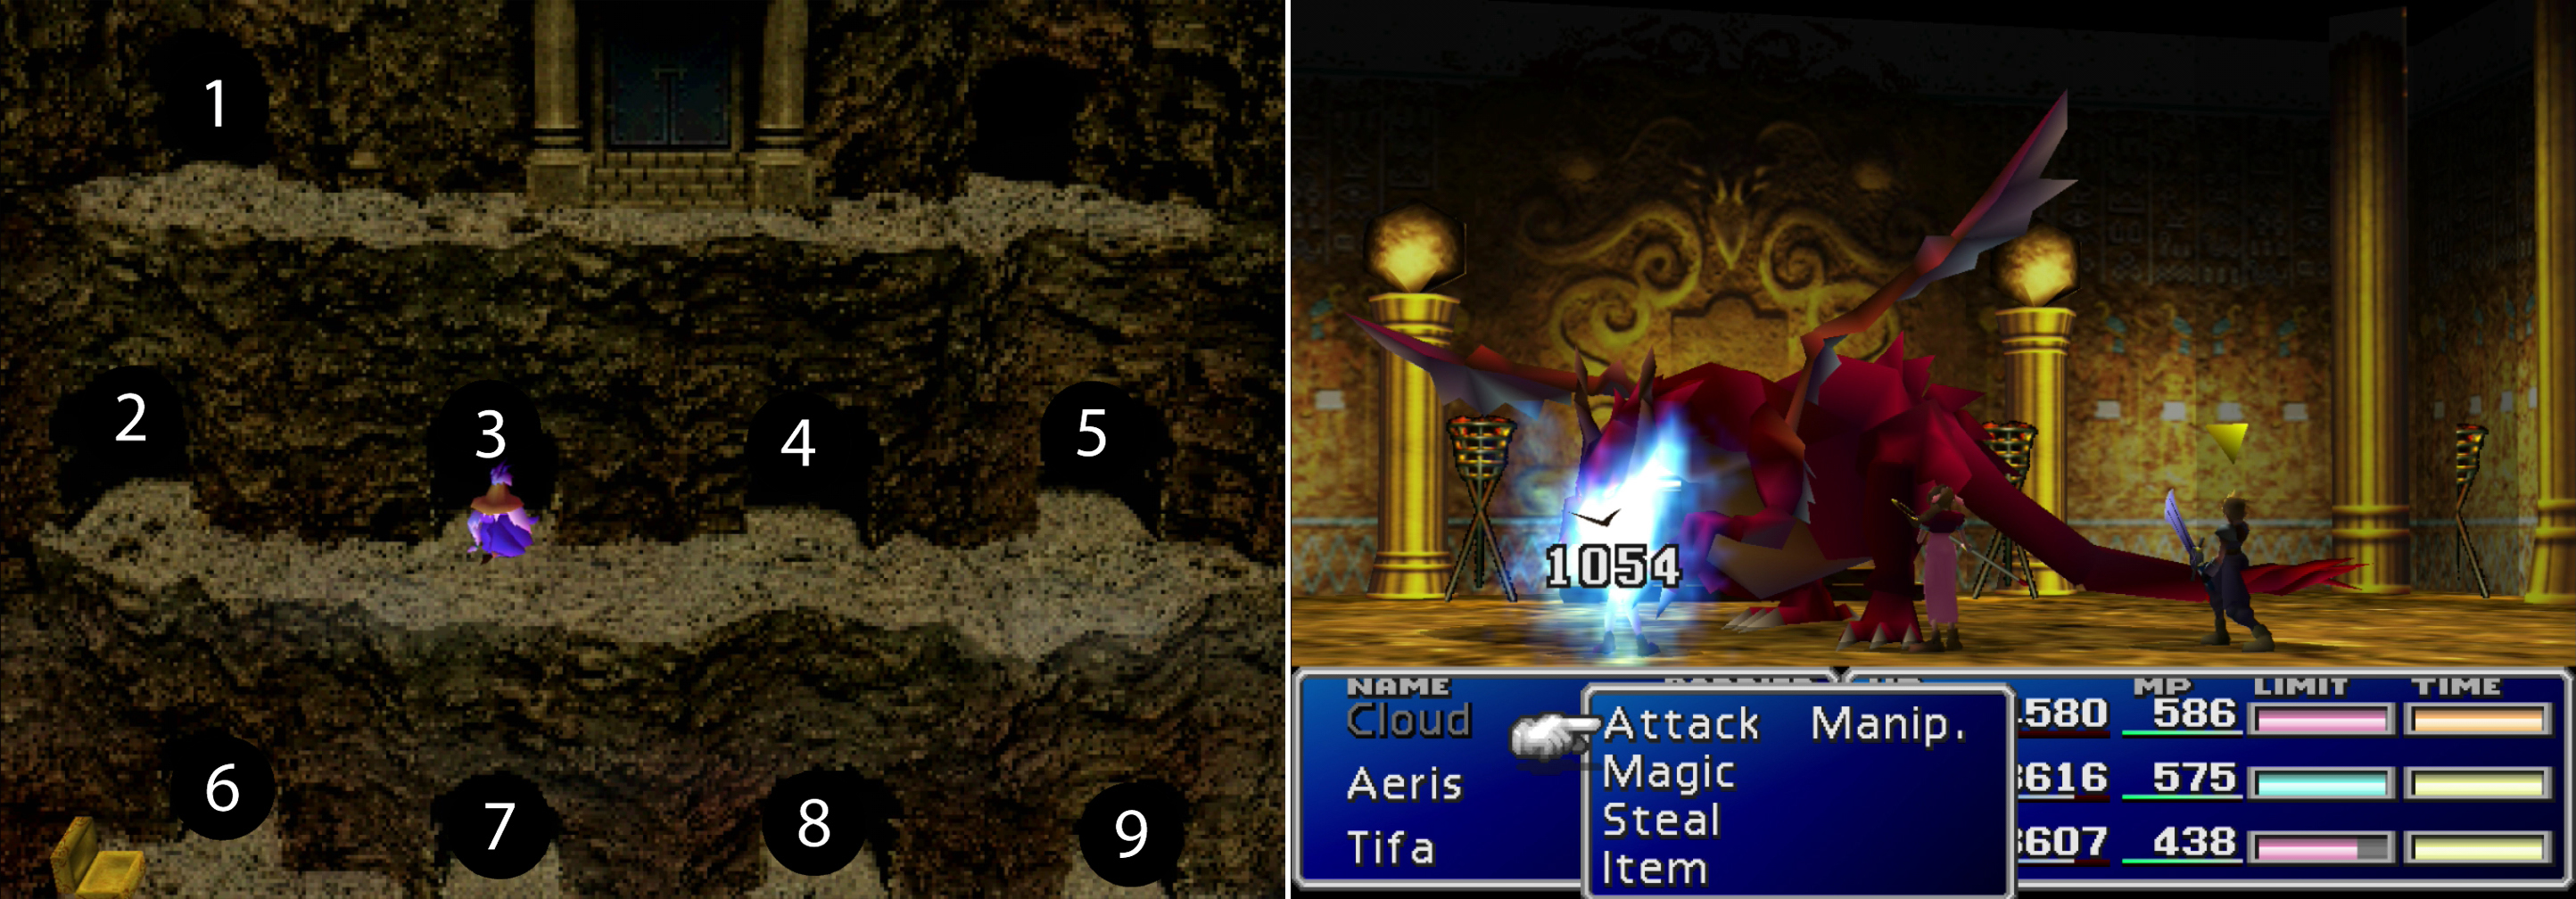
Chase the Ancient Spirit in and out various doors, Scooby-Doo style, the numbers on the image correspond to the directions give in the next (left). The Red Dragon uses plenty of fire elemental attacks and can deal decent damage, but it’s not an overly dangerous foe (right).
| Red Dragon | Stats |
|---|---|
| HP: | 6800 |
| MP: | 300 |
| Weaknesses: | N/A |
| Resistances: | Fire (absorbs), Gravity (negates) |
| XP: | 3500 |
| AP: | 200 |
| Steal: | N/A |
| Drop: | Dragon Armlet |
| Gil | 1000 |
After the Red Dragon is vanquished you’ll get a Dragon Armlet , which is a neat little piece of armor that has six Materia sockets (three pairs of joined sockets) and halves fire, cold and lightning damage. It also has defensive stats that are generally superior to a Diamond Bangle. Good stuff. Pick up the Bahamut Materia on the ground and equip it on somebody, then heal up, put everybody in the back row… and consider replacing Aeris’ armor and weapon if they’re unique (they can’t be purchased from any store). Once done, head east and examine the floating model of the temple. After some expert deciphering by Aeris, and some equally expert tinkering by Cloud, they’ll realize that recovering the Black Materia might not be a simple task. Aeris will chat with her dead ancestors, after which you’ll get a call from a disposable flunkie of your own, who offers to take one for the team. Since you have no other viable alternative, leave the mural room, exit the “Room With Many Doors” and return to the clock room, where the clock has finally decided to shut up and just provide a bridge to the exit (XII). Along the way, save and rest up at the Ancient you chased down earlier, as the strongest boss you’ve faced yet guards the exit.


Boss Battle: Demons Gate
The Red Dragon was just a warm-up for this monstrosity, which attacks fast, hits hard, and have plenty of attacks that strike the whole party. Its weakest, most basic attack consists of dropping a boulder from the ceiling on one character, dealing around 1300 damage. Its “Cave-In” attack is an ice-elemental attack that hits all characters for around 700 damage, and its most dangerous attack, “Demon Rush” will hit all characters for over 1000 damage.
How are you going to whittle down this beast’s 10,000 HP? Well, being the back row will reduce the damage it deals by half, since apparently none of its attacks are long-range, which should allow you to survive long enough to fight back. Summoning Bahamut at the start of the fight will shave off around 3000 HP from the Demon Gate. “????” also can work wonders, if you’re brave enough to let your HP fall low enough to take advantage of it. Failing that, Limit Breaks and tried and true Enemy Skills like “Trine”, “Beta” and “Aqualung” will serve you well. Starting the fight out with “Big Guard” is a no-brainer, as well.
The Demons Gate’s “Demon Rush” attack can deal heavy damage to the entire party (left). Consider employing your new-found Bahamut Materia to shave off a hefty chunk of damage from this boss (right).
| Demons Gate | Stats |
|---|---|
| HP: | 10000 |
| MP: | 400 |
| Weaknesses: | N/A |
| Resistances: | Earth (halves), Gravity (negates), Poison (negates) |
| XP: | 3800 |
| AP: | 220 |
| Steal: | N/A |
| Drop: | Gigas Armlet |
| Gil | 4000 |
After the battle, Cait Sith will show up and give one last fortune (much to Tifa’s annoyance, if she’s in your party). Once that’s done, the game will play up the importance of Cait Sith’s impending sacrifice; the demise of a remote-controlled treacherous doll. Somebody at Squaresoft was overly attached to their dakimakura. Anyways, Cait Sith says his “final, final farewell” then goes about his business. After that overly drawn-out scene, Cloud will go to retrieve the Black Materia. Unfortunately Sephiroth will reappear and complicate matters, aided by Cloud recurring erratic behavior, which persists even after Sephiroth leaves. Fortunately your third party member will intervene, after which Cloud will have a strange dream. Apparently Aeris has a plan to counter Sephiroth… a plan Sephiroth is aware of.
No Comments