
| Important Items in this Area | Enemy Skills in this Area* |
|---|---|
| Destruct Materia | ???? |
| Enemy Launcher | |
| Luck Source x2 | |
| Magic Source | |
| Odin Materia | |
| Platinum Fist | |
| Silver M-Phone | |
| Twin Viper |
Rewriting History
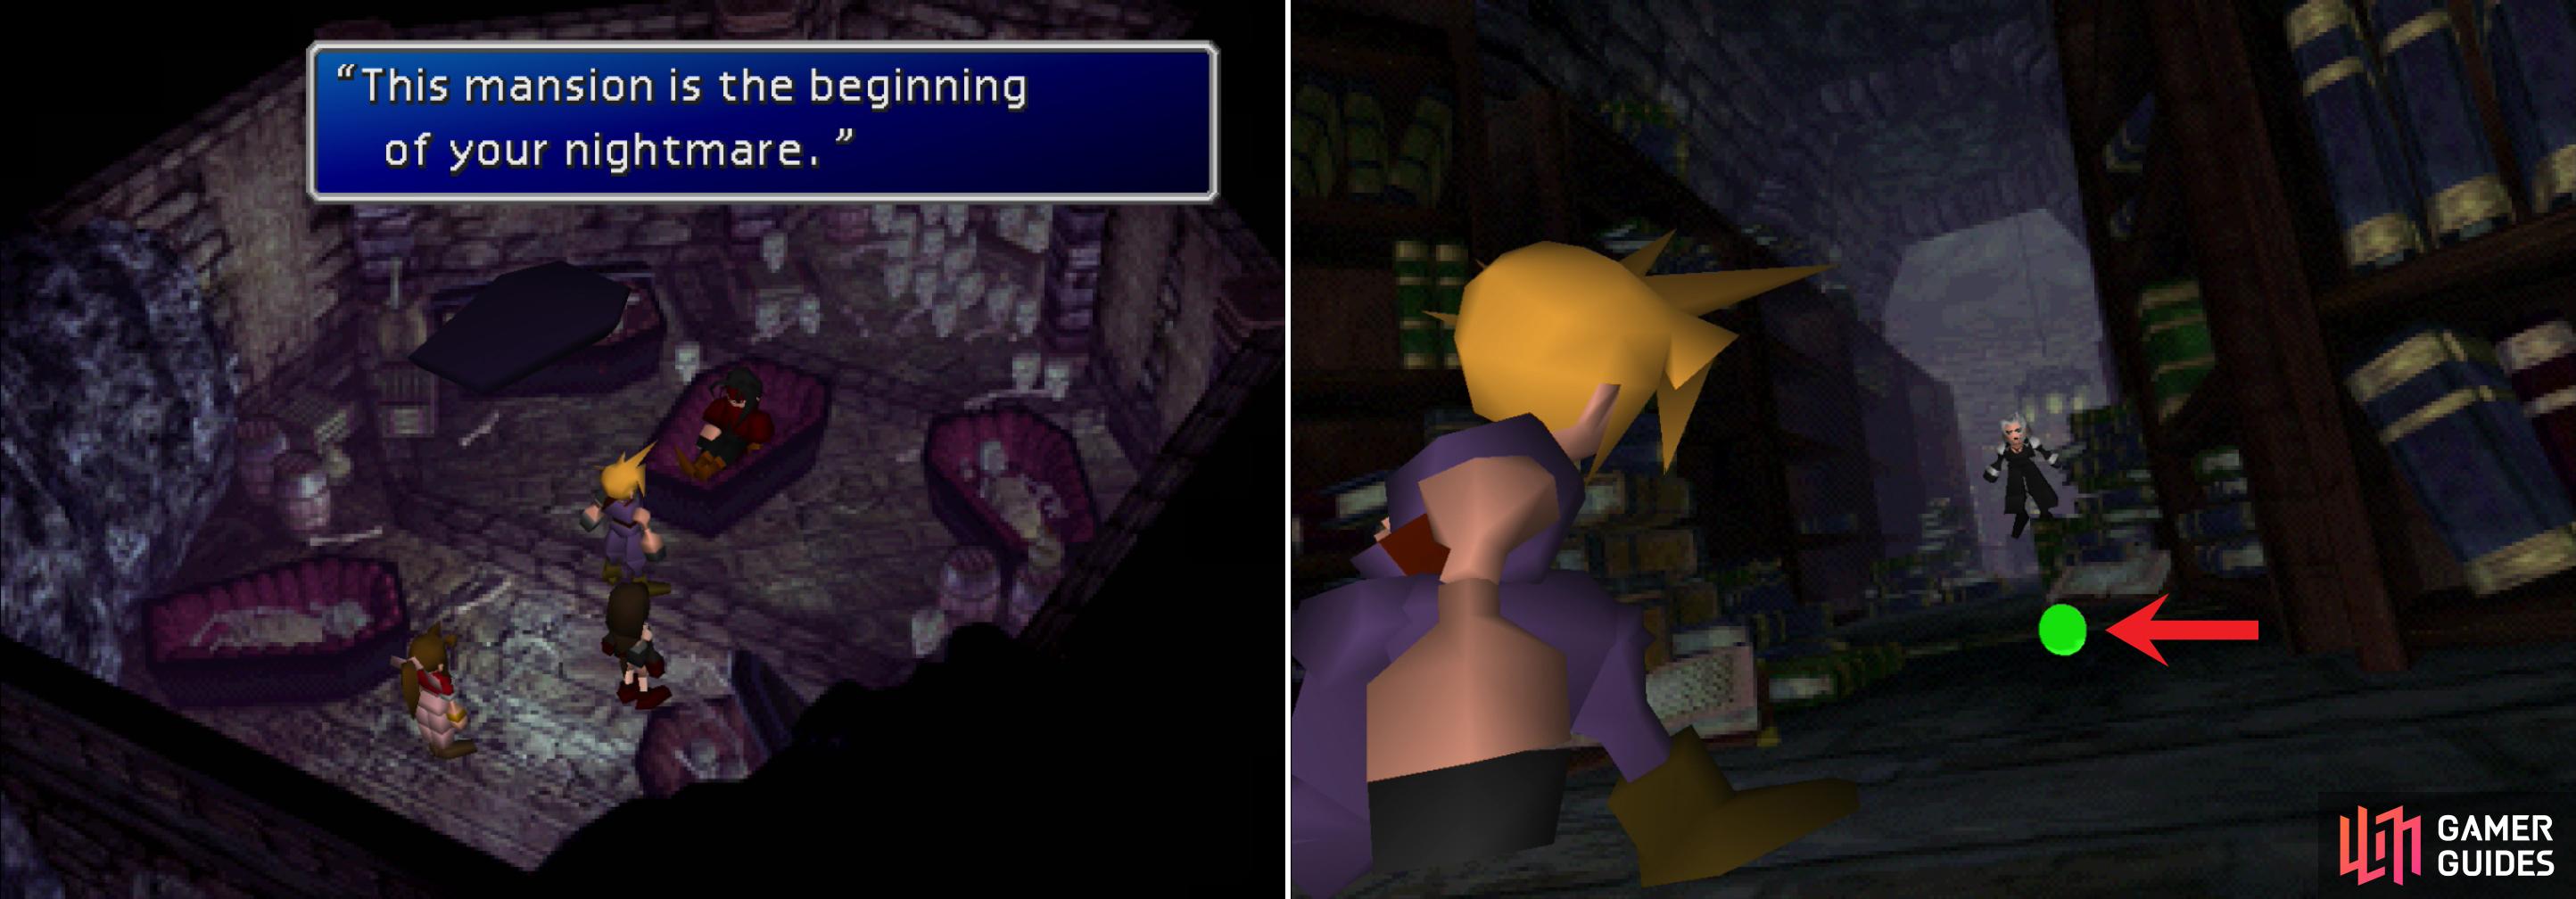
Continue past Cosmo Canyon, eventually following the western coast to the north. Cross a river and drive north to find a small village nestled in front of some mountains. Exit the buggy and enter the village to find… Nibelheim. Somewhat less destroyed than it seemed last time. So much for this place being happy… move forwards and discussion between your party members will ensue. Once the chatter is over, head into the inn, where the innkeep - a stranger - will tell you that your memories are bogus. The cover-up is real, which is kind of silly… why would Shinra cover up the Nibelheim Incident but not the Gongaga Reactor explosion and the Corel massacre? Head into the back room and talk to a black-cloaked figure, whom Cloud will rob, obtaining a Luck Source in the process. Note that he has a tattoo; the number 6.
Like the first time, explore the village by moving clockwise, house by house. In the shop adjacent to the inn you’ll find an item shop, which sells an unimpressive selection of items. Another townsperson will lie to you, and another cloaked figure (#12) near a furnace will give up an Elixir .
Item Shop
| Item | Gil |
|---|---|
| Potion | 50 |
| Hi-Potion | 300 |
| Phoenix Down | 300 |
| Tent | 500 |
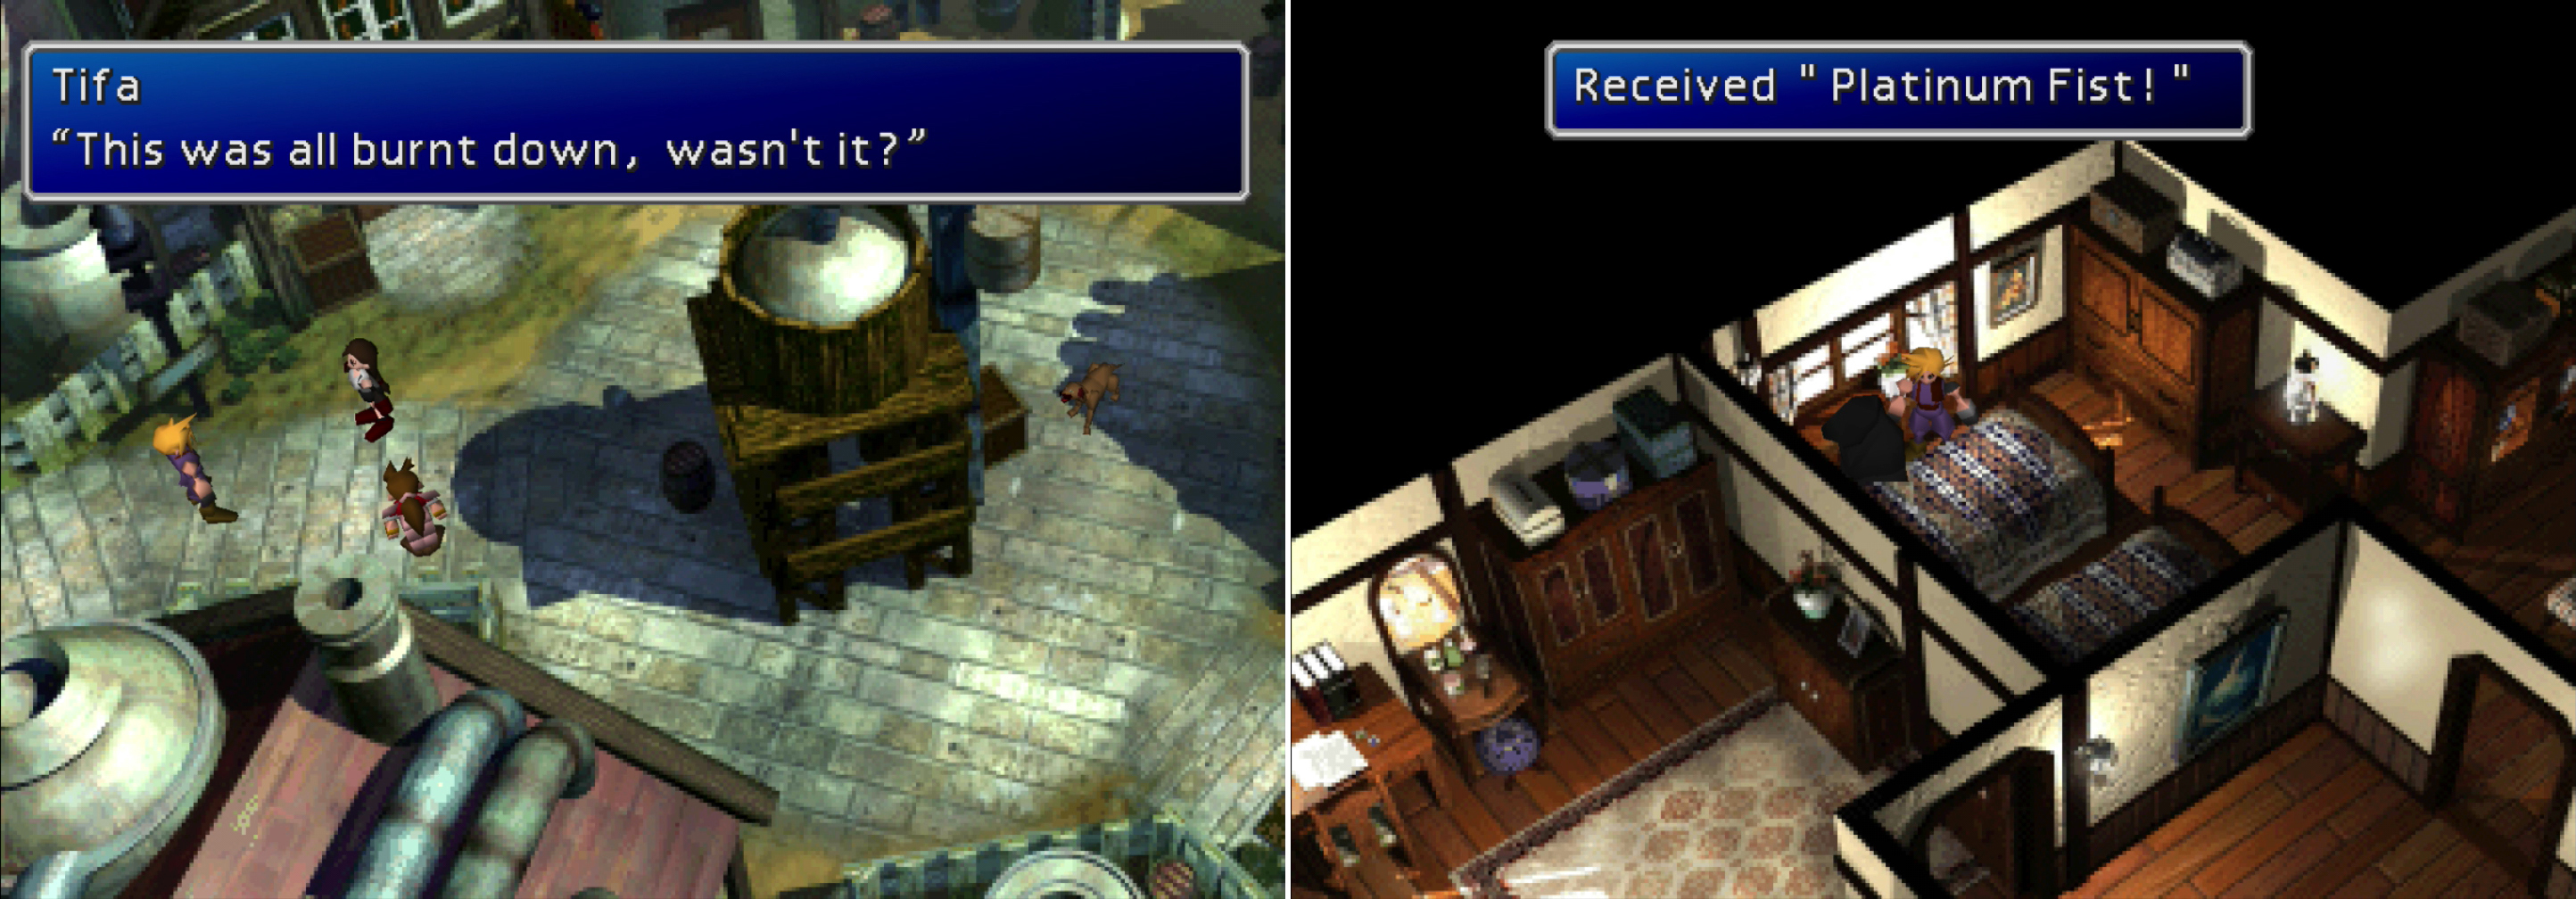
Cloud returns to Nibelheim only to find the town oddly intact, despite being destroyed by Sephiroth five years ago… (left). Talk to the black-cloaked figures to rob them of various goodies (right).
Cloud’s house is uninteresting, but in Tifa’s house you’ll find another cloaked figure (#5) walking near the front of the house. He’ll give you a Turbo Ether , and another one upstairs (#4) will give you a Platinum Fist . This is a nice weapon for Tifa, having a bit more Attack than the Motor Drive, but having four Materia sockets with Double AP Growth. If you want to practice on Tifa’s piano again, you can play the melody following melody:
Playstation controller
X, [Square], [Triangle], R1 + [Triangle], R1 + [Square], X, [Square], [Triangle], R1 + X, [Circle], X, [Square], X
PC controls
[CANCEL], [SELECT], [MENU], [PAGE UP] + [MENU}, [PAGE UP] + [SELECT], [CANCEL], [SELECT], [MENU], [PAGE UP} + [CANCEL], [OK], [CANCEL], [SELECT], [CANCEL]
If you play the melody successfully, you might obtain Tifa’s secret savings; one Gil! Score. Finally head to the last house and head upstairs to find another cloaked figure and its mini-me. The former has a Luck Source , while the latter just babbles about a “Reunion”. In fact, they all seem to mention some “Reunion” and “Sephiroth”. Head up to the Shinra Mansion, where you’ll find two more cloaked figures, one east of the mansion and one to the west, although they don’t have any goodies to impart. The one to the east will suggest that Sephiroth is in the mansion. What more incentive do you need?
Shinra Mansion
From the entrance head west into a small room and search a note on the floor to find out about some “member of the Turks” who was put to “sleep in the basement”. It’ll also give clues on how to find this person, which involves opening some safe. According to the note, you have twenty seconds to enter the code, and you cannot pass the target numbers. More than that, you have to turn to the correct numbers by going in the correct direction. Read further to read three clues… and a hidden fourth clue that can be found by selecting the blank line below the third clue:
Dial (1) “The lid of the box with the most oxygen.”
Dial (2) “Behind the Ivory’s short of tea and ray.”
Dial (3) “The creek in the floor near the chair on the second floor… then to the left five steps, up nine steps, left two steps, and up six steps.”
Dial (4) “(Right 97)”
Well, you know one code. While you search this place, you might as well keep an eye out for the rest. Head through a doorway to the east to find a chest in a small room, which contains a Silver M-Phone , which has eight - count them, eight - unjoined Materia Slots… but only 28 Attack. Backtrack to the entrance area, then go through a door to the west and head into a room to the north with a piano in the south-eastern corner. If you search the front of the piano you’ll get some info on the piano keys. More interestingly, search the end of the piano near the eastern wall to find the second code for the safe: “(Left 10)“ . Travel north and enter a hallway to the east. Continue east and bypass the door leading south to continue into a room to the east. From here, head north into another room with a chest that contains a Twin Viper , a 36 Attack weapon for Yuffie with four unjoined Materia sockets and Double AP Growth. Backtrack to the hallway and go through the neglected door to the south to return to the entrance area.
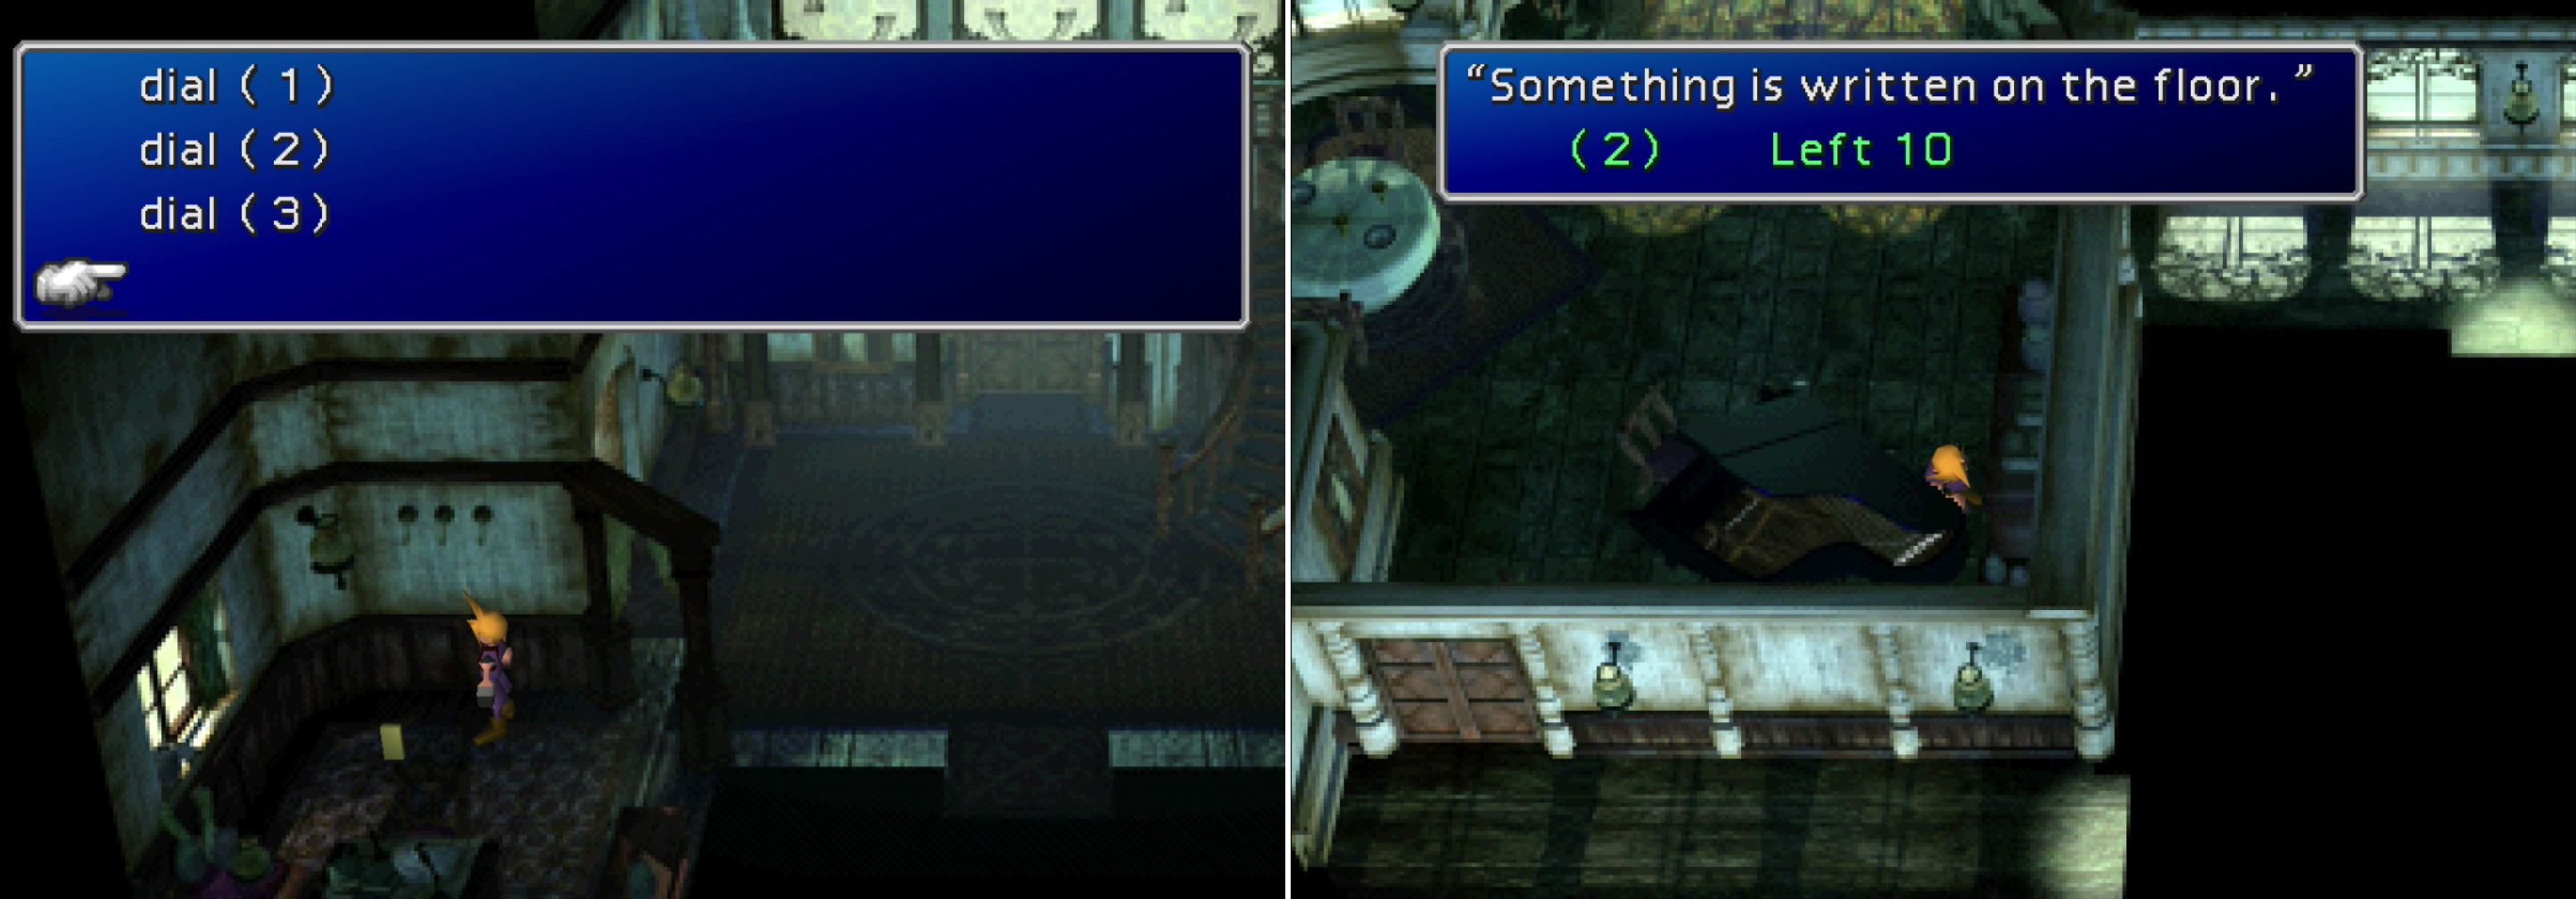
Search the room just west of the entrance to find the clues to a little game a former resident of the Shinra Mansion left behind. The first code is on the fourth, blank line under the clue (left). Another clue can be found behind a piano (right).
Go up the stairs and turn east to reach the upper east wing of the mansion. You can follow the note’s instructions to find the third code, or you can just walk up the western side of the northern hallway, constantly clicking [Circle] ([OK] on the PC) to find the code on the floor, which happens to be “(Right 59)“ . Continue north to the end of the hallway and enter the room to the east, where you’ll find a chest containing a Magic Source .
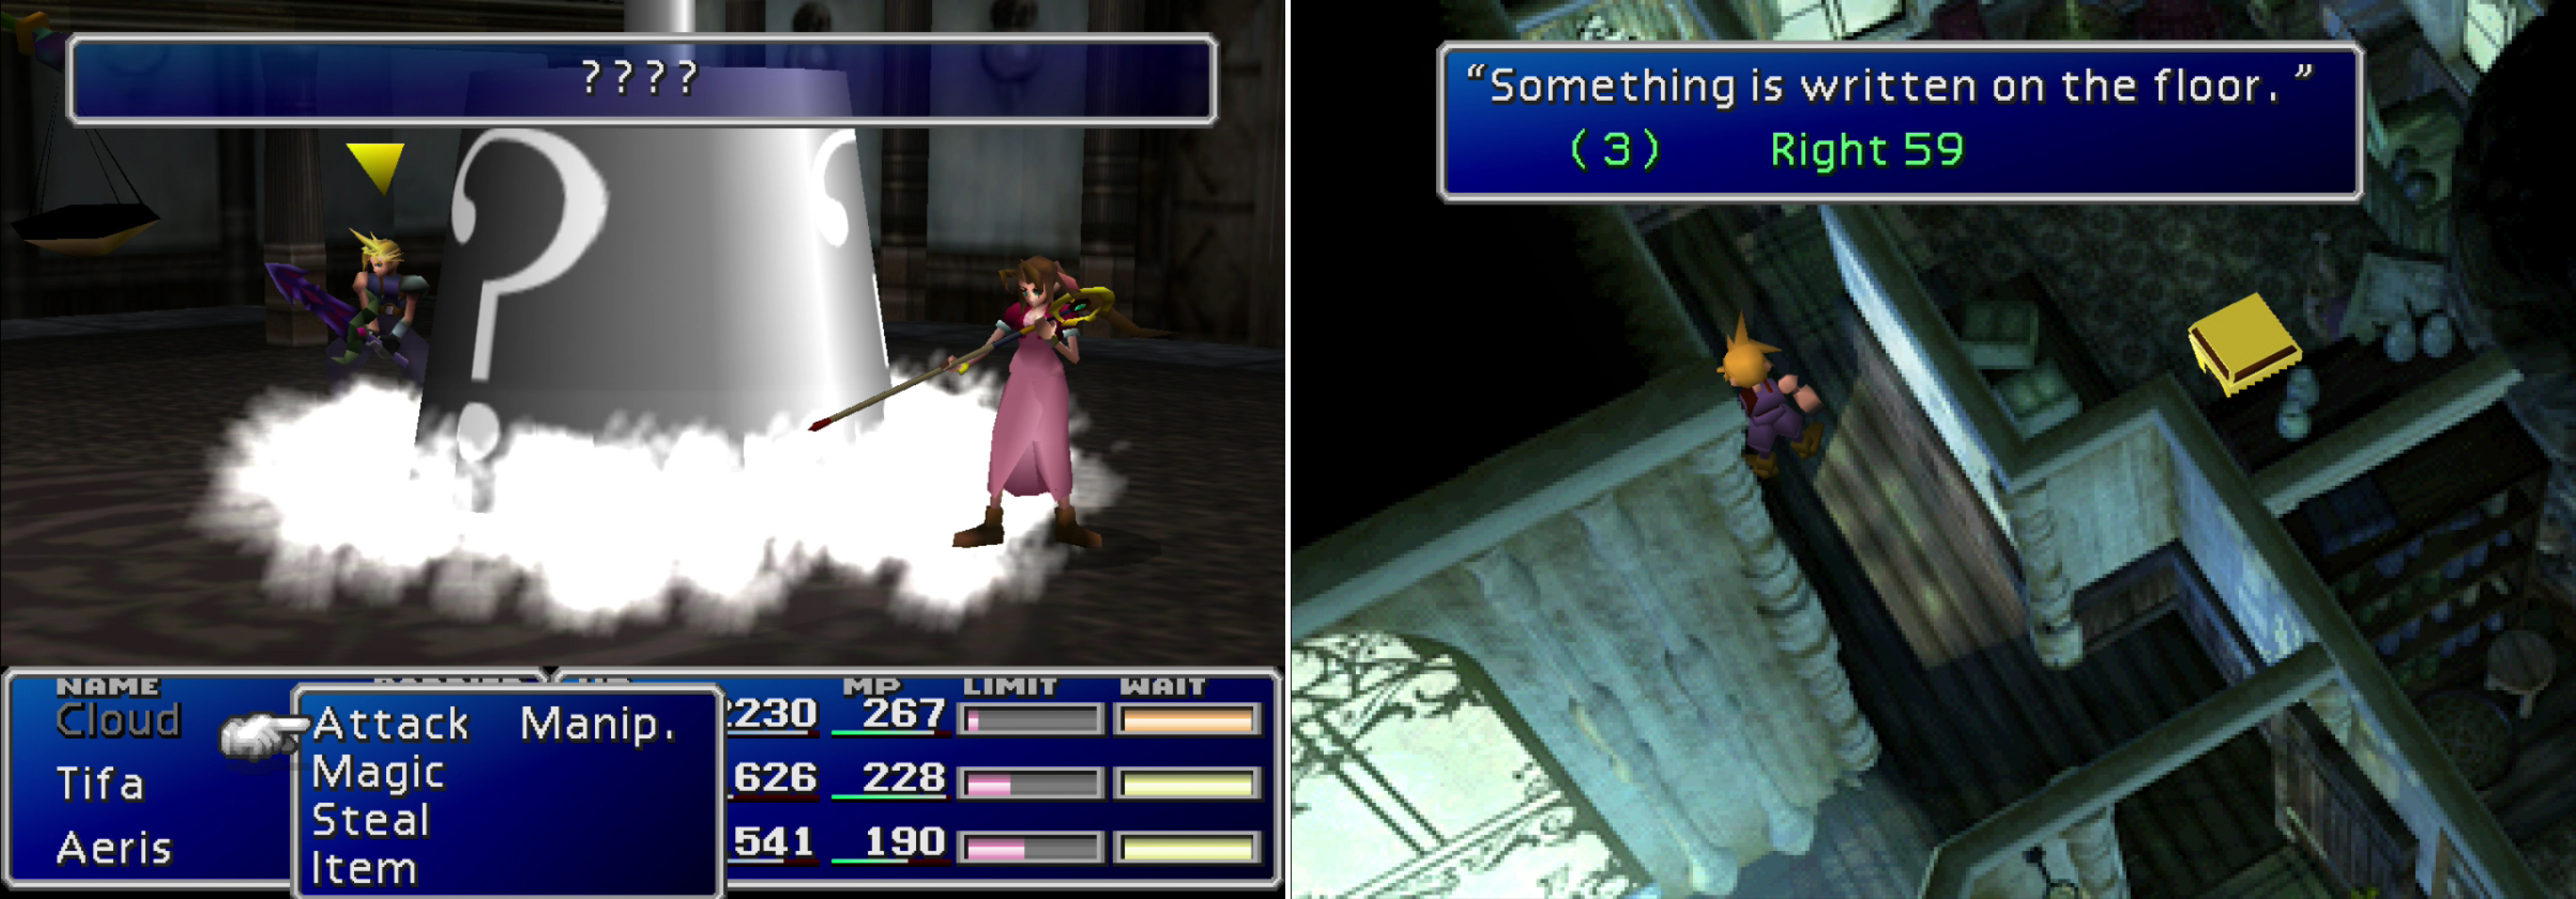
Jersey enemies will cast the “????” Enemy Skill on you (left). Search the eastern upstairs hallway for another code (right).
Backtrack to the last screen to the west and head to the upper western wing of the mansion, then make your way into a circular garden room and loot a chest for an Enemy Launcher . The Enemy Launcher is weaker than the Heavy Vulcan, but it does have one more Materia socket. Search the chest again to find the first code; “(Right 36)“ . Now that you have all four codes, you can attempt to open the safe in the next room. Before you attempt it, however, leave the mansion, rest, save your game, and get ready for what is by far the toughest boss you’ve faced so far. When you’re ready, head to the safe and input the four codes, in order, turning them the right way, without going over, and in the time limit. Whew! As annoying as that can be, you still have a powerful boss to deal with afterwards, so don’t get too excited when that chest pops open…
Safe Codes
| 1) Right 36 |
|---|
| 2) Left 10 |
| 3) Right 59 |
| 4) Right 97 |
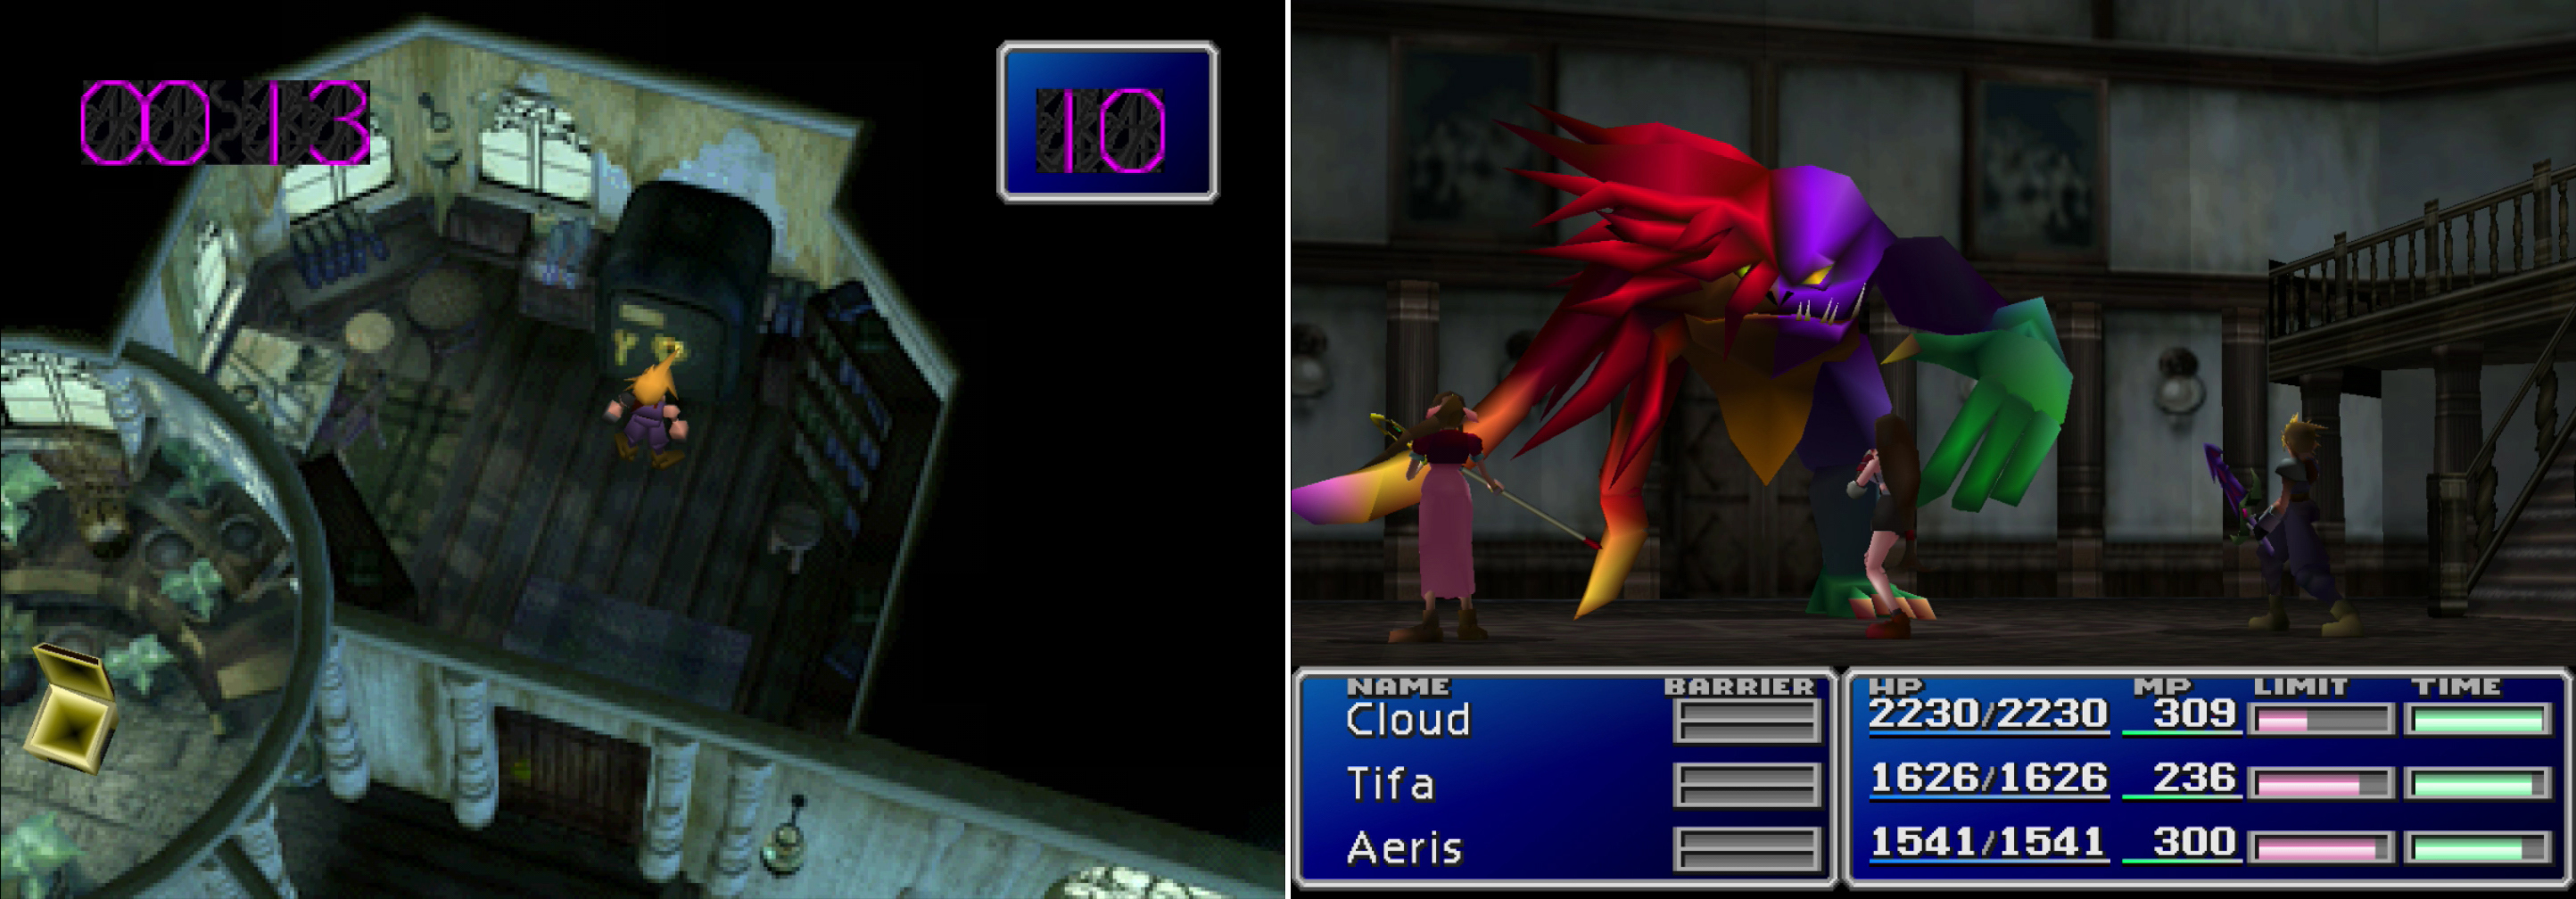
Getting inside the safe is only half the problem (left) as the safe’s guardian, Lost Number, will attack once the safe opens (right).
Boss Battle: Lost Number
Lost Number is an odd boss, starting out half red, half purple. It only has two attacks, a relatively weak punch that deals around 300 damage, and “Bolt2”, which deals about 500. Not really too bad… but when it drops below half its health, it’ll transform into either a form favoring physical damage (purple) or one favoring magic (red).
In its physical (purple) form, it becomes absolutely wretched, dealing around 700 damage per hit with its normal attack (which it can perform in quick succession), and if it performs its special “Lost Blow” can deal over 2000 damage in a single blow.
It’s magical (red) form its attacks are still formidable, but not quite so dangerous as the physical form’s attacks. It can use spells like “Bolt”, “Bolt2”, “Quake”, “Quake2”, “Bio” and “Bio2”, the lower level spells will deal around 250 to 350 damage, while the higher level ones deal around 650 to 750 damage. It also has an “Aspil” attack that drains MP from you and replenishes its own pool, so don’t expect it to run dry.
So how to deal with this beast? Well, by abusing your Enemy Skills, of course! If you start out with “Big Guard”, the Haste effect will help you out immensely. Once you’re boosted up, go on offense. What form it turns into depends on what damage you deal to knock it below half its HP, so pummel Lost Number with “Beta” until it changes to its less dangerous magical form. After this, just use “White Wind” to heal when necessary and Limit Breaks when the opportunity arises. So long as it doesn’t turn into its purple form, you should be fine.
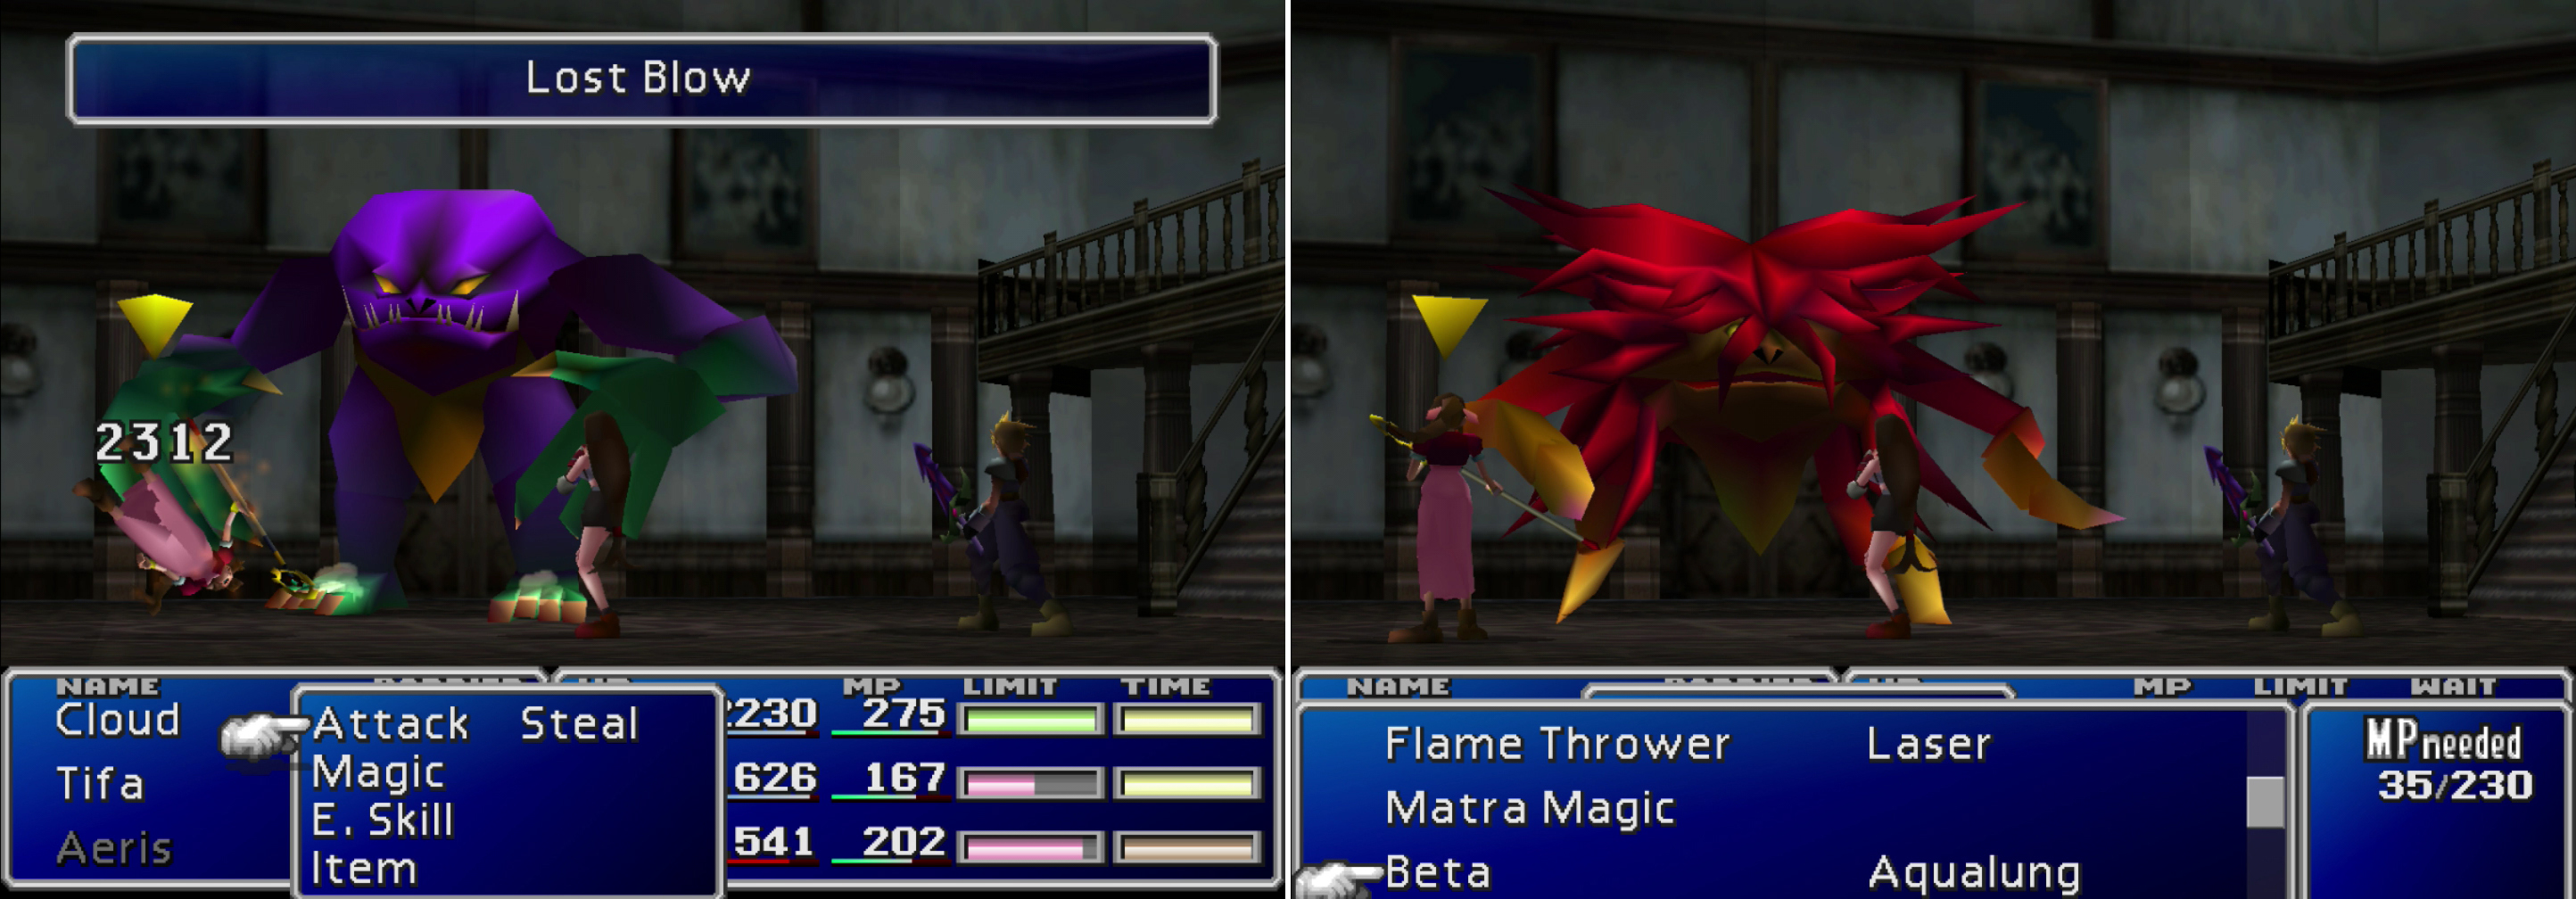
Depending on what type of damage (phyisical or magical) you deal to Lost Number at the beginning of the fight, it’ll turn into either it’s purple (left) or red (right) form later on. Considering the power of its “Lost Blow” attack (also left), it’s wiser to try to trigger its red form.
| Lost Number | Stats |
|---|---|
| HP: | 7000 |
| MP: | 300 |
| Weaknesses: | N/A |
| Resistances: | Gravity (negates) |
| XP: | 2000 |
| AP: | 80 |
| Steal: | N/A |
| Drop: | Cosmo Memory |
| Gil | 2000 |
When it dies, grab the Odin Materia on the ground, then loot the “Key to the Basement” in the safe. You will also get the “Cosmo Memory” item from Lost Number, which is Red XIII’s ultimate Limit Break. Just keep it handy until he learns his six lesser limits. With the key in hand, return to the upper east wing and enter the circular stone tower where Sephiroth fatefully researched the Jenova project. Run down the ramp to the bottom of the tower and enter the caves, then head through the first screen to reach the second.


In the second cavern screen search to the north near the western end of the area to find a door, which you now have the key to open. Do so and investigate a sarcophagus in the room beyond to awaken its inhabitant. When talking to him, pick the dialogue option “Talk about Sephiroth” and the two will discover that they have a common interest. Cloud will tell his side of the story, but when he asks the stranger about his past, he’ll decline, and elect to instead go back to sleep. Bug him again and ask “Who are you?” in order to name him (the guide will use the default name, Vincent). He’ll join you as you go to leave the caves.


With the “Key to the Basement” in your hands, you can rouse a slumbering sinner in the bowels of the Shinra Mansion (left). If you continue into the offices you’ll have a brief encounter with Sephiroth, who tosses you a piece of Destruct Materia (right).
Leave Vincent’s room and head east to reach the lab where Sephiroth discovered his past and, in the northern office, you’ll encounter Sephiroth. He’ll ask you about the Reunion, claiming Jenova will “become a calamity from the skies” there, and tell you to follow him “North past Mt. Nibel” if you wish to know more. Afterwards he’ll pelt you with a piece of Destruct Materia before flying off. Pick up his, ah, “gift” and leave the Shinra Mansion. When you’re back in town, exit by heading north-east to reach the world map north of Nibelheim. Head north through the mountains to find a cave, which will take you through Mt. Nibel.
No Comments