
| Important Items in this Area | Enemy Skills in this Area |
|---|---|
| Guard Source x3 | Dragon Force |
| HP Absorb Materia | L5 Death |
| Magic Source | Laser |
| Mind Source x2 | Magic Breath |
| Power Source x2 | |
| Save Crystal |
The North Cave is home to some of the strongest critters in the game. It’s also a treasure trove of new items and Materia, and many of the new foes will have Enemy Skills to learn. In addition, fighting monsters in the North Cave can be very lucrative in terms of XP, AP, and Gil… especially in AP. Still, maximizing your gains should be a secondary consideration to survival. Ultimate weapons are suggested, despite their lack of AP growth… at least on one character, anyways. A good party for the beginning of the North Cave consists of Cloud (with Apocalypse), Yuffie (with her Conformer) and Cid (with his Javelin). Yuffie can equip Slash-All Materia in her weapon and, given the strength of the enemies in the North Cave, she should absolutely wreck everything with the Conformer. Cloud, with Double Cut can contribute, but Cid is just there to look pretty and absorb AP. Having Ribbons on all three is a good idea, as well, but there are plenty of enemies who will use Death effects, which the Ribbon doesn’t protect against. Destruct + Added Effect will block Death effects, however, as will the Enemy Skill “Death Force”.
Spiral Walkway
Once you’re prepared, fly to the North Cave and land in the crater, then disembark. Climb down the rope ladder and head south (towards the camera) and slide down the slope… Don’t worry, it’s not yet a one-way trip. You’ll land on a stone ledge; the top of a broken stone ramp that spirals down to the mako-filled bottom of the crater, where Sephiroth lurks. It’s a pretty simple screen to navigate, and there’s plenty of ground to covers and encounters you’ll likely have to fight, but fortunately there’s also some treasure in a pair of chests. The items they’ll bestow are, in descending order, a Save Crystal and a Guard Source . Shortly after the first chest is a cave you can enter to reach a ledge, which will lead you back to the Highwind if you climb the cliff face to the east. For now, however, descend the ramp, score treasure, and fight the foes lurking here and make your way down the next screen.
Enemies in the Upper North Cave
There are a great many interesting and dangerous creatures in the upper reaches of the North Cave that deserve their own section to discuss. There are quite a few Enemy Skills to learn here, a few items to steal, and ways to counter some nasty attacks, so be sure to read about the enemies below:
Dark Dragon:
The Dark Dragon is a fairly powerful foe whose melee attack can deal some vicious damage. They have two Enemy Skills you can learn from them; the new “Dragon Force” spell, which increases the targets Defense and Magic Defense by 50% and “Laser”, which the two newer Enemy Skill Materia need. You can also steal Dragon Armlets from them. Do not cast spells on them while fighting, as they can counter magical attacks with “Ultima”, which will not feel good.
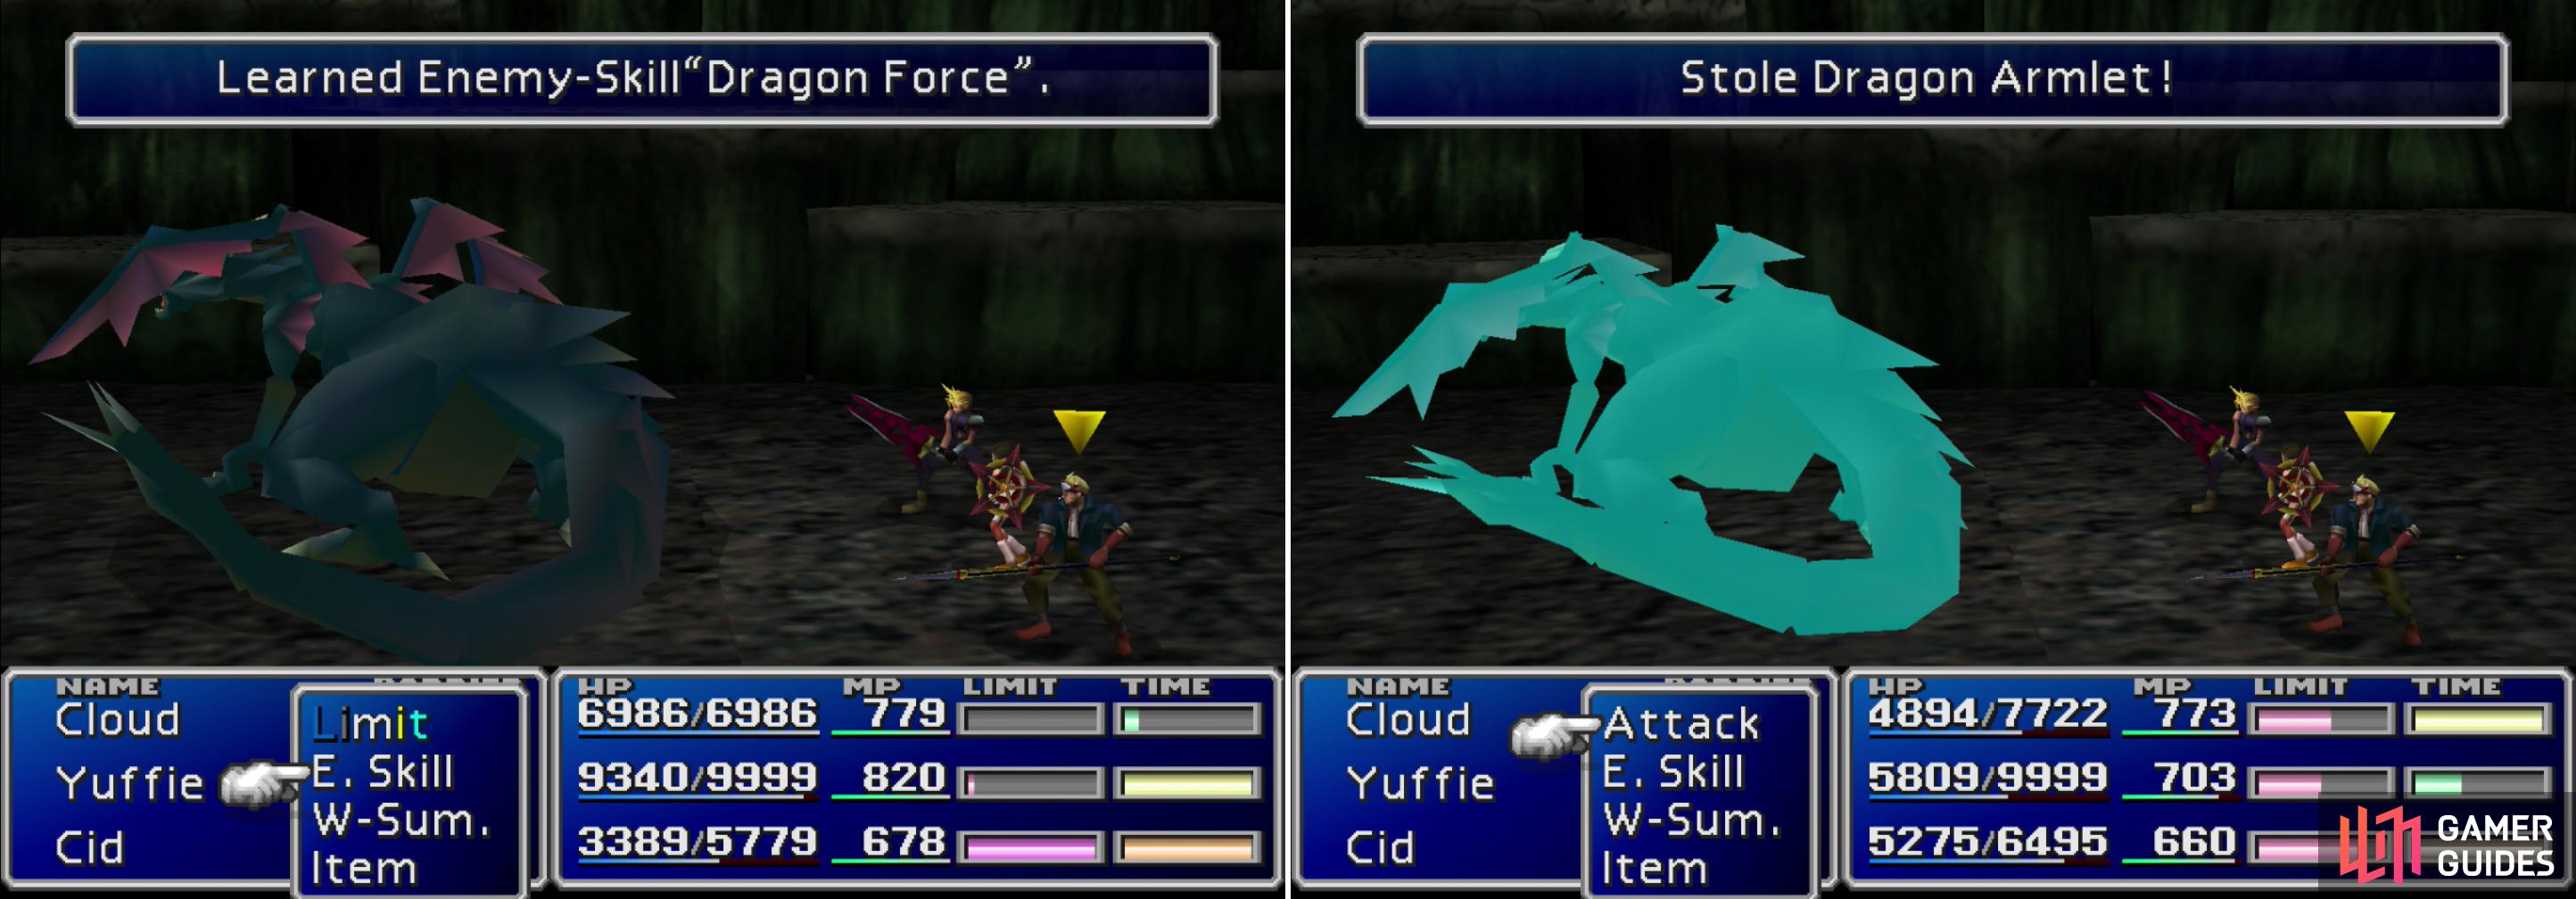
You can learn the “Dragon Force” and “Laser” Enemy Skills from Dark Dragons (left), you can also steal Dragon Armlets from them (right).
Gargoyle:
They are immune to damage at the beginning of fights, but once they animate, they’ll become vulnerable. They’re not too rough, but when they die they’ll cast “L4 Death” on the party, so start out the fight by casting “Death Force” to block the attack.
Master Tonberry:
Yet another Final Fantasy staple, the Master Tonberry slowly walks towards the party and, after it ambles close enough, will start carving you up with its knife attack, which inflicts Death. After attacking once in melee, it’ll return to where it started and begin the process again. This can be blocked entirely by “Death Force”, but its other - arguably more dangerous - attack cannot. If attacked too frequently it will counter with “Everyone’s Grudge”, which deals damage equal to the number of creatures a character has killed x10. If you’ve used a character at all, this counter-attack will do massive damage, likely killing them outright.
So, given all that, how do you whittle down its 44,444 HP? Limit Breaks work wonders, and if you only attack it once per time it moves, it will not counter with “Everyone’s Grudge”. If you’re also protected with “Death Force”, there’s not much the Master Tonberry can do. On the other hand, if your damage isn’t stellar, it might be quicker if you just run away. Master Tonberry’s aren’t very generous with their XP, AP and Gil rewards. They can, however, be Morphed into Ribbons .
Parasite:
Another foe with two Enemy Skills, the Parasite knows the new “L5 Death” spell, which inflicts Death upon all targets whose level is a multiple of five (protect yourself with “Death Force” before casting it on yourself). They also know “Magic Breath”, should you need it on some of your Enemy Skill Materia.
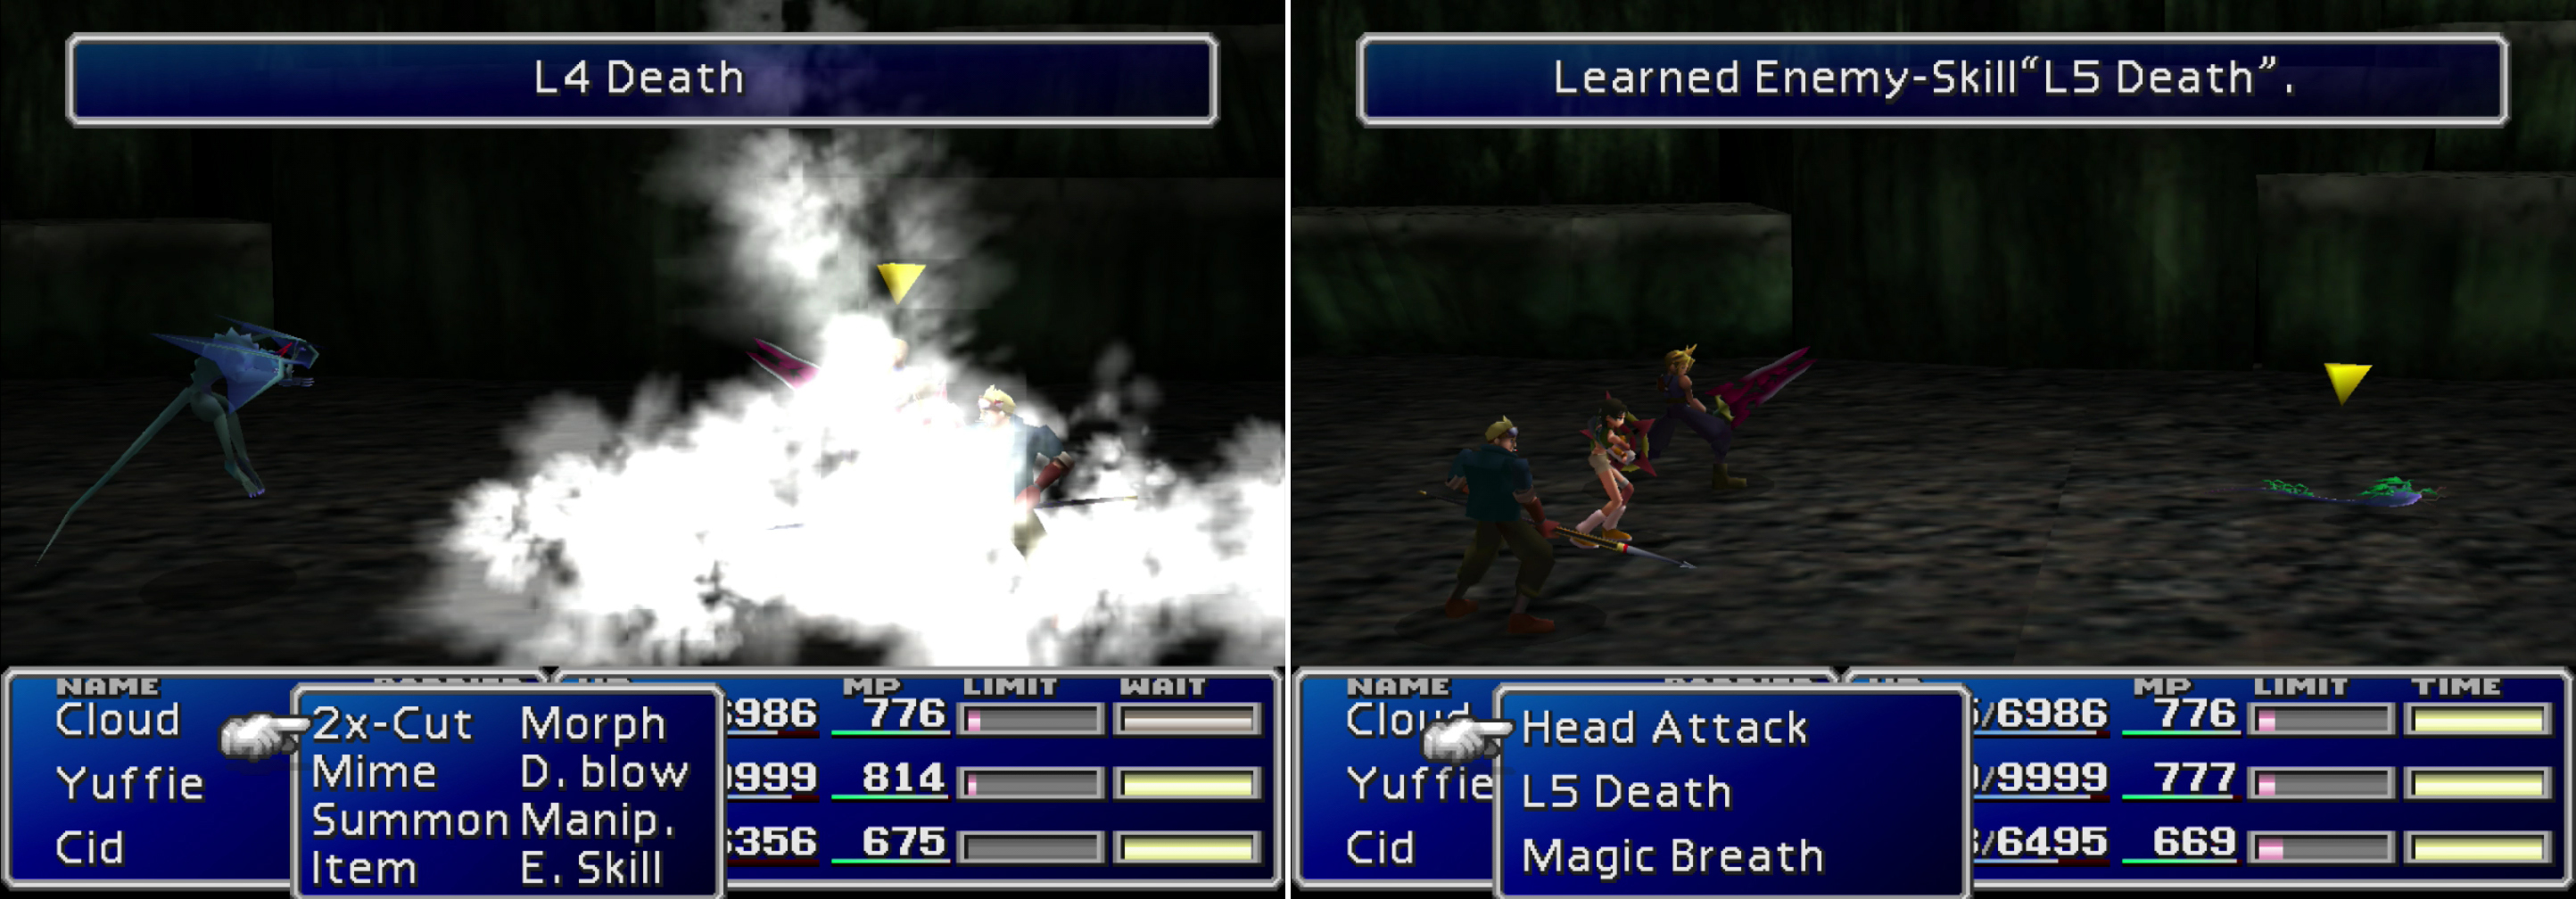
Gargoyles will cast “L4 Death” as a final attack before they die (left), be sure to protect yourself with “Death Force”. You can learn the “L5 Death” and “Magic Breath” Enemy Skills from Parasites (right).
Scissors:
If you attack - but fail to kill - a Scissors, they’ll respond by using an otherwise low-damage “Scissor Attack” which inflicts Death, after which the creature will split into two halves. The lower half will cast “Confu” as well as performing its “Scissor Kick”, while the upper body will perform “Cross Scissor” attacks. The upper body can also use a “Scissor Tornado” attack, which will knock a character out of combat. Pretty wretched foes, but they don’t have many HP and do poor damage if you are protected from Death. Just try to kill them in one hit and they won’t pose much of a problem.
Moss-Covered Ledges
This area is composed of a series of ledges you must jump down, both to the east and west. Both routes have treasure along them, and lead to the same place (a mossy ledge at the bottom of the screen from which you can reach the next area). The moss-covered ledges can be climbed back up, but if you head down the eastern side of the screen, you cannot make your way back up. That all out of the way, head down the eastern ledges first, stopping to grab a Guard Source and a Mind Source from the two chests along the way. Once done, climb back up the western ledges and grab a Magic Source, an Elixir, then a Power Source. Once you score the Power Source, head east behind some foreground and grab a piece of HP Absorb Materia.
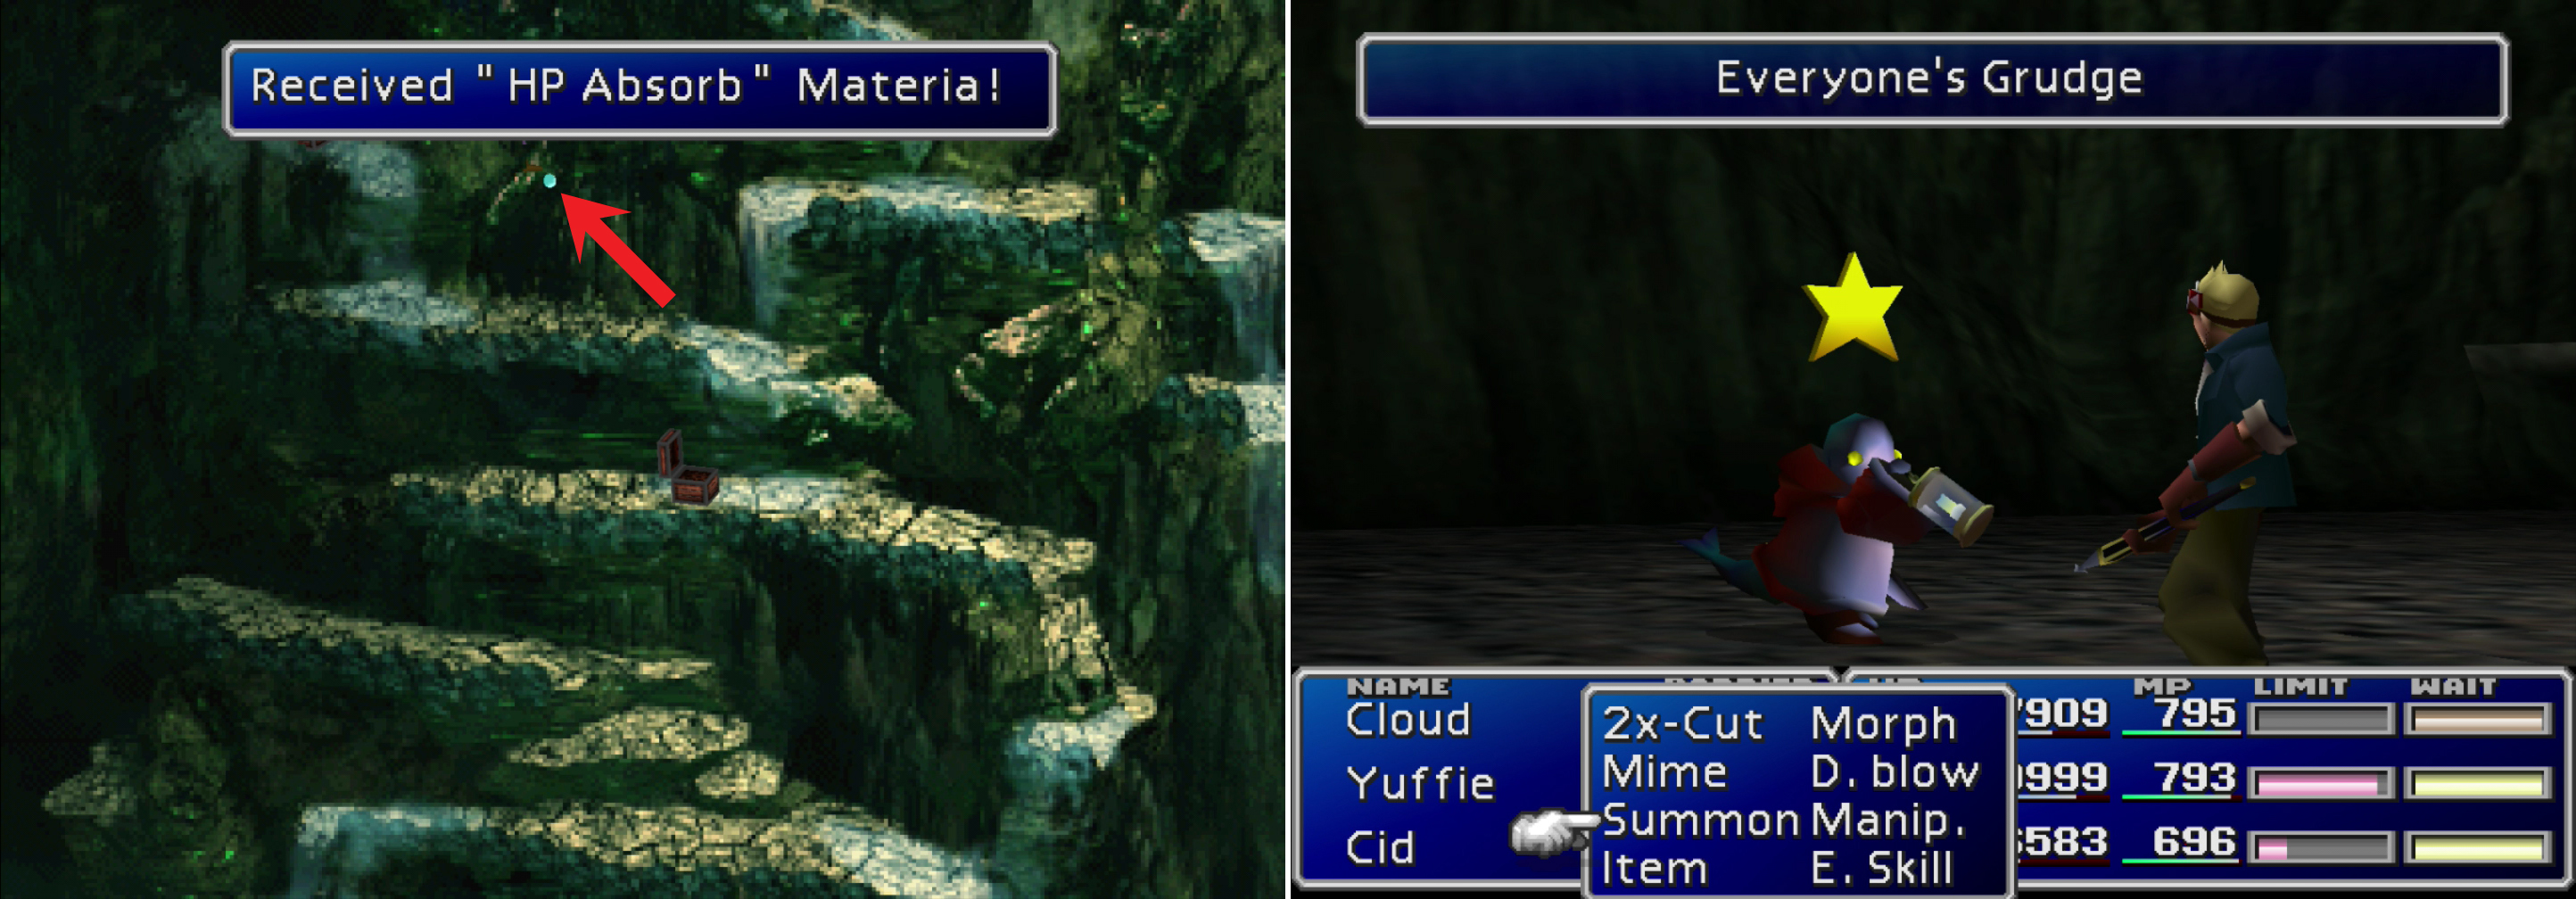
Find the HP Absorb Materia brazenly hidden in plain sight (left). The Master Tonberry will counter attacks with “Everyone’s Grudge”, which deals damage proportional to the number of kills a character has (right).
Caves and Ledges
When you have all those treasures make your way back down to the bottom of the screen and continue to the next area to find a screen covered with ledges, and the odd cave entering into the cliff wall. Hop down onto the ledge spanning the width of the level and head into the cave to the west to reach an internal cavern complex. Head down a slope along the eastern side of the screen then head north to reach a hole, which will take you behind some foreground and up to a chest in the north-eastern corner of the area, where a chest lurks. Loot it for a Power Source then return back through the holes to reach the larger cavern complex and continue south along the eastern edge of the area, stopping only to loot another chest for a Guard Source before making your way west along the southern end of the screen and back to the ledge-lined exterior area.
Back in the ledge area, head east and loot a chest to obtain a Hero Drink , then head back into the cave to the west and return back north to return to the upper ledge near where you started. Head east along this ledge until you fall to a a lower ledge, then turn west and search a chest, which contains a Mind Source . Continue east until you are prompted to jump up to the ledge above then do so and make your way west until you fall down to the western end of the ledge the chest you just looted is on. Go east and enter the cave which leads to a small cavern with a chest inside. Grab the Megalixir inside and continue west, jump back up to the ledge above and run back east and drop down to the previous ledge, then continue east to fall onto a lower ledge. Enter a cave and make your way down and around a short loop to exit back to the previous screen. Having entered out of a cave on a lower ledge, head west and drop down onto some lower ledges, then head east to yet another lower ledge. You can now make your way west and drop down two lower levels, then turn east to reach the next area.
No Comments