
| Important Items in this Area | Enemy Skills in this Area |
|---|---|
| Desert Rose | Shadow Flare |
| Earth Harp | |
| Master Command Materia | |
| Master Magic Materia | |
| Master Summon Materia | |
| Underwater Materia |
Emerald Weapon
Emerald Weapon lurks along the bottom of the ocean, awaiting anybody foolish enough to dive down to provoke it. The way you’ll do this is by ramming it with your submarine, of course, but before you do, there’s a minor complication to this fight. It’s underwater. And this isn’t Final Fantasy X. Still, the party somehow manages to hold their breath for a whopping 20:00, the time limit for the battle after which it’s an instant game-over. Yeah, you can survive underwater, on the ocean floor, for twenty minutes (never mind pressure). This should be more than enough time for a well-prepared party to defeat Emerald Weapon (what counts as “well prepared” will be discussed below), but in case you want to remove the time limit entirely, you have an option.
As mentioned earlier in the guide you can find a Ghost Ship enemy in the glass underwater tunnel leading to Junon’s Underwater Reactor, which can be Morphed into a Guide Book. They’re annoying creatures because they can use their “Goannai” attack to remove a character from the fight, but with Yuffie’s new-found Morphing powers, they shouldn’t be too hard to subdue. They also occasionally appear as the final enemy in the Battle Arena, but given that you’re limited to one character who will likely be the target of the aforementioned “Goannai” attack, it’s less frustrating to head to the Underwater Reactor. Morph one, get the Guide Book, and return to Kalm (the town north of Midgar). In the house near the underground bar on the eastern side of town you can find a man upstairs who claims to be going on a journey to pray for the souls of his friends, then proceeds to list some things he needs; a “Guidebook” a “Desert Rose” and an “Earth Harp”. Entitled much? Talk to him again and trade the “Guidebook” for Underwater Materia , which will remove the time limit for the Emerald Weapon fight.
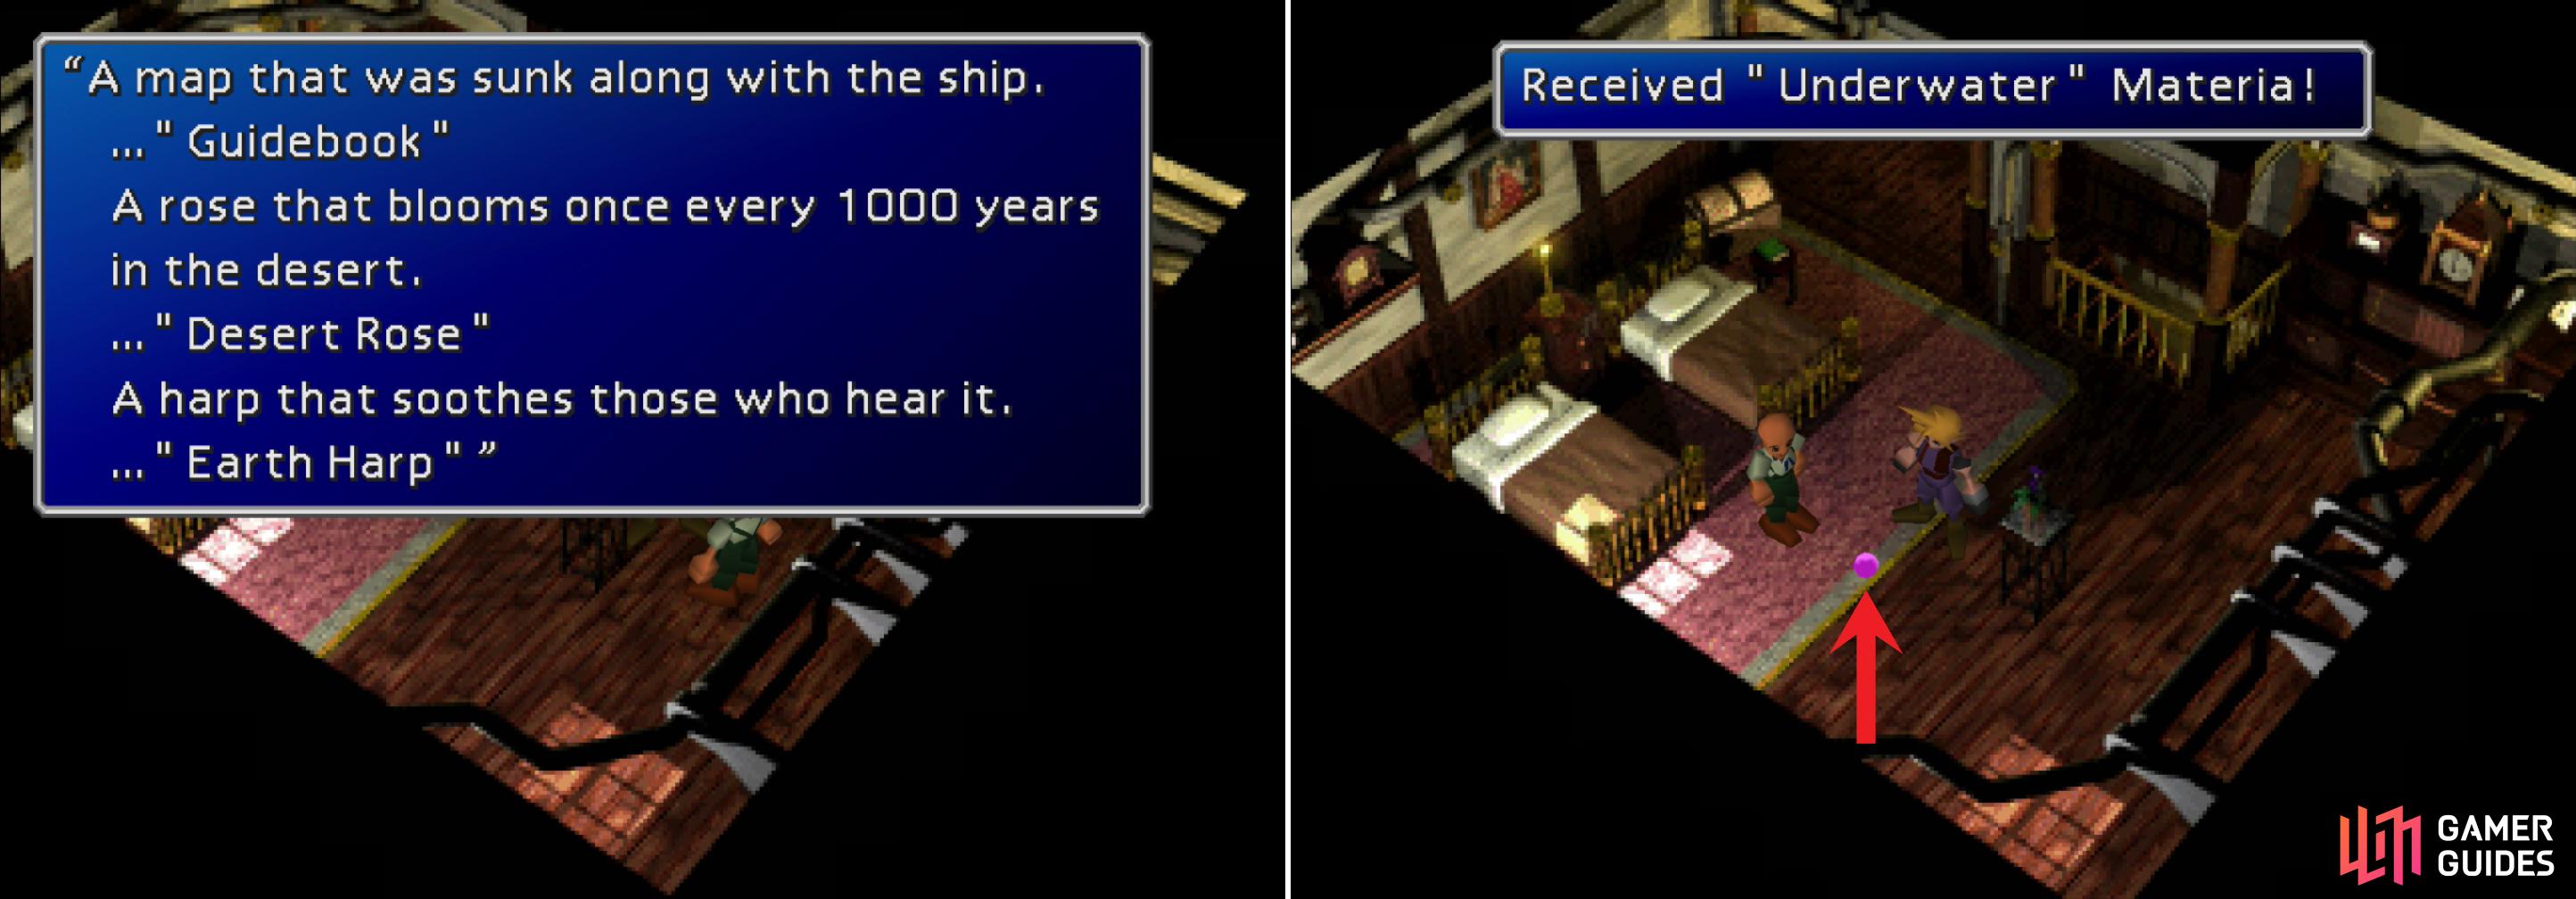
The old man in Kalm will you about some items he needs to begin a pilgrimage. Items he’ll reward you greatly for (left). Give him a Guidebook to optain some Underwater Materia, which will remove the timer from the fight with Emerald Weapon (right).
Now all you have to do is prepared yourself for the battle and go engage Emerald Weapon by ramming it with the Submarine. Your preparations will vary depending on which strategy you prefer, and since preparation is so an integral part of this fight, they’ll be discussed below, rather than under the “Boss Battle” heading. Don’t worry, all Emerald Weapon’s attacks will still be discussed under the “Boss Battle” heading, but the two strategies discussed won’t (with one exception) focus on countering each attack… this fight isn’t quite that nuanced. Also keep in mind there are many, many ways to defeat Emerald Weapon, provided below are just two easy ways to do so.
Knights of the Round Spam:
Time for all that Chocobo breeding to pay off. Knights of the Round is great Materia which can, in conjunction with other Materia, quite easily defeat Emerald Weapon. This is also the easiest (in terms of grinding) and least inventive and most tedious way to defeat Emerald Weapon.
Simply equip one character with the following Materia: Knights of the Round + HP Absorb, Mime, W-Summon. At the beginning of the fight have them double-cast Knights of the Round, then have every other character (who must also be equipped with Mime) just Mime the attack. On the initial caster’s next turn, have them Mime as well. Every turn each character will Mime Knights of the Round twice, which will heal the caster (or Mime) for more HP than Emerald Weapon can hope to inflict.
There are only a few possible things that can go wrong; if Emerald Weapon counters with “Aire Tam Storm”, he might wipe the entire party in one cast, but if you only equip the above Materia, it shouldn’t do enough damage. Alternatively, equip one character with Phoenix + Final Attack Materia, and if “Aire Tam Storm” kills them, the character will cast Phoenix before they die, which will revive them (and the rest of the party). The other possible problem is… well, Knights of the Round can take a wretchedly long time to cast, and it’s feasible that you might run out of time by spamming it. Underwater Materia will remove this timer, of course, and if you can get your hands on another Knights of the Round Materia (done by mastering it) or a Master Summon Materia, you can pair it with MP Turbo, which will up the damage of each Knights of the Round casting considerably. Lastly, if you add the Mime + Counter combo to the mix, characters will counter-attack by Mimicking the last action the party took when attacked… which should be to double-cast Knights of the Round, but like MP Turbo, this addition shouldn’t really be necessary.
As for weapons, it doesn’t really matter too much, you won’t be using them with this method. Considering the absurd XP, AP and Gil Emerald Weapon gives you, you might want to just bring your grinding party along. Cloud with his Apocalypse and Cid with his Javelin (or Scimitar) will get great gains out of this fight. Emerald Weapon inflicts no status effects, so you can dispense with Ribbons in favor of defensive accessories like the Tough Rings or Circlet. The Mystile makes great armor, if you have three of them, that’s all you should wear. The Ziedrich makes a good secondary option in a pinch, however.
Command Materia Strategy:
This approach will end the battle more quickly, but requires more grinding to set up. For this approach you’ll need three Master Command Materia, which in turn requires you to master three Deathblow, Manipulate, Mime, Sense, Steal and Throw Materia. In addition you’ll need three more Mime Materia, three mastered Double Cut Materia, three mastered Counter and three HP Absorb Materia. In addition, since physical attacks matter more, having 255 Attack, and as much Luck and Dexterity as possible helps as well.
Your party should consist of Barret with his Missing Score, Cloud with Ultima Weapon, and Yuffie with her Conformer. Equip them all with the following Materia combination: Master Command + HP Absorb, Mime + Counter and Double Cut Materia. The Mystile or Ziedrich are good pieces of armor, and you should also wear Tough Rings and Championship Belts as accessories. When in combat, simply attack Emerald weapon with “4x Cut”, and, if you’re doing perfect damage, you should leech 999 HP per attack (or 3,996 per combo). Furthermore, you should also counter attack with “4x Cut” every time you’re attacked. If your characters are powerful enough, they should just plow through Emerald Weapon and absorb any damage he inflicts.
Boss Battle: Emerald Weapon
Emerald Weapon has a whopping 1,000,000 HP, making it the undisputed HP king of Final Fantasy VII. As mentioned earlier, you must engage it by ramming it with the submarine, and if you don’t have the Underwater Materia (see above), you’ll have a scant twenty minutes to finish the fight. Emerald Weapon’s attacks can dispel buffs, but otherwise don’t inflict status effects, so you should dispense with Ribbons for now and instead use Tough Rings for defense, or Circlets or Championship Belts, depending on your strategy (two of which are presented above). In addition to the main body’s 1,000,000 HP Emerald Weapon also has four eyes on its shoulder mantle, each of which can attack independently and have 25,000 HP. Whether its eyes are open or closed affects Emerald Weapon’s behavior.
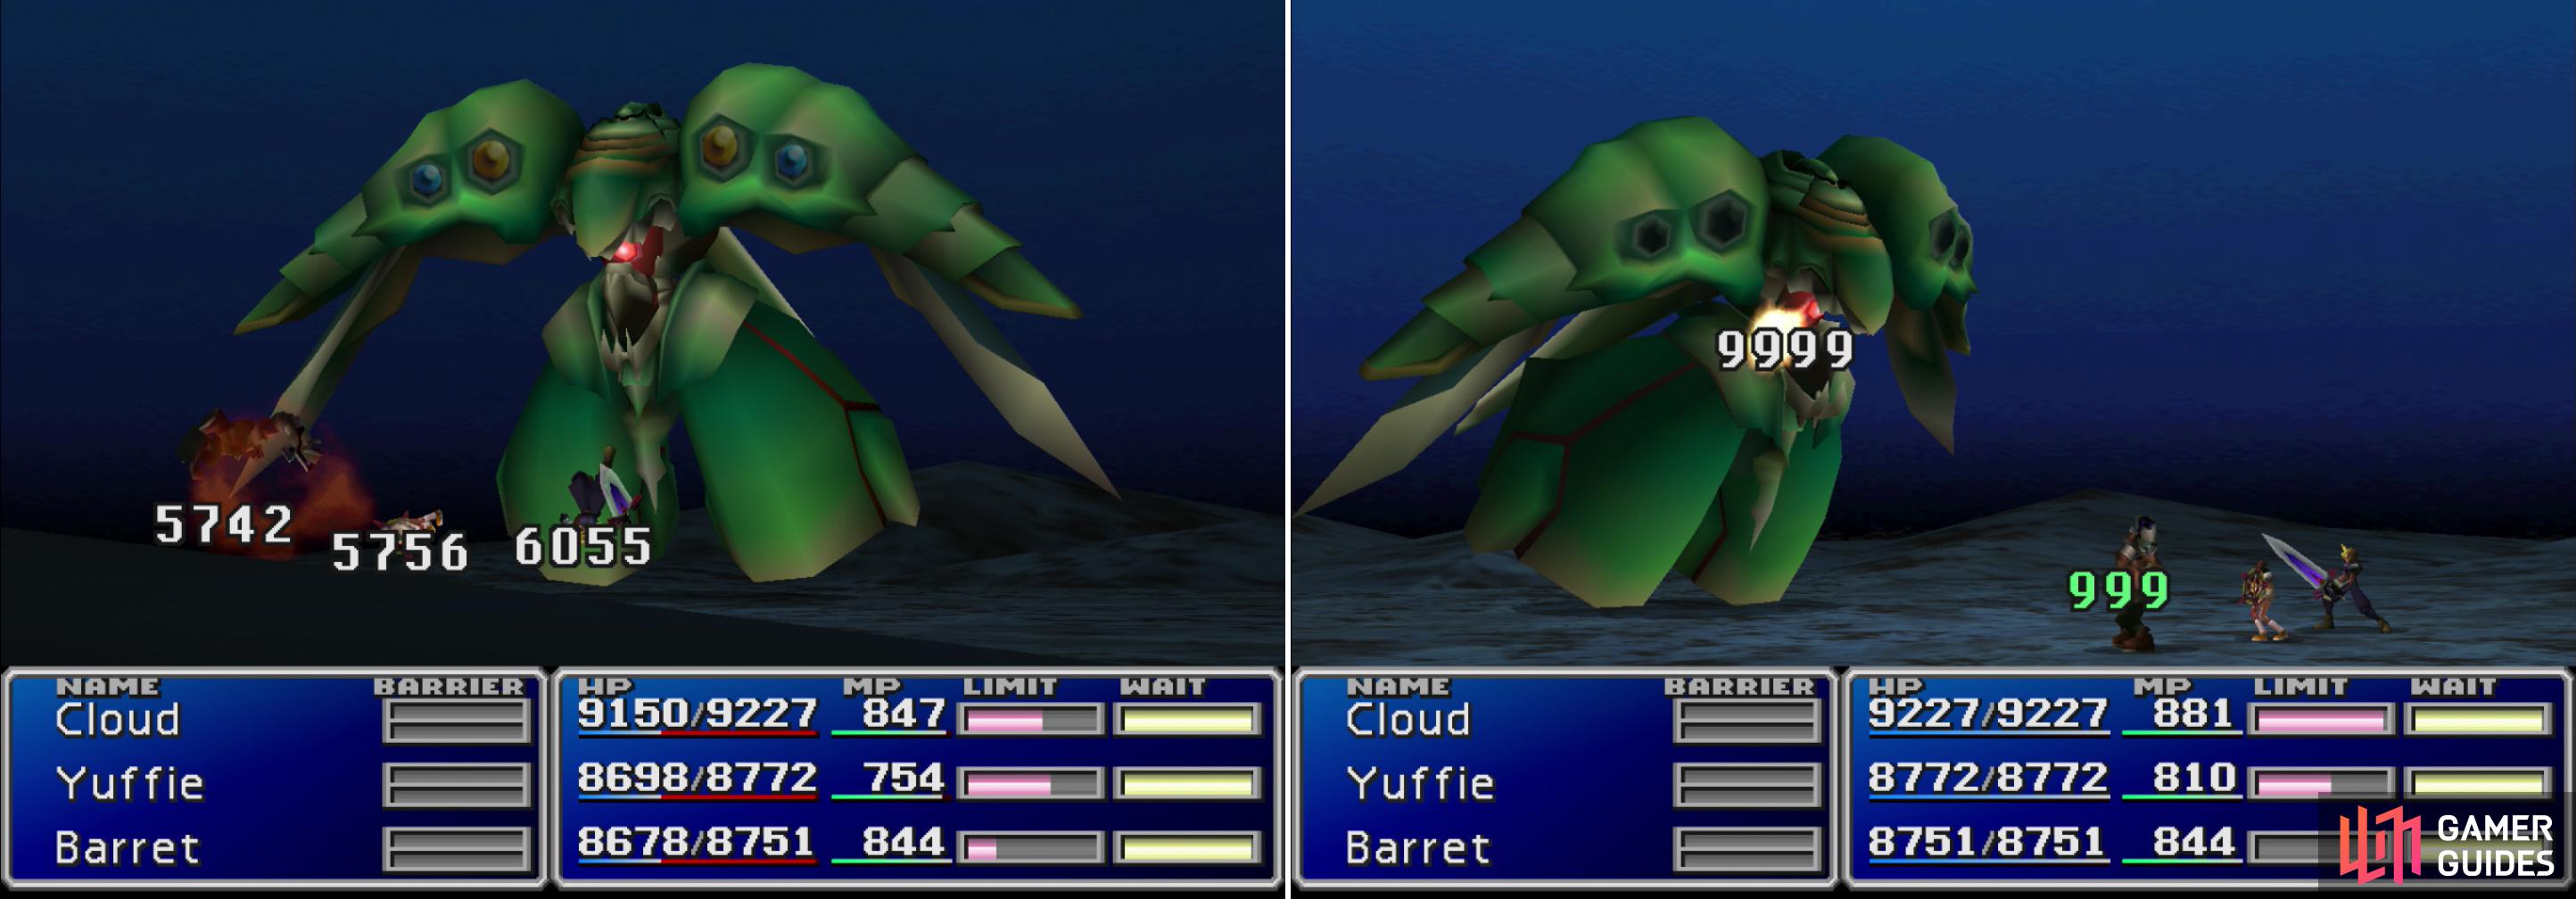
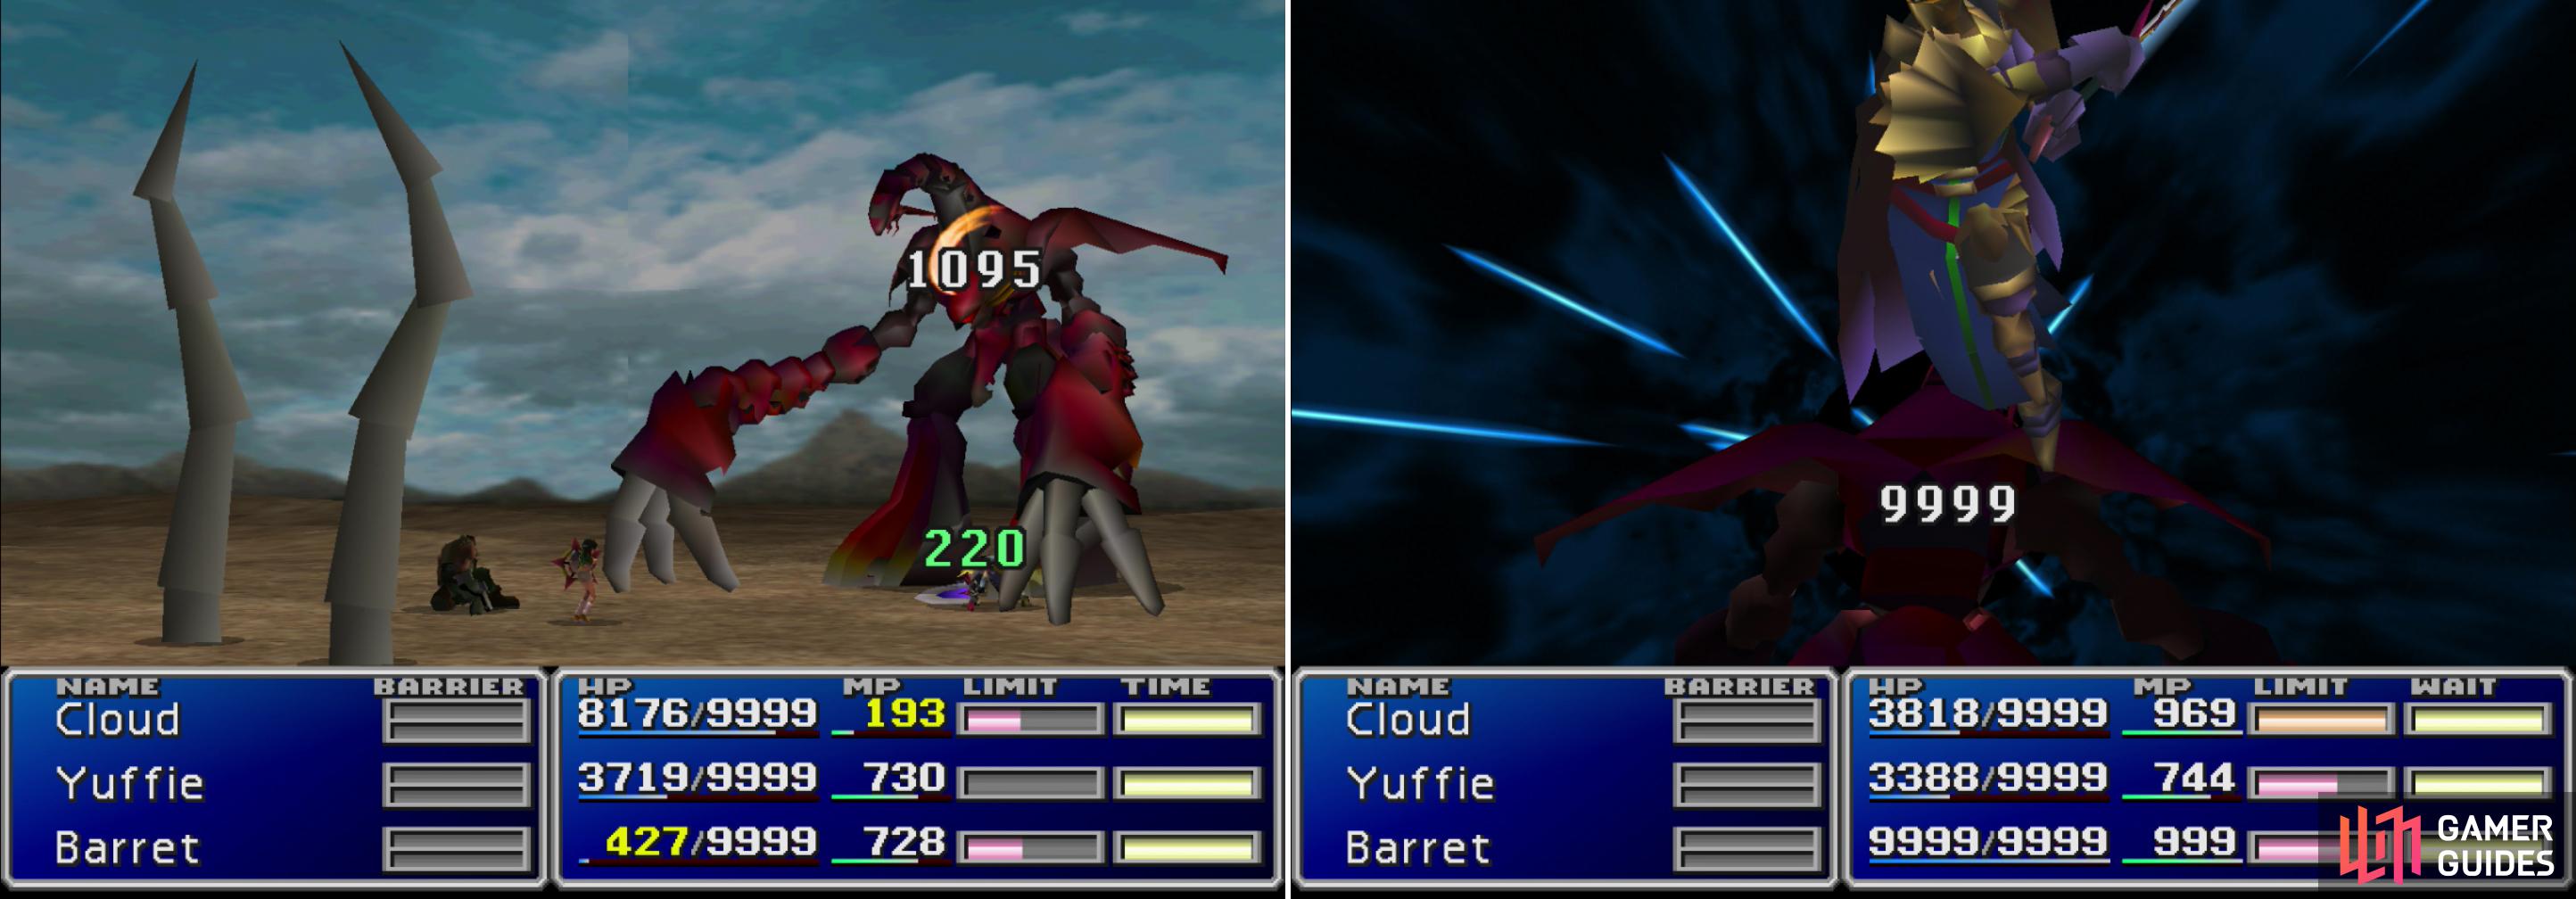
Emerald Weapon is on another level than Diamond and Ultimate Weapon were, expect to take thousands of damage from its basic attacks (left). Counter Materia, Mime Materia, Double Cut Materia and HP Absorb Materia can be combined to devastating effect (right).
The two most common attacks you’ll face are “Emerald Shoot” (6000~ damage, dispels Barrier, MBarrier, Shield and Death Force) and a stomp attack (3500~ damage), both of which are used when the eyes are closed and attack the whole party. When the eyes are open, Emerald Weapon’s shoulder-eyes are open it’ll cast “Emerald Beam”, which does reduces the HP of the party by 21/32 (or a little over 63%) and cancels the Regen status, if it’s applied. While its eyes are open it’ll counter attacks on its body with “Revenge Stamp” (2500~ damage, cancels Haste status). All of these attacks are brutal, but survivable if you’re high-leveled and wearing decent gear, especially if you’re leeching HP with HP Absorb. The eyes themselves either attack with a blue eye beam (2000~ damage) or a green beam (400~ MP damage). Emerald Weapon has a pair of each color, four eyes in total.
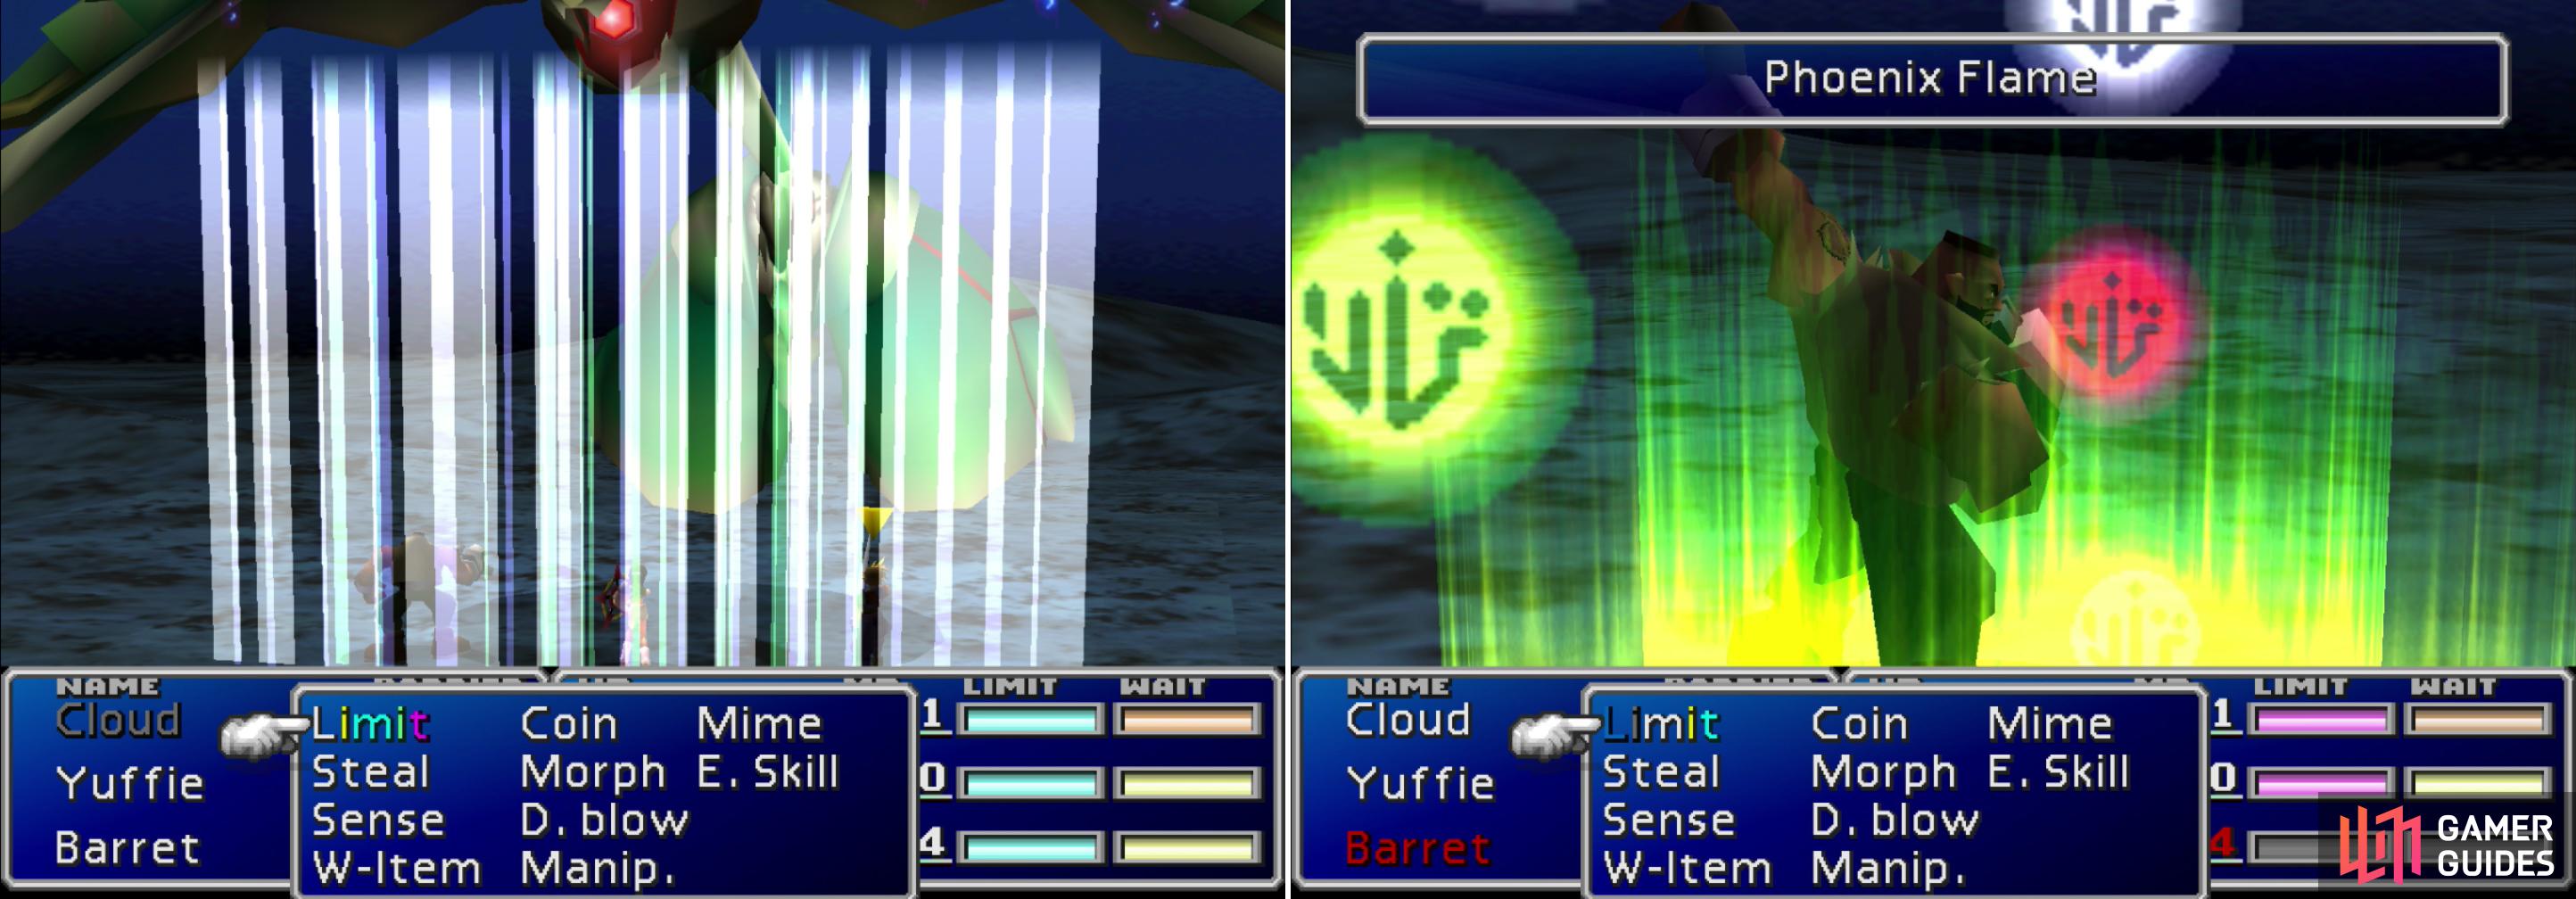
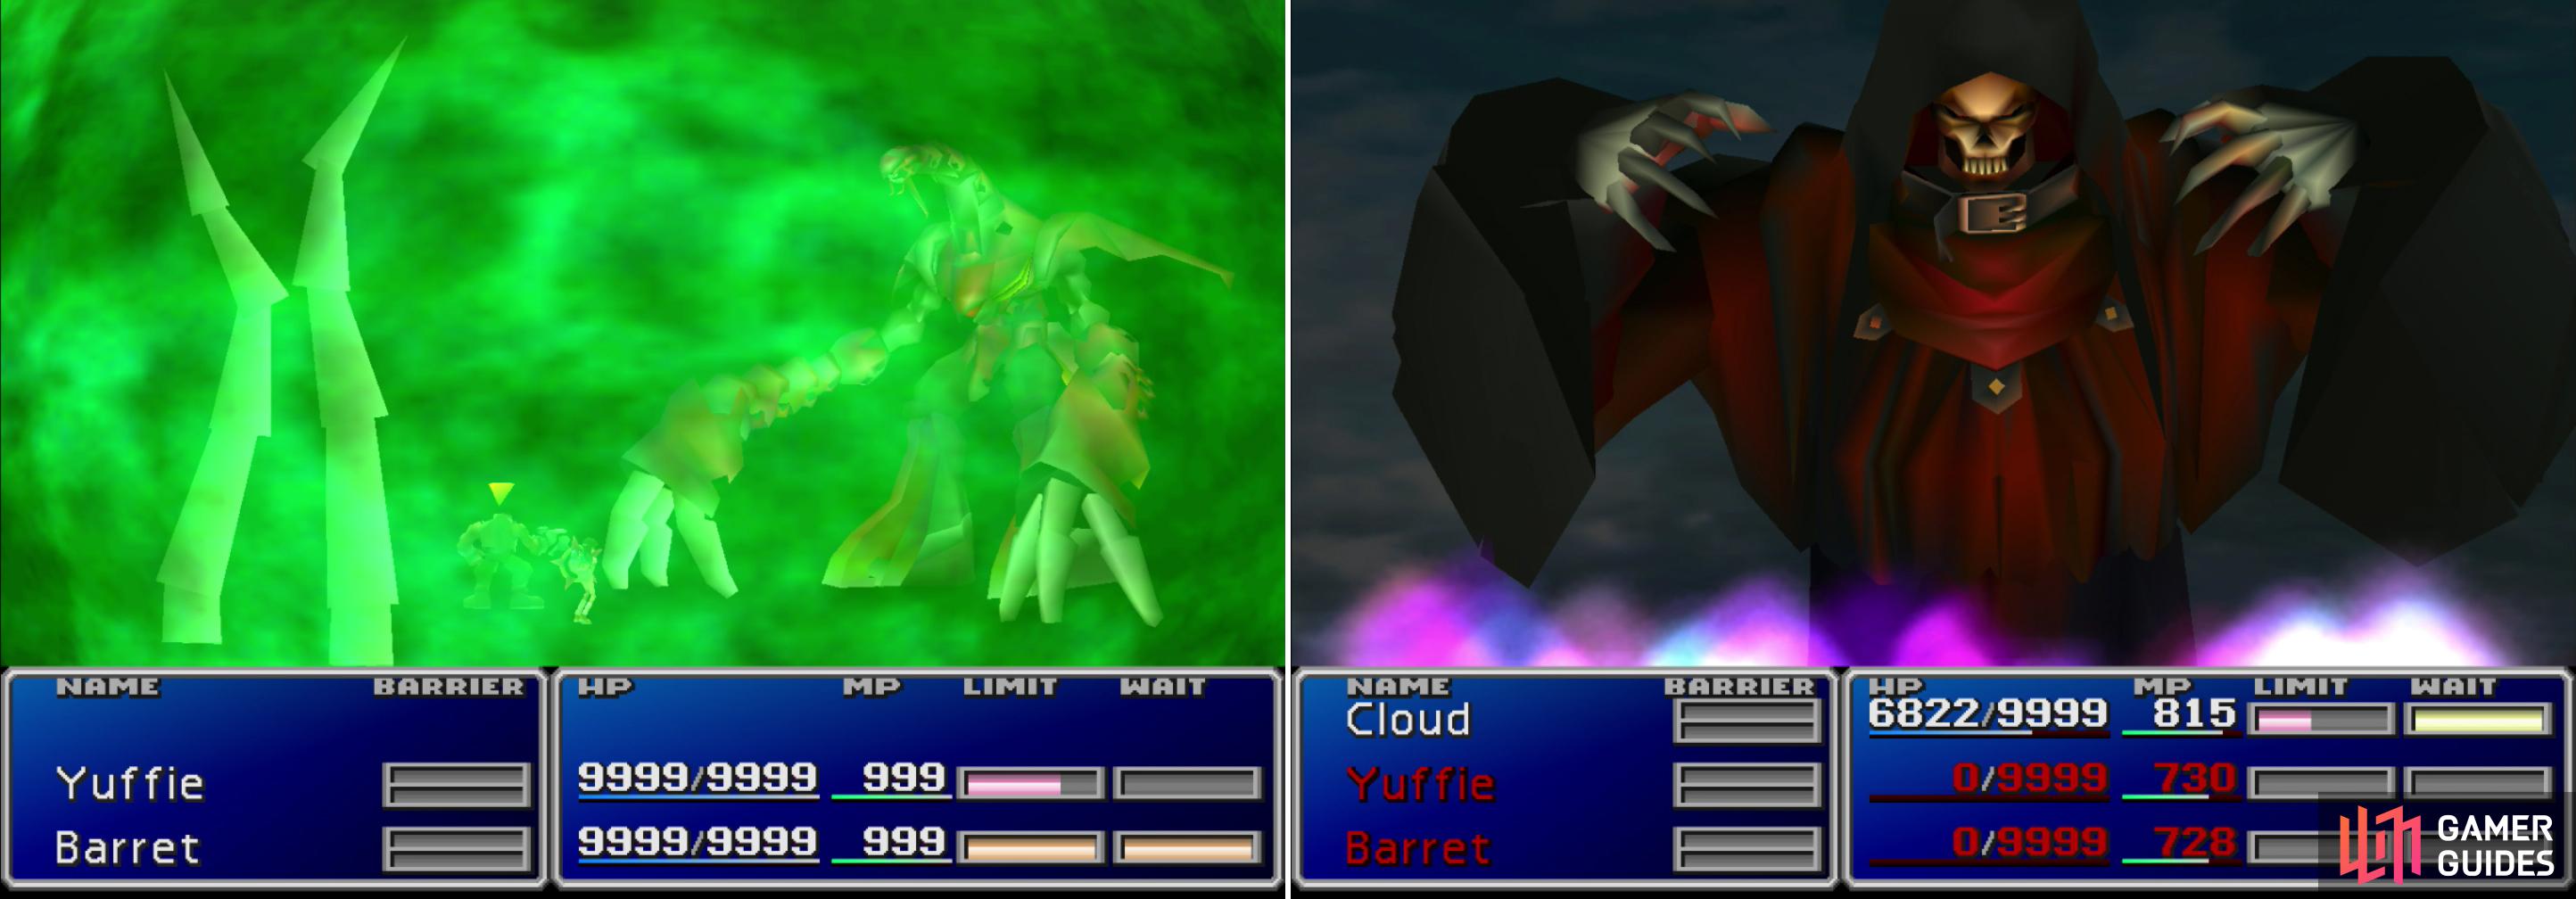
Emerald Weapon’s Aire Tam Storm is easily its most dangerous attack, dealing 1111 damage per piece of Materia a character has equipped (left). Having Phoenix + Final Attack Materia equipped will revive the party in case they get wiped out (right).
Emerald Weapon’s most dangerous attack is Aire Tam Storm, which deals 1111 damage to each character per piece of Materia they have equipped, which is one reason why light Materia builds are suggested for Emerald Weapon. A good counter to this attack (and general accidents) is to equip the Phoenix + Final Attack Materia. If done, the character will summon Phoenix when they die, which will revive all fall characters, allowing you to continue the fight.
When you defeat it, you’ll get a whopping XP, AP and Gil reward, as well as the Earth Harp . If you give this to the man in Kalm who trades Underwater Materia for a “Guidebook” you’ll get three Master Materia ; one of each color (Command, Magic and Summon).
| Emerald Weapon | Stats | Eye | Stats |
|---|---|---|---|
| HP: | 1,000,000 | HP: | 25,000 |
| MP: | 100 | MP: | 100 |
| Weaknesses: | Lightning | Weaknesses: | Fire |
| Resistances: | Earth (negates), Gravity (halves), Ice (absorbs), Water (absorbs) | Resistances: | Earth (negates), Ice (absorbs), Water (absorbs) |
| XP: | 50,000 | XP: | N/A |
| AP: | 50,000 | AP: | N/A |
| Steal: | N/A | Steal: | N/A |
| Drop: | Earth Harp | Drop: | N/A |
| Gil | 50,000 | Gil: | N/A |


Ruby Weapon
Ruby Weapon will start showing up after Ultimate Weapon is defeated, lurking in the desert around the Gold Saucer with only its head showing. The Knights of the Round Spam tactic that worked on Emerald Weapon will - with some tweaks - work fine on Ruby Weapon, as well. If you run on into this fight, however, you probably won’t be successful, some additional, seemingly counter-productive preparations are required.
First, equip your Ribbons again, because Ruby Weapon can inflict status effects. There are ways to cure them, but it’s best to avoid any complications outright. Also throw the Hades Materia to the mix, mastered if possible. Ruby Weapon isn’t immune to all status effects, and Hades has a good chance of paralyzing Ruby Weapon. You can also use Dazers, items which can be obtained by Morphing Boundfat enemies in Corel Valley - the area between the Sleeping Forest and the Forgotten Capital. You can also steal Dazers from Battery Caps, who dwell in the forests south of Rocket Town, near the entrance to Mt. Nibel. Ruby Weapon also doesn’t have an attack analogous to “Aire Tam Storm”, so feel free to load up as much Materia on your characters as you wish.
Once your party is equipped with the right weapons, armor, accessories and Materia, finish up your preparations by knocking two of your party members unconscious them unconscious. Just get in a random fight and hit them with “Goblin Punch” until they’re down, then board the Highwind and fly it into Ruby Weapon.
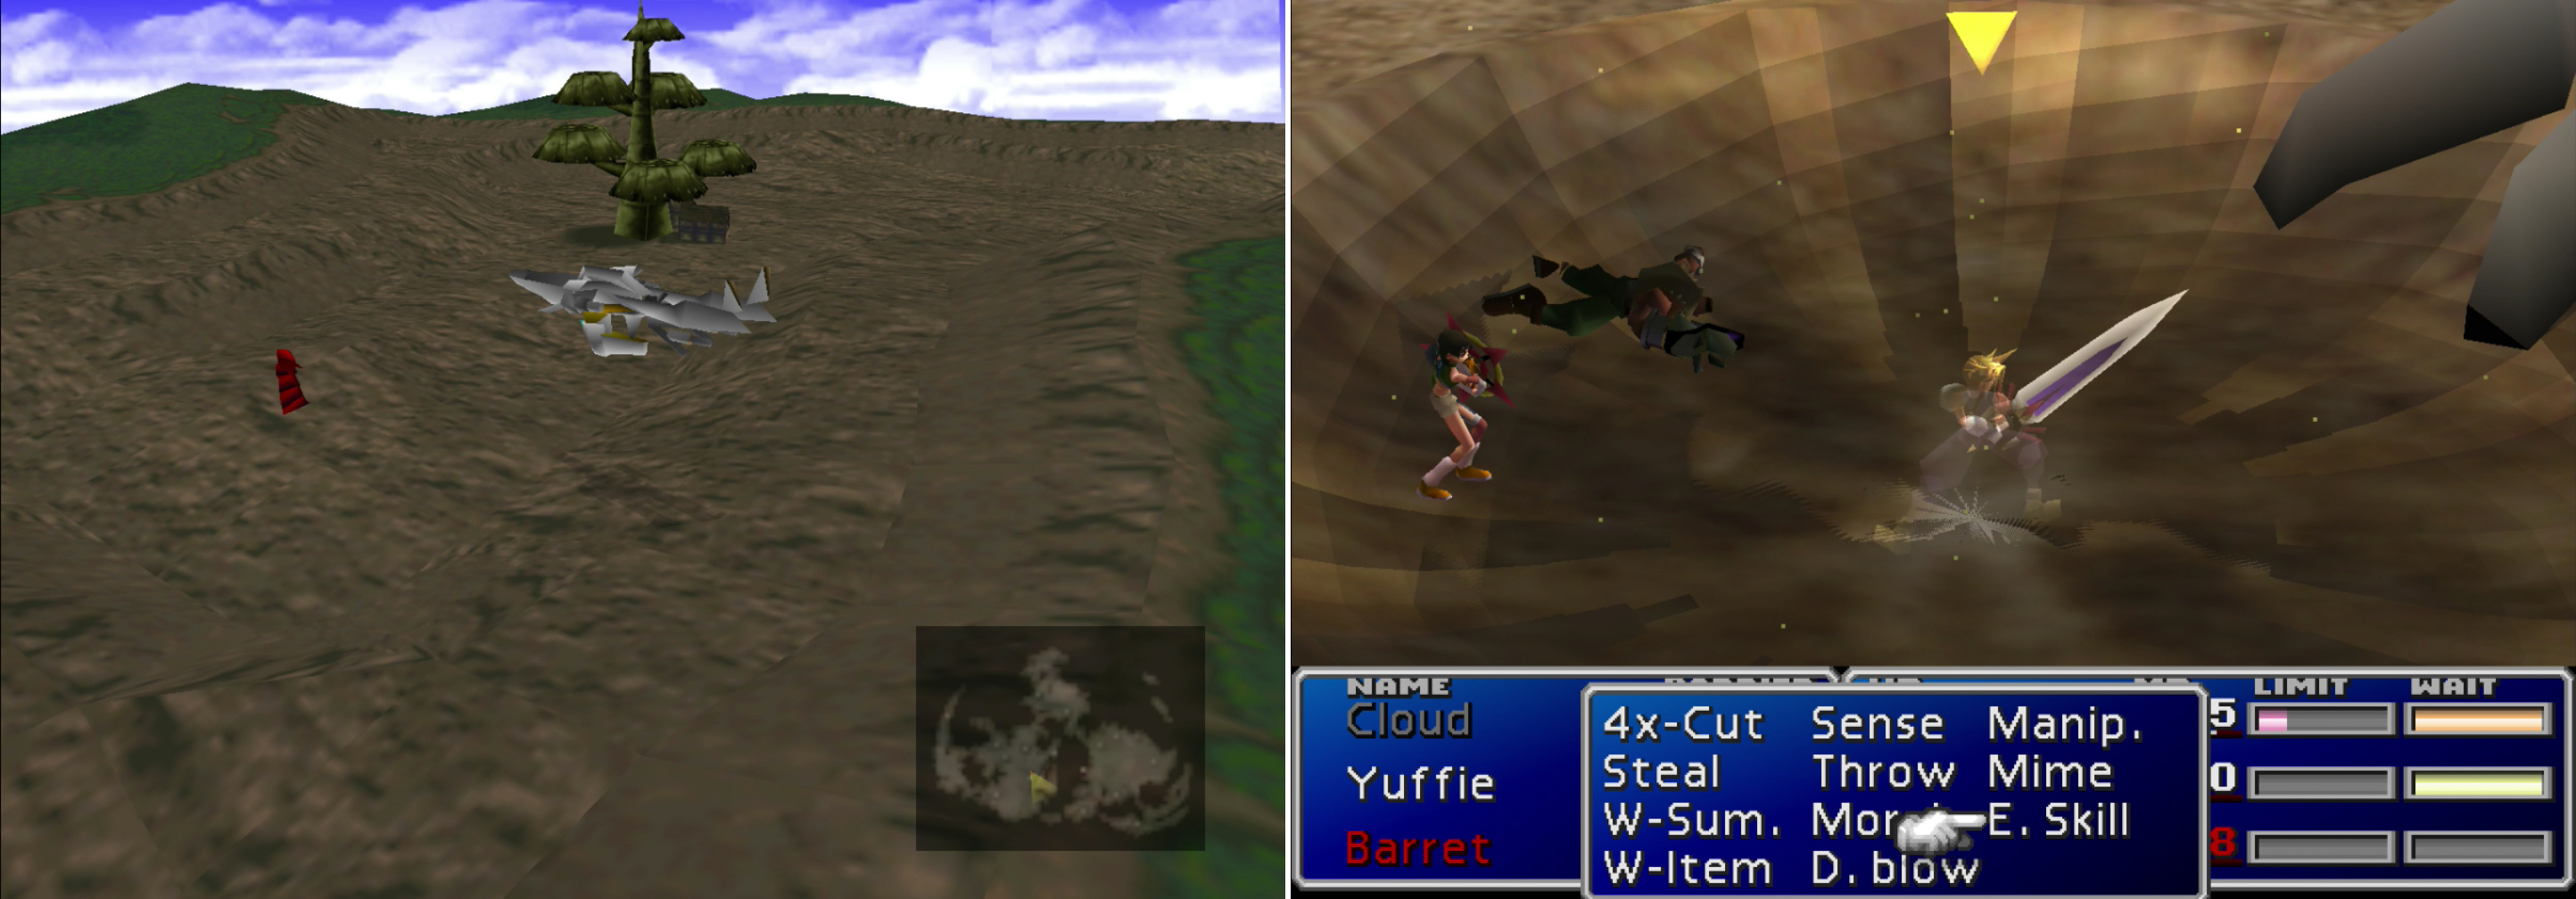
You can see Ruby Weapon lurking in the desert around the Gold Saucer (left). Enter combat with two characters dead, or Ruby Weapon will use “Whirlsand” to remove some character from the fight (right). Fighting Ruby Weapon at less than three-to-one odds is a recipe for disaster.
Boss Battle: Ruby Weapon
Ruby Weapon is a tricky boss; it has two tentacles which it can stick in the ground (surfacing behind the party) or it can keep them… handy. The position of its claw-tentacles will determine its vulnerabilities and attacks; while its tentacles are up Ruby Weapon is immune to damage and will perform a claw attack (deals damage equal to 5/8 of target’s HP, or around 60%), “Big Swing” (4000~ damage, can inflict Paralysis), “Comet 2” (2000~ damage, hits four times randomly). Its worst attack in this mode, however, is “Whirlsand”, which will remove all but one character from the fight and one on one odds against Ruby Weapon is a good way to lose the fight. Fortunately, however, if you enter combat with two characters dead, it’ll skip this attack pattern and stick its tentacles in the sand.
So, with two characters dead at the start of the fight, Ruby Weapon will immediately go to burrow its tentacles. Immediately cast Hades on Ruby Weapon to paralyze it, then raise your fallen comrades with Phoenix Downs or “Angel Whisper”. Once done, start your Knights of the Round spam (W-Summon Knights of the Round + HP Absorb) and keep it up until Ruby Weapon dies. It’ll counter your summons with “Ultima” every once in a while (6000~ damage to all characters) if it stops being paralyzed and it’s tentacles might attack from time to time, but HP Absorb should heal more damage than Ruby Weapon deals, especially with Mystiles equipped, as you’ll have a good chance to dodge the attack. Failing that, Phoenix + Final Attack will add an extra layer of defense in case Ruby Weapon gets lucky with one too many counter-attacks.
Ruby Weapon is highly resistant to physical attacks (left) so the Command Materia Strategy won’t work here. Knights of the Round - perhaps boosted with MP Turbo - will deal massive damage, however (right).
If you want to avoid the “Ultima” counter-attack, kill the tentacles by casting Knights of the Round on them once, or either recast Hades or throw some Dazers at Ruby Weapon. If you don’t have Master Summon Materia, however, you won’t have unlimited summons, so you might not want to break your Knights of the Round chain. Then again, you could have obtained a Master Summon Materia by turning the Earth Harp in to the man at Kalm, so you really have no excuse not to have one anymore. You can also use “Magic Hammer” to drain Ruby Weapon’s MP (2560 MP), which will prevent it from casting “Ultima”, but at twenty five castings, it’ll take a while to do. Don’t be afraid to use the odd healing item (Elixir, Megalixir, Turbo Ether, etc.) if necessary, those things won’t serve you better than being used here. If you took the time to grind out Materia for the Command Materia Strategy for Emerald Weapon, know that it isn’t entirely wasted on Ruby Weapon; the Mime + Counter trick works wonders, especially if you end up countering its attacks with Knights of the Round.
Ruby Weapon will counter summon spells with “Ultima” (left), but can be paralyzed by summoning Hades (right).
While the tentacles are deployed Ruby Weapon will, as discussed earlier, counter summons with Ultima. It can also use “Ruby Ray” (3000~ damage, can cause Confusion), “Ruby Flame” (3500~ damage) and “Shadow Flare” (8000~ damage). Its tentacles will also strike, one of which reduces HP by 15/32 (around 45%) or 15/16 (around 90%), while the other reduces MP by 15/32 or 25/32 (around 75%). If you do not defeat Ruby Weapon quickly enough, it may use its “Whirlsand” attack again, so why there’s no hard timer, quickness counts. The Command Materia Strategy isn’t ideal for this fight considering Ruby Weapon’s impressive resistance to physical attacks.
When you finally defeat Ruby Weapon you’ll get a Desert Rose, which can be traded to the man at Kalm for a Gold Chocobo… you know, in case you defeated Ruby Weapon without Knights of the Round, or something.
| Ruby Weapon | Stats | Tentacles | Stats |
|---|---|---|---|
| HP: | 800,000 | HP: | 40,000 |
| MP: | 2560 | MP: | 1000 |
| Weaknesses: | N/A | Weaknesses: | N/A |
| Resistances: | Earth (absorbs), Fire (absorbs), Gravity (negates), Ice (absorbs), Lightning (absorbs), Water (absorbs) | Resistances: | Gravity (negates), Water (negates) |
| XP: | 45,000 | XP: | N/A |
| AP: | 50,000 | AP: | N/A |
| Steal: | N/A | Steal: | N/A |
| Drop: | Desert Rose | Drop: | N/A |
| Gil | 30,000 | Gil: | N/A |
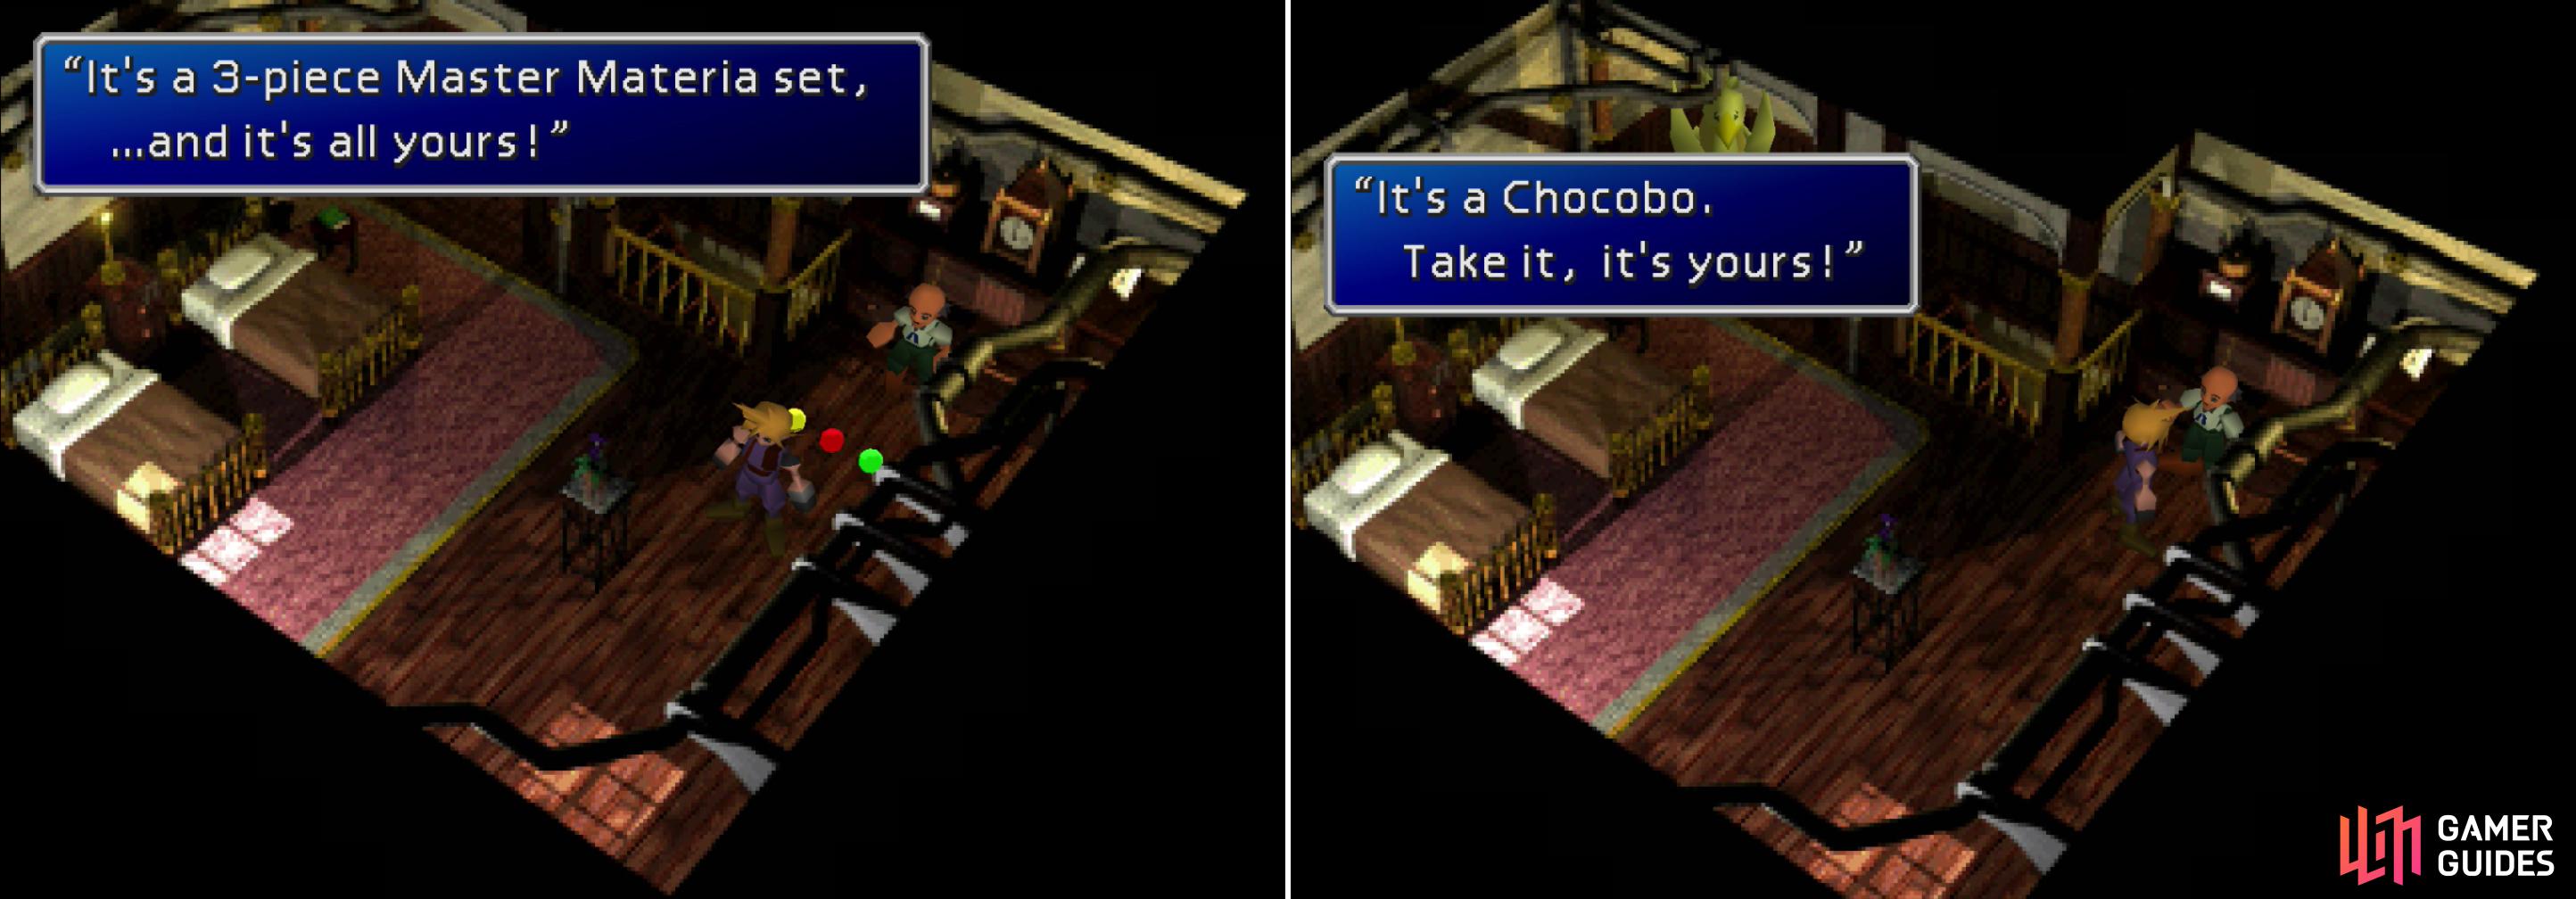
Give the old man at Kalm an Earth Harp to get a three-piece set of Master Materia (left). The Desert Rose can be traded for a Gold Chocobo (right).

Once both Weapons are defeated, it’s time to return to the North Cave and settle things with Sephiroth. Fair warning, though, it’s the point of no return; do whatever you want to do, be it grinding, Chocobo racing, competing in the Battle Arena… When you’re ready, head back to the North Cave and descend to where the party has gathered.
No Comments