
Dark Testament Challenge Stage
When you first enter this map, you will see a Level 250 Lilith, with a bunch of miscellaneous enemies on Geo Panels behind her (no effect on them). All of these enemies are male, with the exception of the Flora Beast with the Gender Bender Evility (making her male), which will power up the Lilith due to Shame. In total, there’s 31 male units and each one adds 5% to the Lilith’s stats, so she gets an increase of 100% for her stats (would be 155%, but 100% is the cap). The other enemies are all low level, with the Lucky Board being the highest at 77. Concentrating on the Lilith first and defeating her will make the rest of the battle a snap.
Scorching Flame Challenge Stage
This is one of the more troublesome Challenge maps, as you are pressed for time because of the Geo Effects. There is the red Geo Panel area near your Base Panel, which has two Ally Damage 50% effects, meaning that one turn standing on that will kill any of your characters. To make matters worse, there is also a Super Encroach effect on the same panel color, so that Ally Damage 100% effect will extend more and more each turn, eventually filling the map. Of course, if it fills the map, then that also means the Absolute Area will fill the map, making it so you won’t be able to move or kill anyone. To complicate things even more, there is a No Ranged effect in place to prevent you from hitting the Lethal Combatants with magic.
To begin, you will want to have a Wrestler (or Logan) with nothing but shoes equipped. If you have access to Accelerators, equip three of them on him, giving him enough movement to reach the yellow Geo Symbols near your base. You can’t destroy these, as it will set off a chain reaction that will fill the map with Absolute Area. Instead, you are going to pick up one of them and toss it onto the yellow area. When it’s there, use another character to destroy it (yellow on yellow, so no color change).
Do this one more time with the other Ally Damage symbol, then you can start making your way across the stage. You’re going to need to throw characters past the Absolute Area panels, with the first one requiring three people, the second three more and the final set needing two people (you can destroy the Super Encroach symbol past the second set to stop the need for an emergency). Make sure they are strong enough to be able to defeat the enemies.
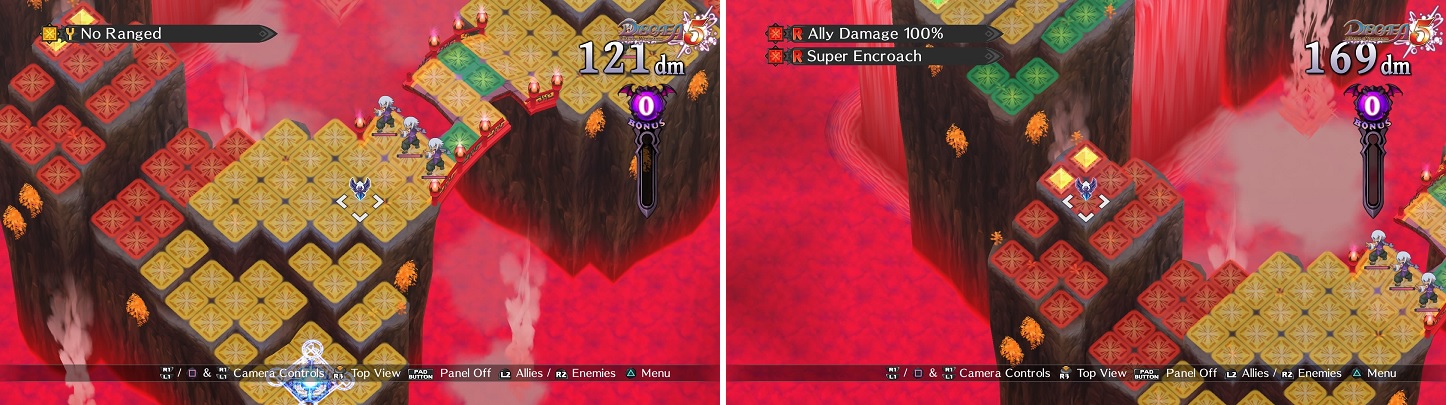
Ranged characters are not particularly useful on this map (left). Even more worrisome is the combined effects of Ally Damage and Super Encroach (right).
Toto Bunny Castle Challenge Stage
This map is divided into two areas, a low one and a high one, with you starting on the higher one. The lower area is covered in Mighty Enemy panels, with the two Eryndoms sitting down there. Enemies are invincible while receiving the Mighty Enemy effect, but you can’t lift them thanks to their Heavy Stance Evility. The top area houses the four Eryngi, who are sitting right in front of an area covered with the Absolute Area effect. Defeat those enemies first, then grab someone who can attack from at least 6 panels away, like someone with elemental spells or a gun user who has their range enhanced by one. Destroy the Mighty Enemy symbol, which will clear the bottom area, allowing you to defeat the Eryndoms.
Flowerful Challenge Stage
You can only use one character for this because of the Lonely effect. This is more of a race than a battle, as there are two special panels sitting at the end, one with a Stage Clear effect and the other with a Game Over one. The Diabolos will be trying to get to the Game Over one, which he’ll do shortly because of his 13 movement stat. There are a few ways to do this map, but one of the surefire ways is to get someone like Zeroken, who has a base movement of 6.
Equip him with three Accelerators to boost his movement to 12. At the beginning of the battle, move him onto the playing field, close enough to the Base Panel, as you will be bringing out a Professor (the Base Panel is always a free space not affected by Geo Effects) who has the Medical Care buff, which boosts your movement by another 4. Now, move as far as you can and you should be able to outrun the Diabolos to the Stage Clear panel.
Gorgeous Challenge Stage
This can be an annoying stage, because Wrestlers have that combo of skills, with the first one lifting your character (without them taking damage), followed by another skill that throws you away from them. There are four towers on this stage (5 Wrestlers on three and your Base Panel on the last), covered in Geo Panels, with no effects on them at the beginning. As soon as you end a turn off of your own tower (in the green area), then the No Entry symbol will move onto the red panel, basically blocking you off from retrieving any more characters. So, all of the characters you want to use in this battle should be brought out as soon as you can. This will also trigger the first set of Wrestlers to drop down into the bottom area.
As soon as you go down to the bottom area (left), the Geo Symbol on the other side of the map will move onto the panel (right), making it so no one else can be brought out of your base.
On the next two subsequent turns, the Ally Damage 50% symbols will move onto the green Geo Panels, essentially limiting the area in which you can fight to the middle section of the lower area. The other two sets of enemies will also drop down on the same turns as the Ally Damage symbols move onto the panels. Depending on the strength of your characters, this battle can prove to be quite challenging or not, since you want to ideally strike them down in one hit or combo, without giving them the chance to retaliate. If the enemies drop down and retain their “X” formation, a sword user with the Vacuum Slice X skill will hit them all, as well as certain formations for spell users (and 3x3 skills).
No Comments