
Sandcano Carnage Stage
The first enemy you run across will be the Orc near your Base Panel, who is pretty strong due to getting a 63% stat increase from Mass Psyche, then another 10% from Insect Lover, plus he has Bad Trip. The Titania have access to the Tier-level spells, which will get a 15% increase in power from Magical Boost. The Bears only really have high HP and nothing else that makes them a problem; use fire or wind attacks on them to deal more damage. Behind them are the second batch of enemies, with the God Buster dodging all counters and the Fighter forcing characters to counter (and increasing his own power when he counters back). The one Battle Master has Bad Trip, which is about the only thing annoying about them.
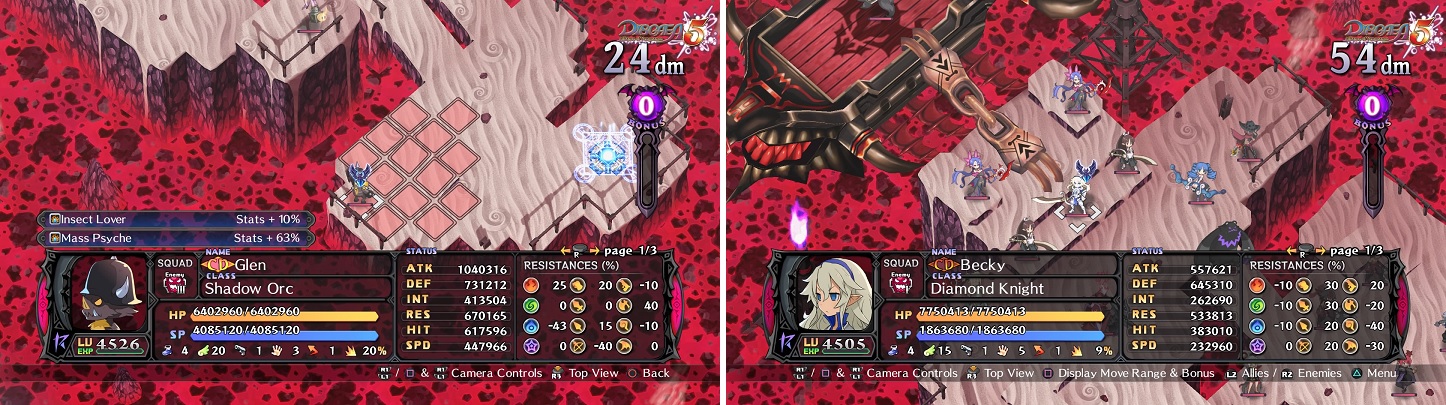
The Orc near your Base Panel gets a huge powerup (left). Near the top, you want to concentrate on the Diamond Knight (right).
The Gunner is able to extend his shot range by 2 and can shoot like a bow, instead of being restricted to a straight line. The Anti-Messiah doesn’t have anything it can use to attack, so it will resort to sticking with buffs. Keep your HP above 25% to avoid being deathblowed by the Lady Samurai, who you should know excel at fighting a single target. The Armor Knight is still defensive, but doesn’t have the Evility that increases her DEF even more when guarding.
However, she does recover 5% of her HP at the end of each turn. The one Sage with Magic Conversion and Concentration should be taken out as soon as you can, due to the extra firepower she’ll get from those two. The boss doesn’t have much to make her a threat, other than Bad Trip, which she likely won’t use because the Nine-Tail Fox tend to rely on magic.
Dark Testment Carnage Stage
This stage can definitely be a big annoyance if your characters aren’t overpowered. There’s a total of 10 Liliths on the map, all with different sets of Evilities, which are going to be your main concern because of their ability to Charm. If you don’t have Charm Vaccine equipped or a max set of the Charm resist innocent (Pastor), then you might want to get some for your characters if they are relatively similar in stats to the enemies here. Despite the Bastets having Vendetta (10% chance to Deathblow when countering), they only have one attack, so if you wait for them to attack your character(s) first, you can retaliate without fear of them countering and possibly killing your characters in one hit.
The Mother Brains will spam buffs on the other enemies, with these buffs lasting six turns because of Effective Delivery, instead of three turns. Two of the Behemoths in the center are nothing special, but the other two get a 50% boost in their stats from Power of Bowls. The Space Knight does have access to Fire, Wind and Ice (up to Giga), but doesn’t have any Evilities that make her stand out as a major threat. Try to take out the Fighter from a distance, to avoid the forced counters. All three of the Imps have Isolation as one of their Evilities, which increases their stats by 20% when no one else is adjacent to them. As for the boss, try to use elemental magic against it, since Convert Force drops all of its resistances by 50 in exchange for more stats.
Scorching Flame Carnage Stage
The Iron Maiden and Battle Master near the beginning of the map both have bows equipped, in addition to their melee weapon. Neither of them have any dangerous Evilities to watch out for, so there’s nothing to worry about there. On the raised platform is a Gunner and Sage, with the Gunner able to attack as if he had a bow equipped. The Sage has Star Break, making it so whenever she uses a skill with Star, your resistance to it will be set at 0 (can be both good and bad, depending on what was beforehand). The Horseman will Magichange with the Dark Knight on their first turn, making the Dark Knight a little meatier thanks to Immortal Body. Behind him will be a Thief and Maid, with neither standing out, although the Maid does have access to buffs.
The Sage behind them doesn’t have much, Evility-wise, but it does get a boost to her fire and star spells from the Evilities (Tera-level for each). Going up the level from there, you will run into the first of three Diamond Knights, who will utilize their defend-happy nature to annoy you. This is the only one that does have Auto Recovery, making her even more of a pain, as well as pretty decent resistances. The other two Knights don’t have Auto Recovery, but are still as beefy. The Mother Brain is someone you should be used to by now, with her using buffs, but she also has Star spells.
Near the boss will be another Sage, as well as a Space Knight. The latter has a 30% boost to the three basic elements and has access up to the Giga-tier of those spells. The Sage has access to the Tera-tier of Ice and Star, with a 20% boost to them, as well as Magic Conversion, making her slightly more powerful. As for the boss, he has the typical Chimera Evilities (Lock Eyes, Day of Calamity and Reduction Curse), but he also has Tera Ice/Wind/Fire and the 30% increase Evilities associated with them.
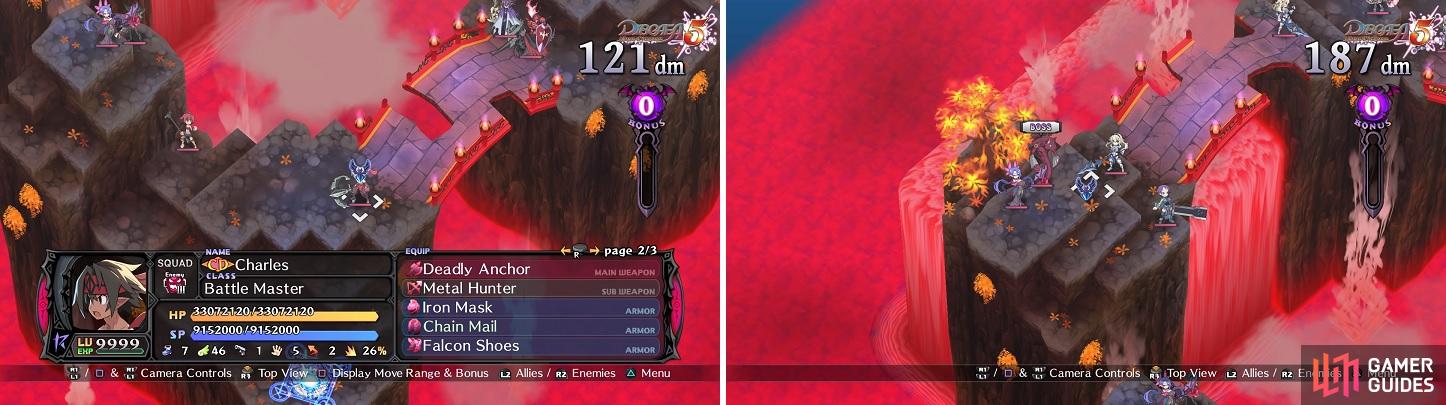
The two enemies closest to the Base Panel have a bow as their subweapon (left). Be mindful of the ranged artillery at the top of the map (right).
Toto Bunny Carnage Stage
The first set of enemies you’ll encounter are the three Agni near your Base Panel. Remember that all of their skills are fire-based and two of them have the Physical Boost Evility. If your characters are weak to fire, you want to take out the middle Agni first, since it has Attack Weakness, giving it more damage to those fire attacks. As long as you don’t allow the Shadow Master behind you, you’ll be fine with him.
The Behemoth is nothing special (does have Physical Boost) and the Mother Brain will pretty much buff her allies. The one problem with this stage is that the boss is fairly close to you in the beginning, and the boss is a Nine-Tailed Fox. In front of her are two Horsemen and to the side is a Sage. The latter has a similar setup to the previous map, with Star Break and Magic Conversion, while the Horsemen are just tanks (limit their movements).
Despite the look of things, the Black Puddings actually do not Magichange with the Wrestlers, meaning you’ll have to worry about them and their poisoning skills, as well as not ending up next to them at the end of the turn. That also means that you need to keep an eye on the Wrestlers, in case they decide to use their lifting skill. The Rabbits are nothing special, but will get at least a 25% boost to their ATK and SPD, due to Hidden Valley. If you can, keep the Parthenocissus away from any other enemies, lest she buffs them with her Evilities. On the other side of the map, you have two Archers, a Skull, two Gunners and a Succubus. Of course, the Succubus is always annoying because of Charm, and the Skull is always a big damage dealer because of his Evilities.
Toto Bunny Castle Carnage Stage
This can prove to be a very challenging map, as the Wrestlers are out of reach (unless you have very high jump) and will toss down the Prinnies, causing massive damage. They each have around 60 million HP, so you’ll be dealt 30 million of that as damage for each one that is tossed at you. To make matters worse, the Maids and Pirates will simultaneously attack, posing an even bigger challenge. Hopefully, you’ve been keeping up with the CD Elixir Curry to boost your HP up real high to survive these blasts, as it will take a lot to make it past the initial stages of this map. However, there is a single Evility that negates the whole Prinny attack, which is Evade Danger (under Thief), so it would be extremely beneficial for you to equip it for just this map.
Outside of the whole Prinny situation, the Wrestlers are still annoying if they decide to use their lifting skill, as it takes the character out of the action, although a character equipped with Heavy Stance is not able to be lifted. The Maids and Thief aren’t anything special and the Pirates are designed to deal more/take less damage the further you are from them.
The Eratos are ice specialists, with two having an Evility that reduces your water resistance by 15% each and the other three boosting their ice-elemental damage by 40%. The Chimera Boss is the typical one you’ve probably run into a lot, with Evil Eye reducing your stats and Day of Calamity having a chance to deathblow depending on the number of ailments inflicted on your characters. Note that both his physical and magical attacks get a boost, as well as his Star spells, of which he access to the full range of them.
No Comments