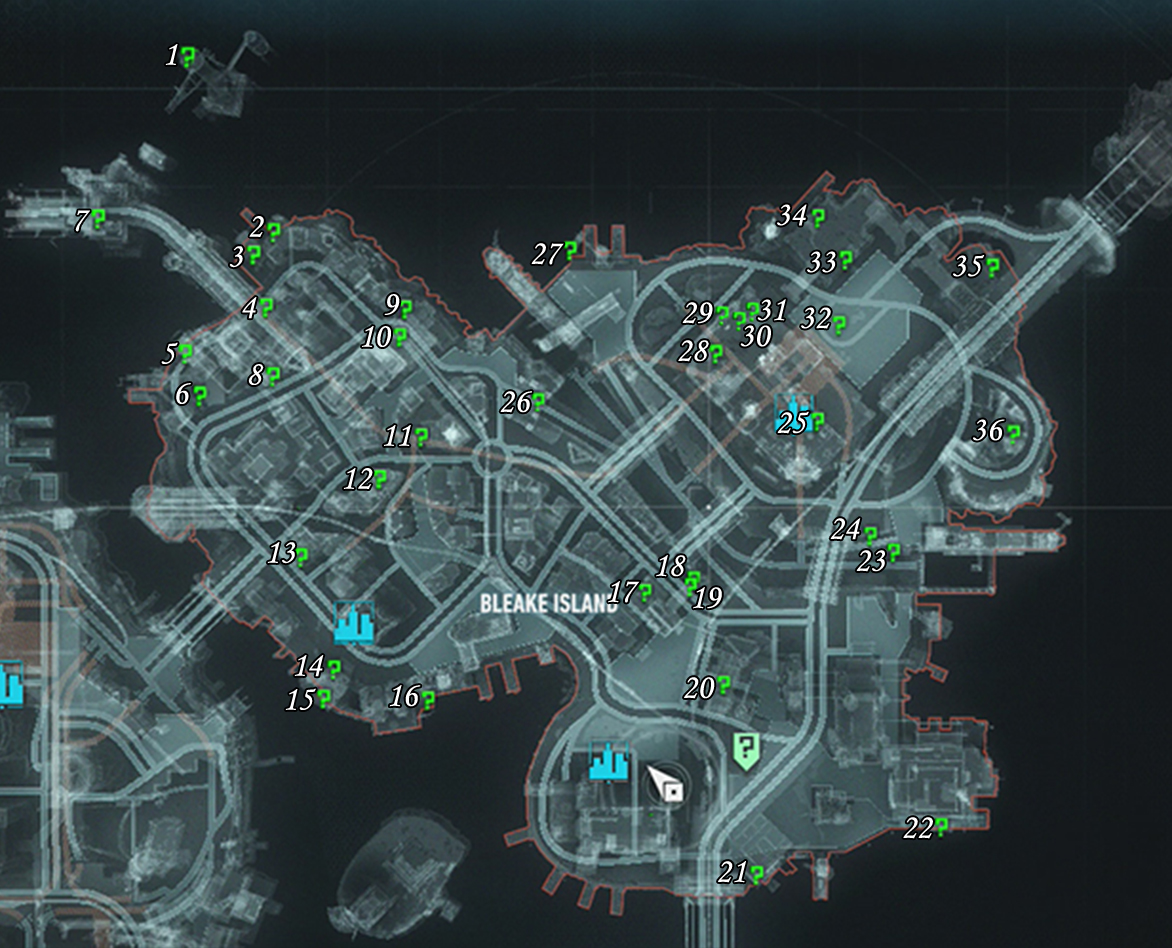
There are a total of 37 Riddler Trophies located on Bleake Island and they can be found in the following locations:
Riddler Trophy 01
Map Co-ordinates: 1298, 2032
On the northern end of the large crane in the water north of Bleake Island.
Riddler Trophy 02
Map Co-ordinates: 1523, 2112
Behind a weak wall on the western side of the waterside building at the co-ordinates close to the roof. Use Detective Mode to find the wall and then bring the Batmobile up onto the bridge to the southwest. From here use the Batmobile to shoot the weak wall before heading over and climbing inside to find the Riddler Trophy.
Riddler Trophy 03
Map Co-ordinates: 1551, 2072
Inside the upper levels of a waterfront warehouse building.
Riddler Trophy 04
Map Co-ordinates: 1632, 2099
This one is found on a balcony area with a large glass roof and an electrified floor. Whilst standing on the glass area, use your Voice Synthesizer on the Riddler Robot on the balcony and have him walk across the electric floor and pick up the Riddler Trophy . Once he has it, direct him back to the balcony where you can now drop down and fight him to obtain it.
Riddler Trophy 05
Map Co-ordinates: 1703, 1972
On the second floor of a building at the co-ordinates specified. Note the pair of ‘?’ lights on the shipping containers inside the door. Hit the ‘?’ with the up arrow with a Batarang to raise them. When they rise, return to the back of the room and step on the pressure plate. From here, use the Batclaw to grab the Riddler Trophy .
Nabbing the trophy will cause armed enemies to appear in the previous room. Use a Remote Controlled Batarang to fly past them and hit the ‘?’ with the down arrow on the shipping containers just inside the door. You should now be able to escape!
Riddler Trophy 06
Map Co-ordinates: 1764, 1988
You’ll find a green panel at ground level at these co-ordinates that will be activated by using the Batmobile Forensics Scanner Pulse . This will create a trail of question marks that you will need to follow in Forensics Scanner mode a short distance, across the nearby bridge towards ACE Chemicals. Eventually the question marks will lead you to a green target we can shoot high up on the bridge (at 1498, 1840).
Grapple up to the small hole you just created in the wall of the small bridge building to find a Riddler Trophy inside.
Riddler Trophy 07
Map Co-ordinates: 1496, 1843
On a small ledge located below the main deck of the bridge leading to ACE Chemicals. It is hidden behind a series of generators.
Riddler Trophy 08
Map Co-ordinates: 1734, 2102
On the wall of the building with the large ACE sign. Use the Batmobile’s Power Winch on the anchor point here and pull it out. This will reveal a small compartment in which you’ll find the Riddler Trophy .
Riddler Trophy 09
Map Co-ordinates: 1636, 2307
This can be found on the water-facing side of the building at the co-ordinates specified behind a weak wall halfway up. This weak wall is made of wood panelling, so we can fly into it to destroy it. Climb to the roof above, glide off and fly into the boards to knock them down (it might take a few tries to find a decent angle, but is definitely doable!). Inside you’ll find the Riddler Trophy .
Riddler Trophy 10
Map Co-ordinates: 1669, 2284
This Riddler Trophy is located in the sewers beneath Chinatown. The area in which it can be found will only be accessible after completing part four of the ‘Gunrunner’ Most Wanted side-quest. It can be found by the control panel we are required to use to open the area to the Batmobile during that side-mission and is very hard to miss.
Riddler Trophy 11
Map Co-ordinates: 1828, 2337
The Riddler Trophy will be in a small cage on the wall next to a large fluorescent question mark. This small rooftop is guarded by three Riddler Robots. Defeat the robots and then hit the question mark with a Batarang , this will revive them. Knock them out again and then revive and knock them out one final time for the cage to open up so that you can grab the Riddler Trophy.
Riddler Trophy 12
Map Co-ordinates: 1892, 2286
This Riddler Trophy is found at the very highest point of the Osamu Tower building in a small cage. The numbers ‘1665,3171’ are written on the ground nearby. These are actually co-ordinates to a junction box that we can activate with the Batmobile’s Power Winch .
Activating the junction box will trigger a countdown during which the cage holding the trophy will open. Quickly race along the rooftop on the Batmobile and perform an eject at the far end into a glide to get a good head start and then continue to grapnel boost and glide your way back to the Riddler Trophy location to grab it before time runs out.
Riddler Trophy 13
Map Co-ordinates: 2006, 2166
This trophy is on a balcony area with a large glass roof and an electrified floor. Sitting on the glass area, use your Voice Synthesizer on the Riddler Robot and have him disable the first Sentry Turret just inside the door and then move him close to the second.
Switch to Batman and use the Remote Hacking Device to blind the next Sentry Turret, and then quickly use the Voice Synthesizer to have the robot pick up the Riddler Trophy . Once he has it, direct him back to the balcony where you can now drop down and fight him to obtain it.
Riddler Trophy 14
Map Co-ordinates: 2178, 2191
At ground level, at the base of a building facing the street (the one below the giant crane) you’ll find a Generator and an anchor point. Use the Batmobile’s Power Winch on the anchor point and pull it out as far as possible. Use the Remote Electrical Charge on the generator. This will open the nearby gate, revealing the Riddler Trophy .
Riddler Trophy 15
Map Co-ordinates: 2216, 2183
Inside an abandoned building beneath a crane at the co-ordinates listed. It can be found on the floor on the upper level.
Riddler Trophy 16
Map Co-ordinates: 2223, 2332
This Riddler Trophy is attached to the bottom of a wooden platform. It is hanging upside down over the water. You can grab it using the Batclaw from the nearby boat ramp.
Riddler Trophy 17
Map Co-ordinates: 2063, 2661
At this location you’ll find a pair of anchor points we can grab with the Power Winch . Grab and pull out the left one first. Exit the Batmobile and use a Batarang on the ‘?’ by the door to open it. Head inside and move to the right. Switch back to Remote Batmobile Control and this time grab the second anchor point and pull it out. As Batman you should now be able to nab the Riddler Trophy .
Riddler Trophy 18
Map Co-ordinates: 2049, 2732
Hop onto the raised monorail track to the east of this location and look back towards the co-ordinates listed. Activate Detective Mode to spot some weak windows on the wall here. Glide Kick through the window to find the trophy on a table.
Riddler Trophy 19
Map Co-ordinates: 2037, 2736
This Riddler Trophy is found at the very highest point of the Mendo Soap Co building in a small cage. The numbers ‘ 3496, 2540’ are written on the ground nearby. These are actually co-ordinates to a junction box that we can activate with the Batmobile’s Power Winch on the blocked bridge leading south from Miagani Island.
Activating this will trigger a countdown during which the cage holding the trophy will open. There isn’t much time, so I’d recommend racing back across the bridge to Bleake Island using the Batmobile and as soon as you are across, perform a Batmobile eject into a glide to fly your way over to the Riddler Trophy location and grab it before time runs out.
Riddler Trophy 20
Map Co-ordinates: 2198, 2781
If you stand underneath the building bridging the road at this location and look up you’ll find a section of weak ceiling. You can shoot this with the Batmobile to destroy it. Look into the hole and use the Batclaw to grab the trophy within.
Riddler Trophy 21
Map Co-ordinates: 2489, 2831
This Riddler Trophy is inside a large open warehouse on the waterfront below and by the east side of Mercy Bridge. Attach the Power Winch to the anchor point on the wall here, pull it back as far is it will go and shoot the dots on the ‘?’ as they pass through the rings. If successful, the cage will open and you’ll be able to use the Batclaw to grab it.
Riddler Trophy 22
Map Co-ordinates: 2422, 3115
Attach the Power Winch to the anchor point on the back of the train here and pull it back as far as you can. Exit the Batmobile and run past the train. Enter the underground vent cover the train had been on top of to find the Riddler Trophy inside.
Riddler Trophy 23
Map Co-ordinates: 2000, 3044
At the eastern end of the empty canal. Attach the Power Winch to the anchor point pull it back slowly, you need to use the pipes here like a pinball machine. Pull the launcher back just far enough so that the ball goes past the small hatch that drops down, but does not hit the corner at the top. Grab the Riddler Trophy from the ball.
Riddler Trophy 24
Map Co-ordinates: 1975, 3004
This Riddler Trophy is housed inside a modified shipping container with an anchor point on the outside we can grab with the Power Winch and the only entrance blocked by steam valves. Grab the anchor point with the Batmobile and pull the attached section of wall out as far as it will go. Place some Explosive Gel on the side of the wall facing the steam valves.
Have the Batmobile release the anchor point so that the wall returns to its initial position. Detonate the Explosive Gel to disable the steam pipes. Return to the Batmobile and use the Power Winch to pull the anchor point out again.
As batman, we’ll now be able to get a short run up and slide beneath the disabled steam pipes to claim the trophy within.
Riddler Trophy 25
Map Co-ordinates: 1805,2917
On the southern part of the rooftop of Panessa Studios there is a small platform with two Riddler pressure plates and a Riddler Robot (right where we hacked the junction box near the start of the game). From a nearby platform, use the Voice Synthesizer to have the Riddler Robot stand on one of the pressure plates, then glide in and step on the other. Use your Batclaw to grab the Riddler Trophy .
Riddler Trophy 26
Map Co-ordinates: 1775, 2502
This Riddler Trophy can be found inside a warehouse-like structure on the ramp leading from the canals up to the streets. It has weakened doors at either end that the Batmobile can drive through. Inside, on a catwalk near the top of the room you’ll find the trophy.
Riddler Trophy 27
Map Co-ordinates: 1552, 2552
You’ll find the next one inside a shipping container suspended by a crane over the water. You’ll need to find the open door on the water-facing side and either drop down from above or attempt to glide inside to grab the Riddler Trophy within.
Riddler Trophy 28
Map Co-ordinates: 1707, 2770
In the sheltered section of the Panessa Studios rooftop in the westernmost corner.
Riddler Trophy 29
Map Co-ordinates: 1647, 2780
On the ground outside the northwest corner of Panessa Studios you’ll find a small rocky outcrop with a Batmobile switch on it. Drive onto the Batmobile pressure plate and you’ll notice that one of the ‘?’ mark signs on the wall opposite will light up.
Use your machine gun to shoot this, and then continue to shoot the question marks that light up afterwards (you’ll need to be quick though – if you take too long, they will reset) until the Riddler Trophy cage opens. You can then Batclaw it down.
Riddler Trophy 30
Map Co-ordinates: 1657, 2802
Return to the roof of Panessa Studios with the Batmobile, right near where you use the Power Winch to climb up to the balcony, you’ll find a green panel that will be activated by using the Batmobile Forensics Scanner Pulse . This will create a trail of question marks that you will need to follow in Forensics Scanner mode a short distance, off the rooftop to the left, through the nearby sewer tunnels until you reach the empty canal.
The question marks will lead you to a green target we can shoot on the underside of a bridge over the canal. Shoot the target and look into the small hole you just created in the bottom of the bridge and use the Batclaw to grab the Riddler Trophy inside.
Riddler Trophy 31
Map Co-ordinates: 1635, 2825
This one is located in the tunnel beneath Panessa Studios. At the specified co-ordinates you’ll find a junction box that can be activated with the Batmobile’s Power Winch complete the revving mini-game to open the door and continue inside.
You’ll see the Riddler Trophy mounted in a cage on the far wall and beside this another junction box that we can attach the Power Winch to. This junction box however is a little different as it will charge up the Batmobile’s special attacks.
You will have noticed the green energy shield overhead – there are three ‘?’ lights behind it and the shield itself will block all of your attacks. To solve this puzzle we need to keep the Batmobile attached to the junction box to have the abilities good to go and use a level 2-3 Missile Barrage as the missiles start firing, use an EMP to knock out the shield. The missiles should strike the ‘?’ lights and you’ll earn yourself a Riddler Trophy !
Riddler Trophy 32
Map Co-ordinates: 1664, 2951
This one is in the Panessa Studios Carpark. There is a pillar structure here with an anchor point at its base. Attach the Power Winch and you’ll note that the glass panels above will rotate. Behind the panels are three question marks.
We need to rotate the glass panels so that the openings in the glass match up with the question marks. When they are in the open, exit the Batmobile and hit them with a Batarang to activate them. Once all three have been hit, the pillar will lower and reveal the Riddler Trophy .
Riddler Trophy 33
Map Co-ordinates: 1573, 2956
On the rooftop you need to drive across with the Batmobile, that leads to the rooftop of Panessa Studios you’ll find a small tower with a weak wall. Shoot this with the Batmobile and you’ll find a Riddler Trophy inside.
Riddler Trophy 34
Map Co-ordinates: 1502, 2921
This can be found on the water-facing side of the building at the co-ordinates specified behind a weak wall halfway up. This weak section of wall is made of wood panelling, so we can fly into it to destroy it. Climb to the roof above, glide off and fly into the boards to knock them down. Inside you’ll find the Riddler Trophy .
Riddler Trophy 35
Map Co-ordinates: 1567, 3188
This Riddler Trophy can be found on a small platform just above the water below and slightly southeast of Merchant Bridge.
Riddler Trophy 36
Map Co-ordinates: 1568, 3187
In a small wooden stall near the base of the lighthouse.
Riddler Trophy 37
Map Co-ordinates: GCPD HQ
This Riddler Trophy is located inside the GCPD HQ. You’ll find it in a glass case opposite theentrance to the evidence room.
No Comments