The ‘Occupy Gotham’ side missions are very similar to the ‘Own the Roads’ side-missions in that they revolve around finding and taking out militia checkpoints that have been established throughout Gotham. Unlike the ‘Own the Roads’ objectives, the objectives for ‘Occupy Gotham’ are all located on rooftops around the city.
These objectives can be identified by a Tower-shaped marker on the world map and in the game world are comprised of rooftop areas draped in the Arkham Knight symbols, red flags and often with sentry turrets with bright red searchlights on the walls surrounding it.
These objectives involve a range of approaches, ranging from stealth, to all out melee brawls as well as the occasional hack-whilst-you-fight scenario. In general, to eliminate a checkpoint, you’ll need to enter the area, clear it out of enemies and then find the command console and use your Explosive Gel on it to blow it up.
There are 21 rooftops to clear in total with four on Bleake Island, and nine on Founders’ Island and eight on Miagani Island. Their locations along with what you can expect to find are listed below.
Part 1: Bleake Island Watchtower Locations
There are a total of four militia Watchtowers located on Bleake Island and they can be found in the following locations:
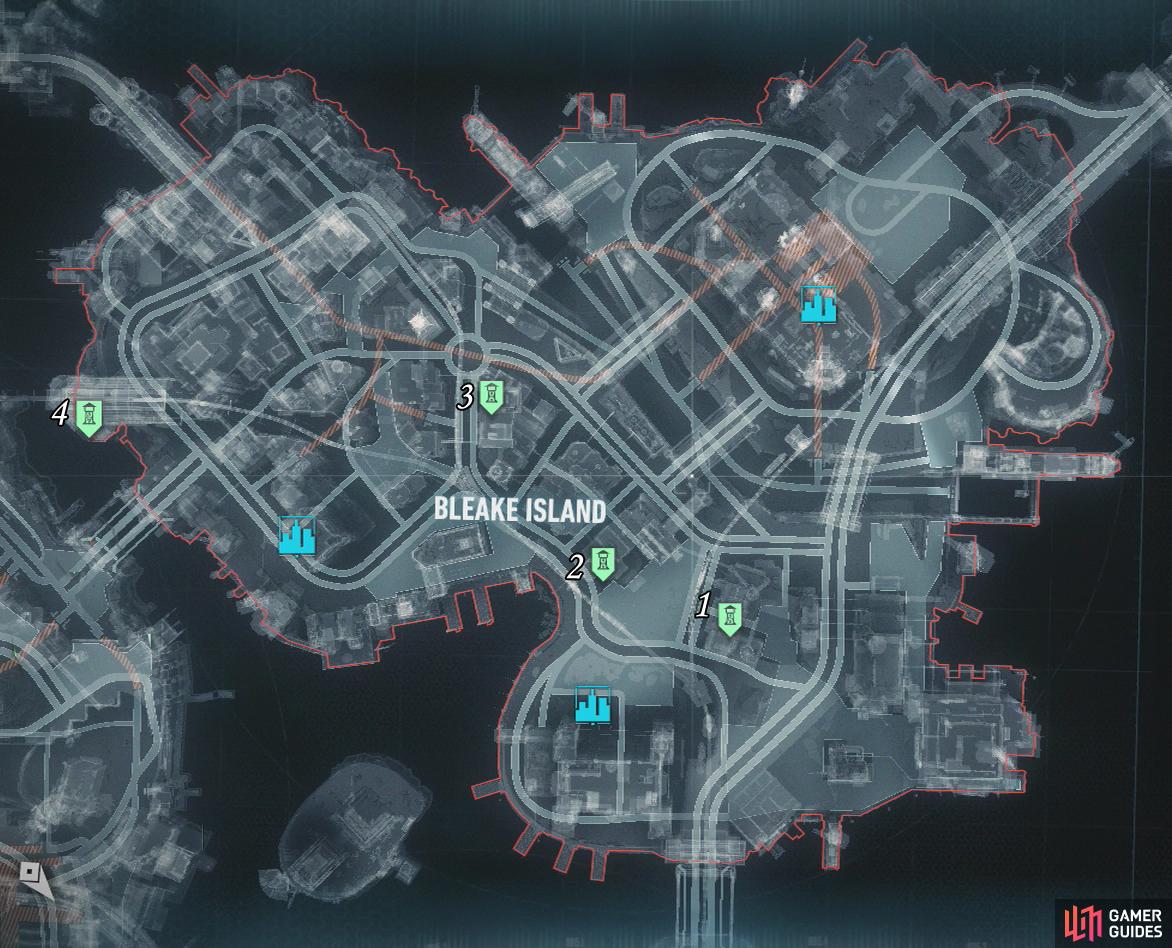
Bleake Island Watch Tower 01:
Map co-ordinates: (2197, 2780)
Description: On top of the building a block directly north of Mercy Bridge.
This watchtower is essentially a small predator area. We’ll need to deal with the four Soldiers (two who have camouflage armour), a Boa Drone and a Minigunner. The other difficult part of this area is the presence of a wall mounted Sentry Turret overlooking the rooftop. We will need to use the Remote Hacking Device to blind the Sentry Turret before we set foot on the rooftop.
Unfortunately, there is not much in the way of useful environmental features here from the buildings/walls we can use for corner takedowns and a cable strung overhead in one part of the rooftop. Fortunately, it’s not all bad as we can use the Remote Hacking Device to download the Boa Drone codes to use them to your advantage and sabotage the weapons crates with the Disruptor before using the Voice Synthesizer to have guards inspect them.
As is the case usually, you will want to leave the Minigunner for last because if you attack him, the noise will alert other guards to your presence.
Once you have eliminated all of the enemies you can then find the command console and use your Explosive Gel on it to blow it up.
Bleake Island Watch Tower 02:
Map co-ordinates: (2130, 2614)
Description: On a roof halfway up the building adjacent to the gas station, just north of the GCPD headquarters.
This watch tower is comprised of a very small enclosure guarded by a group of enemies whom we’ll need to drop in on and knock out. The enemies guarding this small rooftop include four Soldiers, three Combat Experts and three Brutes (one with a shock stick and another with a shield). Before approaching the fight we will need to use the Remote Hacking Device to blind the Sentry Turret overlooking the combat area.
During the fight you’ll want to focus on downing the Thugs and Combat Experts as soon as possible before finally dealing with the Brutes. Note that there are several environmental takedowns here that can be handy in dealing with the Brutes when you see an opening to use them.
Note that if the timer on the Sentry Turret blinding runs out, you’ll want to quickly grapple out of the area and re-apply the Remote Hacking Device before continuing.
Once you have eliminated all of the enemies you can then find the command console and use your Explosive Gel on it to blow it up.
Bleake Island Watch Tower 03:
Map co-ordinates: (1922, 2469)
Description: On a rooftop just northeast of Oracle’s Clock Tower and just south of the large roundabout.
This watchtower has a definite predator mode feel to it. There are eight armed Soldiers, a Medic and two Boa Drones patrolling a large section of rooftop. You should use you usual predatory tactics to take them out.
With the pair of Boa Drones, you use the Remote Hacking Device to download their codes to use them to your advantage. It is also possible to sabotage the weapons crates with the Disruptor and use the Voice Synthesizer to have guards inspect them. There is a cable strung above part of the area which will allow you to sneak up on enemies undetected. As per usual prioritise the medic beforehand and then wait for enemies to become isolated before picking them off with a range of silent takedowns and corner takedowns to prevent detection.
When you only have a few enemies left, creating a distraction and luring a group of enemies into Fear Multi-Takedowns is also a good way to mop things up.
Once you have eliminated all of the enemies you can then find the command console and use your Explosive Gel on it to blow it up.
Bleake Island Watch Tower 04:
Map co-ordinates: (1961, 1947)
Description: On the western side of the Urbarail station building in Chinatown, just north of the Perdition Bridge.
This is quite possibly the easiest watchtower in the game as it consists solely of two Thugs. The way into the building can be tricky to find however as there is only one entry point. To get inside you’ll need to to enter via the windows on the river side (southwest) of the building.
Although, it is completely optional, if you explore the building before taking over the watchtower and attempt to enter the guarded via the stairs on the northeast side of the building you’ll reach iron bars blocking your way, the Thugs behind will see you and you’ll get some funny dialogue.
Once you have eliminated all of the enemies you can then find the command console and use your Explosive Gel on it to blow it up.
No Comments