There are a total of 33 Riddler Trophies located on Founders’ Island and they can be found in the following locations:
Riddler Trophy 01
Map Co-ordinates: 1760, 1676
On the upper deck of the lighthouse. Watch out for the Sniper here if you have not freed the fire-fighter at this location previously.
Riddler Trophy 02
Map Co-ordinates: 1903, 1695
Behind a weak wall about halfway up the ‘Trade House’ building at the end of the docks facing the lighthouse. This weak wall is made of wood panelling, so we can fly into it to destroy it. Climb to the roof directly above it, glide off the rooftop and immediately pull a 180 degree turn and fly into the boards to knock them down. Inside you’ll find the Riddler Trophy .
Riddler Trophy 03
Map Co-ordinates: 1963, 1477
Similar to the previous Riddler Trophy , this is located behind a weak wall over the water on the side of a building opposite the ‘Fish Market’. This weak wall is also made of wood panelling, so we can fly into it to destroy it. Climb to the roof directly above it, glide off the rooftop and immediately pull a 180 degree turn and fly into the boards to knock them down. Inside you’ll find the Riddler Trophy .
Riddler Trophy 04
Map Co-ordinates: 1976, 1510
This is on the middle level of a building by the docks that has seen much better days. On the western side of the building is an anchor point we can pull down with the Batmobile’s Power Winch to create an opening we can enter with Batman. Inside you’ll find the floor filled with Riddler pressure plates and the Riddle Trophy mounted on the wall behind a fence on the far side of the room. Stepping on any of the pressure plates will immediately lock the trophy.
To get to the open hatch, we need to first step on the green pressure plate and then switch to Remote Batmobile Control and release the anchor point. With the door back in place we can now deploy the Line Launcher and ride it to the far end of the room. Go grab the trophy… Grab it to the max.
Riddler Trophy 05
Map Co-ordinates: 1956, 1789
In a small ruined building with holes in its walls that sits just above the slum area over the water.
Riddler Trophy 06
Map Co-ordinates: 2155, 1678
In the lower deck slum area on the small platform above the main entrance door to the ‘Killingers’ Department Store. The numbers ‘2147, 1492 are written nearby. These are actually co-ordinates to a pressure plate located on the roof of the twin ‘Logerqist Towers’ building nearby. Stepping on this will trigger a countdown during which the cage holding the trophy will open.
Dive off the rooftop immediately and summon the Batmobile as you fall to land in it. Quickly drive back down the ramps to the Riddler Trophy location before time runs out to grab it.
Riddler Trophy 07
Map Co-ordinates: 2068, 1676
After clearing out the militia roadblock at this location, you will find a junction box on the wall that can be powered up with the Batmobile’s Power Winch . Doing so will open the shutter door beside the junction box. Behind the door is a Riddler Robot and a pressure plate. Simply use the Voice Synthesizer to direct the enemy to the pressure plate to unlock the Riddler Trophy on the wall nearby.
Riddler Trophy 08
Map Co-ordinates: 2251, 1815
After clearing out the militia checkpoint at this location you’ll find a small sheltered ledge beneath one of the arched entrances you can climb up to that houses the Riddler Trophy .
Riddler Trophy 09
Map Co-ordinates: 2178, 1841
This Riddler Trophy can be found mounted on a wall just by a corner with an anchor point on the other side. Use the Batmobile’s Power Winch to pull out the anchor point and reveal three ‘?’ lights. Hit all three with your quick-fire Batarangs to unlock the trophy. Batclaw it down to add it to your collection!
Riddler Trophy 10
Map Co-ordinates: 2198, 1950
This one is located on the docks just beneath the southern part of Perdition Bridge. Here there is a generator, hit this with the Remote Electrical Charge to open the door beneath it. Inside you’ll see a Sentry Turret’s lights and on the wall next to this there is a glowing ‘?’ sign. Move up and interact with the ‘?’ light to shut the door in front of the turret. We can now move into the next room to grab the Riddler Trophy .
Picking this up will spawn some armed Riddler Robots in the previous room. Use your Remote Control Batarang to hit the ‘?’ light on the wall by the Sentry Turret in the previous room to open the door and have it take them out. Hit the ‘?’ once more with a second Remote Control Batarang to close the shutter once again to allow Batman to escape.
Riddler Trophy 11
Map Co-ordinates: 2406, 1726
This is located in the lower slum area. When you approach the co-ordinates you’ll see a group of Riddler Robots behind a barred fence. Use the Voice Synthesizer to have one of them step on the nearby pressure plate. This will open the door to the right.
Head in through the now open door and use your Explosive Gel to take down the section of weak wall opposite the entry. Move through the vent into the room with the Riddler Robots. Defeat them all and when the room is clear of enemies you’ll be able to grab the Riddler Trophy from the wall.
Riddler Trophy 12
Map Co-ordinates: 2319, 1667
In the ditch directly beneath the ramp we used to jump to the upper levels of a construction site in the Batmobile during the campaign.
Riddler Trophy 13
Map Co-ordinates: 2214, 1467
In the lower level slum area below the southernmost of the two large cylindrical buildings (the ‘Logerqist Towers’) you’ll find a green sonar panel at ground level. This can be activated by using the Batmobile Forensics Scanner Pulse . Doing so will create a trail of question marks that you will need to follow in Forensics Scanner mode.
Follow the ‘?’ signs a short distance until you reach the fan on the ceiling. At this point, you’ll need to quickly make your way to the surface and look for the corresponding manhole up on the road here to continue the search (place a custom waypoint on the map to make this easier). When you have found the right manhole, the ‘?’ will start appearing again.
Continue to follow the trail along the streets until you are led to a green target we can shoot on a wall at the base of a tall building. Head into the gap that opens to find the Riddler Trophy inside.
Riddler Trophy 14
Map Co-ordinates: 2259, 1332
This Riddler Trophy is located on one of the east facing balcony areas of the Wayne International Plaza building.
Riddler Trophy 15
Map Co-ordinates: 2238, 1100
You’ll find this Riddler Trophy on a yellow crate in the middle of a waiting area on the northern end of the train station just west of the Wayne International Plaza building.
Riddler Trophy 16
Map Co-ordinates: 2369, 1435
This collectible is located on one of the south facing balconies of the ‘Lex Corp’ building. There is an armed Riddler Robot and a pair of pressure plates involved.
Land on the roof of a building opposite and direct the Riddler Robot onto one of the pressure plates using the Voice Synthesizer . Dive down and land on the other plate to release the Riddler Trophy . Drop a Smoke Pellet when the Riddler Robot attacks and use the Batclaw from the smoke to nab the trophy before leaving the area quickly.
Riddler Trophy 17
Map Co-ordinates: 2419, 1461
To reach this Riddler Trophy , you must first gain access to the ‘Pretty Dolls Parlour’ in the slums in western Founders’ Island. This requires that we complete the ‘Perfect Crime’ Most Wanted mission.
Once you are able to enter the building, you should see the Riddler Trophy behind a window directly in front of you. Move past this to the right to find a grating on the floor. Enter the grating and emerge at the far end of the tunnel. Blow down the weak wall here with Explosive Gel and go and pick up your prize.
Riddler Trophy 18
Map Co-ordinates: 2505, 1401
After clearing out the militia roadblock at this location, look for an anchor point on the western side of the area. Attach the Power Winch and use it to pull down this weak wall. Head inside with Batman. Step on the pressure plate inside and use the Batclaw to grab the Riddler Trophy .
As soon as you pick the trophy up, walls will drop down either side and a spiked door will appear at the entrance and quickly rush forward to crush you. Immediately switch to Remote Batmobile Control and nab the anchor point on the back of the spiked door. Pull it all the way out so that Batman can escape.
Riddler Trophy 19
Map Co-ordinates: 2516, 1403
On a set of stairs near the top of the ruined building at the co-ordinates listed.
Riddler Trophy 20
Map Co-ordinates: 2560, 1418
Behind a weak wall on the northern side of the structure at the co-ordinates listed. Use Detective Mode to find the wall and then bring the Batmobile up onto a vantage point further to the north. From here use the Batmobile to shoot the weak wall before heading over and climbing inside to find the Riddler Trophy .
Riddler Trophy 21
Map Co-ordinates: 2640, 1391
At the base of the building with the watchtower on it at the co-ordinates given you will be able to find a green panel. This can be activated by using the Batmobile Forensics Scanner Pulse . This will create a trail of question marks that you will need to follow in Forensics Scanner mode.
When you get to the ramp, you’ll need to quickly use the Power Winch to pull it back as far as possible and jump to the building opposite to find the final target. Shoot the green target and hop up into the opening to find the Riddler Trophy .
Riddler Trophy 22
Map Co-ordinates: 2609, 1597
This one is located behind a weak wall on the upper levels of the eastern side of the Bank of Gotham building. Use Detective Mode to find the wall and then bring the Batmobile up onto the street to the northeast until you are able to see it (there is a militia roadblock west of the Bank of Gotham that has a great line of sight on the weak spot ). From here use the Batmobile to shoot the weak wall before heading over and climbing inside to find the Riddler Trophy .
Riddler Trophy 23
Map Co-ordinates: 2563, 1816
This is located on top of a monorail support by the skyscraper with purple neon trimming opposite the Church. The numbers ‘2456, 2663’ are written nearby. These are actually co-ordinates to a junction box that is mounted on the southern wall of the GCPD HQ building on Bleake Island. Activating this this will trigger a countdown during which the cage holding the trophy will open.
Once you have activated the timer, detach the Batmobile and immediately drive it along the waterfront towards the Lady of Gotham statue. Perform a Batmobile eject when you reach the corner to launch into a glide across the water at high speed. Grapnel boost and glide your way back to the Riddler Trophy location before time runs out to grab it.
Riddler Trophy 24
Map Co-ordinates: 2640, 1956
This trophy is on a balcony area with a large chain linked wire roof and an electrified floor below. Sitting on the roof, use your Voice Synthesizer on the Riddler Robot and have him move close to the Sentry Turret below.
Switch to Batman and use the Remote Hacking Device to blind the Sentry Turret, and then quickly use the Voice Synthesizer to have the robot pick up the Riddler Trophy . Once he has it, direct him back to the balcony where you can now drop down and fight him to obtain it.
Riddler Trophy 25
Map Co-ordinates: 2808, 1966
This Riddler Trophy can be found on a small platform just above the water below and slightly south of Penitence Bridge.
Riddler Trophy 26
Map Co-ordinates: 2747, 1881
This Riddler Trophy is located in a ball within an obstacle course of sorts mounted on the side of a building. This puzzle features a pair of generators linked to anchor points, one at the top and another on the right side. To begin with, you’ll want to use the Batmobile’s Power Winch to move the top generator all the way to the left and the right hand generator all the way to the top. Hit both generators with a attract blast from the Remote Electrical Charge and whilst it is active, pull the top generator to the right to move the ball across to a safe area.
Next, we’ll want to pull the top generator as far as possible to the right. This time, you’ll want to shoot the right hand generator first before quickly hitting the top generator as well. This should raise the ball up and pull it through the small hole on the right to the next safe area below.
When the ball is at the lowest level of the puzzle, move the top generator so it is directly above, hit this with an attract blast from the Remote Electrical Charge and then hit the right hand generator with a repel blast to push it to the left. This will deposit the ball back at the start and allow you to grab the trophy.
Riddler Trophy 27
Map Co-ordinates: 2788, 1828
Behind a weak wall on the western side of the large bridge-like structure at the co-ordinates listed. Use Detective Mode to find the wall and then bring the Batmobile up onto the street to the south until it is in range. From here use the Batmobile to shoot the weak wall before heading over and climbing inside to find the Riddler Trophy .
Riddler Trophy 28
Map Co-ordinates: 2849, 1711
This Riddler Trophy is inside the broken down walls on the upper levels of the building with the co-ordinates specified right besides the construction scaffolding.
Riddler Trophy 29
Map Co-ordinates: 2963, 1496
Inside a small office beneath the crane just to the east of the entrance to Port Adams.
Riddler Trophy 30
Map Co-ordinates: 2990, 1360
You will find this trophy inside a modified shipping container amongst the stacks of shipping containers near the middle of Port Adams. If you land on the roof, you should be able to see through the floor and inside.
This Riddler Trophy is guarded by a large number of Armed Riddler Robots. Fortunately we won’t have to fight them. Use the Voice Synthesizer (you can select more than one) to move all of the Riddler Robots out of their initial room and below the suspended shipping crate nearby.
Once all of them are in position, use a Batarang to hit the ‘?’ light on the side of the shipping container to drop it and crush all the Riddler Robots in the process. This will allow you to safely proceed inside and grab the trophy.
Riddler Trophy 31
Map Co-ordinates: 3008, 1172
This is located on the western side of Port Adams mounted on the side of a shipping container at ground level. The numbers ‘3253, 2136’ are written nearby. These are actually co-ordinates to a pressure player located on top of the Eiffel Tower-like building by Miagani Botanical Gardens on Miagani Island. Activating this this will trigger a countdown during which the cage holding the trophy will open.
Once the cage is opened, you’ll want to immediately grapnel boost and glide your way back to the Riddler Trophy location before time runs out to grab it. Note that you’ll have to use the Batclaw to grab it so be sure you have it equipped!
Riddler Trophy 32
Map Co-ordinates: 3266, 1291
This Riddler Trophy is located inside a modified shipping container in the southern part of Port Adams.
On the outside of this container are three anchor points that we can pull with the Power Winch . Pulling each of these out will remove a small portion of wall inside, however as soon as you let go of each, they will start to close. We need to pull all three anchor points out and then run to the opposite end of the shipping container from the trophy and throw a Remote Control Batarang through the gap. Pilot it through the holes in the walls and hit the ‘?’ light at the end to be rewarded access to the trophy.
Riddler Trophy 33
Map Co-ordinates: 3289, 1476
This Riddler Trophy is placed on a small platform just above the water below one of the cranes on the eastern side of Port Adams.
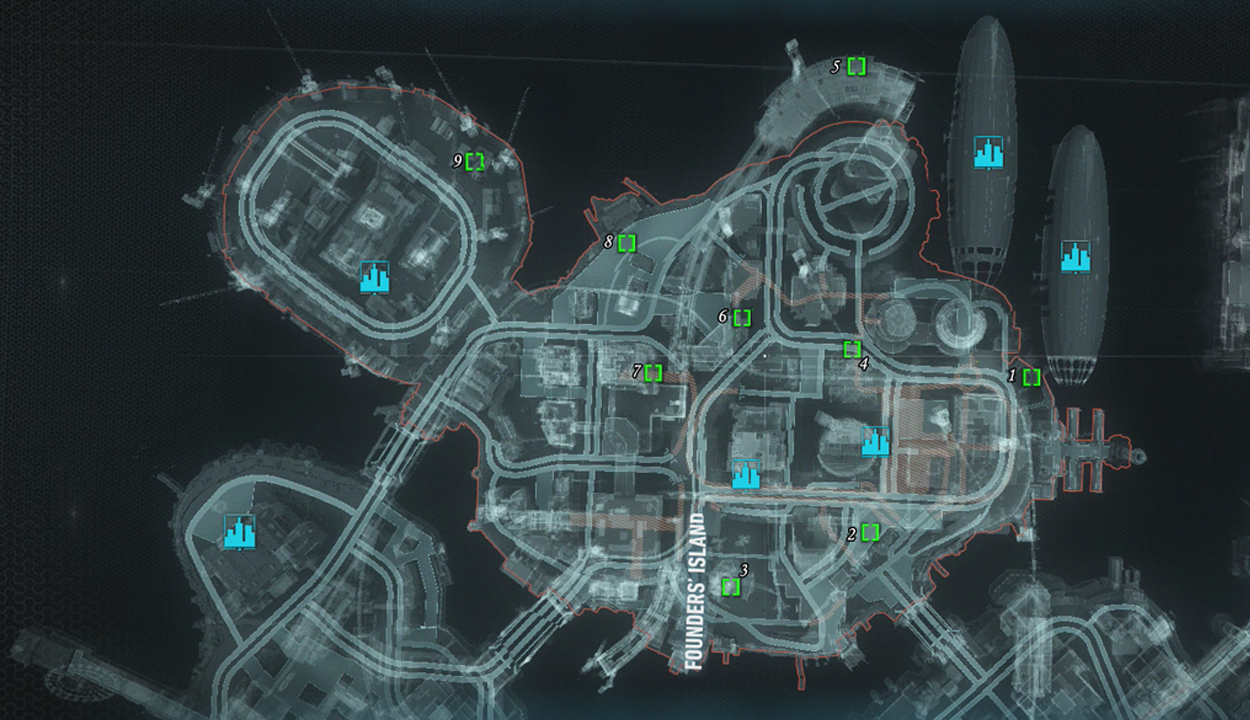
can someone change the map to the correct one
Excuse me, but the map for the Riddler Trophies is showing the Riddle locations
can someone change the map to the correct one
Excuse me, but the map for the Riddler Trophies is showing the Riddle locations