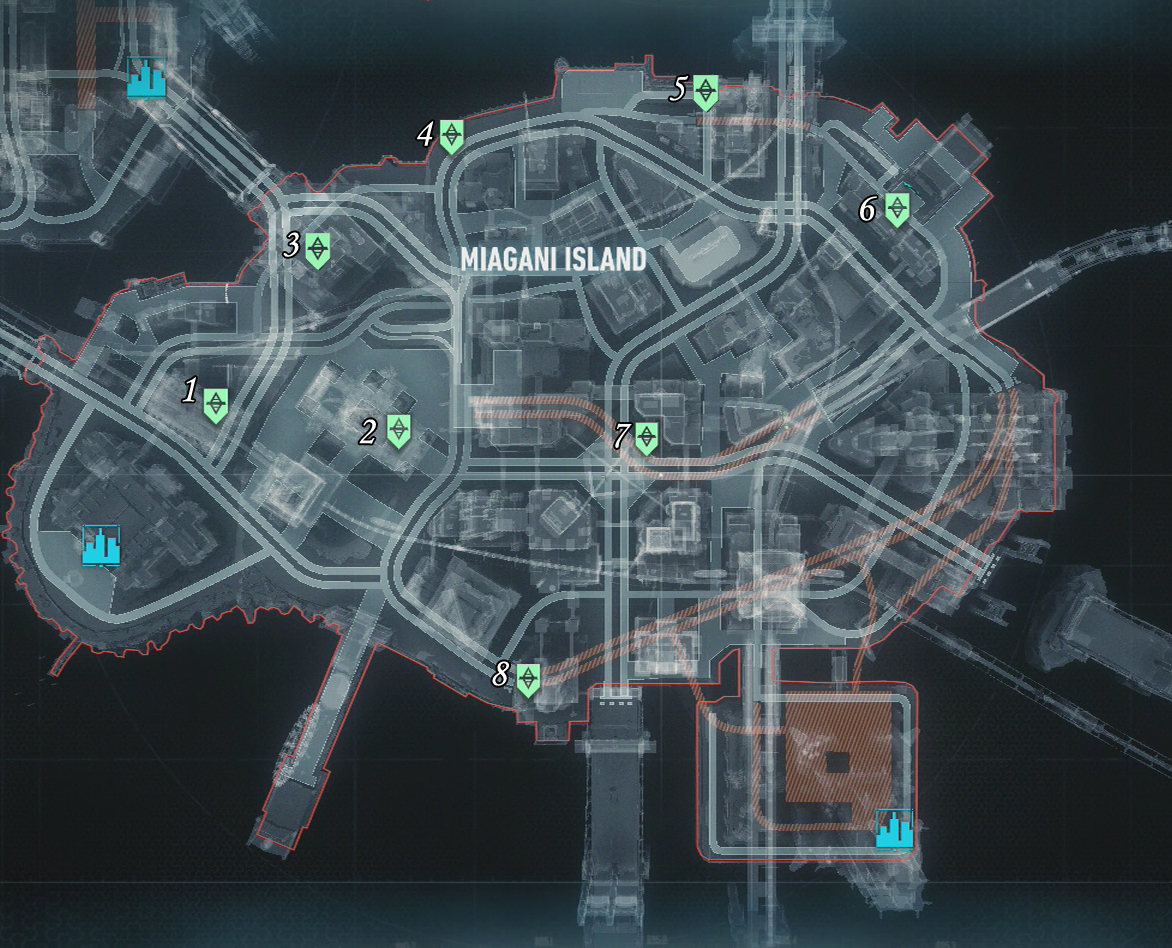
There are a total of eight militia roadblocks located on Miagani Island and they can be found in the following locations:
Roadblock 01:
Map co-ordinates: (3135, 2002)
Description: A block to the east of the end of Salvation Bridge leading to Port Adams in Founders’ Island.
This roadblock is surprisingly simple. It is constituted of an alleyway linking two streets with mines at either end and a group of eight armed Soldiers in between. We can easily use the Batmobile to target and blow up the mines and then move in and take out all the soldiers.
Once they are all knocked out, inspect the pulsating body with Detective mode active for a button prompt to destroy the communicator.
Roadblock 02:
Map co-ordinates: (3166, 2242)
Description: Beneath the Miagani Botanical Gardens building where we went with Poison Ivy a few times during the story missions.
Within this roadblock you will find a pair of Sentry Drones and eight armed Soldiers – that sounds tough for Batman to do on foot doesn’t it? Whilst it is entirely possible to clear the area with ample use of the Remote Hacking Device , Fear Multi-Takedowns and Smoke Pellets , you can fortunately use the Batmobile to drastically reduce the difficulty if you know where to approach from.
Just to the northeast of the location, you can drive up to an overpass which is pretty much directly above the tunnel that we had to infiltrate during the early part of the story. From this overpass you can look beneath the Botanical Gardens building and over the barricade to take out both Drone Sentries and as many guards as possible. When you feel it safe to do so, fly on in to mop up.
Once they are all knocked out, inspect the pulsating body with Detective mode active for a button prompt to destroy the communicator.
Roadblock 03:
Map co-ordinates: (2961, 2181)
Description: Second floor of Elliot Memorial Hospital, just at the end of Penitence Bridge leading to Founders’ island.
This roadblock looks quite daunting from its makeup of eight Soldiers (two with stun sticks, two with shields, and one with a gun) and two Brutes in a confined space and it certainly is if you go in for hand-to-hand combat. Fortunately, you can use the Batmobile if you know where to look!
There is a small ramp along the road just to the east of this roadblock’s location that we can manoeuvre up with the Batmobile to get a nice view of the location. We can shoot most of enemies in the roadblock area from this location before flying in to mop up.
Once they are all knocked out, inspect the pulsating body with Detective mode active for a button prompt to destroy the communicator.
Roadblock 04:
Map co-ordinates: (2779, 2311)
Description: Along the water just east of the Penitence Bridge leading to Founders’ Island.
This roadblock is essentially a very small enclosure guarded by a group of enemies. You guessed it, we’ll need to drop in and knock them all out! This roadblock‘s enemies include five Thugs and a Brute. If you can pull off a Fear Multi-Takedown to lead off the fight, you’ll halve the numbers (or more) immediately, making it even easier!
Once they are all knocked out, inspect the pulsating body with Detective mode active for a button prompt to destroy the communicator.
Roadblock 05:
Map co-ordinates: (2724, 2646)
Description: Just west of Mercy Bridge leading to Bleake Island.
Although there is a Detective Mode Scrambler among the enemies here, this roadblock basically consists of a medium sized group of enemies that we’ll need to subdue. The forces guarding the roadblock include seven soldiers (one with a shield) and a Brute. As would be expected, if you can perform a Fear Multi-Takedown to commence the fight and can take down 3-5 enemies straight off the bat, you’ll reduce the difficulty considerably.
Once they are all knocked out, inspect the pulsating body with Detective mode active for a button prompt to destroy the communicator.
Roadblock 06:
Map co-ordinates: (2877, 2896)
Description: Outside the Ranelagh Ferry Terminal, just southeast of Mercy Bridge.
This roadblock is extremely difficult to complete on foot and although it is possible, it is much easier to use the Batmobile to sort things out. Within the roadblock you will find a pair of Sentry Drones and five armed Soldiers. Fortunately, you can use the Batmobile if you know where to look!
Along the road just to the north of the roadblock we can manoeuvre up a set of stairs leading to a conveniently placed raise walkway which provide the Batmobile a nice view of the location over the top of the barricades. We can shoot most of enemies in the roadblock area from this location before flying in to mop up.
Once they are all knocked out, inspect the pulsating body with Detective mode active for a button prompt to destroy the communicator.
Roadblock 07:
Map co-ordinates: (3174, 2569)
Description: On Grand Central Avenue opposite the Klyce Theatre.
This is another of the small enclosure roadblocks that is guarded by a small group of enemies. This roadblock‘s inhabitants include five Soldiers and a pair of Medics. If you can pull off a Fear Multi-Takedown to lead off the fight (and tag both Medics), you’ll reduce the threat considerably. If you can’t snaffle both medics from the get go, remember to prioritise taking them out before anyone else!
Once they are all knocked out, inspect the pulsating body with Detective mode active for a button prompt to destroy the communicator.
Roadblock 08:
Map co-ordinates: (3491, 2416)
Description: Along the coast between Wayne Tower and the Ferris wheel.
This roadblock feels much more along the lines of a small predator area than the majority of the others which play out more like brawls. There are six armed Soldiers and a Boa Drone patrolling a small balcony area here.
You should use you usual predatory tactics to take them out, using a range of silent takedowns and corner takedowns. Of course you’ll probably want to wait for enemies to become isolated before taking them down to prevent detection. Luring groups of enemies into Fear Multi-Takedowns is also a good idea to get the numbers down quickly and it’s also possible to use the Remote Hacking Device to download the codes to the Boa Drone and have some fun with that.
Once they are all knocked out, inspect the pulsating body with Detective mode active for a button prompt to destroy the communicator.
No Comments