
The Timewyrm is an optional superboss that appears in the normal world, upon defeating the End of Time in the Deepest Recesses of the Past. It is located via a time rift in the northwest portion of the world, above the Tower of Lost Time. This is the strongest enemy in the Definitive Edition, without a doubt, and even harder if you have Draconian Quest options active. If you plan on fighting this boss straight up, you are going to need a lot of luck and to farm some seeds for your characters. Yep, this boss is no joke and can wipe you very quickly if you’re not fully prepared for it.

The Timewyrm will be located through this rift here

The Timewyrm might look a bit familiar
A good barometer for where you want to be, should you be doing this without the strategy below, is to only farm for Seeds of Defence, Seeds of Life, and Seeds and Strength. There is absolutely no reason to farm for Seeds of Sorcery, since most of the big damage dealing attacks are physical in nature. Also, Seeds of Deftness and Pretty Betsys are low returns (only a single point for each one). Having max MP with both Serena and Veronica can be a good thing, too. For physical attackers, farming enough Strength to where they have 999 Attack is ideal, plus every participant should have around 500 or so defense. Lastly, all characters that are going to be in the battle should have 999 HP. You will need this, especially because you will be using buffs.
Easier Strategy
If you want to use a better method that won’t take hours upon hours of farming, then there is one. It involves a Pep Power called Yggdragon’s Blessing, which requires only the Hero and three other party members (doesn’t matter who). You will be abusing this Pep Power, so you’re going to need a bunch of Pep Pops in your inventory. You can purchase these in Cobblestone after fixing the place, but they cost 200,000G a piece, so you are going to need a lot of money. If you need tips on how to get money, go to the How To Farm Money page. You will also want to get a bunch of Elfin Elixirs, since you will be doing most of your damage with Veronica’s Magic Burst.
You can get Elfin Elixirs for 10,000 Tokens each at the Octagonia Casino. If you’ve managed to get Veronica’s MP to 999, then Magic Burst will do almost 3,000 damage to the boss. Basically, you just multiply whatever Veronica’s MP is by three to get the damage you will do with the spell. The boss has two parts and each part has 20,000 HP each, so you will know how many Elfin Elixirs you need for the battle. In fact, the majority of your characters’ inventory will contain Pep Pops (you should split like 20 amongst them) and Elfin Elixirs. This strategy does work, but you might get bad luck in the turn order sometimes, where things go awry.
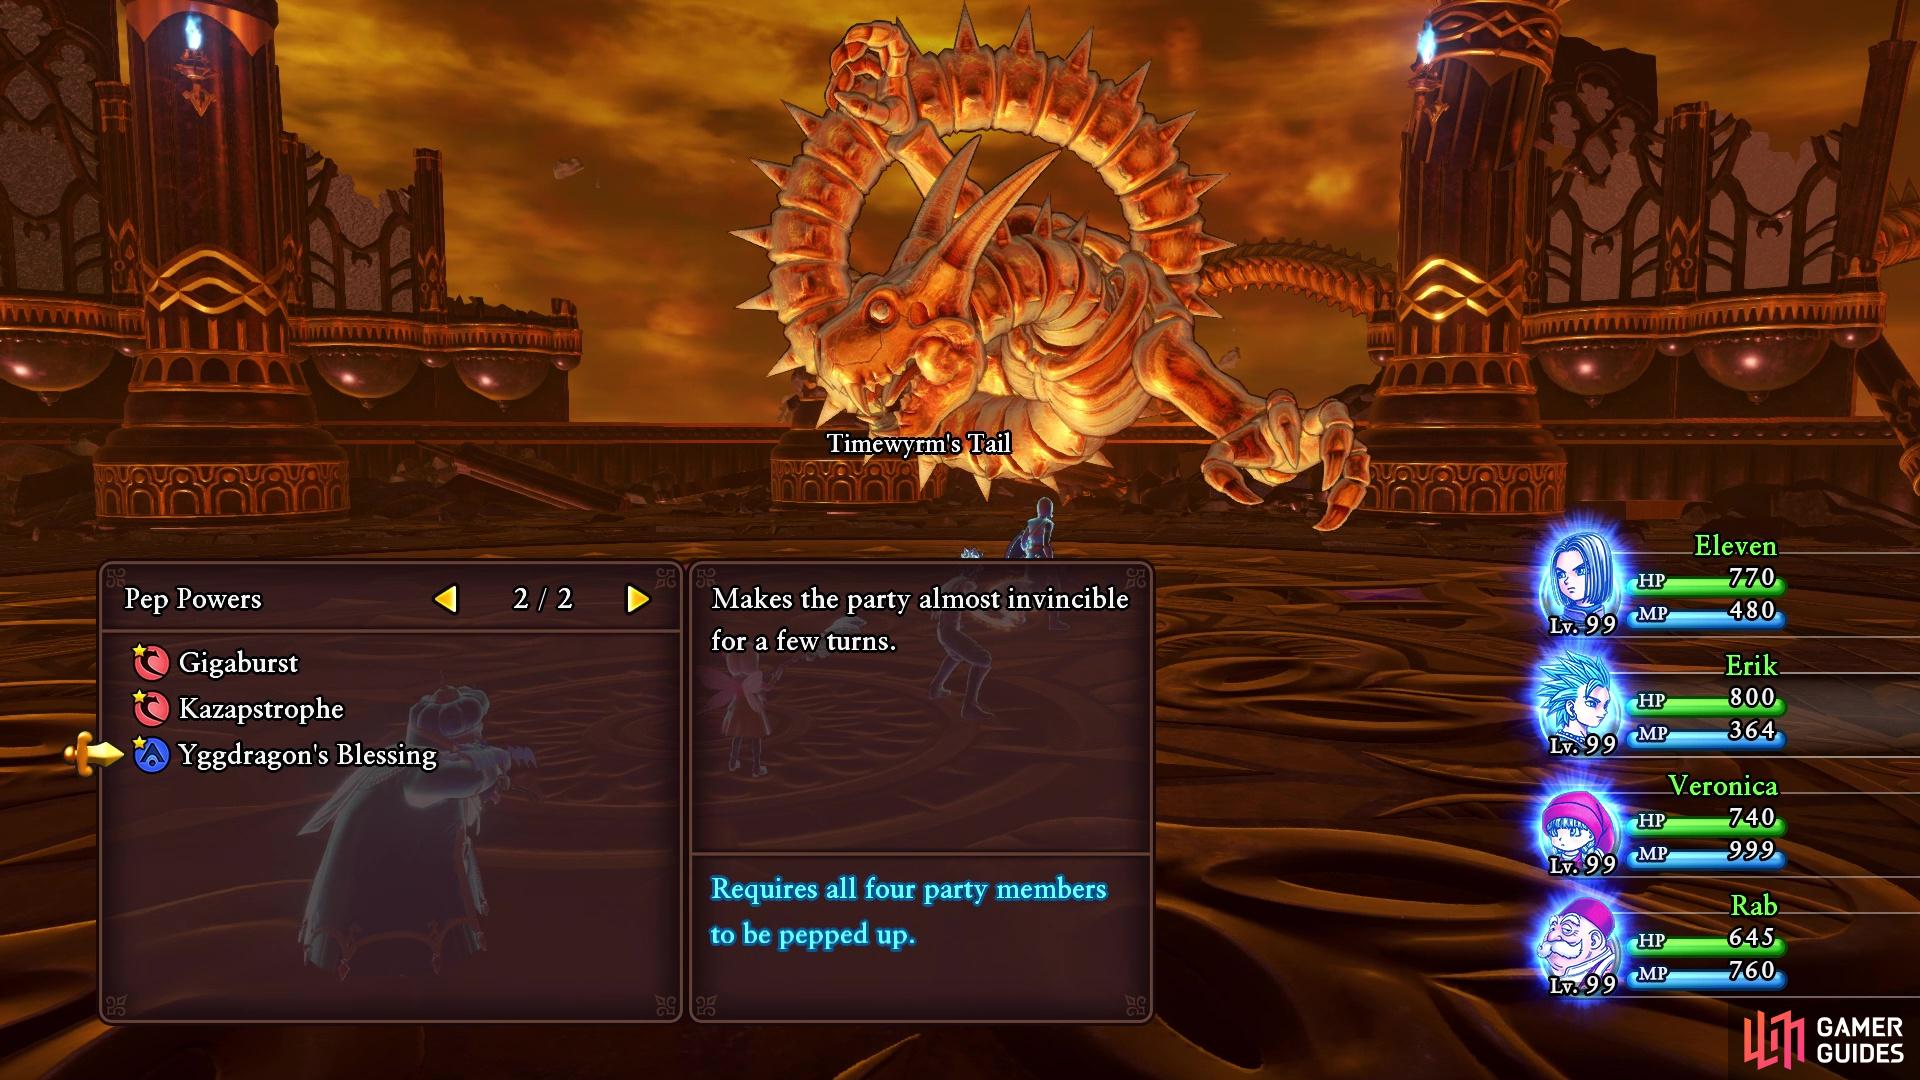
Yggdragon’s Blessing is the Pep Power you will want for the easier strategy

as it makes your characters invulnerable to damage while it’s active
A suggested party for this battle would be Hero (needed for the Pep Power), Erik (to do some extra damage), Veronica (Magic Burst) and Rab. The reason you want to include Rab is because he’s able to strip buffs away from enemies, which includes the pepped up state. This will become important later in the battle, even if you do have the invincibility from the Pep Power active. Before starting the battle, you will want your four main characters to be pepped up before it. Simply get into any battle with an enemy that doesn’t run away, then defend until your characters are pepped up. Once a character is pepped up, switch them out for someone else to preserve it.
BOSS - Timewyrm and Timewyrm’s Tail
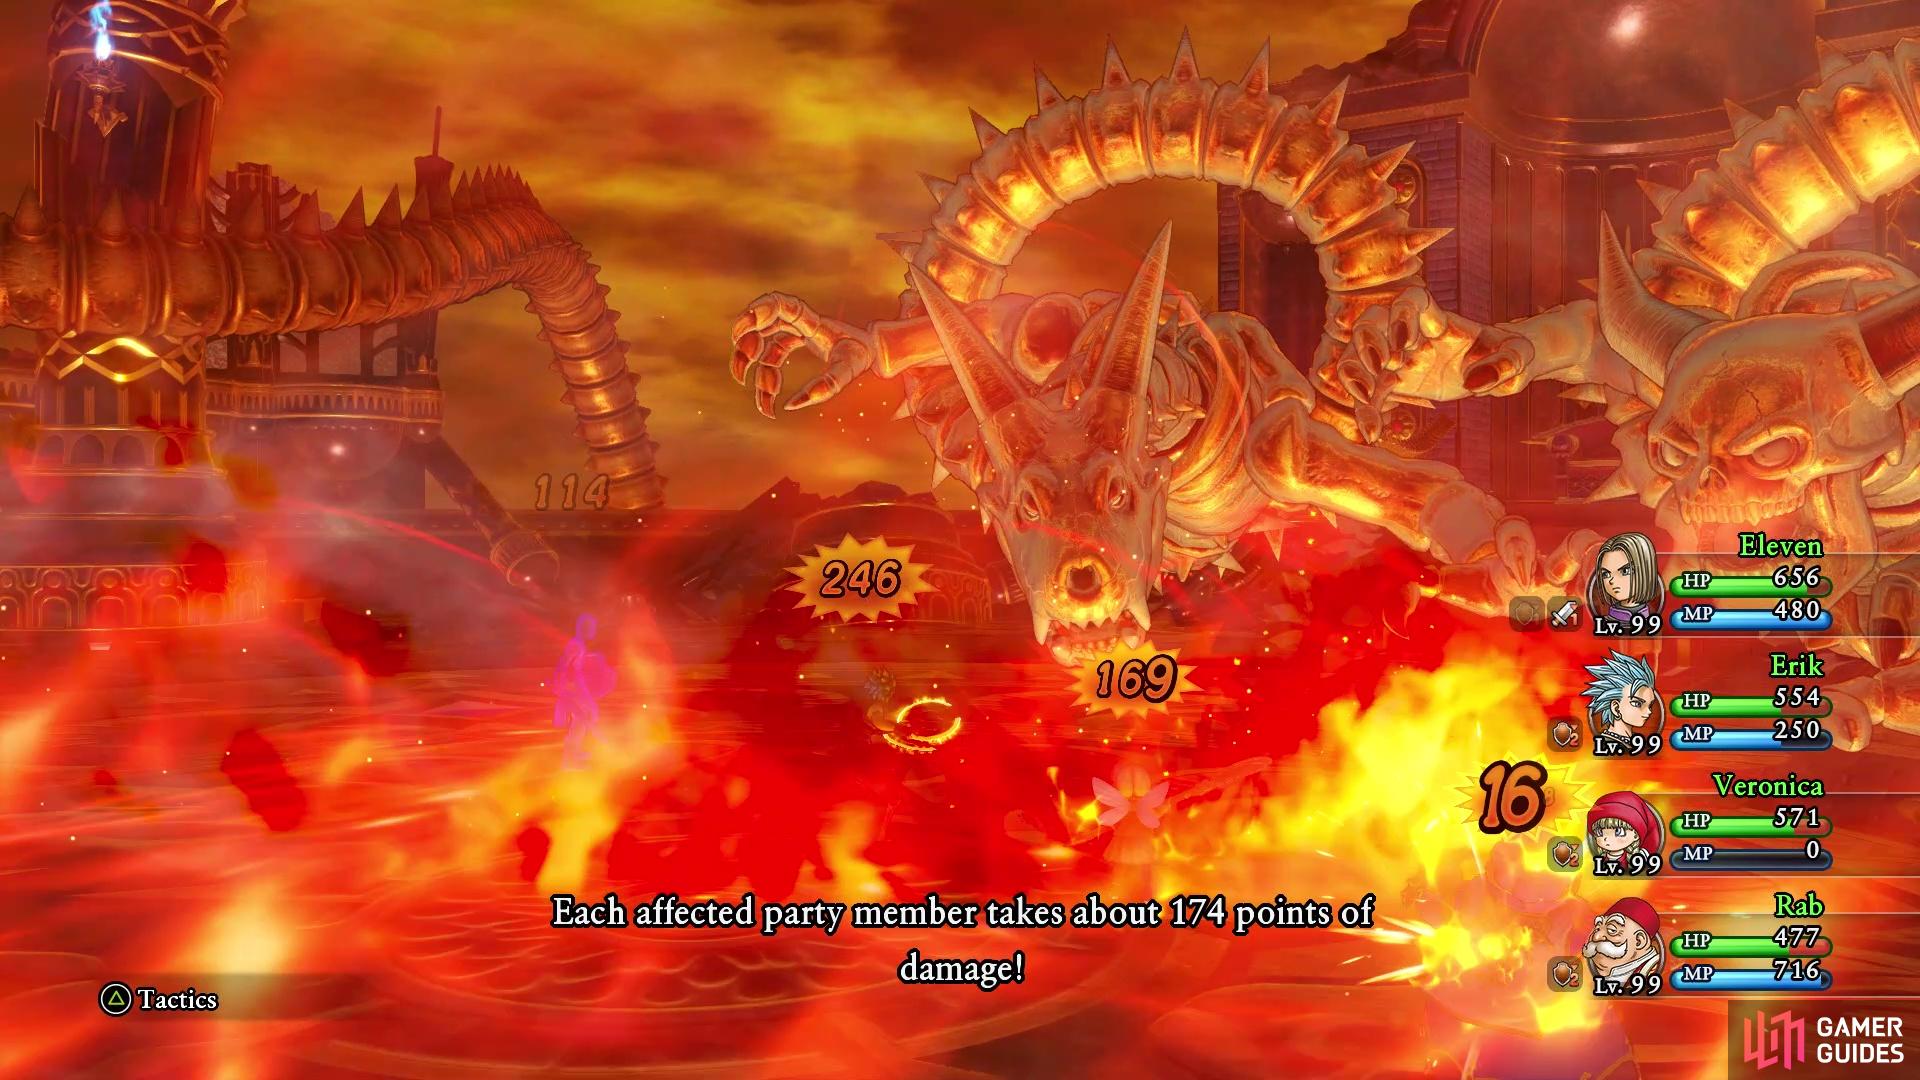
So, whenever you’re ready, call Cetacea and fly to the giant rift that’s over the Tower of Lost Time. As soon as you agree to join the battle, then you will be thrown right into it. Timewyrm is pretty much the same, in terms of structure, to Mordragon at the end of the middle part of the game. When the battle begins, the Timewyrm will sit in the background, while Timewyrm’s Tail will come to the front, where you can damage it. Of course, Timewyrm will still do things in the background, like cast spells to damage you or buff up the Tail with Oomphle. The two will change positions once you’ve done enough damage to the Tail, then once you’ve done enough to the main body, both the Tail and body will be together in the front. Anytime they switch, the current active boss will use disruptive wave to remove all buffs.
As already mentioned, the Tail will start out the battle in the front, with Timewyrm in the background. You cannot attack Timewyrm here, but only the Tail, but Timewyrm can attack you. It can use Oomphle on the Tail, as well as cast some spells on the party, like Kacrackle. Meanwhile, you will need to worry about the Tail, as it has a bunch of damaging abilities. There is a fire breath attack, as well as an lightning breath one, too. The lightning one seems to inflict a lot more damage than the fire one, although that one also does a lot of damage. This is most likely because the best equipment usually has some nice of protection for fire, or just elemental in nature.
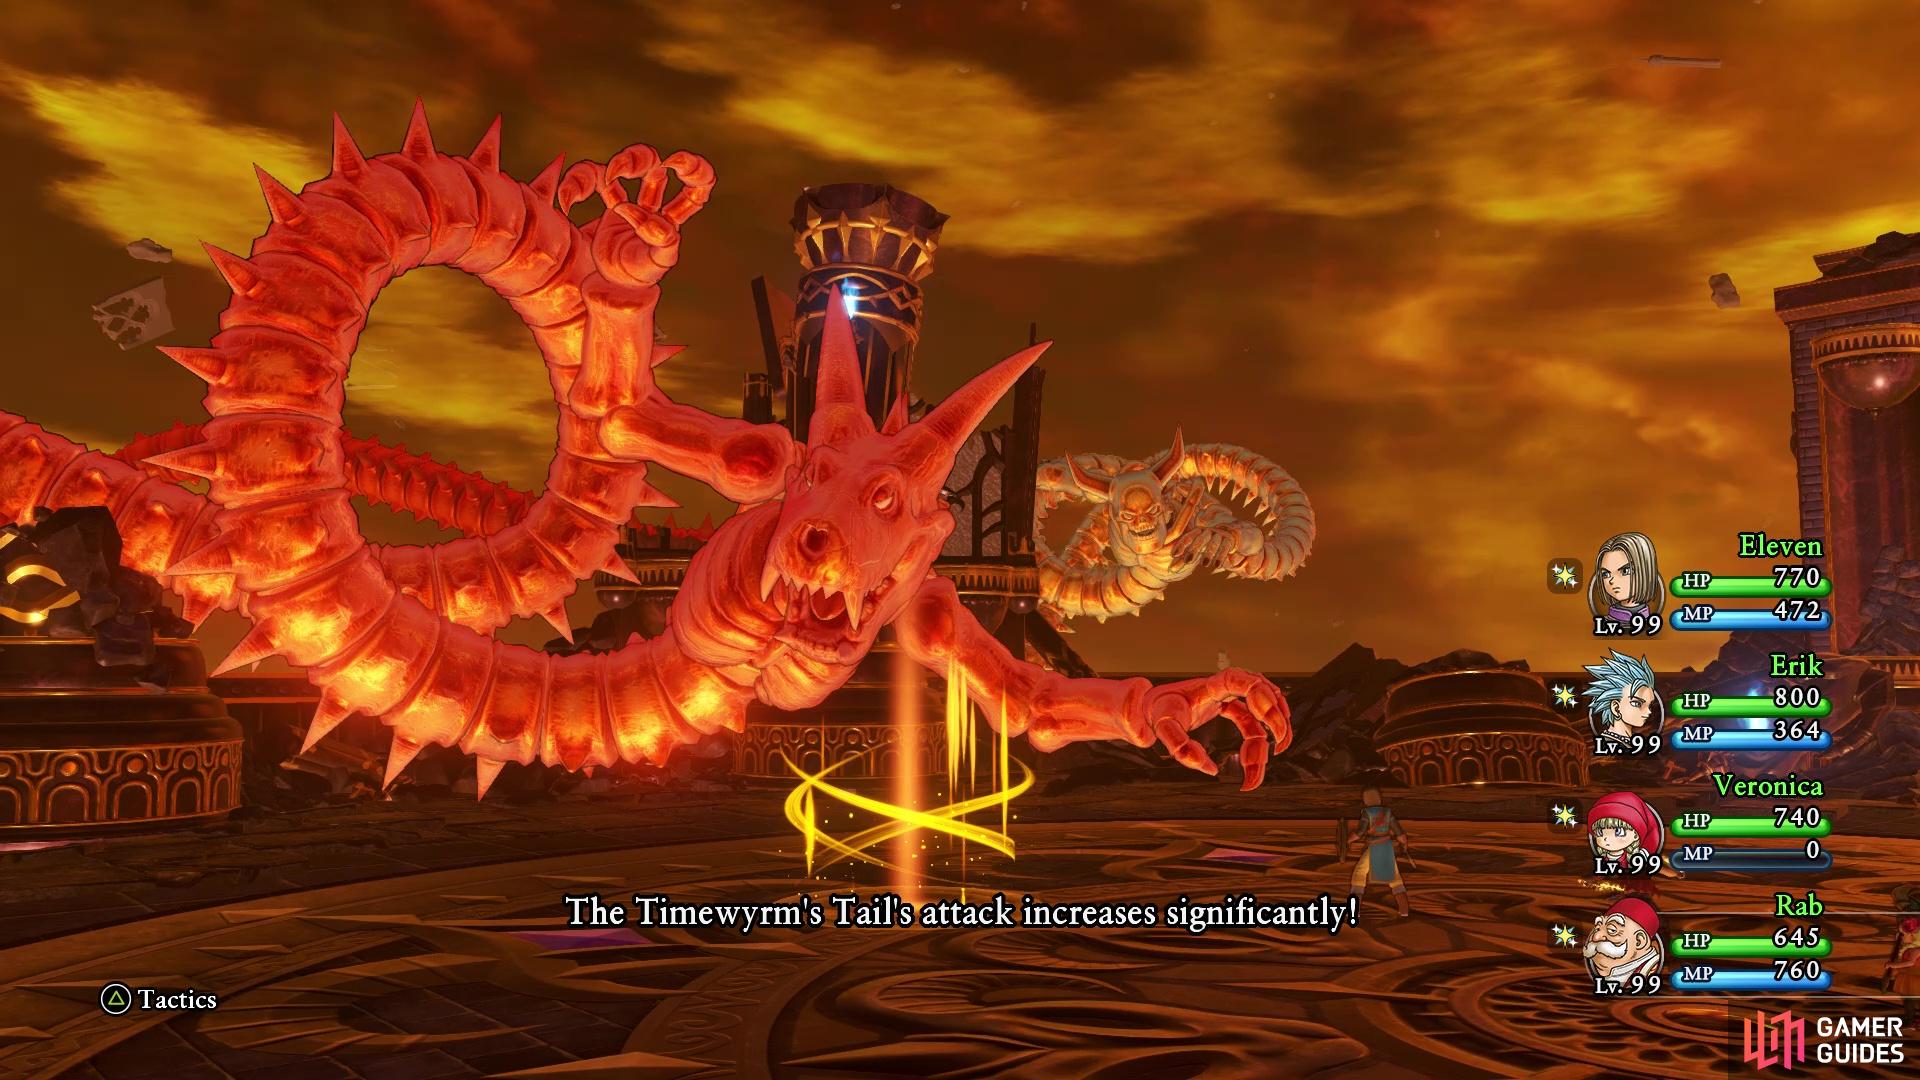
The part in the back will do things in the battle, too, like buff the other part

or attack your party with spells
Outside of the breath attacks, the Tail has plenty more in its arsenal, like smacking the ground with its fists. It does this around 5-6 times and hits randomly on your party, but should it have Oomphle, then this attack has the possibility to wipe out your party. You might see another version of this, where the Tail will target a single character, with it possibly dealing upwards of 500+ damage with Oomphle. This is especially even more true if the Tail casts Kasap, since it can do that. You will also see a Sweet Breath, where the Tail tries to put everyone to sleep, but the Catholicon Rings will be doing their work there.
There is also Kasizzle and Kafrizzle, as well as Kafuddle, but like with the Sweet Breath, you will be protected from confusion. Lastly, whenever the Tail’s eyes gleam strangely, your characters’ Magical Mending and spell resistance will be lowered. You might also see a chance for the Tail to use disruptive wave to wipe your buffs (it’s not clear if it can do this outside of the last phase). There’s really a lot here, especially with the main Timewyrm in the background adding to the problem. Once you do deal enough damage, though, the Tail will force the disruptive wave on your party and go into the background, with the main Timewyrm body coming into the battle.
The main Timewyrm body is not a pushover, either, especially since you have the Tail in the back pegging you with its spells. One of the first things Timewyrm will likely do is envelop the area in a magical mist that makes all abilities use twice the MP. If you’re using Magic Burst, then this essentially cuts its damage in half. Timewyrm can also do desperate attacks, which hurt a lot. Calling forth bolts from the blue is a lightning attack that hits the entire party for major damage, and Kacrackle hits everyone for ice damage. You will also see Kazammle, dealing dark damage to a single character, as well as an ice breath attack and even Kaboomle. Lastly, Timewyrm has a war cry that can damage the entire party for huge damage.
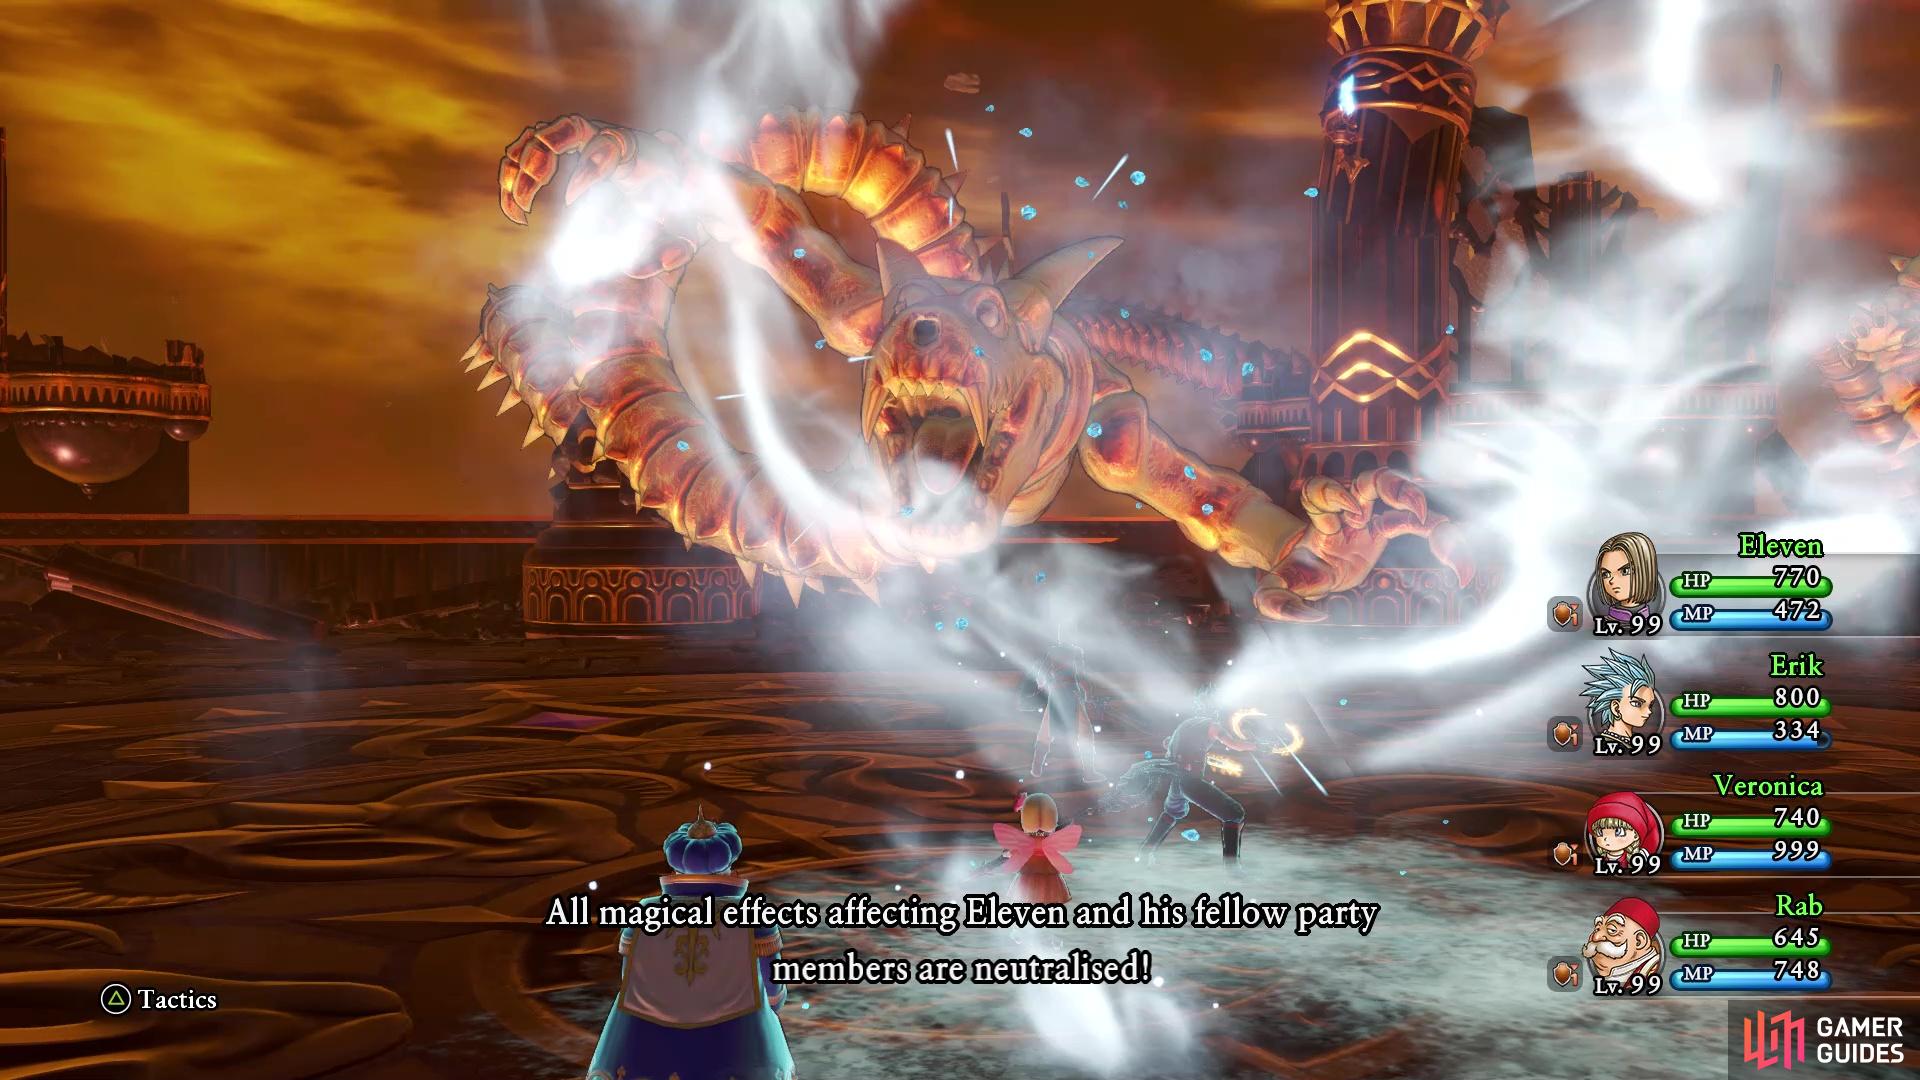
(1 of 3) Each phase switch will always have the part using disruptive wave to dispel buffs
Both of them can waste a turn by “guffawing graciously,” which is something you always want to see in a tough battle like this. Once you deal enough damage to Timewyrm, the true battle will begin, as both Timewyrm and the Tail will be in the front now. They don’t have any new moves here, save for when they’re both pepped up, but each one should be getting two actions per turn (sometimes they don’t, for some odd reason). If you do see them get pepped up and aren’t using Rab, it might be a good idea to switch him in and have him dispel it with either Rake ‘n’ Break or Clear Your Mind.
Doing this will get rid of any normal buffs they may have, but most importantly, it removes their pepped up state. Should you not do this, then you may see one of two different Pep Powers. Malicious Magic Burst will do heavy damage to the entire party, so if you’re not topped off with 999 HP, then it might wipe the party. The other Pep Power is called Blackest Mark, which will inflict damage on each character’s turn. This damage is dark-elemental, but the thought of removing the Catholicon Rings is too great. During this final phase, the Tail can chew up some party members, removing them from the battle for a few turns. When it spits them out, they can be afflicted with some ailments.
Strategy
So, that’s pretty much the entire fight, which can be scary because of the high damage being thrown your way. If you’re not fighting it with Yggdragon’s Blessing, then you want to use buffs (Kabuff, Magic Barrier, Insulatle) to make survivability greater, reapplying them during each phase. Having both the Hero and Serena here is invaluable, since both have Omniheal. The Hero should be using Sword Dance, while either Jade using Multifeet or Erik using Double Down, depending on who you brought along. You could fill the other characters’ inventories with Elfin Elixirs and Yggdrasil Leaves/Dews for healing/reviving.
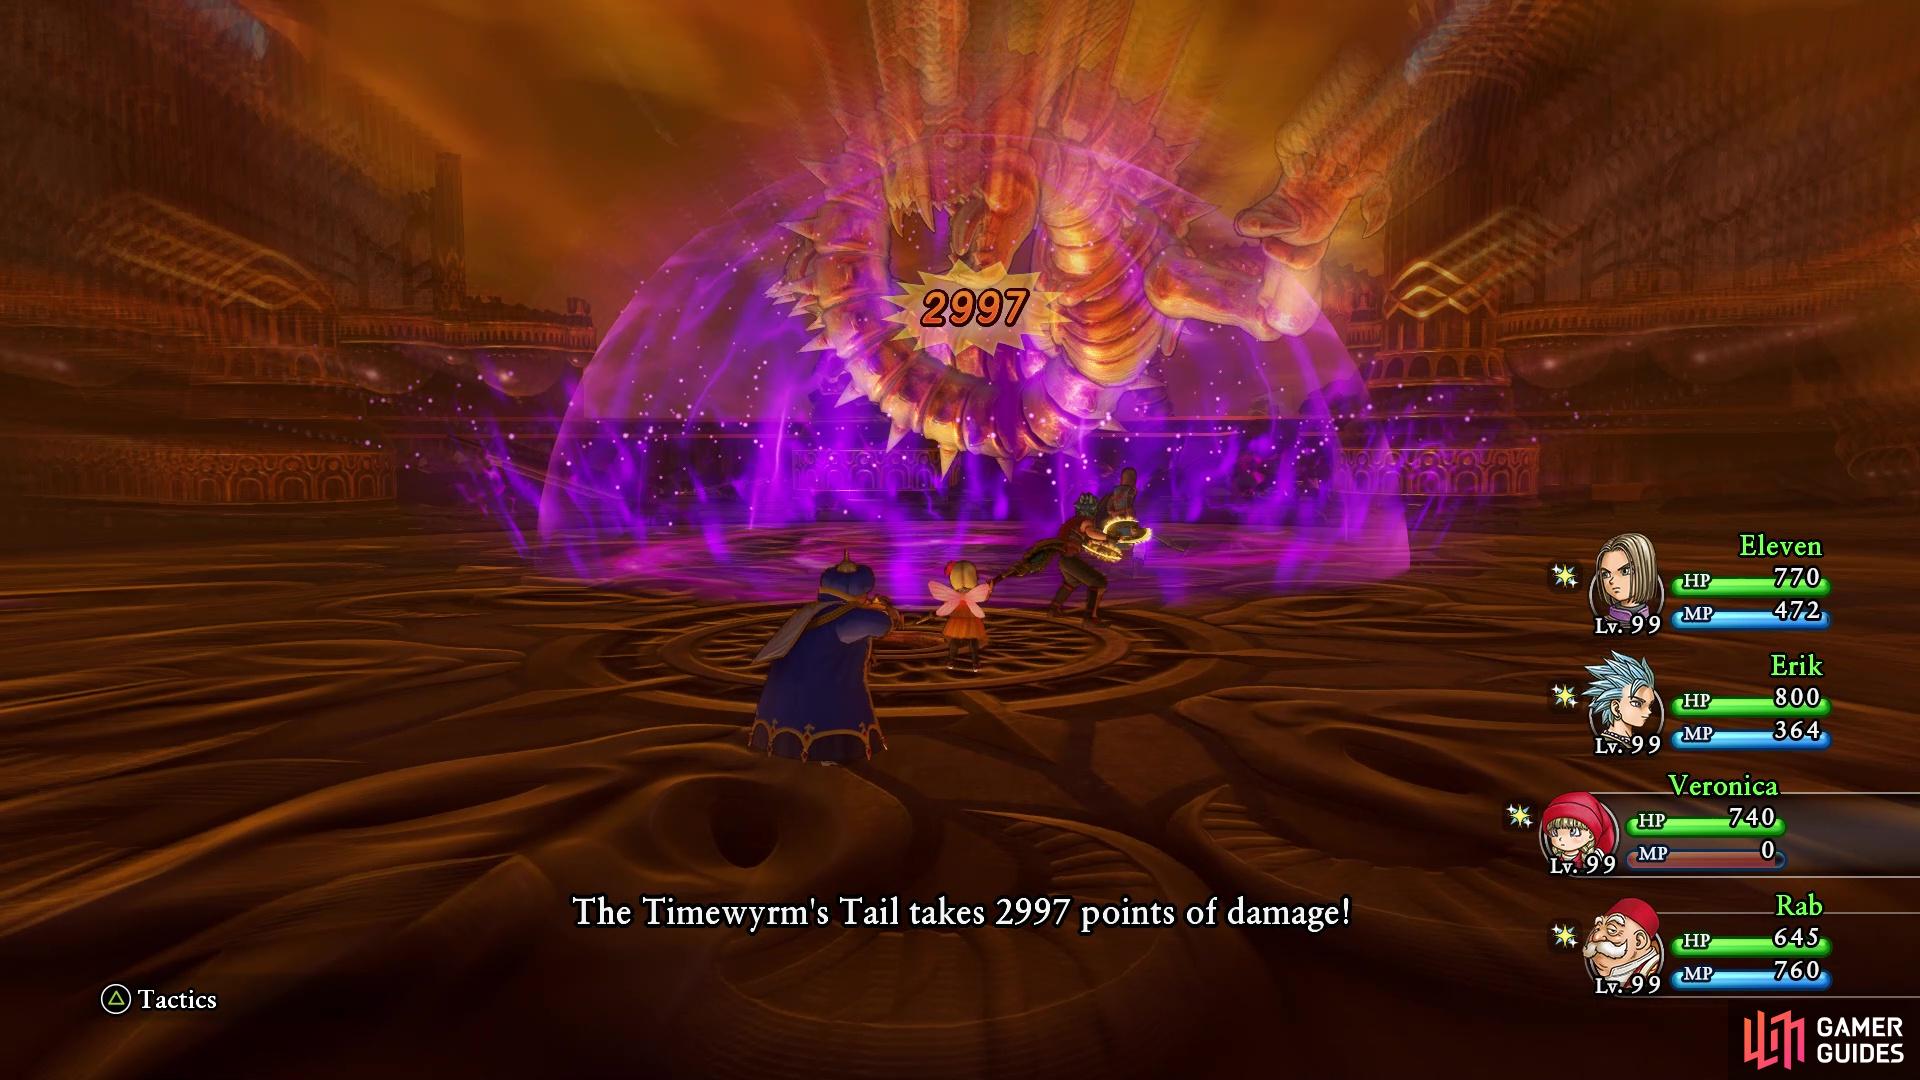
Magic Burst will be your best bet for damage in this battle
Sometimes you will get a bad roll on turn order even when using Yggdragon’s Blessing
If you’re using Yggdragon’s Blessing, then things are going to be a little different. Everyone should be pepped before the battle begins, so your first action should be to use the Pep Power to make everyone invulnerable. This buff only lasts 2-3 turns, so when you see the icon flashing, you will want to toss a Pep Pop to get ready for another casting. Should you wish to fight normally after that, then you go to the above for the damage dealing options. Of course, Veronica should be using Magic Burst, especially if you didn’t farm Seeds of Strength, as that will be your best offensive option. Feed her Elfin Elixirs to keep using it, keeping in mind that the MP cost-increasing thing the main Timewyrm does will cut the damage in half.
You should be able to persevere if you have enough Pep Pops and Elfin Elixirs, using the second method. Your reward for winning the bout is two items, the Hare-Raising Suit for Jade and the Sands of Lost Time. The armor will make Jade invincible, as any time her HP is reduced to zero, she will be automatically revived. If you’ve obtain all of the other costumes in the game, then this will be the final one, popping the Dedicated Follower of Fashion trophy/achievement in the Definitive Edition. The other item, the Sands of Lost Time, will enable you to refight the Timewyrm again. The only reason for doing so is because there’s two additional Accolades, one for defeating it under 70 turns and another for defeating it in under 50 turns.
No Comments