
1) The OTHER Flooded Metro
This is a pretty uneventful metro. Make your way south, looting and killing whatever Ghouls you find until you reach a door leading to the Arlington National Cemetery. There’s a bear trap by the door, but not really anything else you should be aware of. Now that was easy, eh? South of Arlington National Cemetery North you’ll find the entrance to Arlington Utility, a place we’ll explore later.
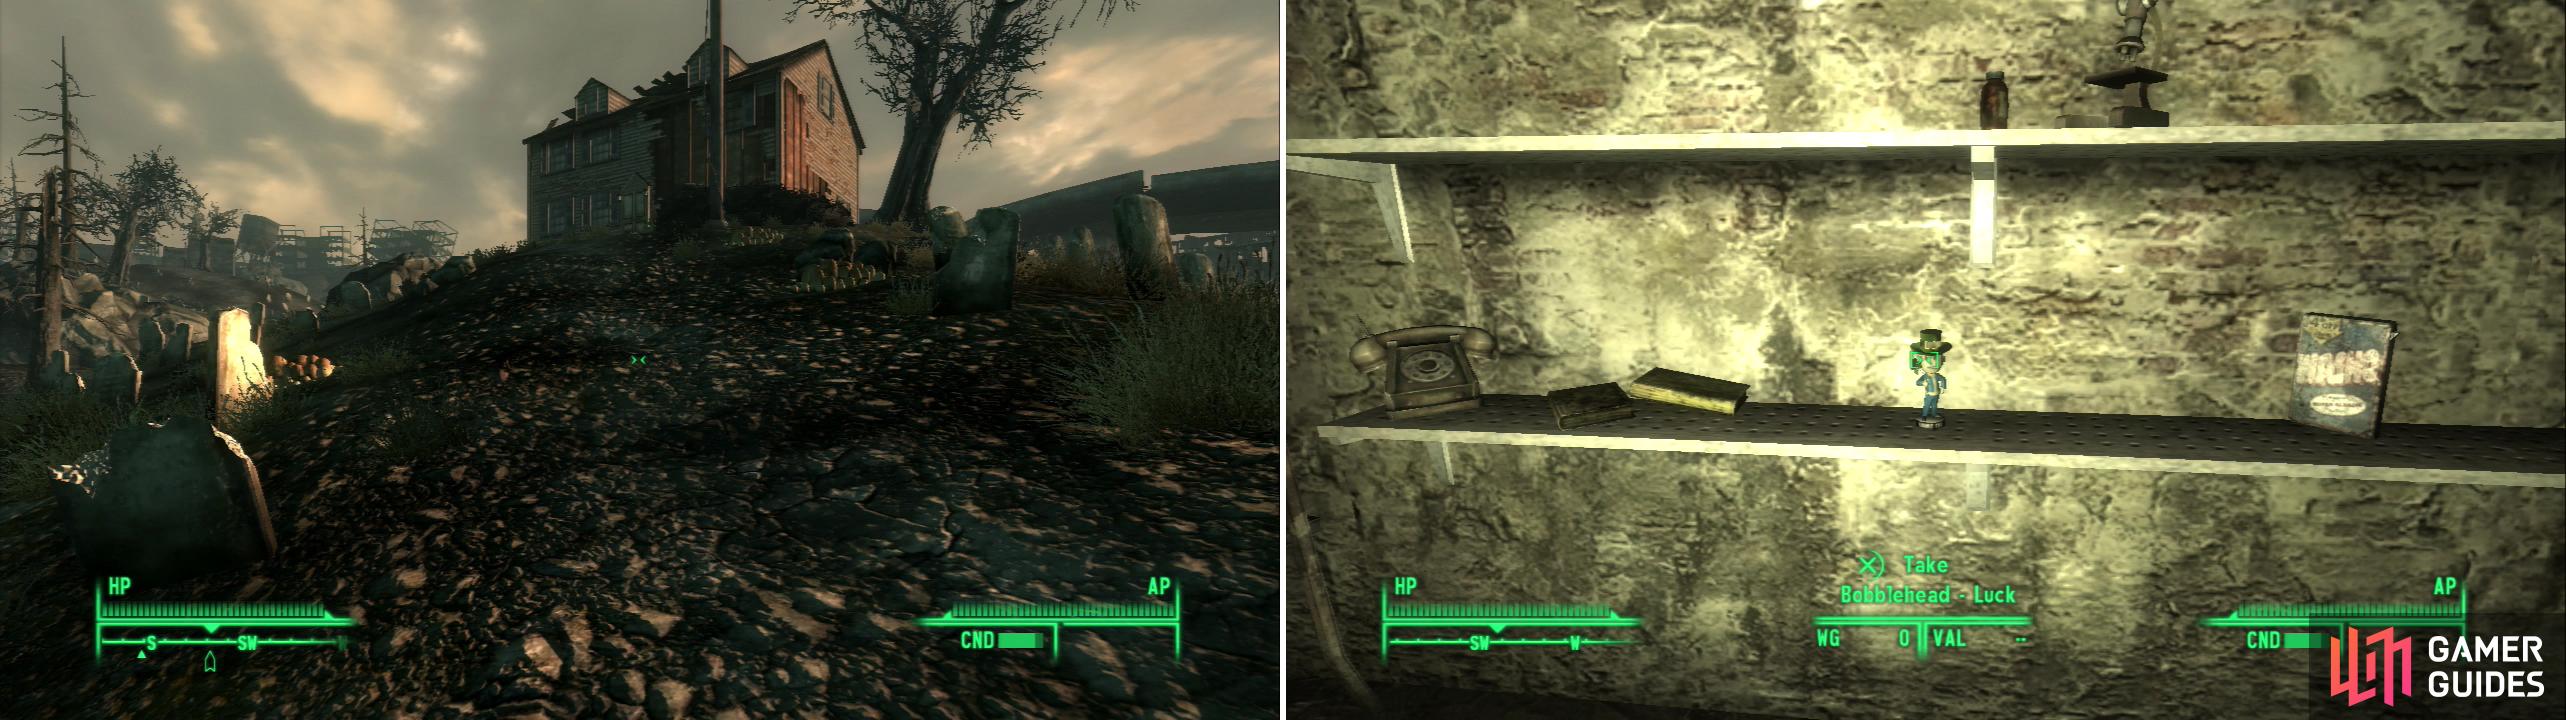
The Arlington House stands tall in the cemetery (left), inside you’ll find the Bobblehead - Luck (right).
2) Arlington House
Bobblehead - Luck
Book - Big Book of Science
Head west, go up some stairs, and kill some Raiders, then follow the road south past a fountain. When the road splits head south-west to find the Arlington House. By the bathroom door is a locked cabinet [Very Easy], and in the kitchen you can find a Big Book of Science on a table in the corner. Upstairs there’s a safe [Easy] behind a dresser, and in the basement you’ll find a locked safe [Very Easy], a locked first aid box [Very Easy], the Bobblehead - Luck on a shelf, and a creepy shrine to Lincoln.
We are now quite done with our Bobblehead hunt, and if you want to continue on to the next part of the guide, feel free to do so. Otherwise, we will now cover the rest of Arlington Library, and the “return” trip out of Arlington, which will cover the Falls Church and Mason District areas… you know, for the sake of completionism.
3) Outside Mama Dolce’s
Book - Tales of a Junktown Jerky Vendor
Head south-east to find Mama Dolce’s, a place where we will find a good bit of loot. North of Mama Dolce’s is a blue truck with plenty of food in the back, and north of that is an overturned truck bed. There are numerous radioactive barrels around, but none of them will give you any rads. In the truck bed is the body of a Wastelander, and near them you will find a copy of Tales of a Junktown Jerky Vendor . Now to explore Mama Dolce’s. You can enter either the Food Distribution area or the Processed Foods area, it doesn’t really matter which you do first, but this guide will cover the Food Distribution area first.
4) Mama Dolce’s Food Distribution
Loot the room you enter into, including the personal footlocker [Very Easy] and the ammo boxes to the west. You should find a Turret Control System terminal [Average] on a table, along with a Stealth Boy. Deal with the turret as you please and head down the stairs into the larger room to the south.
5) Chinese Remnants
You’ll likely encounter some Chinese Remnant Soldiers… who are really just well-armed Ghouls. Maybe they don’t know the war is over? Dispatch them how you wish and head through the noodle-laden room, through a smaller room, and into another large room. Go up the stairs in the southern end of the room to reach the upper levels where you’ll find a Chinese Remnant Captain, who possesses the “Mama Dolce’s Encryption Key”.
6) Treasures in the Deep
Book - Tumblers Today
If you go west you’ll come to a door leading to the Mama Dolce’s Loading Yard area… of which there are several in this area. You’ll also find some stairs down. If you explore the lower levels you’ll eventually discover a room with a large hole in the floor leading down into a cavern. Explore the tunnel a short ways to find two locked safes [Hard] and [Average], and a copy of Tumblers Today near a skeleton.
7) The Captain’s Room
If you go east from where you found the Chinese Remnant Captain you’ll find a room with plenty of loot, including two wall safes [Easy] and [Average], and a Nuka-Cola Quantum and Pre-War Book on the desk. Continue through the door to the north along the ramparts to find another room, with another exit to Mama Dolce’s Loading Yard. You’ll also find a Rolling Pin on the table.
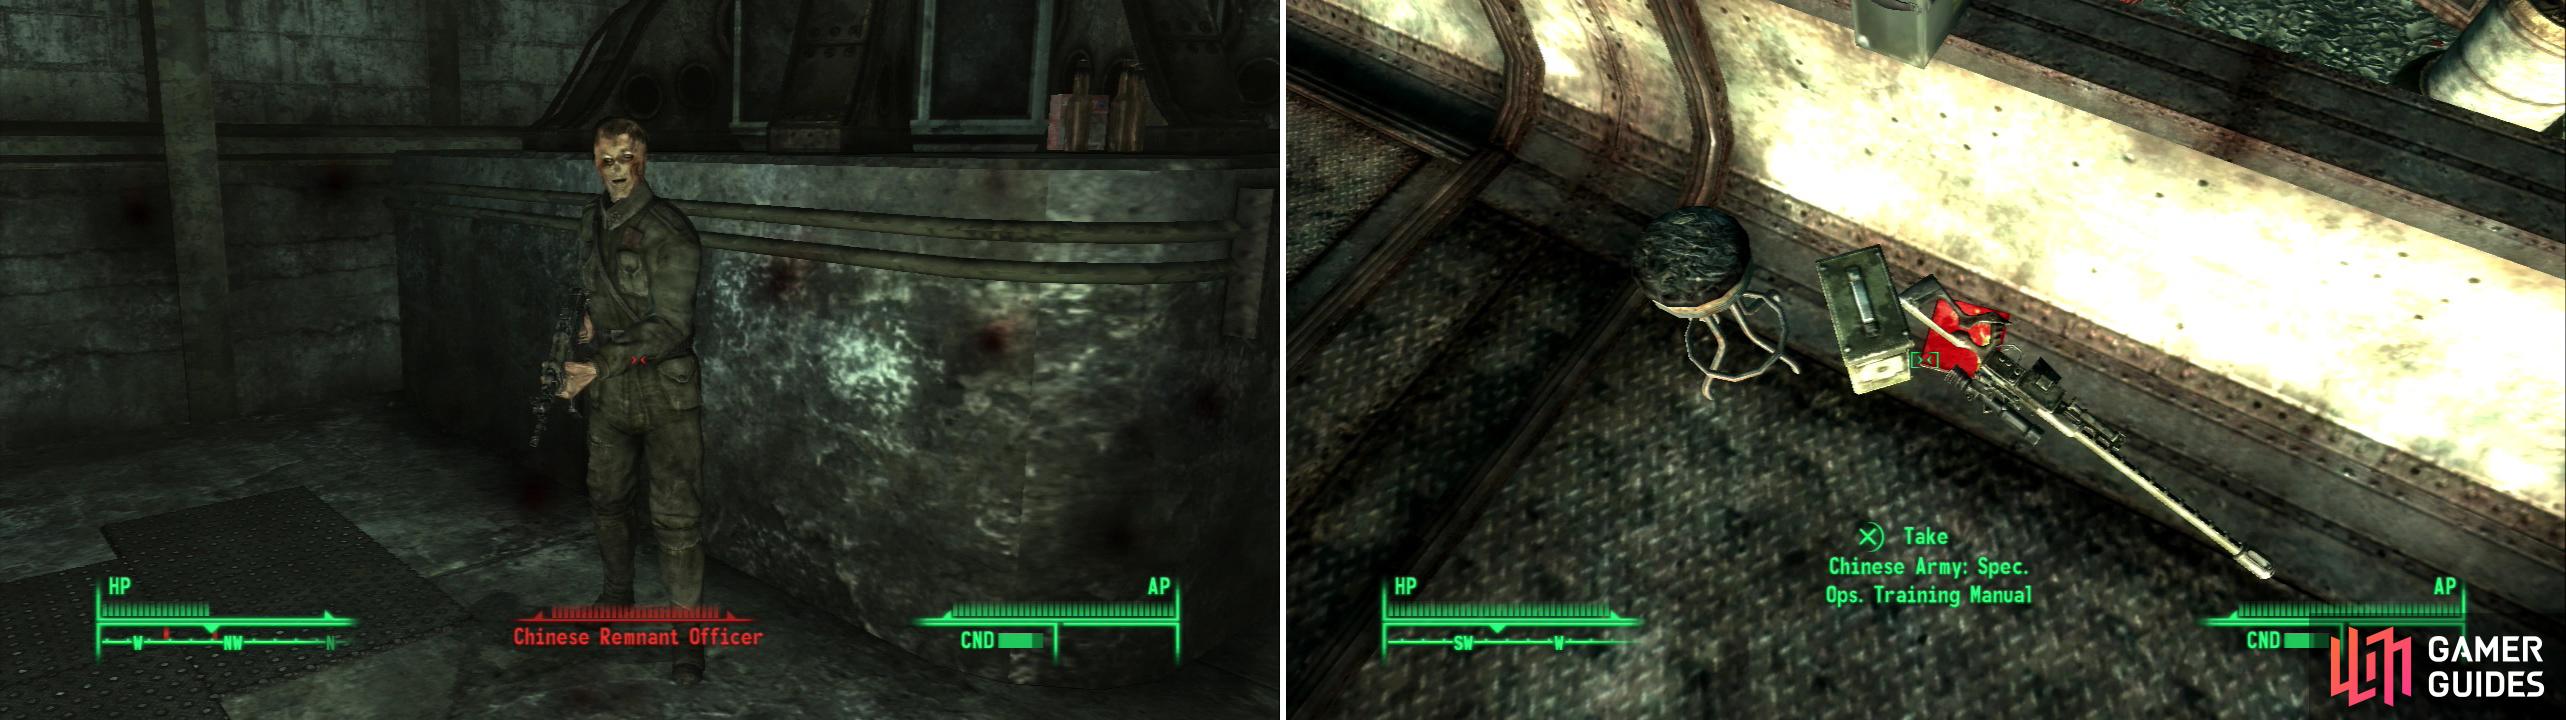
Mama Dolce’s is still occupied by the Chinese Remnants who used the place as a front during the great war (left). On the balcony over-looking the Loading Yard you can find a sniper’s kit, including a Chinese Spec. Ops. Training Manual (right).
8) Mama Dolce’s Loading Yard
Book - Chinese Army: Spec. Ops. Training Manual
Book - Guns and Bullets
This area consists of two balconies connecting Mama Dolce’s Processed Foods to Mama Dolce’s Food Distribution, and a central loading area crawling with Chinese Remnants. On the eastern balcony (the side we’re on) you’ll find a Chinese Army: Spec. Ops. Training Manual on the ground near a stool, and on the western balcony is a copy of Guns and Bullets . There are also bad guys on the balconies, so it might be a good idea to stealth-kill the guards up here, then sneak around to the other side to kill those guards. Once everybody up top is dead you can liberally pick off the people on the ground.
9) Mama Dolce’s Processed Foods
In this room you’ll find a Pre-War Book on the table. Head through a door to the north and go down some stairs into a large room. To the north through some double doors you’ll find a room with some decent loot inside, including a Stealth Boy on a table near the doors as well as the exit back out into the Arlington National Cemetery. To the south you’ll find a door leading back to Food Distribution.
10) Finishing Up Mama Dolce’s
Book - Dean’s Electronics
Book - Guns and Bullets
Go up some stairs in the south east corner of the rooom and you’ll find a four-way hallway beyond a door to the Loading Yard. To the west you’ll find the woman’s bathroom, wherein you can discover a copy of Guns and Bullets on the floor near the toilet in the stall. To the north is an uninteresting room over some water, and to the south lie some stairs. On the first landing you’ll find a metal shelf with a copy of Dean’s Electronics on it. Continue up the stairs to eventually reach a door leading to the Loading Yard, where you can complete this area. Kill the sniper, and with the captured Sniper Rifle kill the people on the ground. Grab the Guns and Bullets , loot the ground floord of the Loading Yard, and head back out into Arlington National Cemetery.
11) Arlington/Falls Church Metro
Book - U.S. Army: 30 Handy Flamethrower Recipes
From Mama Dolce’s head west until you find the Arlington/Falls Church Metro (marked on the map at “Arlington Cemetery South”), the next stop in our journey to explore Arlington. Once iinside head west, then south into the metro station, where you’ll notice the bed of a truck to the south-west. Jump on in there to find a copy of U .S. Army: 30 Handy Flamethrower Recipes on a chair. Continue to the south to find the gate leading to the Falls Church area.
12) Falls Church North
Head up some stairs to discover Falls Church North. This place iis heavily occupied by Super Mutants, especially the building across the street to the south. Still, nothing a little sneak-attack shotgunning can’t fix with wondrously lethal anonymity. East of Falls Church North you’ll find Falls Church East, which seems to mark the location of L.O.B. Enterprises rather than a metro.
13) L.O.B. Enterprises
Book - Pugilism Illustrated
In the front office you’ll find a L.O.B. Enterprises Front Desk Terminal, which is amusing if nothing else. To the south are some fairly uninteresting bathrooms, and up the stairs to the west are some fairly uninteresting offices. So let’s head north. Work your way to the east after going through the door to the north and you’ll eventually come to a room full of metal shelves, on one of which is a copy of Pugilism Illustrated .
14) Glowing Goodness
Loot your way to the west until you come to a room with more metal shelves. You’ll have passed some stairs down to L.O.B. Enterprises Archives, but in the rooms to the west you’ll find another exit. Head into the room west of the room with the metal shelves to find a Nuka-Cola Quantum glowing in plain sight on a table. Go down the stairs, then through a gas-filled room to find another door to the Archives.
15) L.O.B. Enterprises Archives
Book - Chinese Army: Spec. Ops. Training Manual
Head north into another gas-filled room, then go down some stairs. This area is heavily guarded by leveled robots, most likely Sentry Bots by this point. You can expect to encounter around a half-dozen of them on this level. Getting close to them so they’re less likely to fire missiles is a good idea, and if you can thin the herd by putting a few of them down with Robotics Expert … even better.
Once at the bottom of the stairs go through a door to the east. Dispatch any Sentry Bots that may be lurking around, then head north from the door, then west when you can. There are a lot of empty metal shelves to the east, but as you walk west down a hallway you’ll pass several lootable filing cabinets, as well as a grenade box, and a mine box [Average], near which is a lootable cabinet [Very Easy]. When you can’t go west any further, turn south and go through a pair of doorways to reach a small cafeteria, within which you’ll find the typical food items and a locked safe [Average]. Continue to the east past two bathrooms (within the toilet of one you’ll find five Cherry Bombs) to reach a maintenence room with numerous components on metal shelves, including a Stealth Boy. There are also two first aid boxes in here, one of them locked [Very Easy].
Now backtrack out of the maintenence room, through the cafeteria, and into the large room with the cabinets and grenade/mine boxes. Keep going east past the empty metal shelves to find an eastern room. Make your way to the north-western corner of the room where you’ll find an office. On a desk near a computer you’ll be able to score a Chinese Army: Spec. Ops. Training Manual . Now head back up to L.O.B. Enterprises via the same route you entered this level and head upstairs to reach L.O.B. Enterprises East Wing, the door to which can be found up some stairs, in the south-western corner of the L.O.B. Enterprises level.
16) L.O.B. Enterprises East Wing
Head north and check out the “Security Operations Terminal” to the right, where you can see more of L.O.B.‘s activities and-more importantly-grab a Stealth Boy from a desk near a non-operational terminal. You can continue north into a larger room with an collapsed ceiling for some minor loot, and through another door to reach some stairs leading to the upper level, but we’ll get there soon enough.
17) R&D Operations Terminal
Instead head around a corner and to the west. Explore the rooms to the north and south to find a way past the rubble-blocked hallway… along with a bit of loot. At the end of the hallway you’ll find a door to the south leading to some stairs. Ascend them and follow the hallway above to the east and you’ll find an office to the north, containing, among other things, two Pre-War Books and the “R&D Operations Terminal” [Very Hard]. The terminal talks about some incendiary weapon L.O.B. was creating. Before you get all excited, however, keep in mind that the production prototype used 10mm Rounds, which means it can’t be very powerful.
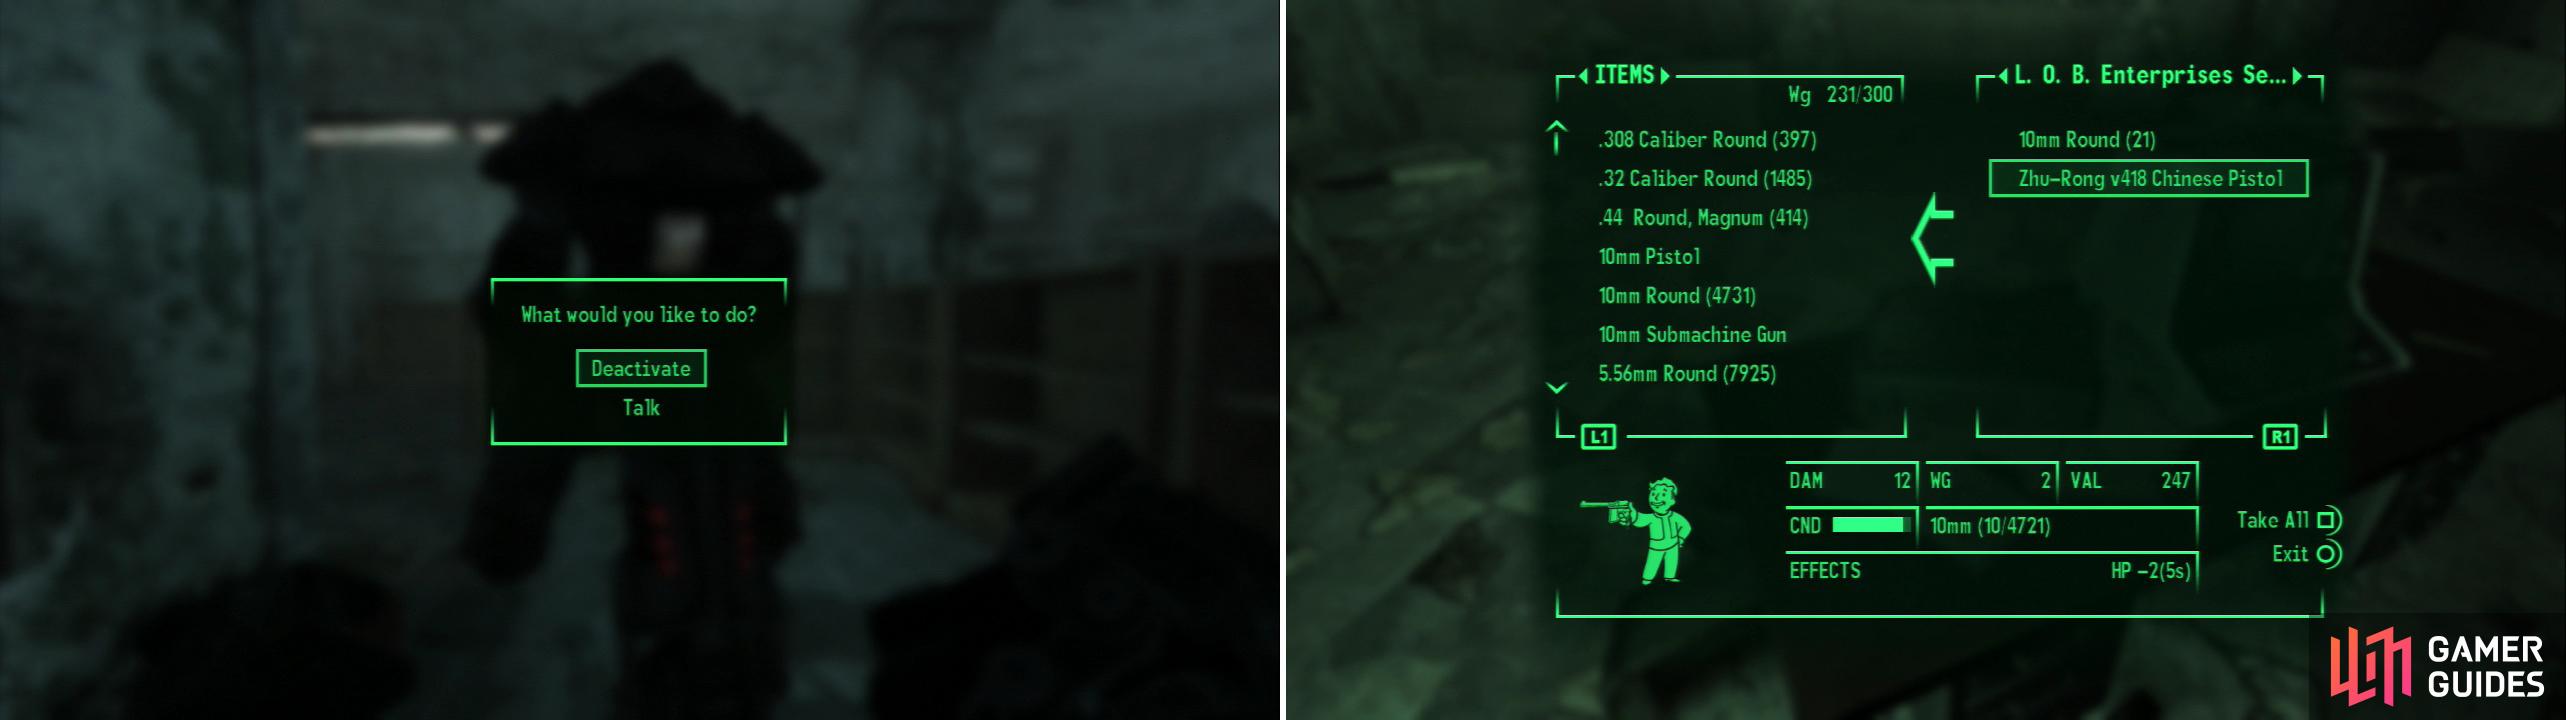
With a high Sneak score and the Robotics Expert perk, dealing with the robots here will be no problem (left). Your prize for scouring the L.O.B. Enterprises building is the Zhu-Rong v418 Chinese Pistol (right).
18) Zhu-Rong v418 Chinese Pistol
Book - Tumblers Today
Head back into the hallway and go east some more. To the south is a locked door [Very Hard], and to the north is another office. Go through the office and to the east to reach the upper level of the room with the destroyed ceiling. Creep along the ledge to the east and go through a doorway to find yourself at the far end of the rubble that blocked the hallway we were just in. Ahead of you is a much less locked door leading to more offices. Explore the first one, then head to the west to find the CEO’s office, which contains a fair amount of loot including a cabinet [Easy], a first aid box [Average], a copy of Tumblers Today , and the L.O.B. Enterprises Secure-Case [Hard], inside the latter of which you’ll find the Zhu-Rong v418 Chinese Pistol . In the desk you’ll find the L.O.B. Enterprises CEO Key, which will unlock that pesky [Very Hard] door for you.
19) Office Building
Once you’re done with L.O.B. Enterprises head west through the Super Mutant occupied building until you reach a playground on the other side. South of this playground is an office building for your exploring pleasure. Go east up some stairs and explore the bathroom, disarming the trip wire at the door at taking the rigged shotgun in the garbage can. Go south into an office room to find two dead Super Mutants and two dead Brother of Steel Initiates. No telling which side won in the end, but neither will need their loot anymore. Continue on until you find some stairs leading down to an exit back to Fall Church.
20) Paladin Hoss’ Request
Head west until you find Falls Church Metro, where you’ll find that there’s a heated fire-fight between two Brotherhood of Steel characters and a significant number of Super Mutants. This late in the game you really have to baby sit the Paladins, as they seem mindlessly incapable of surviving even against Super Mutants with Hunting Rifles. After the Super Mutants are dead talk to Paladin Hoss, who will tell you that they were attacked during an exercise and were cut off from one of their initiates. Offer to help and head south to the building where the initiate fled to. Chances are you had to clear these Super Mutants out already, as fighting near the Paladins tends to draw more Super Mutants into the fray.
21) Saving Initiate Pek
Book - Tumblers Today
Mutants, Mutants every where. And unlike the ones outsides, these will level all the way up to Overlord… or at least one of them might. Head through the door to the west then go through another door to the north to find a room with a few Super Mutants inside. Make sure to kill them decisively, but sylishly for bonus points. The term “room” should be used loosely here, as this was several rooms at one point, but through time and perhaps some Super Mutant remodeling many walls are now gone. In the southern-most “room” you’ll find a desk with a copy of Tumblers Today on it, and a safe [Easy] underneath it.
Continue north until you find Initiate Pek in a room by himself, unarmed. If you have a high enough Small Guns skill you can make a check to repair his weapon, giving him the ability to tickle any Super Mutants he might encounter with his 10mm Pistol. Go return the inept Initiate to Paladin Hoss, who will now accompany you throughout the Falls Church Area.
22) Falls Church/Mason Dst. Metro
Book - D.C. Journal of Internal Medicine
Book - Duck and Cover!
Now head into the Falls Church/Mason Dst Metro, which is east of the Merigold Station. In here you’ll be attacked by a number of Raiders. Kill them and head east to find the metro station, where a formidible seeming Raider fort stands. On the top level, however, you’ll notice the place has been overrun by Ghouls, likely stemming from the Franklin Metro Utilty in the east. In a ticket booth you can find a missile, a first aid box, and a copy of Duck and Cover! In a diner you’ll find a Pre-War Book on a table and a Stealth Boy on the back of an oven. If you head back to the lower level and continue to the east you’ll find the exit to the Franklin Metro Utility [Easy], which can also be opened by a terminal [Easy]. This area can be explored by the brave and the greedy, and so we shall First, however, explore the upper level, heading north to find some bathrooms. Inside of one of them you’ll find a D.C. Journal of Internal Medicine resting on top of a first aid box [Very Easy] on the wall. If you continue on you’ll find the exit to the Mason District… but we’re going to explore Franklin Metro Utility, first.
23) Franklin Metro Utility
This place is absolutely wretched at a high levels, since it’s crawling with leveled Ghouls. There’s a good bit of loot in this place, but you have to decide if you’re up to killing that many Reavers and catching a decidedly unhealthy amount of rads. In the very first room you’ll find a haul of components by the computers and in the lockers, including two Stealth Boys. On another metal shelf to the east you’ll find two Pre-War Books. Just east of the table lined with broken computers you’ll find a wall safe [Hard]. Search the upper area and kill your first Ghouls. You’ll probably get enough loot that you’ll want to head back and stash it!
24) The Turret Path
Book - Tumblers Today
There are two ways out of this room, to the east you’ll find some stairs leading to a small room with a deactivated turret in it. This route can be a little dangerous, as there are many Ghouls milling outside the door by the turret, although you can hack the turret [Hard] and get it to fire on the Ghouls, it’s just as likely to shoot at you, given its location. In the fenced-off area in the turret room you’ll find a stash of loot, including a copy of Tumblers Today on an mine box [Average]. There’s also a metal shelf nearby with some goodies on it.
25) Ghouls Galore
Book - Guns and Bullets
The other way down is to the north, where you’ll find some stairs leading down. Either way, both routes lead you to a large room with a fenced-off central area. Kill the Ghouls surrounding the fence (for me this was a mix of Feral Ghoul Reavers and Glowing Ones) and loot the north and south ends of the room before exploring the fenced-in area. On a table in the middle of the room you’ll find a Combat Shotgun, a Stealth Boy, and a copy of Guns and Bullets.
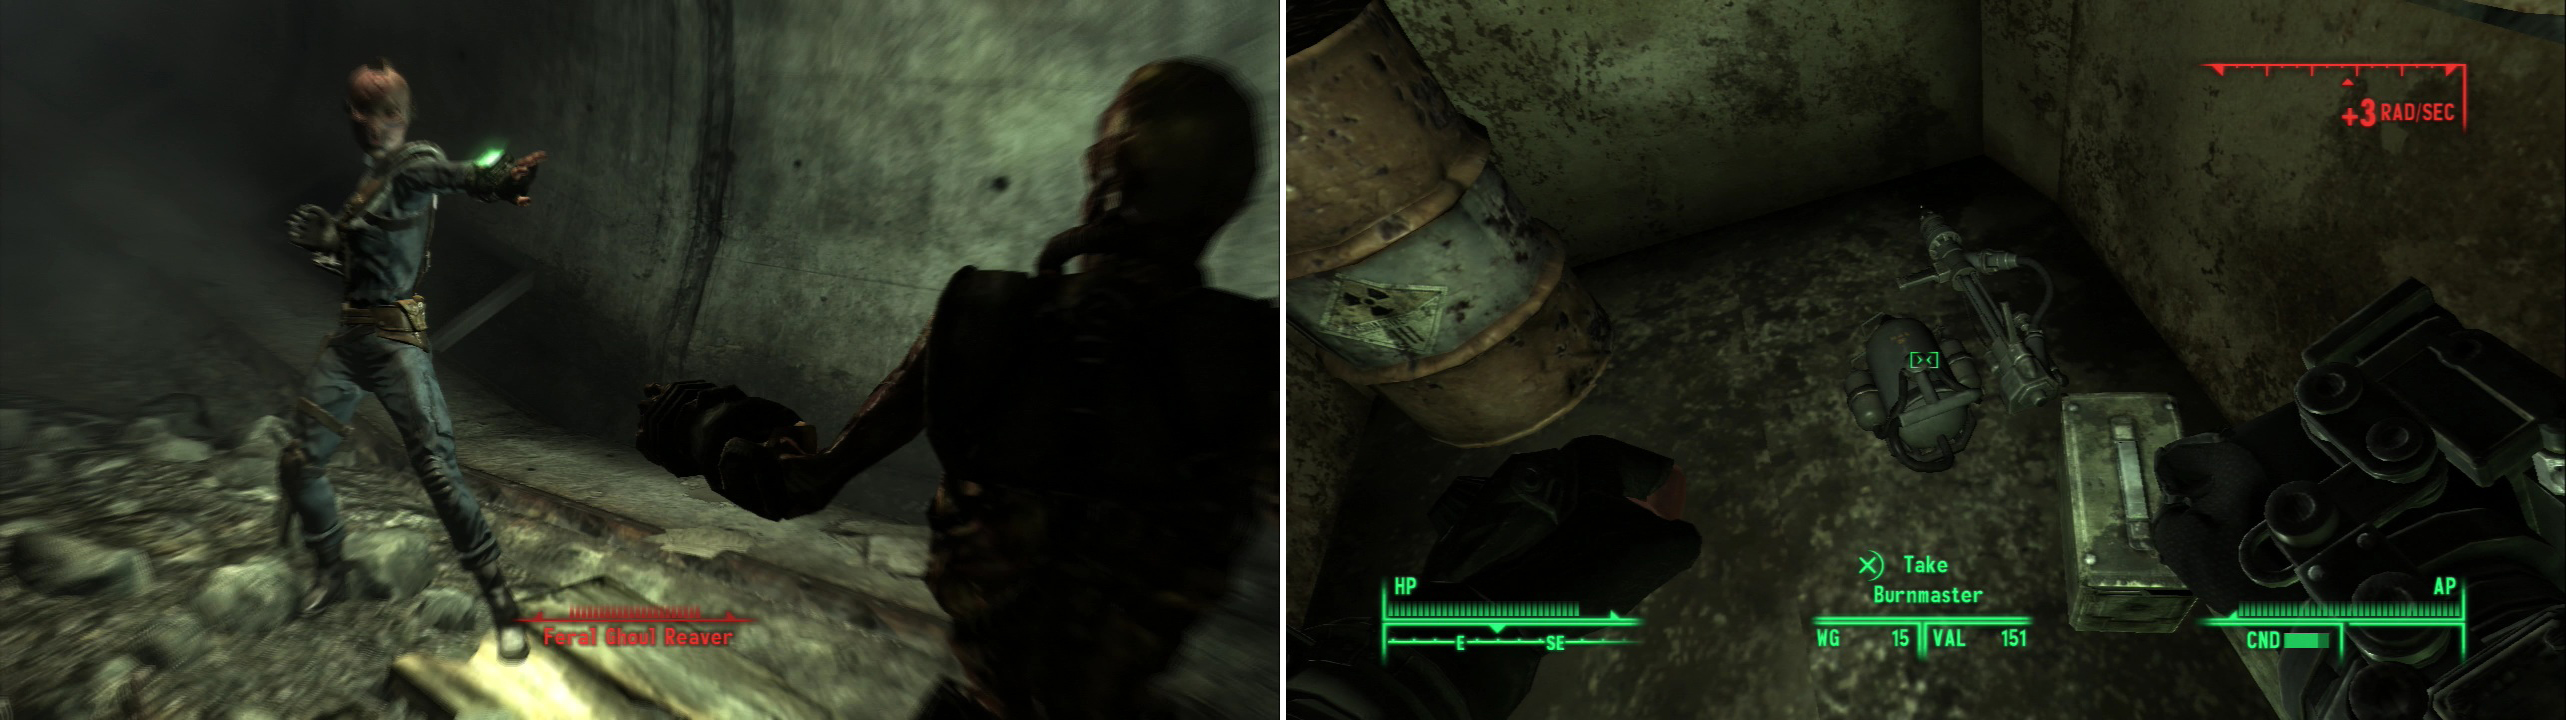
These tunnels are crawling with Feral Ghoul Reavers (left). The Burnmaster excels at making things extra crispy! (right)
26) Burnmaster
Head into a sewer to the east where you’ll find some RadAway. Finding some chems isn’t uncommon, but in this case take it as a warning of radiation to come. Continue heading through the sewer until you find a flooded tunnel. Swim east into the submerged area a short ways to find a pile of radioactive barrels behind a Radiation Suit Case, on top of which is a Mini Nuke. Take the Radiation Suit and swim back west. Swim through a hole in the wall until you reach dry land on the other side. Continue up a natural ramp leading east and you’ll find yourself in another metro tunnel. Continue east through a tunnel full of radioactive barrels to find a truck, within the back of which lies a unique Flamer: Burnmaster , a Nuka-Cola Quantum, some drugs, and no less than five ammo boxes, two of which are locked [Average].
27) There and Back Again
U.S. Army: 30 Handy Flamethrower Recipes
Head west over the hole leading to the flooded area and continue up a tunnel. Stop in front of the barricades long enough to loot some tool boxes and metals shelves, on one of which you’ll find a copy of U.S. Army: 30 Handy Flamethrower Recipes . Continue west and loot some more metal shelves, then loot a defunct connection tunnel, and finally continue on until you discover a room to the south that has various components inside, including two more Stealth Boys. Instead of walking all the way back, classily drop through the hole in the floor to land in a garbage bin back near the entrance. Now it’s time to back track through the Falls Church/Mason Dst. Metro, and from there make your way to the Mason District exit.
28) Mason District
Book - Dean’s Electronics
Book - Guns and Bullets
You’ll surface near the Hubris Comics map marker. As usual, when you surface you’ll probably spawn some Regulators/Talon Company Mercenaries. There are also plenty of Super Mutants to the south. First loot the Pulowski Preservation Chamber and grab the copy of Dean’s Electronics within. In the center of the playground south of Hubris Comics you’ll find a truck bed with some ammo boxes and several Chinese Assault Rifles inside. In a building overlooking the playground to the south you’ll find a Sniper Rifle, some ammo boxes, a 10mm Pistol, two Frag Grenades, and a Stimpak, along with a copy of Guns and Bullets . Other than that, you can find some more ammo boxes and Chinese Assault Rifles in a ruined building some ways to the south, and you can discover the far end of the Flooded Metro which will return surface near Arlington Library. To finish off this area… and with it everything in the southern half of the map save D.C., head into Hubris Comics.
29) Hubris Comics Publishing
Book - Tales of a Junktown Jerky Vendor
In Hubris Comics you have to be wary of two things: traps and Ghouls. Past the receptionist desk is a barricade, consisting in part of a bookshelf, upon which is a Pre-War Book. There’s a trapped toilet in the bathroom to the west, and one of the terminals on the receptionist’s desk is rigged. Above this rigged terminal, on a shelf, is a copy of Tales of a Junktown Jerky Vendor , so try not to blow up the terminal. If you go through the door to the east you’ll find the Hubris Comics Utility Tunnels, if you go north over the barricade you’ll continue deeper into the building.
30) Reign of Grelok
Go north over the barricade and east down a tunnel. Break the trip wire and deactivate the rigged baby carriage. You’ll come to a door leading south which simply connects to another tunnel east that terminates in a north-south fork. Head south to find an office room near a Nuka-Cola vending machine. Inside are numerous desks to loot, some stairs leading down, and a large hole in the floor, over which looms a Grenade Bouquet. Down on the lower level you’ll find more desks to loot, some ammo boxes and first aid boxes in the south-western corner, and a terminal with the game “Reign of Grelok” on it. To my knowledge there’s no reward for playing it, other than the glory of playing a game within a game.
31) To Hubris Comics Printing
Return to the upper level and exit this office room, returning to the north-south hallway, this time exploring to the north. Here you’ll find a large room with numerous desks and a hole in the floor on the eastern side of the room. On the bottom floor are several Ghouls which are unable to close with you. Like shooting fish in a barrel. There is little reason to explore the lower level. If you go through a door to the east (carefully walking along the broken floor around the edge of the room) you’ll find another route to the Hubis Comics Utility Tunnels, and if you go the west down a hallway (disarming the trip-wire rigging up three pitching machines) you’ll eventually come to a door leading to Hubris Comics Printing, which is our current destination.
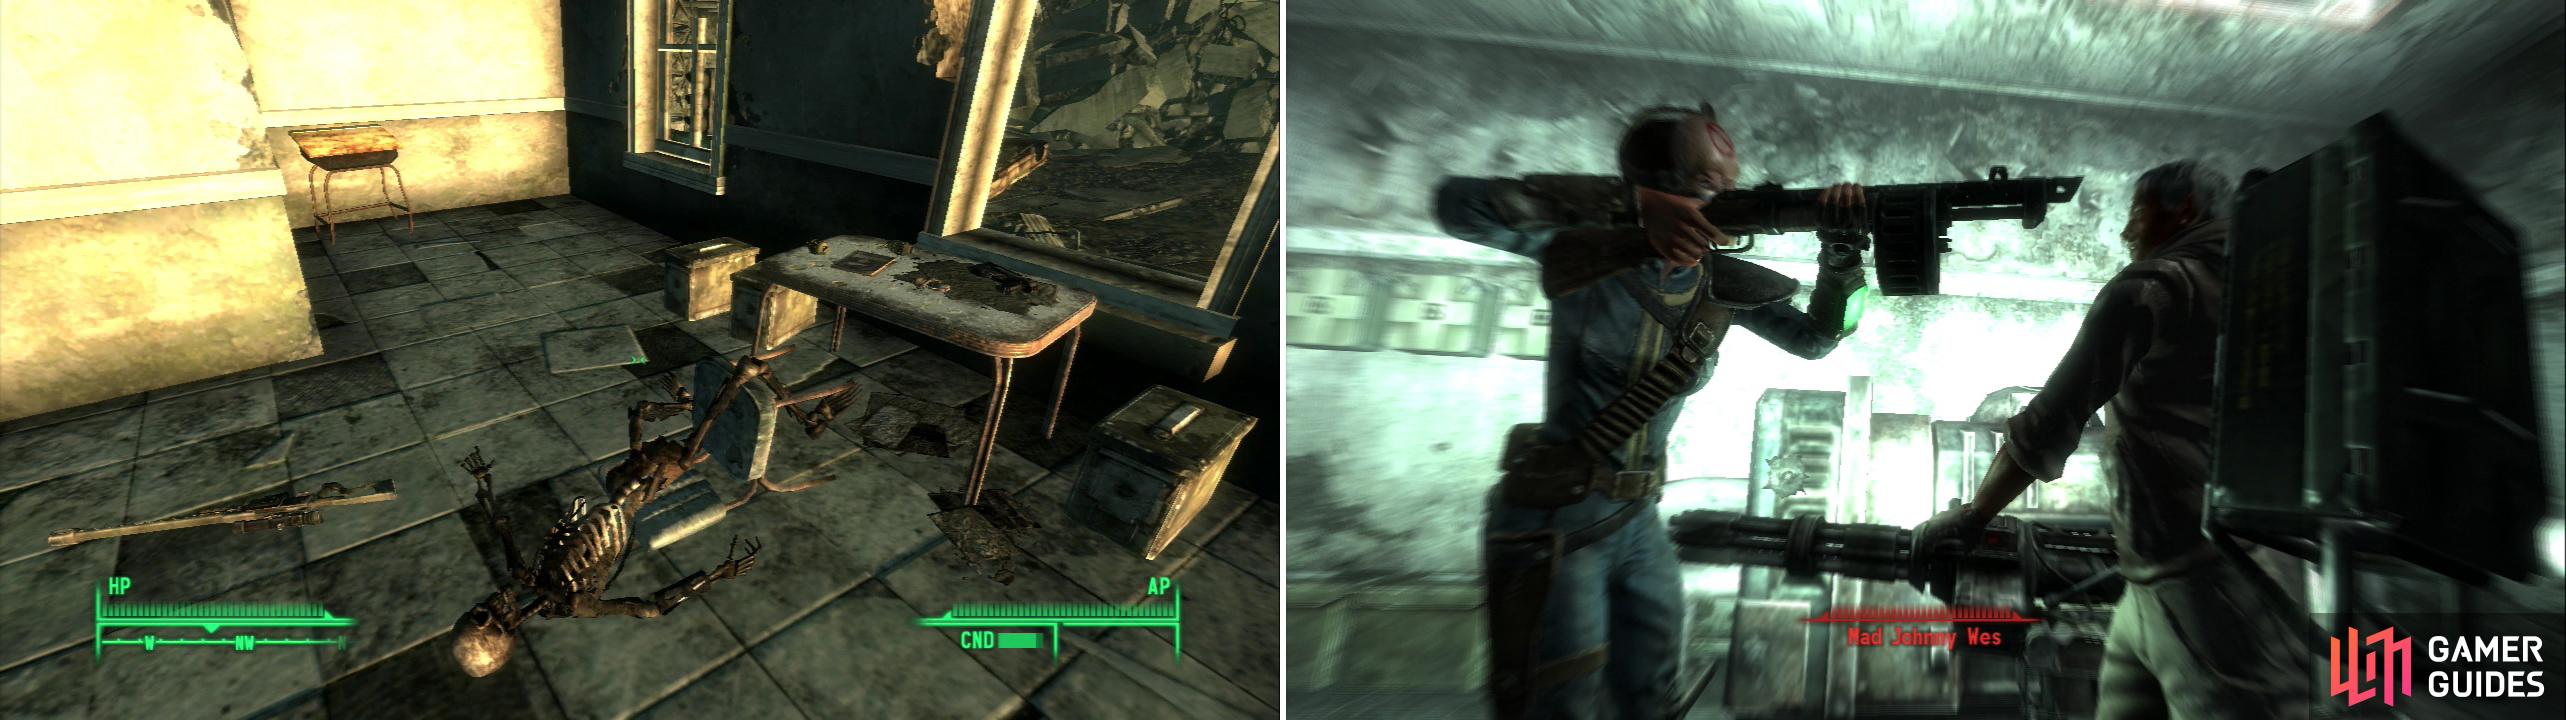
The remains of this sniper overlooks some choice loot, including a copy of Guns and Bullets (left). Confront Mad Johnny Wes in the depths of Hubris Comics (right).
32) Mad Johnny Wes
Book - Grognak the Barbarian
Just to the south you’ll find a large room, wherein you’ll find Mad Johnny Wes, his (leveled) turret defense, and some Ghouls. It is much better to simply let the two sides kill each other off before making your presence known. Why deal with Mark VII Turrets, a pyscho with a Minigun, and Feral Ghouls all at once if you don’t have to? Once the Ghouls are dead head into the printing room. Be wary of landmines. Also, Mad Johnny Wes will shoot at various explosive elements (generators, air cannisters) near you, whether he actually detects you or not). Head down some stairs to the lower level, continue to the southern wall, where you’ll find a doorway. Go through it and head down a hallway to the west past some pitching machines. Up some stairs you’ll find a locked door [Average], beyond which is Mad Johnny Wes. Kill him and his turrets before looting his three ammo boxes, three first aid boxes, and stealing his Nuka-Cola Quantum and copy of Grognak the Barbarian .
You can mess with the printing press, but doing so doesn’t seem to do anything other than draw your attention to the skeleton jamming up the works. And that, ladies and gentlemen, is why we avoid machinery while it’s being operated. There is now only one area left to explore before we are done with our glorious sweep of Arlington: the Hubris Comics Utility Tunnels. The next step will assume you entered via the door near the entrance to Hubris Comics (east of the receptionist’s office), just to set a standard for navigation.
33) Hubris Comics Utility Tunnels
Book - Dean’s Electronics
Another series of pre-war tunnels filled with components and teeming with Ghouls. By now we’ve been through areas just like this a dozen times or more… well, it seems like it, anyways. Go around the fencing to find a skeleton near a grenade box, two ammo boxes, and a first aid box. To the north you’ll find a with a Turret Control System terminal [Average] nearby, which, if you bother, can activate a Mark I Turret. Continue north, then east until you come to a four-way split. To the east you’ll find the other entrance to Hubris Comics Publishing, and south is a dead end, so head north up some stairs. You’ll immediately come to… another split!
Go east to find a room where a dead skeleton lies amidst Caps, 5.56 Rounds, an Assault Rifle, a Stealth Boy, and two first aid boxes. Now head west to find a room with several Ghouls in it. On a desk in this room is a copy of Dean’s Electronics . Continue down a tunenl to the north, go up some stairs, and into a short sewer to find the exit to the Capital Wasteland. You’ll exit near Wilhelm’s Wharf.
Our second Great Bobblehead Hunt is over, and so is our exploration of Arlington. Before we tackle D.C. fully, let’s complete the north central part of the Capital Wasteland, once done we’ll really only have D.C. left to explore. Our next target is the Reclining Groves Resort Homes, which is north of Germantown.
No Comments