
1) Going to School
Head north from Megaton to find Springvale School. It’s an uneccessary stop for us, but since it’s along the way we might as well explore it. Outside you’ll find three Raiders of moderate strength for your killing pleasure. Loot around outside and head up the stairs to find a door leading to “Springvale Elementary School”. Ignore the lower door that leads to “Springvale Elementary School Lower Level.” We’ll get there soon enough, but… well, order of operations, and all that.
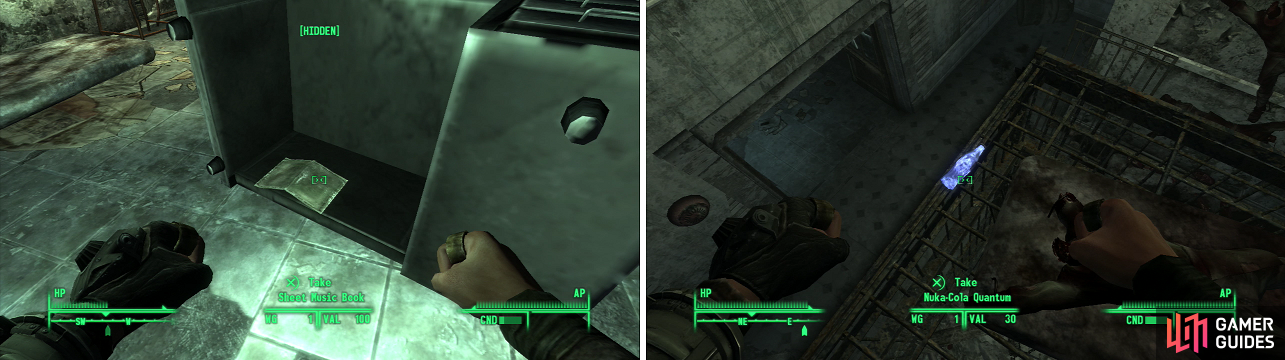
Sheet Music Books (left) will allow you to get some new tunes for your Pip-Boy radio, and Nuka-Cola Quantum (right) are a finite resource without the Quantum Chemist perk.
2) So much for Isolationism - (Springvale Elementary School)
Book - Duck and Cover!
Sheet Music Book
Go forward and kill the Raider in the next room. Then head south and east into a room with a Nuka-Cola machine in it. Over to the south is a cage with a Nuka-Cola Quantum on top, so jump over, grab it, and jump back. Now head to the rooms east of where you entered the school and kill some more Raiders, one of which will have the Springvale School Key, which unlocks the doors leading east [Easy]. Through the doors you’ll find another Raider who has the Springvale Basement Key and a note ‘Springvale Raider Mining Log’, which gives you the insight that these Raiders were trying to tunnel into Vault 101. Search the desk to the south to find a copy of Duck and Cover! and activate the terminal to find out more about these Raiders. Looks like life was about to get a lot more complicated in Vault 101. Search the lower levels, which are mostly uninteresting with one exception: search the south-eastern most classroom to find a Sheet Music Book , which lies on an over-turned metal desk. You can find two staircases down in the north eastern part of the level… both take you to roughly the same area.
3) Tunneling Pests - (Springvale Elementary School Lower Level)
Book - Chinese Army: Spec. Ops. Training Manual
Go through a locked door to the east using the Springvale Basement Key to find a hole leading to some caves. The place is filled with Ants, but nothing that you can’t handle with ease. Keep going east until you come to a large open chamber. Go up to the north to find a bunch of Ant Egg Clutches and some dead bodies. Some more Ants will comes out to attack you. Slay them and loot the norther passage, which contains an Assault Rifle, Jet, some Stimpaks, and a Chinese Army: Spec. Ops. Training Manual hidden under one of the dead Wastelanders. Once you’re done here, leave and head north-west from Springvale School.
4) Big Town
Cross under an elevated highway (on top of this highway are a number of Raiders, if you’re looking for some extra XP and loot) and continue north-west until you spot a number of relatively intact houses. This small village, as you’ll soon discover, is Big Town. Find a moat with a rope bridge along the northern side of the town, and attempt to cross. A man named Dusty will bother you, question your motives, and warn you about Super Mutants who have apparently been raiding the town.
Cross the bridge and talk to the various residents, from whom you can learn that they are all outcasts from a place called “Little Lamplight”, a haven for children far to the east that kicks out its members when they hit adulthood. Big Town isn’t quite so great, by comparison-constant raids by slavers from Paradise Falls and Super Mutants from the Germantown Police HQ compound the daily struggles with radiation and starvation that everybody has to endure.
Aside from getting the backstory and a map marker for the Germantown Police HQ, there’s not much to do here, and we won’t be dealing with “Big Trouble in Big Town” , **** Little Lamplight, or Paradise Falls any time soon. If you talk to Bittercup and find out she dated Pappy, Flash, and Timebomb, you’ll be able to attempt a Speech challenge while talking to Pappy… which is something, at least. Head over to Red’s Clinic, which is a good bit more interesting.
5) Red’s Clinic (Big Town - Red’s Clinic)
Book - D.C. Journal of Internal Medicine
In Red’s Clinic you’ll find Timebomb. You can fix him up if your Medicine skill is high enough (requires a Medicine skill of 40 or higher), or you can put him out of his misery. If you don’t have a high enough Medicine to fix him, you might as well just leave him alone for now. You’ll get Medicine aplenty on your way to the Cyborg perk. On a desk in the back room is the note “We got the tech, now we need the doc.”, and on a table in the kitchen is a D.C. Journal of Internal Medicine . This is as much as we need to explore Big Town at the present. There are two areas around Big Town worth exploring… if for no other reason than so we have them on our maps, and can use them to fast travel. But mostly because we’re nearby, and we might as well…
6) Moonbeam Outdoor Cinema
Book - Pugilism Illustrated
Leave Big Town and, once on the road outside, turn west. Keep going west past a four-way intersection, and follow the road as it turns north until you find a ruined truck, inside of which is a leveled Super Mutant, usually armed with some nasty heavy weapon or another-typically a Missile Launcher or Minigun. In either case, if you close quickly you should be able to prevent the Super Mutant from firing too much… Follow a road near the truck heading north-west and you’ll find the Moonbeam Outdoor Cinema, which doesn’t have very much of interest save a copy of Pugilism Illustrated on top of some junk books on a picnic table.
7) Fordham Flash Memorial Field
Head south-west from Moonbeam Outdoor Cinema-right past the ruined screen-to find Fordham Flash Memorial Field. There will be a Raider with a Baseball Bat nearby, and some baseball items around the field, but nothing special.
8) Riverside Raiders
Backtrack by following the river east, pass the collapsed bridge near the truck where we fought the heavily-armed Super Mutant, and keep going until you find another bridge crossing the river. This bridge is… crossable, if not necessarily intact. Cross the bridge and, on the northern bank, turn east to find some shacks occupied by Raiders. Give them a taste of the old raid and pillage routine, as you can score a bit of loot here.
9) Hallowed Moors Cemetery
Book - Big Book of Science
Book - D.C. Journal of Internal Medicine
Keller Family Transcript (2 of 5)
Return to the bridge and look to the north, north-west to spot a chapel in the distance. Follow the ruined road to find the Hallowed Moors Cemetery, which is crawling with Super Mutants. Inside you’ll find a Wasteland Captive you can free for some karma. On a bookshelf you’ll find a D.C. Journal of Internal Medicine . You’ll find some ammo boxes on a bench, and three Frag Grenades hidden behind a wooden crate behind the bench. There’s a Chinese Assault Rifle on one of the beds, and on the puplit you’ll find Keller Family Transcipt (2 of 5) and a Big Book of Science . There’s also a Mini Nuke in a wooden crate near a Ham Radio. Not a bad bit of loot for one spot, eh?
10) Meresti Trainyard
Book - Tumblers Today
Head south-east to find the Meresti Trainyard. Again, there’s no need to be here yet, as we’ll come back as part of a quest, but finding it now allows us to save time by fast travelling here. You’ll find a random encounter here as well, which can be any number of things (see the Random Encounters section of the guide for more information.) Head south-east of the Meresti Trainyard to find some ruined buildings. In one of the ruined houses, in a bath tub, you’ll find a copy of Tumblers Today . Now travel north until you find Agatha’s House-her house is a little hard to reach, as the only way to get there is by crossing a rope bridge spanning a chasm. Just north of her house are some suspended railways-if you’re under them, you’ve gone too far.
11) Agatha’s House
Chat with Agatha. She’ll eventually get around to asking you to find a violin for her. If you succeed at a Speech challenge she’ll offer to give you access to her ammo box [Hard], or you could just come back and pick the lock later. We’ll deal with this quest… eventually, but for now, it’s enough that we have it started. Anyways, she’ll tell you where the Vault-Tec Headquarters is, which is where you’ll start looking for Vault 92. Now backtrack across the rope bridge to the west, then turn north-east until you reach the suspended railway that was mentioned earlier. From here, head east to find the Scrapyard.
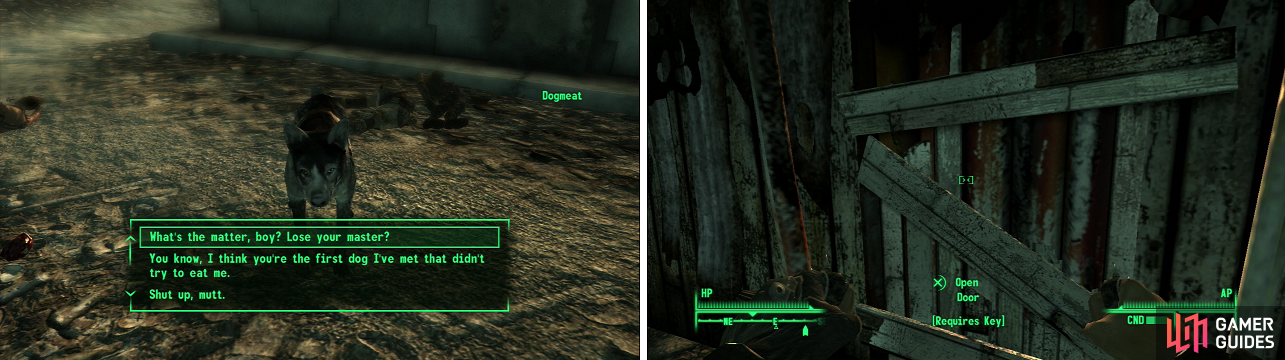
If you don’t love Dogmeat (left) you’re a bad person, and you should feel bad. You’re not getting through this door (right) without the Contract Killer perk.
12) Scrapyard
Book - Grognak the Barbarian
Book - Guns and Bullets
Book - U.S. Army: 30 Handy Flamethrower Recipes
NPC - Dogmeat
The Scrapyard has a bit of junk you can loot. Inside you’ll find Dogmeat, whose owner gets wasted by some Raiders. Some of the Raiders actually have pretty nice loot, including a Scoped .44 Magnum. Near the stairs of a destroyed bus near a red boxcar you’ll find John’s Treasure Box [Hard]. If you get the random encounter where you find John’s Key you’re good to go, if not, we’ll have to wait to get its contents. Inside the box are three books; Grognak the Barbarian , Guns and Bullets , and U.S. Army: 30 Handy Flamethrower Recipes . If you pick up Dogmeat, you should probably drop him off at your house, or near Vault 101, or somewhere else safe where you’ll remember him. Taking an NPC dog through a town full of mines just doesn’t seem like a good idea to me. Leave the Scrapyard by heading north, north-west to finally reach Minefield.
13) MDPL-13 Power Station - Power Substation
Schematics - Railway Rifle
Now that we’ve finally reached Minefield… pass it by and head north until you find the MDPL-13 Power Station. Swerve! Heh… anyways… Go into the western-most building, the Power Substation first for some loot. Inside you can find the Schematic - Railway Rifle . The computer [Hard] and locked safe [Hard] will have to wait. When you finally get enough Science or Lockpick , come back and open the safe for 57 Caps, a Chinese Pistol, some Pre-War Money, a Baseball, and 10mm Rounds. Yeah, what a waste.
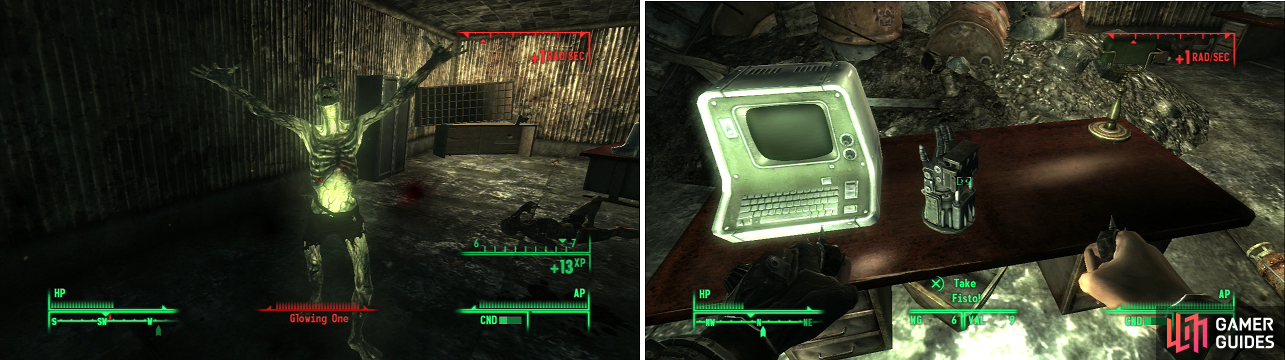
A Glowing One (left) can be a challenging for a low-level Vault Dweller, but the prize, the almighty Fisto! (right) is worth the risk.
14) MDPL-13 Power Station - Derelict Power Plant
Exit the Power Station and head east to the larger building-the Derelict Power Plant. Be careful in this place, radiation abounds and it is filled with ghouls… but it’s better than coming here later, when Feral Ghoul Reavers start appearing. Even at a low level, you’ll have to deal with at least one Glowing One, which can be a tough enough fight on its own. Play defensive, let them come to you, and don’t be afraid to let loose with a 10mm Submachine Gun or Combat Shotgun. Search the place for your prize: upstairs on a desk with a locked terminal [Average] you’ll find a unique Power Fist… Fisto! It’s got more power in its punch, and if your old Power Fists are starting to break (mine sure were!) save them for when Fisto! starts to wear out. There’s also a locked safe [Average] on the floor.When you’re done here, head due south to Minefield.
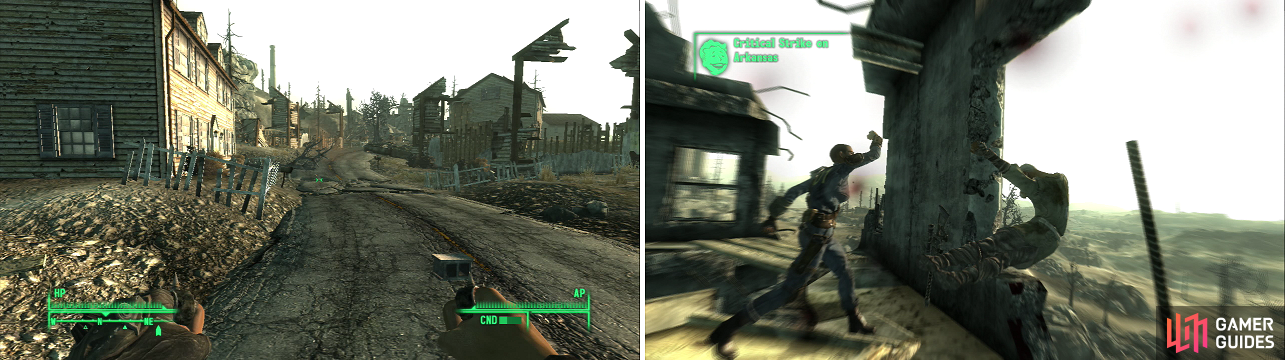
Minefield may not be haunted, but it is a psychopathic sniper’s sadistic playground (left), littered with Frag Mines and vehicles just waiting for an excuse to explode. It’s all worth it in the end, when you can give Arkansas some sweet payback (right).
15) Arkansas
Approaching from the north down a long slope you’ll find a mostly ruined building to your left. Be wary of Frag Mines… they are all over the place, and they’re worth five experience for every one you disarm, which can be substantial in numbers. Plus you get the mine! On the building is an old man named Arkansas, who has a mean disposition and a Sniper Rifle. If you approach through the city from the south he loves to shoot nearby cars and cause them to explode, making the whole affair a tentative walk through a city covered in mines with a loony sniper blowing stuff up around you.
From the northern slope, however, you have a chance to beat him at his own game and possibly snipe him while hidden. If not, just make a dash for his house and kill him in a more conventional manner. You’ll get the Ridgefield Gate Key from him, which will open every house in Minefield. With such a device handy, it would be criminal not to loot the place, right? Plus, we still need to get to the center of town to appease Moira.
16) Looting Minefield
Book - D.C. Journal of Internal Medicine
Book - Grognak the Barbarian
Book - Pugilism Illustrated
Book - Tumbler’s Today
Minefield is home to a variety of goodies, both indoors and out. Outside, there’s a treasure trove of live mines, while inside the buildings you’ll find several skill books, as well as Pre-War Books, among other, lesser loot. The highlights include a copy Tumblers Today in the Gibson House, along with a lock [Very Hard] :Model of Home“ with some Buffout and Pre-War Money insde. There’s a D.C. Journal of Internal Medicine in the Benson House, the Gillian House has-aside from a Radroach problem-a copy of Grognak the Barbarian , and finally the Zane House a copy of Pugilism Illustrated . Four books in one quest, it’s a good thing.
17) Done with Chapter One
Return to Moira again and respond however you wish. She’ll give you some Frag Grenades and some Stimpaks for completing the first chapter. Now you have three more quests to choose from, investigating Mole Rats, handling injuries, and spying on Mirelurks. The Mirelurk one is the most difficult, being that it takes some substantial Sneak skill and a few… toys… to pull off, so we’ll save that one for last. We’ll do the Mole Rat one first, and if we’re lucky, we might even get injured enough to complete the injury one, too! You’ll have to travel to the Tepid Sewers and use a chemical Repellent Stick on ten or more Mole Rats.
The Tepid Sewer is just across the river from Wilhelm’s Wharf, so fast travel there and go across the bridge south-east of Wilhelm’s Wharf… you know, the one covered in landmines? By now you should have some practice disarming them. If you haven’t been to Wilhelm’s Wharf yet (it was suggested that you stop by during the Rivet City Run), fast-travel to Super-Duper Mart. Wilhelm’s Wharf is south-east of here, along the Potomac.
Weapon Info (Repellent Stick): Very poor damage and very, very poor Action Point consumption, this stick is… shall we say… dynamite, when used on Mole Rats. Unfortunately Mole Rats were never much of a threat. Still, it’s a useful stick for when beating rats is called for.
No Comments