
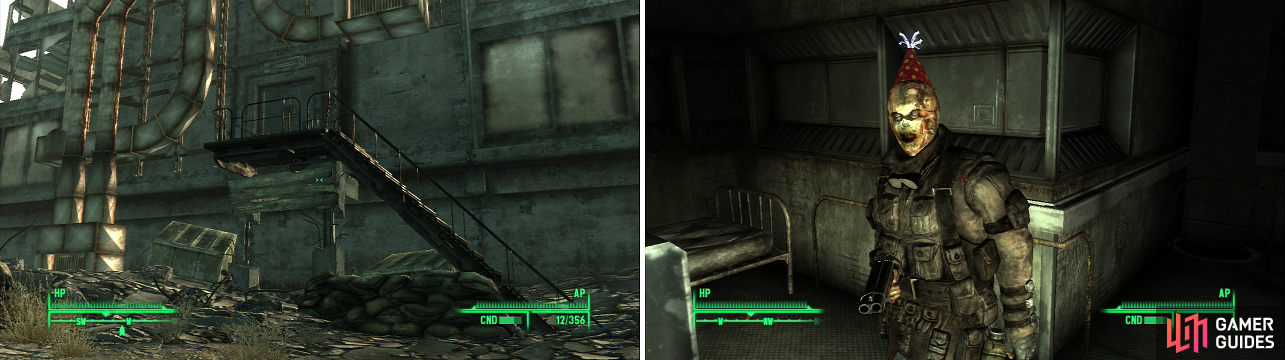
The Talon Company camp near Megaton can be difficult to find, if you don’t know where to look (left). Don’t let the Party Hat fool you, Gallo is not a friendly Ghouls (right).
1) Talon Company Camp
Book - Tumblers Today
South-west from Megaton is a Talon Company Camp. It’s not immediately noticable so it’s location will be described in detail to prevent any hair-pulling and controller/keyboard throwing. The building is south-west across the road from the Sewer Waystation. If you continue south down this road far enough you’ll find a bridge running over the road, which leads to Greyditch. The building with the Talon Company Camp is before this bridge, it’s the building with sandbags in front of the stairs leading up to a door. Inside are a trio of Talon Company Mercenaries. Make them dogfood and loot the place. In the south eastern room (the room with the chemistry equipement) you’ll find a copy of Tumblers Today on a metal shelf.
2) Sewer Waystation
Now travel to the Sewer Waystation, one of the first areas we found outside of the Vault. It’s just north-west of Greyditch. Let’s finally explore it, now that we have an excuse to come back…. especially now that we’re not quite so weak. In the first room you’ll find a skeleton in a fridge, and next to it will be a Nuka-Cola Quantum. In the room to the east you will find some assembly lines with Teddy Bears on them. Teddy Bears in a Sewer Waystation? Whatever. Up some stairs you’ll find a manhole leading to the County Sewer Mainline.
3) A Tale of Two Tunnels
Head south, south-east down a tunnel to find a Ghoul munching on a dead Mercenary. Shortly beyond this you’ll find two paths leading west; one goes up a slope. while the other is level (the path east is a dead-end). The straight path will eventually lead out to an area near the Citadel, and it is a perfectly acceptable alternate route on the Rivet City run… which we don’t need to worry about any more, of course, so uphill it is.
4) Gallo the Ghoul
Book - Tales of a Junktown Jerky Vendor
Disarm a tripwire at the mouth of the uphill tunnel… yeah, it’s going to be one of those areas. Once done, continue uphill, going west, south-west. Up at the top you’ll find a bear trap, and above it is a grenade bouquet. Turn north and deactivate the pressure plate on the four-way bridge. To the north is a locked door [Average] behind which is a storeroom full of loot. In addition to the obvious items there’s a Stealth Boy on one of the shelves, hidden under a wooden crate. When you’re done looting head through one of the doors to the west, where you’ll find a rather clean abode containing one hostile Ghoul named Gallo. Kill and loot him for a copy of Tales of a Junktown Jerky Vendor … one of the few books found on an enemy. It’s a shame he won’t respawn like the Raider up by Bethesda will. On the metal shelf by his bed you’ll find two Pre-War Books, and in a footlocker you can nab Gallo’s Storage Key. You’ll also find a terminal [Easy] which unlocks a safe [Easy]. In the safe is a Nuka-Cola Quantum. Now return back to the tunnel split, it’s time to explore the level path.
5) The Upper Sewers
Book - Big Book of Science
Head to the west and kill some ghouls munching on a dead Wastelander. Grab the ammo and Frag Grenade on the floor and continue on until you come to a door which will lead to a room split by a fenced-off area. Head around the southern side to find your way to the other half of the room. Unlock the gate [Easy] leading to the computer in the center and grab a Big Book of Science and two Pre-War Books on the table. Activate the “Sewer Management Access Computer” and open the storage door, which will open the door to the south-west. The room has some ammo and drugs inside. Now head back to the south and go down some stairs, heading through this room and through another door to the east. You’ll find a maintenence room with a bit of loot in it. Head back to the stairs you came down and go east to find more stairs down. Go through the door to the south, and head down a tunnel to the west. You can explore the bottom floor, but there’s not much down there other than Ghouls and Radroaches.
6) The Lower Sewers
Go through a large metal door (you can use an electrical switch to open and close the door… but since you can just open it manually, what’s the point?) Follow the tunnel south, then west as it turns. There’s a skeleton on the ground with a 10mm Pistol, some 10mm Rounds, and a Stimpak nearby. Go past the irradiated water and into a small store room, where you can loot an ammo box, and pick up a 10mm Pistol and some more 10mm Rounds. Follow the tunnel south some more until it ends by intersecting another tunnel. Go through the door to the south and search the eastern corner. You’ll find a terminal [Average] which will open a floor safe [Average]. There are also some items by and on some metal shelves. You can either backtrack and go down the unexplored tunnel east and south, or continue down the stairs, either way you’ll end up near an exit to the Capital Wasteland, which will take you north of the Citadel.
Now… Remember those Raiders we sneaked past during our Rivet City Run? The ones under the bridge near the Citadel? Whatever, it’s time to go kill them. Because we can.
7) Bridge Raiders Revenge
Remember these guys? We skulked past them in our Rivet City run, but now we’re ready to deal with them. Sure, we’re drastically off course from Greyditch, but when else are we going to find even the most remote excuse to kill them? Under the bridge you’ll find their hideout, which contains alcohol, drugs, and a safe [Average]. From here head north west where you can find another Flooded Metro. Discover it, but don’t explore it yet. It’s the shortest route to the Arlington Cemetary, which we’ll become more interested in reaching once we hit level 30 and wish to complete our Bobblehead collection. Go west around a building to find Grayditch.
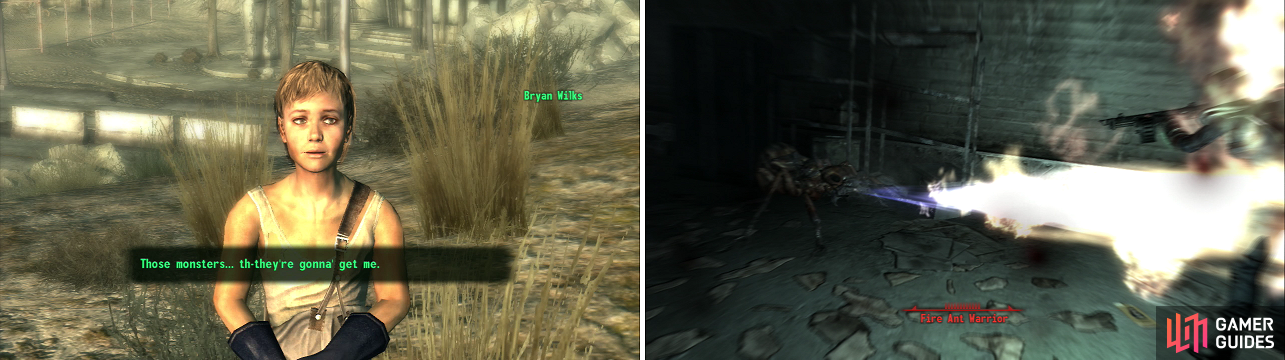
Bryan Wilks claims “monsters” destroyed his home (left). That doesn’t excuse him from being the most annoying NPC in the game. The pests infesting Grayditch are only too willing to show off why they’re called “Fire Ants” (right).
8) Most Annoying NPC in the Game
Grayditch is crawling with Fire Ants, and do they mean Fire Ants! This quest isn’t terribly hard, but in the early going you need to spend a good bit of ammo killing these ants, which we really didn’t have to lose. Also, due to their fire-breathing, getting close to them in melee wasn’t really an option. You’ll probably be approached by an annoying kid named Bryan Wilks, whose need to harrass you with his stupid quest at the begining of the game and his horrible voice-acting makes him one of the most annoying NPCs in the game. The fact that you can’t kill him only makes matters worse.
9) Putting Out the Fires
Anyways, now is the time to talk to him: Succeed at two Speech checks to get him to cough up the Greyditch Dumpster Key. Go find the diner and head around back to find a locked trash bin, which this key opens. Inside is a .32 Pistol, some .32 Caliber Rounds, twelve Frag Grenades, and some Rad-X. Search around Greyditch, exterminating Fire Ants as you go. There’s the Wilks’ House, Brandice’s House, and two Abandoned Homes to search. There’s also a “Recently Built Shack” [Hard] west of the Wilks House. Before we mess around with the quest, however, let’s explore a few more short areas around Grayditch.
10) Ghoul Wastelander Outpost
From the diner follow the road to the south through-and out of-Grayditch. Go up a ramp and when the road ends turn west to find an “Outpost”. Inside are a trio of Ghoul Wastelanders, who have apparently captured a Super Mutant Brute, who will escape and kill them, eventually. Kill all the hostiles in the outpost and loot around. There are some ammo boxes (one of which is locked [Hard]), a Mini Nuke on a metal shelf, a Nuka-Cola Quantum in a wooden crate, and a rigged computer. There’s also a cell [Very Hard], which there’s absolutely no point in opening.
11) Gas, Ghouls and Traps
South of the Outpost is a sewer, which is filled with gas, Ghouls, and traps. Head up the tunnel to the north, where a well-placed grenade can set off the gas, trigger the grenade bouquets, and injure or kill the Ghouls. Along the eastern tunnel you’ll find a dead Wastelander near some grenade boxes (one of which is locked, [Easy]) and at the far northern end of the tunnels you’ll find another dead Wastelander near an ammo box, a first aid box, and a gun case [Very Easy]. As you near the northern end of the sewers, more Ghouls will respawn near the entrance, forcing you to fight your way back out. Once you’re out, return to Grayditch and enter the Wilks’ House.
12) Wilks’ House
In the Wilks House you’ll find the body of Fred Wilks. He’s better off dead with an annoying kid like Bryan. On his body you’ll find the Shed Key and on a shelf you’ll find a Chinese Assault Rifle and some 5.56 ammo. Loot the house and head across the street to the Brandice’s House.
13) Brandice’s House
Upstairs you’ll find W. Brandice’s terminal [Easy]. You’ll find some info about the Brandice’s, as well as the location of a gun hidden behind the fridge, in a tool box. It’s a .32 Pistol, so don’t get too excited. He’ll aslo talk about Lesko, Navarro, and some other things from Fallout 2. Go up to the Pulowski Preservation Shelter and tell Bryan the bad news. Also ask him about the family’s around. He’ll talk more about Dr. Lesko, making his shack the next obvious place to go… for the quest, anyways. Explore the two Abandoned Homes next. First go to the one east of the Brandice’s House.
14) Eastern Abandoned Home
Book - Guns and Bullets
There are some drugs about, and a 10mm Pistol on the shelf in the living room. Also there’s a copy of Guns and Bullets in a wooden crate on the same shelf. In the cabinet upstairs you’ll find some alcohol, and in a wooden crate near the bed you’ll find Pre-War Money and some Jet.
15) Southern Abandoned Home
Leave and explore the house south of the Brandice’s House. You’ll find some Psycho on a shelf, Tin Cans scattered about, and a Chinese Pistol in a cabinet upstairs. Hardly worth the effort, but at least nobody can say we didn’t look. Head to the Recently Built Shack next to the Wilks House.
16) Recently Built Shack
Grab “Doctor Lesko’s Password Recording” off the table and access his computer. You’ll be able to discover that Lesko was messing with the ants, and is presumably responsible for their mutation into Fire Ants. You’ll also discover that he was working out of the Marigold Station. The Marigold Station is just a bit south east of here.
17) Grady’s Last Recording
To take care of the Fire Ants in this area you can rely soley on sneak attack criticals and your trusty Combat Shotgun. It really makes these ants a non-issue. Head south then east, there are two ways to get to where you’re going. Through the door to the east you’ll find some rooms, the first of which has some grenade boxes, and the second has more loot. If you go south you’ll enter into the large metro tunnel. Go inside the ticket booth to find a skeleton, some .32 Rounds, a .32 Pistol, and the note “Grady’s Last Recording.” The recording will tell you to look for a key in a fire hose box in a maintenence closet. Once you have the key you should look for a room marked by a “spinning light”, once you have the package, take it to Ronald in Girdershade. Right.
18) The Tunnels, Two
There are now two tunnels to the east you can take, the northern one leads to the Falls Church area of Arlington and to the completion of this quest, so let’s head south first. At the area where the two tunnels connect you’ll find a Nuka-Cola machine, an ammo box [Easy] and a Silenced 10mm Pistol and some 10mm Rounds in a locker. Past a door to the south you’ll eventually come to a storage closet with Grady’s Fire Hose Box on the wall, inside of which is Grady’s Safe Key. There are also some drugs, boxes, and other things for you to grab while you’re here. If you continue south, you’ll go through another room with some loot in it, and exit at the end of the same tunnel the northern tunnel leads to.

As usual, a guy in a lab coat is behind the problems in Grayditch (left). The fabled Naughty Nightware is a much coveted undergarment! (right)
19) Naughty Nightware
By heading down the northern tunnel you’ll eventually come to a fork. The path east leads to the Fall Church area, so head south. If you stick to the left side of the tunnel you’ll discover a door [Easy] near a flashing light. Go inside and loot the ammo box, first aid box, metal box, mine box, tool box… boxes of every shape and size. Also grab the Ripper from the shelf and search Grady’s Safe, which contains the fabled Naughty Nightware . That Ronald dude is trying too hard. A Raider named Lug-Nut will arrive and threaten you for the clothes. Succeed at a Speech check and he’ll go away. Kill him and he’ll go away forever. Or you can do both. If you take the Naughty Nightware to Ronald in Girdershade you can get him to pay you 200 Caps for it, or 300 Caps, if you succeed at a Speech challenge. If you just give it to him you’ll earn some karma. Keep in mind that if you give him the Naughty Nightware you’ll never get it back, even if you kill him.
20) Doctor Lesko
Keep going until the tunnel ends, then turn west to find a connecting tunnel. Near a generator is the corpse of William Brandice, who has a fair amount of equipment on him, including his key. Continue heading south down the new tunnel and go through the door on the left. You’ll find Doctor Lesko. Offer to help him continue his experiment, and be sure to ask him to pay you for the endeavor, in which case he’ll offer to give you a mutagenic enhancer as well as his old lab coat. He’ll ask you not to harm the Ant Queen in any way, but to eliminate the Nest Guardians near her. If you have enough Science you can get him to admit that he used FEV to speed up the ants mutations. Head through the door to the east and head down the stairs to the Queen Ant’s Hatchery.
21) Queen Ant’s Hatchery
Book - Big Book of Science
Go around killing the Nest Guardians, which are about as strong as a Fire Ant Warrior. If you hadn’t guessed, there are five of them. To the south you’ll find the Ant Queen’s hive, which is occupied by, of course, the Ant Queen. You’ll find Doctor Lesko’s Portocomp [Average] on a desk. Before you go grab the Big Book of Science nearby and the Nuka-Cola Quantum.
22) Ant Sight or Ant Might?
Now head back to Doctor Lesko, who will offer to give you a Mutagenic Bioenhancer injection, which will give you either the Ant Sight or Ant Might perk. He will also give you his old lab coat if you negotiated for it. Once you get your perk you can go back and kill the Ant Queen, and Doctor Lesko, for that matter. On Lesko’s body you’ll find Lesko’s Portable Terminal Access. If you destroy the Mutagen Sample you’ll gain some karma. Now there’s only one thing left to do: return to Bryan Wilks and find out what to do about him.
23) A Home for Bryan Wilks
Go back to Bryan and ask if he knows anywhere else he can stay. He’ll mention a cousin Vera, who lives in Rivet City. Rivet City? That’s right, yet another reason to go there. The trophy/achievment for “Those!” will unlock once we go there and talk to Vera, (or when you just give up and tell Wilks to stay here.)
We’ve explored almost everything in the south-west of the Capital Wasteland and left a trail of resolved conflicts in our wake. Now lets do a little something for ourselves and, for the sake of continuity, make our way to Galaxy News Radio. Head over to the Farragut West Metro Station, just across the river (east, north-east) from Super-Duper Mart.


No Comments