
Tower of Fantasy Outer Islands has 50 new Supply Pods for players to collect, with most of them being Type 1, but there are a few Type 2 golden goodies around there too. This guide is all about helping players find the Tower of Fantasy Outer Islands Supply Pods, offering location coordinates, map marker positions to help visualize it, and any notes you may need to know.
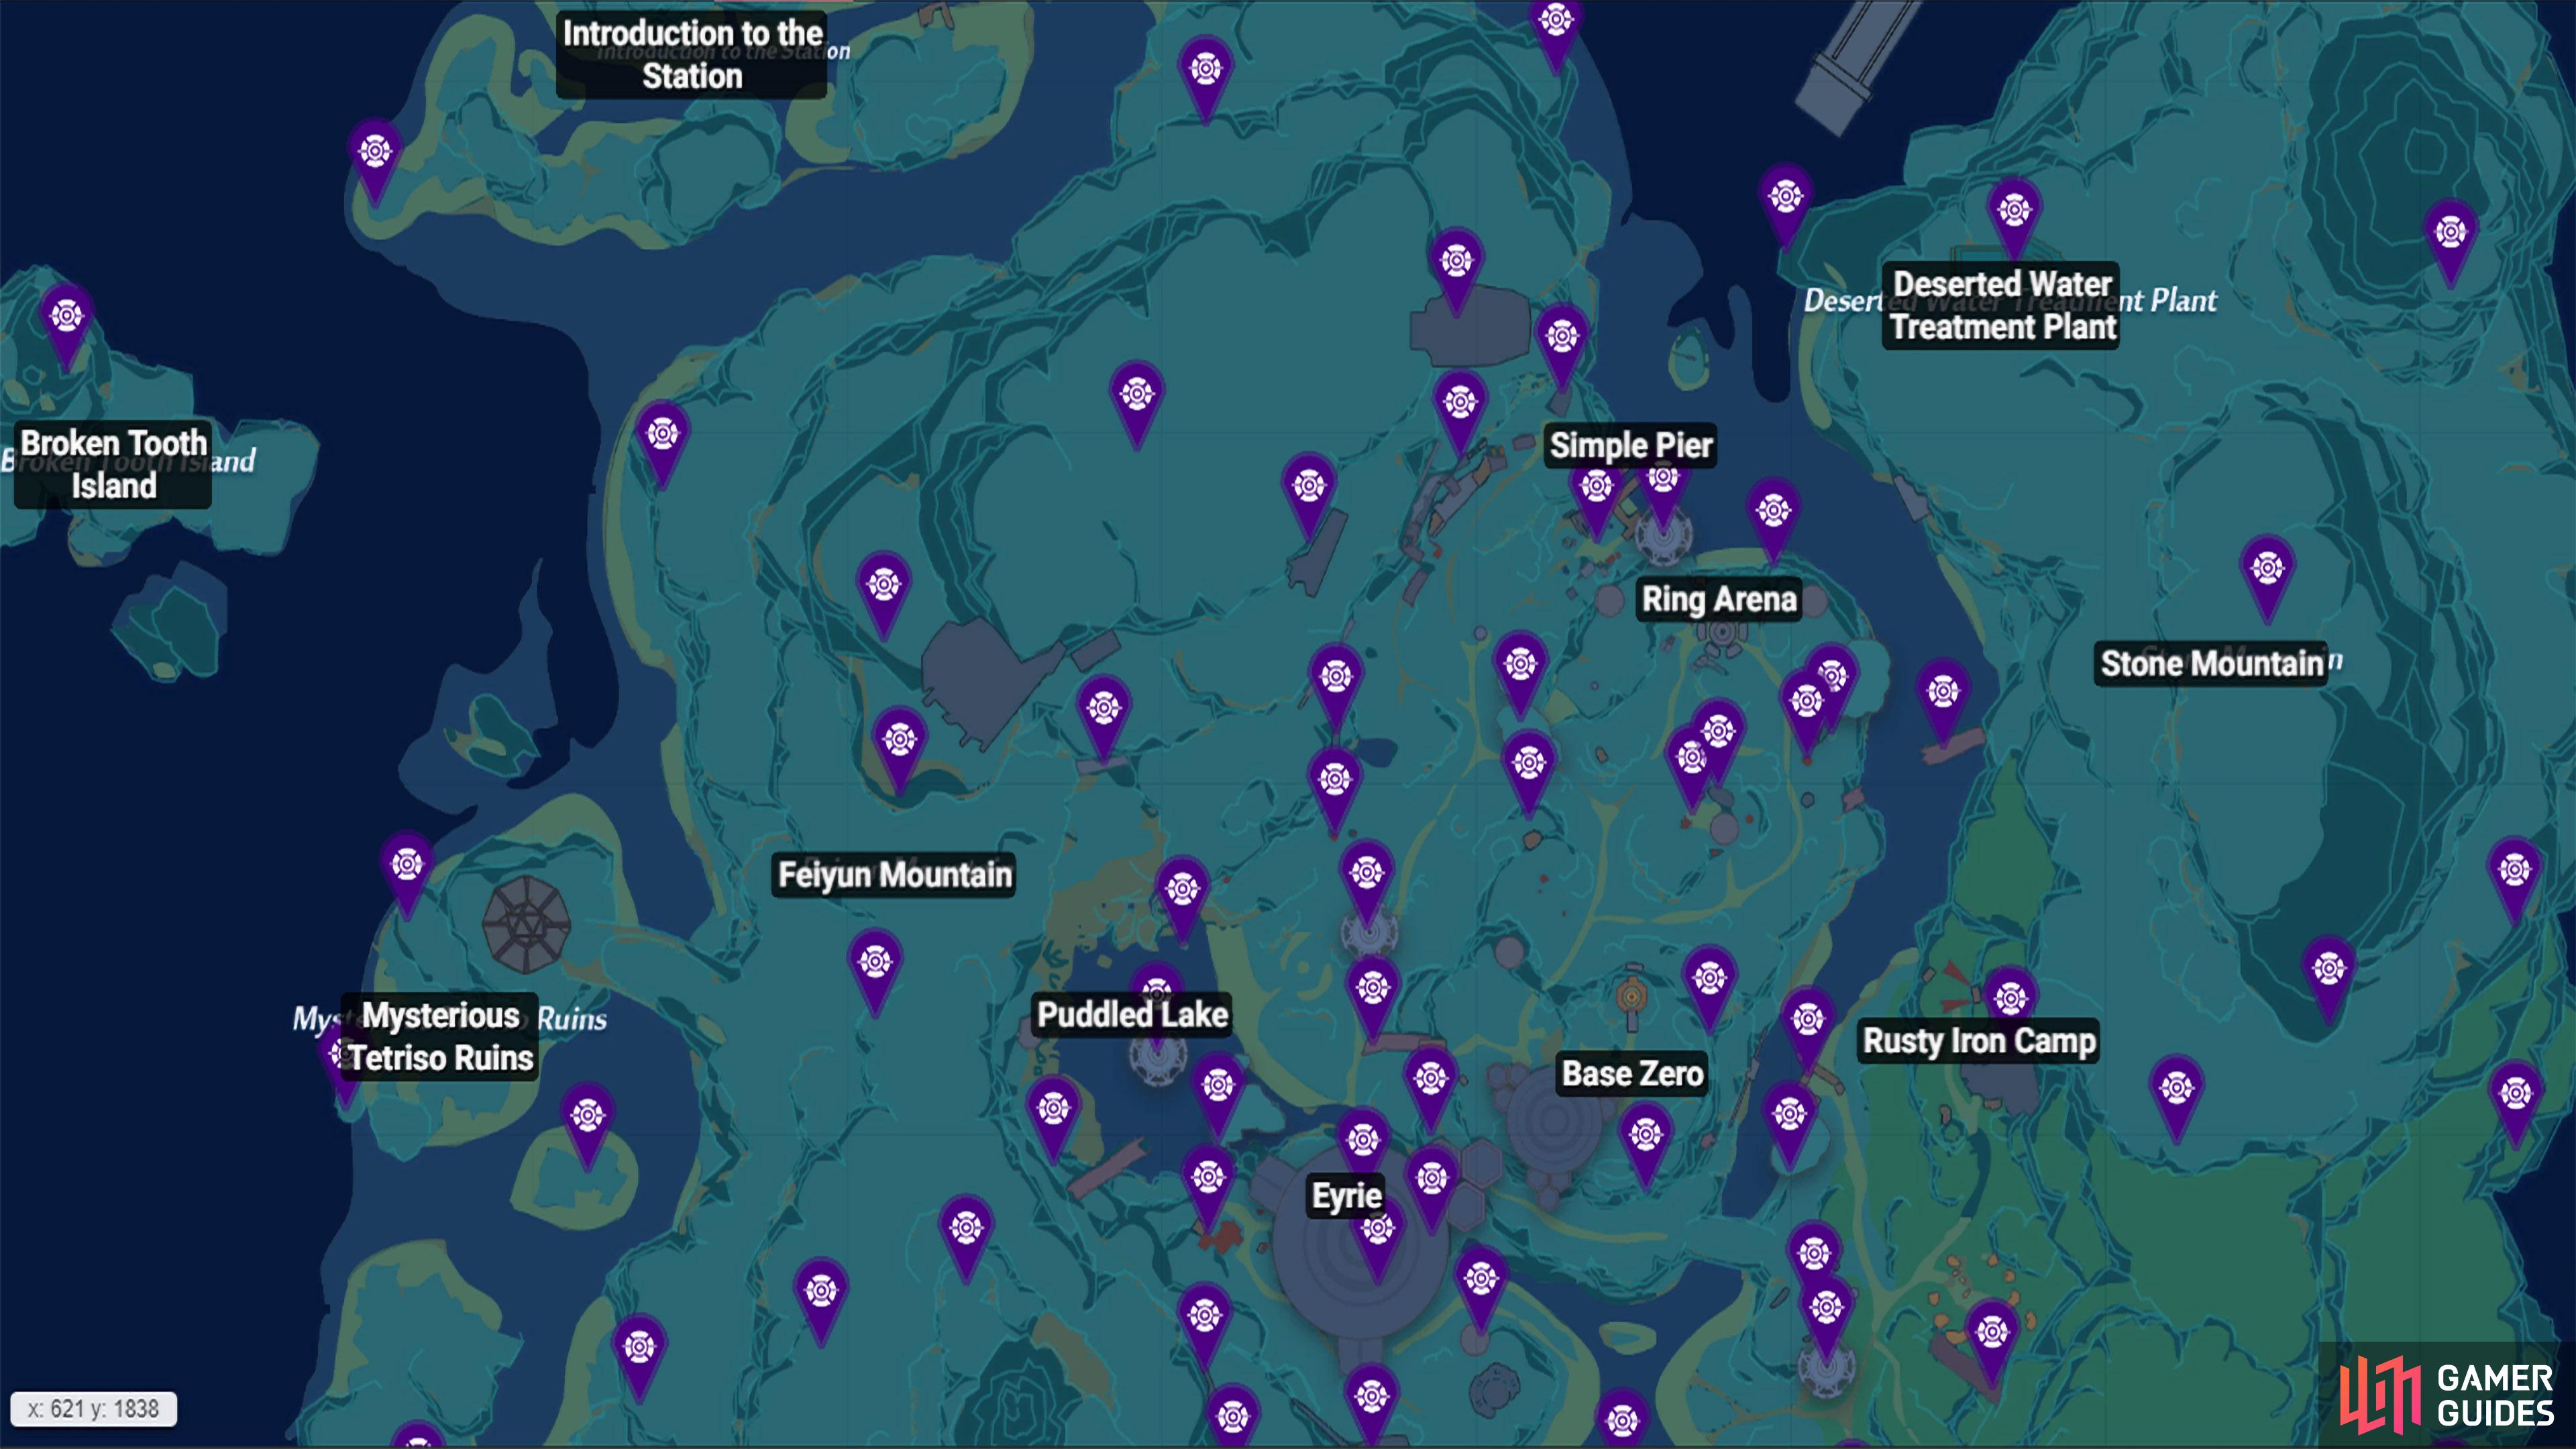
By going to our map, you’ll find the location to all 50 Supply Pods.
Tower of Fantasy Outer Island Supply Pods
Below is a table listing all 50 Supply Pods on the Outer Islands. We recommend checking the map links, as that will show you the screenshots of the exact locations on the game map.
| Type | Coordinates | Map position | Notes |
|---|---|---|---|
| Type 1 | -1116.5, -465.2 | Map Marker | Broken Tooth Island. |
| Type 1 | -996.5, 1456.6 | Map Marker | Northern island of Diurnal Island. |
| Type 2 | -831.8, 648.6 | Map Marker | On a crate in the water inside the sphere-shaped structure on Pavillion Beach. |
| Type 1 | -647.2 , 798.8 | Map Marker | In the middle of the southern island of Pavillion Beach (Covered in a Thornvine). |
| Type 1 | -850.6, -86.2 | Map Marker | In a stronghold west of the Mysterious Tetrios Ruins. |
| Type 1 | -873.8, -581.7 | Map Marker | Western tip of the island “Introduction to the Station”. |
| Type 1 | -714.9, -802.4 | Map Marker | On top of a tower in the stronghold at the northwest of the island “Introduction to the Station” |
| Type 2 | -420.4, -750.1 | Map Marker | On the pier next to a ship in the stronghold at the east of the island “Introduction to the Station”. |
| Type 1 | -647.4, -381.3 | Map Marker | On top of the tower in the stronghold in the northwest of Feiyun Mountain. |
| Type 1 | -478.0, -274.8 | Map Marker | On top of the tower in the stronghold in the central part of Feiyun Mountain (north of the text). |
| Type 1 | -456.7, -162.9 | Map Marker | Hidden inside a boulder on the edge of the cliff in the central part of Feiyun Mountain (north of the text). Attack the boulder to unveil it. |
| Type 1 | -478.5, -3.2 | Map Marker | On a tower in the stronghold in the central part of Feiyun Mountain (south of the text). |
| Type 1 | -668.1, 263.4 | Map Marker | On a tower in the stronghold in the southwest part of Feiyun Mountain. |
| Type 1 | -542.2, 552.0 | Map Marker | On a tower in the stronghold in the southern part of Feiyun Mountain. |
| Type 1 | -483.7, 443.4 | Map Marker | On a tower in the stronghold in the southern part of Feiyun Mountain. |
| Type 1 | -263.5, 785.7 | Map Marker | On top of the eastern part of the ship remains on the Stranded Remains Island. Use your jetpack to reach it. |
| Type 1 | -405.2, 185.7 | Map Marker | Wrapped up in a Thornvine in the central part of Feiyun Mountain. West of the Eyrie. |
| Type 1 | -518.4, 233.7 | Map Marker | Covered in a Thornvine to the south of the Battle Transmission Gate. Attack with a Fire weapon to release it. West of the Eyrie. |
| Type 1 | -298.9, -183.7 | Map Marker | On top of the pipe above the waterfall north of Puddled Lake. |
| Type 1 | -131.8, -346.1 | Map Marker | In the stronghold with the large metal wall leaning into the cliff. Defeat the nearby Treasure Guard to unlock it. West of Simple Pier. |
| Type 2 | -13.8, -509.8 | Map Marker | At the back of the stronghold, near the cliff. Northwest of Simple Pier. |
| Type 1 | -214.1, -643.3 | Map Marker | On the tower in the stronghold near the edge of the cliff. South of Estuary. |
| Type 1 | -259.5, -409.8 | Map Marker | Covered in Thornvine in the middle of the field. North Feiyun Mountain. |
| Type 1 | -106.1, -795.3 | Map Marker | On top of the tower in the stronghold southeast of the Estuary Spacerift. |
| Type 2 | -351.7, -1181.1 | Map Marker | Island of Pins. On top of the large stone pillar. Use a combination of the Grapplehook, Jetpack, and Omnuim Handcannon to get to the top. |
| Type 1 | -776.4, -523.1 | Map Marker | On top of the tower in the stronghold east of the Deserted Water Treatment Plant. |
| Type 1 | 715.3, -764.3 | Map Marker | On top of the tower in the stronghold northeast of the Deserted Water Treatment Plant. |
| Type 2 | 427.9, -542.5 | Map Marker | On top of the Deserted Water Treatment Plant. Use a combination of the Grapplehook, Jetpack, and the Omnium Handcannon to reach it. |
| Type 1 | 560.5, 80.3 | Map Marker | In a boulder at the edge of the cliff in the south of Stone Mountain. |
| Type 1 | 625.9, -291.1 | Map Marker | Covered in a Thornvine north of the Stone Mountain map text. |
| Type 2 | 677.2, -5.5 | Map Marker | Sitting at the edge of the cliff on the southern central mountain of Stone Mountain. |
| Type 1 | 827.6, -74.3 | Map Marker | On top of the tower in the stronghold situated in the southeast of Stone Mountain. |
| Type 1 | 925.3, -320.6 | Map Marker | Hidden inside of a boulder on the lower east mountain of Stone Mountain. Attack the boulder to reveal it. |
| Type 1 | 279.2, -1877.4 | Map Marker | Covered in a Thornvine in the middle of the island “Listen to Earwyn”. |
| Type 1 | 827.1, 87.6 | Map Marker | Hidden inside a boulder on the northeast lower ledge of Mount Sandy. Attack the boulder to reveal it. |
| Type 1 | 588.0, 639.3 | Map Marker | Hidden inside a boulder on a southeast ledge of Mount Sandy. Attack the boulder to reveal it. |
| Type 2 | 375.0, 765.3 | Map Marker | At the peak of Mount Sandy, near the edge of the cliff. |
| Type 1 | -298, -184 | Map Marker | On the tower in the stronghold in the South of Mount Sandy. |
| Type 1 | 231.7, 611.7 | Map Marker | On the tower in a stronghold northeast of the Natural Dragon Tumulus Spacerift. |
| Type 1 | 452.7, 424.4 | Map Marker | On the tower in the stronghold in the South of Mount Sandy. |
| Type 2 | 54.7, 614.5 | Map Marker | On top of the ribcage remains in the Natural Dragon Burial Mounds. |
| Type 1 | 170.1, 884.8 | Map Marker | Hidden inside a boulder in the far south of Mount Sandy. |
| Type 1 | 765.1, 795.7 | Map Marker | Right at the top of Stone Moss Island. Use a combination of your Relics to reach its peak. |
| Type 2 | -708.5, 104.9 | Map Marker | On top of a small stone pillar on the small island south of Tetriso Ruins. |
| Type 2 | -196.9, 528.3 | Map Marker | On the tip of the cliff facing towards the Natural Dragon Tumulus at the southeast of Feiyun Mountain. |
| Type 1 | -899.0, 61.1 | Map Marker | On a floating island above the Mysterious Tetriso Ruins. Jetpack from the top of the ruins, and use the grapple hook to reach it. |
| Type 1 | 244.9, -551.4 | Map Marker | At the tip of the cliff west of the Deserted Water Treatment Plant. |
No Comments