
Leave Galbadia Garden and look for a train station nearby, just southwest of Galbadia Garden, in fact. Walk into the platform to enter the train area, walk up the stairs and talk to the conductor and pay the 3,000G required to purchase a ticket. So wonderful that the Garden doesn’t fund the travel expenses of their SeeDs… Anyways, go into the train, and after Squall messes around with the terminal try to leave the train to prompt your allies (the three characters you didn’t travel with) to arrive.
Listen to some chatter, then when Irvine follows Selphie into the nearby hallway, follow him to make sure he’s not up to too much trouble, then follow him back to the previous section of the train. Here he’ll be chastised by Quistis before launching into a melodramatic tirade about the loneliness of his profession. What a dweeb.
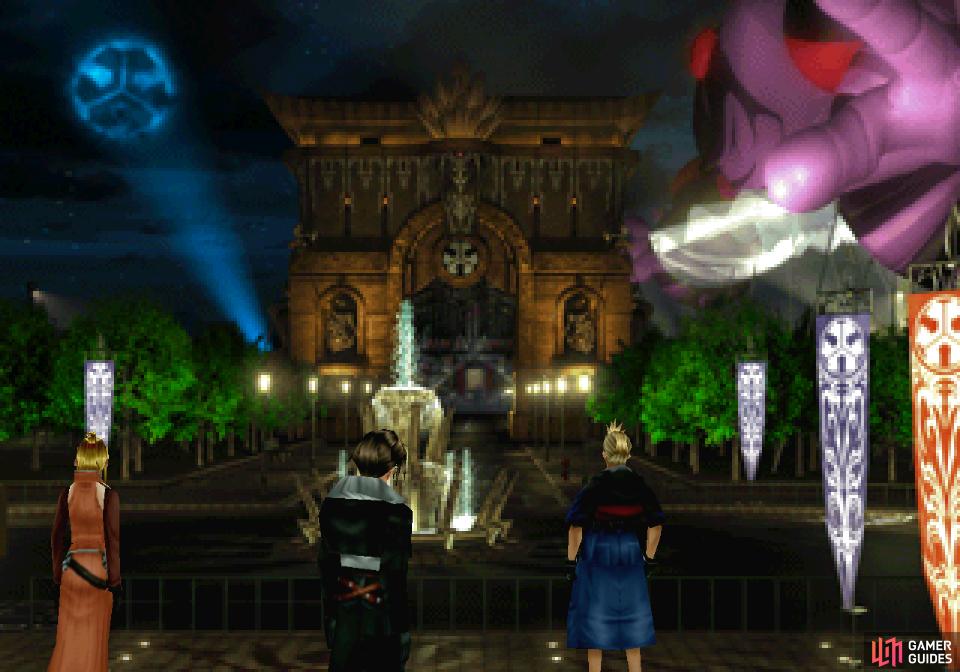
Anyways, you’ll shortly arrive in Deling City. Head down to exit the train platform, then continue up an escalator to reach the Deling City square area - the three-way intersection with the fountain in the middle. You should remember this place from Laguna’s first dream - apparently Deling City has changed little in nearly two decades. Talk to one of your companions to reform your party, then continue on to reach the street-side.
If you want to continue straight away to Caraway’s mansion, wait until one of the red and black buses stops in front of you, then talk to the man in a suit standing nearby. That said, there’s a few things worth grabbing in Deling City before you meet with General Caraway, namely claiming another copy of Timber Maniacs, acquiring a new rare card and checking out what weapons you can craft for Irvine.
Timber Maniacs 12
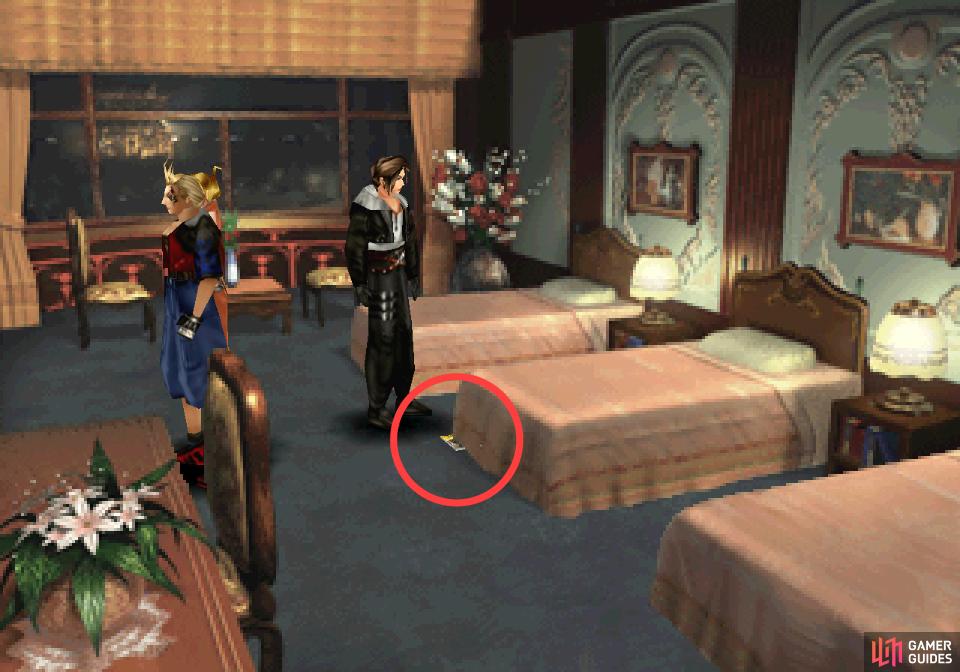
First things first, exit to the right and continue up the street beyond to reach the Galbadia Hotel. Enter the hotel and rent a room for 100G, and once you’re in your room search under the upper-left-most corner of middle bed to find Timber Maniacs 12.
Kiros Card
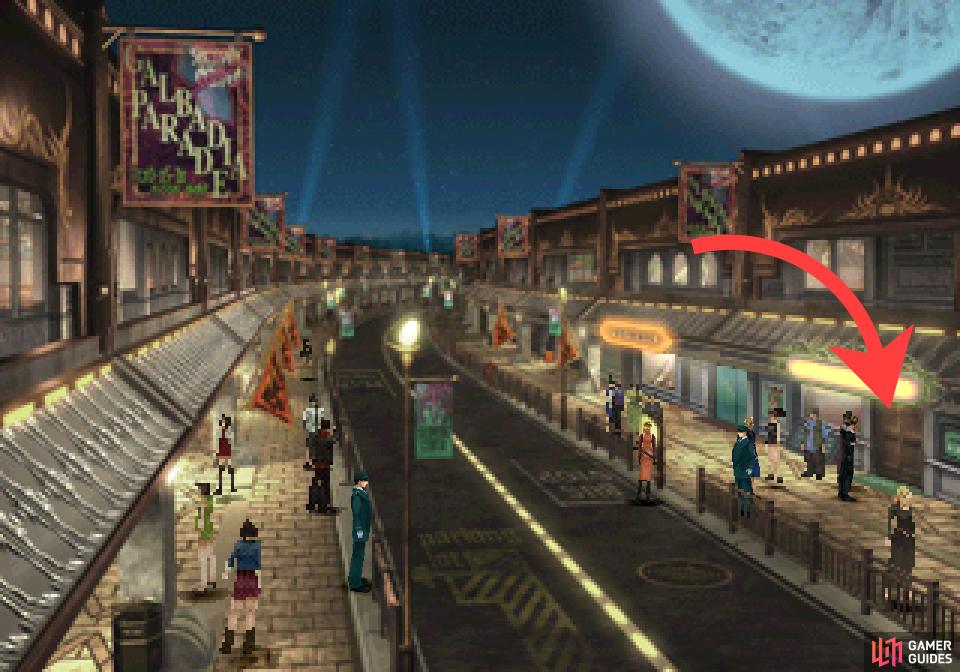
Leave the hotel and exit the street to the left to reach another street. Run down (you’ll be on the left side of the road) and look for a man in black standing next to the road, just above where the bus stops. Challenge him to a game of cards and play him until he plays his Kiros card, which you should endeavor to deprive him of.
When you have Kiros, it’s time to talk about its potential. As a playing card it’s… profoundly alright. Perhaps it boils down to playstyle, but we prefer cards that have two strong adjacent sides which allows the card to be socketed into a corner, presenting two strong sides to be challenged by future plays. The definition of “strong” is soon to become set in stone, as the strongest cards you’ll regularly face - Level 6-7 Boss cards - typically only have a max side face of 8, meaning cards that can present two adjacent sides of 8+ are fairly safe plays. Of the cards you currently possess these include Ifrit, Siren, Diablos, Fujin and Raijin and Gerogero, although the odd vertically/horizontally strong cards are good for playing later in the match, when more flanks are secure due to previously-played cards (Quistis is currently the cream of the crop in this regard). Kiros, on the other hand, has moderately strong faces on three sides, with a supreme “A” left side. Still, 6s and 7s leave this card vulnerable on every other side, making it of somewhat dubious value as a high-tier playing card.
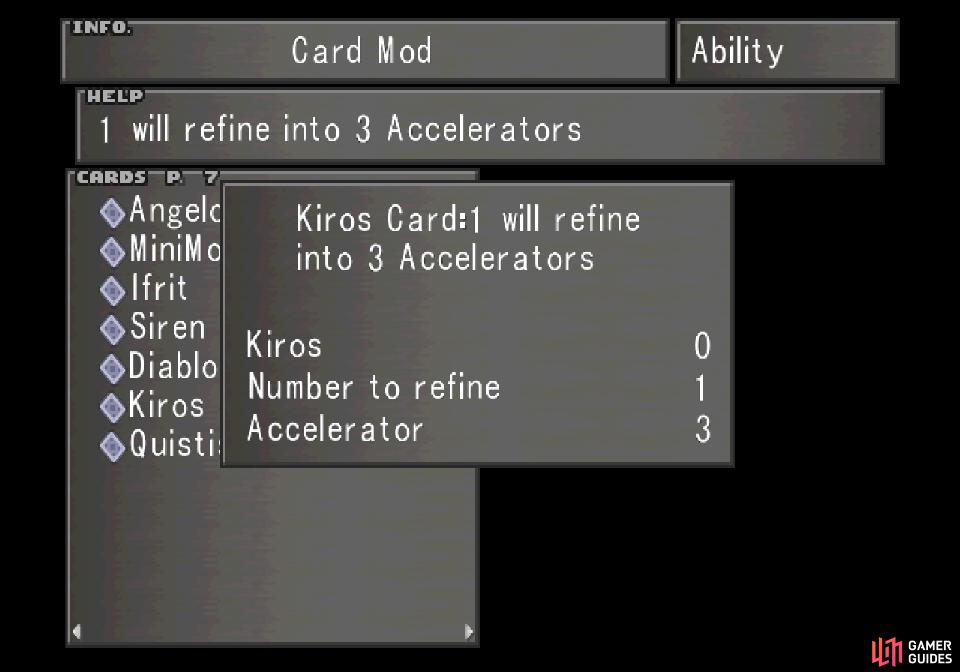
Refine the Kiros card into three Accelerators
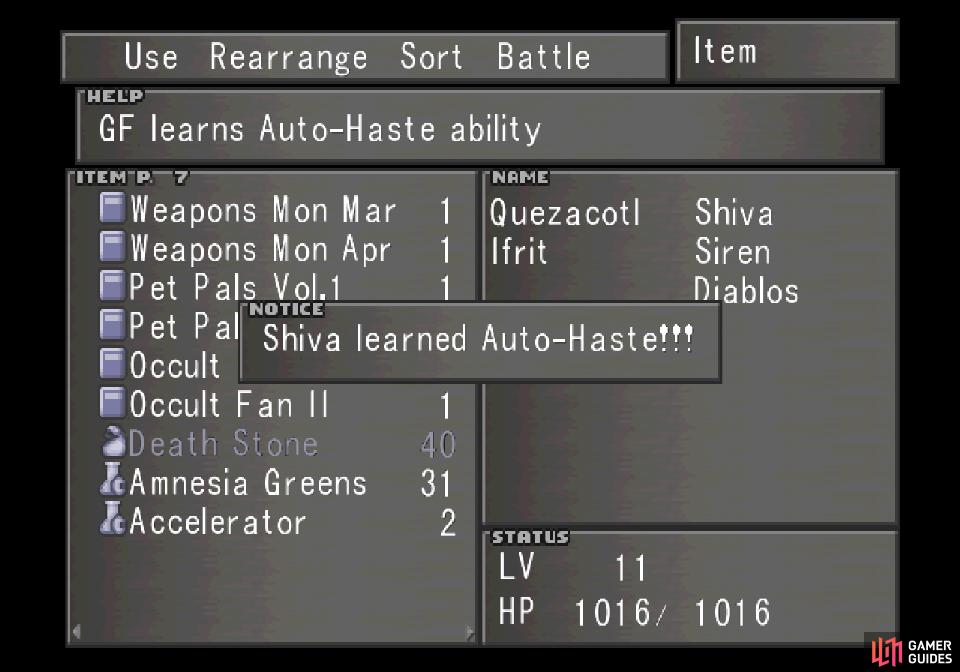
then use these Accelerators to teach three GFs the Auto-Haste ability
That said, what about Card Mod? Kiros can be refined into three Accelerator items, which can each be refined into 100 Haste spells… or far better, they can be used to teach GFs the Auto-Haste ability. This does exactly what you might think it does - it automatically grants the character using Auto-Haste the effects of the Haste spell at the start of each battle. Unlike the normal spell, this will not wear off, meaning you’ll perpetually act faster in combat with this ability equipped. Faster attacking, faster drawing… it’s quite the buff at this stage in the game, and well worth the temporary forfeiture of the Kiros card. Get three Accelerators and teach Quezacotl, Shiva and Ifrit the Auto-Haste ability. Again, we’ll endeavor to keep these three GFs separate, making them safe places to put new abilities… although you may have to use Amnesia Greens to forget some redundant abilities (like Elem-Def-J) to make room for Auto-Haste.
Visit the Deling City Junk Shop
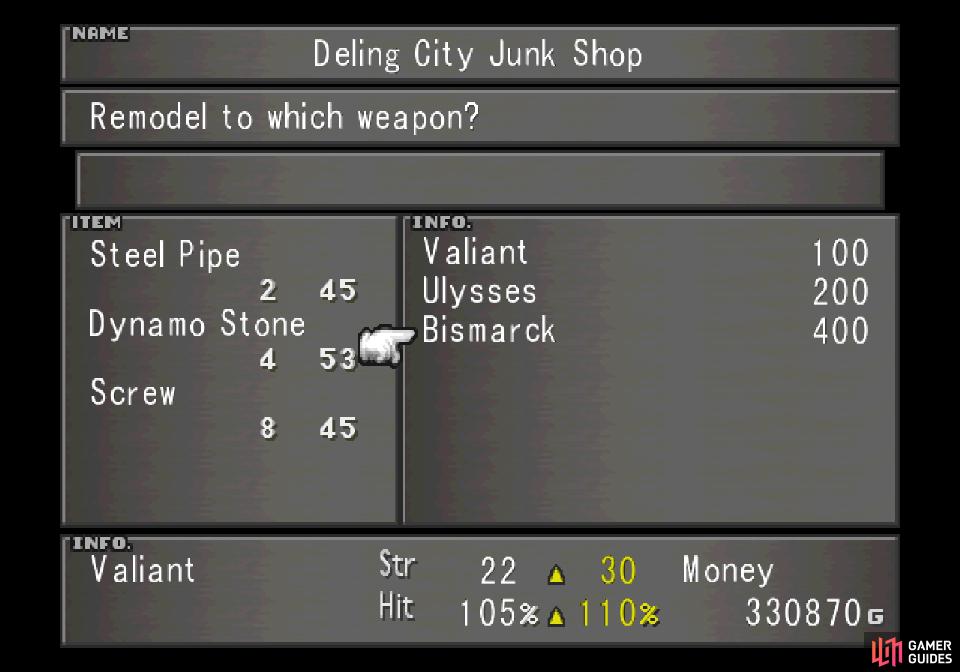
and check out what weapons you can craft for Irvine
Irvine’s Weapons
Finally cross the street to the right and look out for some wooden double doors under a purple sign with flashing yellow text. This is the Deling City Junk Shop, where you can upgrade weapons. Shouldn’t be much to do here now (unless you harvest Dragon Skins earlier, in which case - go nuts!), but Irvine is new, so it’s worth discussing his weapons:
| Weapon | User | Materials | Cost | Str | Hit% |
|---|---|---|---|---|---|
| Valiant | Irvine | Screw x4, Steel Pipe x1 | 100G | 12 | 105% |
| Ulysses | Irvine | Bomb Fragment x1, Screw x2, Steel Pipe x1 | 200G | 15 | 108% |
| Bismarck | Irvine | Dynamo Stone x4, Screw x8, Steel Pipe x2 | 400G | 20 | 110% |
| Exeter | Irvine | Dino Bone x2, Moon Stone x1, Screw x18, Star Fragment x2 | 800G | 25 | 115% |
As you can see, most of Irvine’s weapon models require copious numbers of Screws (easily obtained from Geezards - their cards or the monsters themselves) and the odd Steel Pipe (use Card Mod to refine Elastoids). Neither of these should be a problem, nor should the Bomb Fragment required for the Ulysses (Card Mod a Bomb) or the Dynamo Stones (Card Mod some Blitz cards) required for the Bismarck. Sadly, the Moon Stone required for Irvine’s ultimate weapon is currently beyond your means to obtain right now, so you’ll have to settle for the Bismarck. None of the Bismarck’s components are hard to get, so while it - like most weapons - is a bit of a modest upgrade, it won’t really hurt to craft it now and enjoy the boost, however slight.
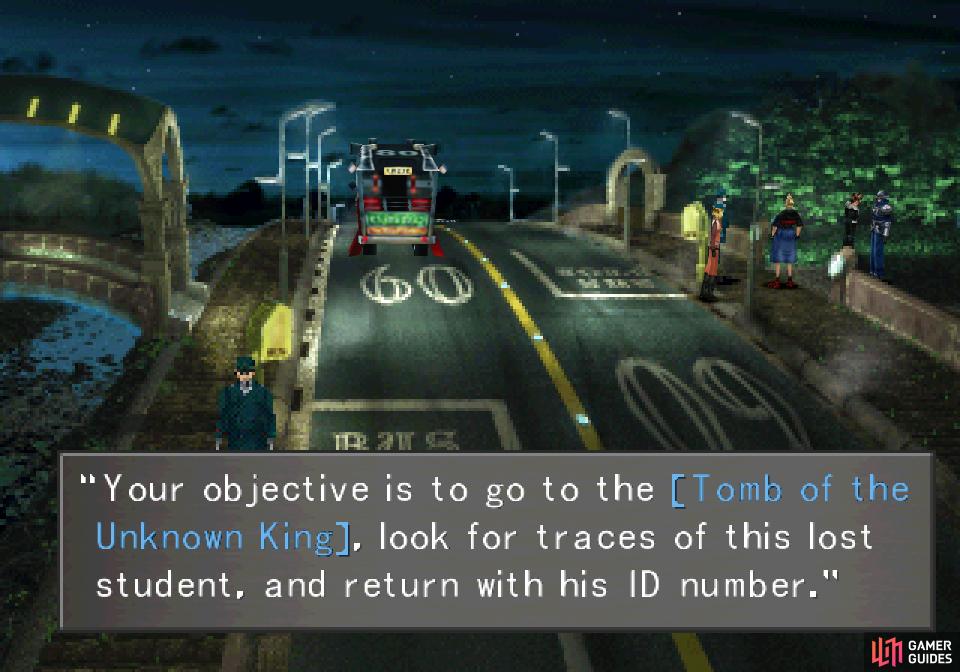
Instead of the desired meeting with General Calaway you’ll end up sent on an errand
which requires you to travel to the Tomb of the Unknown King to the northeast
Meeting with Caraway
Now that you’ve taken care of some fairly substantial business in Deling City, it’s time to see General Caraway. Since you’ve run this far already, might as well just go there on foot - you’re only two screens away, anyways. From the shopping strip area where you won the Kiros card and/or found the Deling City Junk Shop head down to exit the screen to find yourself in another three-way intersection - the Presidential Residence area, in fact. Continue right and exit the screen to reach a vertically-oriented screen with an exit across a bridge to the left and another exit to the right, near which a Galbadian Soldier stands.
Exit to the left first and you’ll find a lit walkway on which a Thundara draw point can be found. With any luck you’ve obtained Thundaga via Card Mod, but if you need it, draw it. When you’re done, return back to the right and talk to the soldier across the street who will tell you that you need to pass a test before you’ll be allowed to see General Caraway. It makes sense for somebody plotting a coup to be wary, but a test of loyalty would make more sense than a combat competency check - you’re SeeDs, after all! Oh well, nothing for it. Seems you’ll need to travel to some Tomb of the Unknown King and bring back a code number.
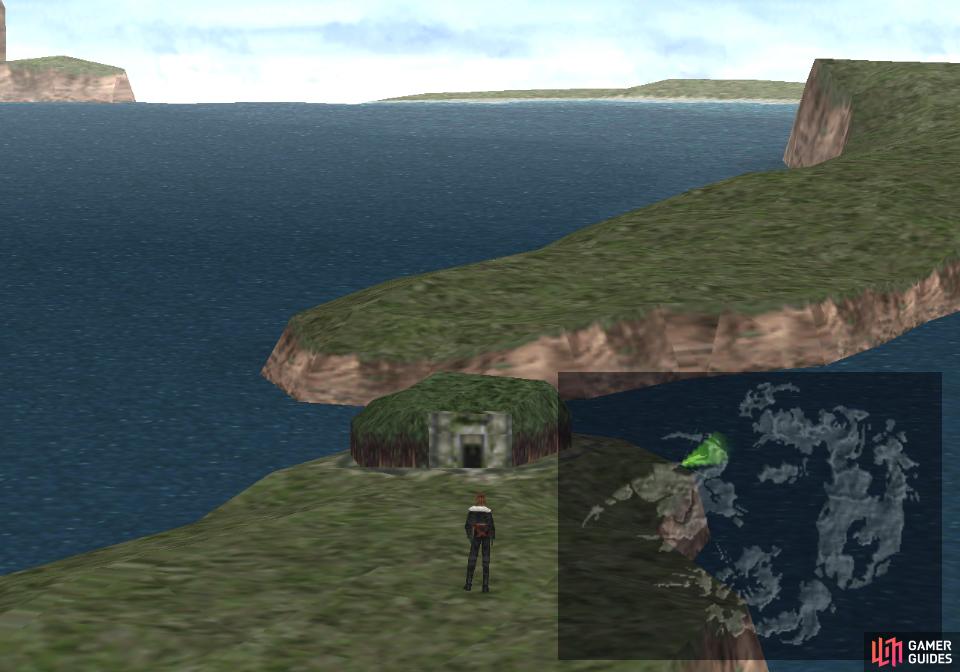
What a chore. Before you leave you’ll be given some options, including Ready to answer, Buy a hint for 3,000 Gil, Buy a location displayer for 5,000 Gil and Have him escort us out of town. No need to waste any money here - you have this guide, right? - so just get him to take you out of town to save yourself the trouble of walking on your own. If you have to exit on foot, exit the screen by following the street up, then in the next screen (the bottom left of which is obscured by a foreground sign) exit to the bottom or left. Either way you should find yourself in front of the Rent-a-Car station - save your money and just exit to the left.
Once back out in the world map, turn northeast and head down a peninsula to find the surprisingly verdant tomb.
No Comments