
Now that you have Eden’s Devour ability and GFAbl Med-RF ability (among a number of abilities obtained from other GFs) you can consider multiple ways of boosting your stats. There are multiple methods for doing this, and you can, of course, mix-and-match as you wish. These strategies will be discussed in detail below.

(1 of 3) GFs like Cactuar have stat bonus abilities that permanently increase the junctioned character’s stats when they level up.
Leveling Up
The first and perhaps most obvious way to boost your stats is to simply… level up. Crazy thought, right? But don’t go seeking out monsters to slay just yet, there’s a bit more to it than just soaking up XP! Even if you wanted to level up at some point, you were advised to keep your level low throughout most of the game, as you can now use stat-boosting abilities to increase your gains from leveling up.
Say you got Enc-None at a relatively early date from Diablos, used it from then on, but otherwise didn’t shy away from XP. In this case you’re probably somewhere between level 20-30, but if you actively avoided gaining XP and used Enc-None regularly, you could be as low as level 7-13, depending on the character. In any event, with abilities like HP Bonus (Cactuar, Brothers), Str Bonus (Cactuar, Ifrit), Vit Bonus (Cactuar, Carbuncle), Mag Bonus (Cactuar, Siren) and Spr Bonus (Cactuar, Leviathan) you’ll gain an additional +1 bonus to a given stat or +30 HP every time you level up should you have the aforementioned abilities equipped. They stack, and with Abilityx4 you can four equipped on any one character. While not much on their own, going from such a low level to the maximum (Level 100) you can gain - in addition to the character’s natural growth) - massive bonuses to these four stats.
Simple enough math, but to make a point assume you’re level thirty before you bother grinding, and you use these abilities the entire time you’re grinding until you hit level 100. This constitutes a whopping 70 point gain in up to four stats, or 2,100 HP. That’s enough, in most cases, to dispense with abilities like Str+60% or Mag+60% without really seeing a difference in your combat effectiveness, post-leveling, or it allows you to down-junction from a higher-tier spell (say Ultima) to a weaker one, thus freeing up the more potent spell to move elsewhere. Or, even better, it’ll just give you a significant boost to said stats that other methods of grinding can much more readily get you closer to maxing out.
Keep in mind that each stat (save HP and Eva) have a maximum value of 255, so there’s no point in boosting above that… or really to that, as even lower-tier spells can probably boost them by 40-50 points, being conservative. It’s also likely not worth boosting HP via this method, as characters gain relatively more HP per level (in relation to the maximum HP value) than they do in any of their other stats. For example, most characters will naturally reach around 4,000 HP (out of a max of 9,999), but will struggle to hit 60 in any stat (out of 255). Considering, then, that Meteor will boost HP by 4,600, that’ll get a level 100 character around 8,6000 HP, which is more than sufficient, while other stats (Str, Vit, Mag, Spr) won’t get anywhere near max unless they’re significantly boosted by stat boosting abilities over many levels, and then junctioned with top-tier spells (like Ultima).
With all the GFs it’s possible to boost two characters at a time this way, so just throw Cactuar (and some GFs with no stat-boosting abilities) on one character, the rest of the GFs on the other, KO the third character, and go hunting monsters. You probably don’t want to take on anything too difficult, as you’ll use up all your ability slots on stat boosting abilities. Then again, if you keep your HP low you can go run around the Islands Closest to Heaven/Hell and hope you get your turn before the enemy. Use Quistis’s Degenerator limit or one of the male character’s stupidly strong multi-hit limits to secure victory and be prepared to reload if things go awry.
While a perfectly fine way to boost your stats, keep in mind that monsters will level with you. With this method, you’re probably gaining more than most of them are, but one enemy stands out as troublesome… the last superboss will have around 200,000 HP if your party is level ten, while if you’re level 100 it’ll have over 1,000,000 HP. The difference in survivability and damage output between a high-level, stat-boosted party and a low-level party isn’t great, so leveling up will make some of the end-game fights more difficult. Again, it’s the struggle between objective strength and relative strength. How much is seeing a bunch of max stats on your status screen worth?
Don’t worry, you can have your cake and eat it, too. Of all the many benefits bestowed by keeping your level low, the ability to boost your stats later in the game is the least of them. Moving on, then…

GFAbl Med-RF Boosting
The easiest, most tedious, and perhaps slowest way to boost (most) of your stats is via the use of a couple of GF abilities. Here are the requirements:
-
You must have acquired Tonberry from the Centra Ruins.
-
Tonberry must have learned Haggle, Sell-High, Familiar and ideally Call Shop.
-
You must visit the Esthar shops, but specifically the Esthar Pet Shop.
-
You must have acquired Doomtrain.
-
Doomtrain must have learned the Forbid Med-RF ability.
-
You must have acquired Eden from the Deep Sea Research Center.
-
Eden must have learned the GFAbl Med-RF ability.
Obviously Tonberry and Eden are central to this, and it’s perhaps unfair to call it the “GFAbl Med-RF Boosting” method given Tonberry’s indispensable role, but Eden was the final piece of the puzzle, and it’s Eden’s ability that will ultimately let you turn store-bought items into the permanent stat boosts.
How this works is pretty simple, but time consuming and just about the most boring thing you can do with your life. You know, aside from writing video game guides. Despair. Anyways, there are items you can purchase (again, ideally via Call Shop) from the Esthar Pet Shop (you’ll often need the Familiar ability to buy these items) that can be refined (via GFAbl Med-RF) into higher tier items, which can then be refined again (via Forbid Med-RF) into permanent stat-boosting items, as follows:
| Base Item | Refines Into | Refines Into | |
|---|---|---|---|
| Giant’s Ring | 10 = Gaea’s Ring x1 | 1x = HP Up x1 | |
| Power Wrist | 10 = Hyper Wrist x1 | 10 = Str Up x1 | |
| Force Armlet | 10 = Magic Armlet x1 | 10 = Spr Up x1 | |
| Hypno Crown | 10 = Royal Crown x1 | 10 = Mag Up x1 |
Str Up, Spr Up and Mag Up items will increase the relevant stat by one point, while each HP Up will give you 10 HP, and can be produced in ten times greater abundance. Before you start thinking about how general HP Ups are, keep in mind that each stat up gets you 1/255th of the way to max, while each HP Up gets you merely 1/999th. Not so generous now, eh?
Some more math. It’ll take 100x base items to get you a one-point bonus to any stat, or 100 HP. With all of Tonberry’s abilities, that’s 1,500,000G per one point in any stat or 100 HP. Granted, you can gain infinite Gil by buying Tents and Cottages, refining them into Mega-Potions via Recov Med-RF, and selling the Mega-Potions, but this all amounts to quite a lot of time fidgeting around in menus. Still, there’s no risk involved whatsoever, except to your sanity.
If you kept your level low and have top-tier spells and abilities, it’s not so tedious of a grind. Just focus on getting Str Up items so you can wean yourself off Str+60% and perhaps swap Ultima out with Aura (a thirty point drop in Strength. This will allow you to junction Ultima to Mag-J and replace Mag+60% and Str+60% with, say, Auto-Protect and Auto-Shell. If that doesn’t suit your tastes, however, the current configuration will see you through the rest of the game just fine, or you can attempt another grinding method… but first, let’s talk about that black sheep of stats: Vitality.
Vitality, for some reason, didn’t get any love from the Esthar Pet Shop. You can still grind it up, but you’ll need to take a longer refining method to do so. Technically you can do this for your other stats, too, but it’s much cheaper and quicker to buy the aforementioned base items from the Esthar Pet Shops. Anyways, the Vitality boosting method:
| Base Item | Refines Into | Refines Into | Refines Into | |
|---|---|---|---|---|
| HP-J Scroll | 10 = Giant’s Ring | 10 = Gaea’s Ring x1 | 1x = HP Up x1 | |
| Str-J Scroll | 10 = Power Wrist | 10 = Hyper Wrist x1 | 10 = Str Up x1 | |
| Vit-J Scroll | 10 = Orihalcon x1 | 10 = Adamantine x1 | 5 = Vit Up x1 | |
| Spr-J Scroll | 10 = Force Armlet | 10 = Magic Armlet x1 | 10 = Spr Up x1 | |
| Mag-J Scroll | 10 = Hypno Crown | 10 = Royal Crown x1 | 10 = Mag Up x1 |
More math: you’ll need 500 Vit-J Scrolls to get 50 Orihalcon, which refine into 5 Adamantine, which in turn become one Vit Up. That’s 3,750,000G per Vit Up. You’re better off boosting Strength so you can free up an ability slot for Auto-Protect. That’ll reduce damage more than boosting Vitality is likely going to do… at least without significantly more grinding.
Anyways, one more boosting method remains: Devour.
Devour Boosting
One of the faster, more active ways to boost your stats - and you can do it without leveling up, if you try! This requires you to use the Devour command, which you can get from the Eden GF, or by completing the UFO sidequest - the PuPu Card yields a Hungry Cookpot via Card Mod, which will teach a GF the Devour command. Otherwise, the only way to gain more Hungry Cookpots is via Angelo Search (and a lot of luck/patience/time) or from Chocobo World, which is much faster than Angelo Search. You really don’t need three characters with Devour, but it can speed things up.
Devour works much like Card, except instead of turning an enemy into a Card, it turns them into delicious stat-boosts. Yum! The viable enemies are far, far fewer, but otherwise there is an obvious similarity: the lower the enemy’s HP, the higher your chances. There’s a catch, however - the enemy must be at its highest level plateau (i.e. the level at which it has its most powerful spells and best item drops), which is usually level 30+. This problem can be mitigated somewhat by using LV Up, but it slows things down considerably. Having Odin or Giglamesh can also be bothersome, as they can show up and deprive you of the opportunity to Devour an enemy. Finally, if you killed Ultima Weapon it’ll deprive you of your best chance to boost your Magic stat with Devour, as high level (40+) Behemoths can be devoured for a boost to Magic, and three such encounters are static if you used Zell to open the door to the excavation site. Then again, without Eden your ability to Devour is compromised, or at least delayed. Something to keep in mind.
Anyways, find an enemy, weaken them, then try to Devour. If successful you’ll get a message, which suggests how appetizing your character found the meal, hence how beneficial it was. The messages and their results are as follows:
| Message | Effect |
|---|---|
| “Shouldn’t have… eaten… it” | 75% max HP damage, inflicts Curse, Darkness, Poison, Silence, Sleep and Slow. |
| “Barf… Bwahhh!!!” | 50% max HP damage, inflicts Poison. |
| “Tastes awful!!!” | 12.5% max HP damage, inflicts Poison. |
| “It’s rotten…” | 6.25% max HP damage, inflicts Zombie. |
| “Can’t see anything” | 6.25% max HP damage, inflicts Darkness. |
| “Taste’s funny…” | Petrify status. |
| “Couldn’t devour!” | No effect. |
| “No good!” | No effect. |
| “Tastes okay…” | 50% max HP healed. |
| “Delicious!!!” | 100% max HP healed. |
| “Refreshing!” | 100% max HP healed, all statuses healed. |
| “Light on my feet!” | 100% max HP healed, Speed +1. |
| “Increased morale.” | 100% max HP healed, Spirit +1. |
| “Clear head!” | 100% max HP healed, Magic +1. |
| “Feel healthier” | 100% max HP healed, Vitality +1. |
| “Gained strength” | 100% max HP healed, Strength +1. |
| “All systems go!” | 100% max HP healed, HP +10. |
With that out of the way, let’s talk about the monsters you’ll want to snack on:
| Monster (Lv) | Stat Boost |
|---|---|
| Ruby Dragon (Lv 45+) | HP +10 |
| T-Rexaur (Lv 30+) | Str +1 |
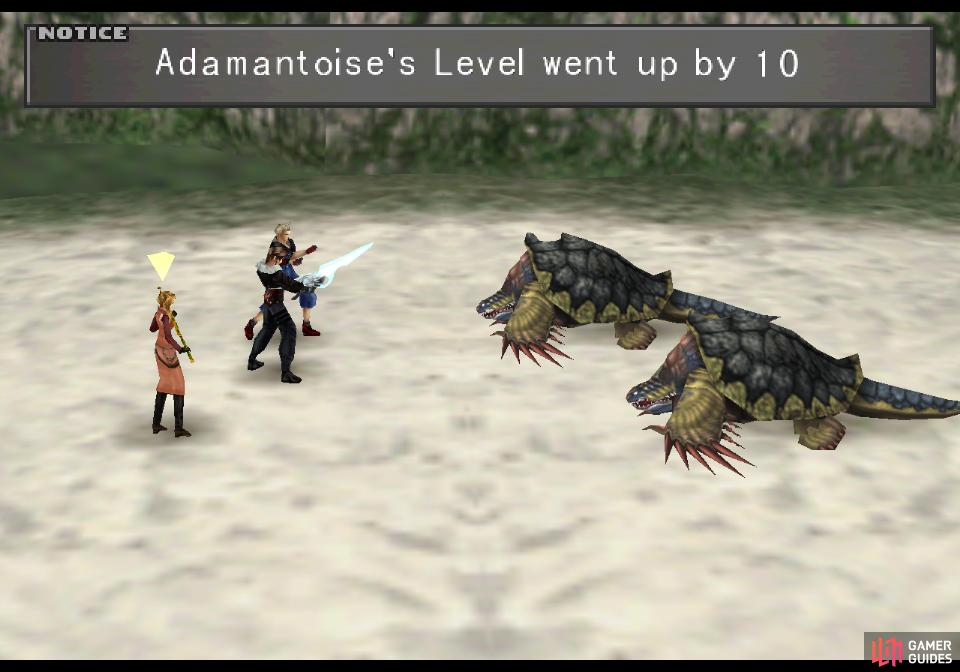
| Adamantoise (Lv 30+) | Vitality +1 |
| Behemoth (Lv 40+) | Magic +1 |
| Malboro (Lv 30+) | Spirit +1 |
| PuPu (Lv 1+) | Speed +1 |
As you can see, the monsters that are worth devouring are limited to pretty much the baddest monsters in the game, and then, only higher-level variants. The Ruby Dragon and Malboro can both be found on the Islands Closest to Heaven/Hell, and in this location they’re both level 100 by default, so you just need to whittle down their HP and Devour them. The Adamantoise can be found in Esthar (Talle Mountains) or on a beach west of Dollet (Hasberry Plains), as can the Behemoth after the Lunar Cry (Abadan Plains, Great Plains of Esthar, Nortes Mountains, Sollet Mountains). Perhaps the most useful Devour is the T-Rexaur, which can be found in a variety of places, but the easiest is in the Training Center of Balamb Garden. As for PuPu… well, he can only be encountered once, and if you Devour the cute little alien, you won’t get his card. In any event, PuPu’s not a viable source of Speed given that it’s unique.
Again, boosting Strength is probably the most useful thing you can do, as a good offense is the best defense. Also, significantly boosting Strength will allow you to dispense with Str+60% and/or Ultima, allowing to junction Ultima to another stat, or to equip another ability. Handy, then, that the T-Rexaur is such an easy foe to Devour. Just head to the back of the Training Center, save your game, then run around the screen to the right until you find them. Only Grats and T-Rexaur’s spawn here, so they’re fairly common. When you find one, use LV Up if necessary, attack it to whittle its HP down (ideally to under 25% of its maximum HP - see table below) then Devour. Junctioning Drain to Status Attack should keep your characters healed, making this even simpler. Save after you successfully Devour and repeat until you’re satisfied.
Grind up what stats you will, and to help you get a ballpark of how much damage to deal to each enemy, here are your Devour target’s HP by level:
| Monster HP/Level | |||||
|---|---|---|---|---|---|
| Level | Ruby Dragon | T-Rexaur | Adamantoise | Behemoth | Malboro |
| 10 | 6,075 | 13,900 | 1,550 | 37,300 | 14,150 |
| 20 | 12,700 | 18,400 | 3,300 | 39,800 | 28,400 |
| 30 | 19,975 | 23,500 | 5,750 | 42,500 | 42,750 |
| 40 | 27,900 | 29,200 | 8,900 | 45,400 | 57,200 |
| 50 | 36,475 | 35,500 | 12,750 | 48,500 | 71,750 |
| 60 | 45,700 | 42,400 | 17,300 | 51,800 | 86,400 |
| 70 | 55,575 | 49,900 | 22,550 | 55,400 | 101,150 |
| 80 | 66,100 | 58,000 | 28,500 | 59,000 | 116,000 |
| 90 | 77,275 | 66,700 | 35,150 | 62,900 | 130,950 |
| 100 | 89,100 | 76,000 | 42,500 | 670000 | 146,000 |

(1 of 5) If you completed the CC Group Quest, the CC Group will be on the Ragnarok in disc 4
CC Group Boosting
There’s one more way to boost stats, and while you can’t do this until disc 4, it’ll be mentioned now for the sake of continuity, and so we have one more chance to encourage you to finish the CC Group Quest on Balamb Garden while you still can.
With that out of the way, let’s get to details.
When you reach disc 4 the CC Group members should join you on the Ragnarok - assuming you’ve completed the CC Group quest beforehand, anyways. The practical upshot of this is that you’ll be able to play them at any time on disc 4, and collectively the CC Group has access to all cards from Lv 1 - 7 save for the PuPu Card.
More importantly, every rare card you’ve held at some point, then subsequently lost or refined away, may randomly show up in the hands of the CC Group on the Ragnarok. Refine away, say, the Giglamesh Card at some point? If you play the CC Group enough it’ll eventually find its way back in the hands of the CC Group, allowing you to win it back again. Even more importantly you’ll be able to refine rare cards away again and win them back as many times as you’d like! You don’t need to do any shenanigans, you can literally win a card, refine it away, play the CC Group members again to win said card back as many times as you’d like without having to move an inch in-game. Suffice to say the ability to quickly accumulate the products of refined rare cards opens up some stat-boosting possibilities, as follows:
| Card | Refines Into (Card Mod) | Refines Into |
|---|---|---|
| Ward | 1x = Gaea’s Ring x3 | 1x = HP Up x1 |
| Zell | 1x = Hyper Wrist x3 | 10x = Str Up x1 |
| Carbuncle | 1x = Glow Curtain x3 | 2x = Str Up x1 |
| Eden | 1x = Monk’s Code x3 | 1x = Str Up x1 |
| Minotaur | 1x = Adamantine x10 | 5x = Vit Up x1 |
| Giglamesh | 1x = Holy War x10, 5x Holy War = Knight’s Code x1 | 1x = Vit Up x1 |
| Edea | 1x = Royal Crown x3 | 10x = Mag Up x1 |
| Rinoa | 1x = Magic Armlet x3 | 10x = Spr Up x1 |
| Irvine | 1x = Rocket Engine x3 | 5x = Spd Up x1 |
Your mileage will clearly vary here, and for some stats it might be easier to boost them via other means. Refining the Ward Card is a very fine way to boost your HP, as each Ward Card won and refined will get you three HP Up items, which in turn will net a single character 30 HP. Strength boosting is also rather fast via this method, as refining an Eden Card will get you three Str Up items, which of course will boost your Str by three. Either way, a 3:1 rate of stat boosting via Card Mod is hard to beat via any other method. Boosting Vitality is somewhat slower, as one Minotaur Card will get you 10x Adamantine, and 5x Adamantine will refine into one Vit Up, while one Giglamesh Card refines into 10x Holy War items, and 5x Holy War items refines into a Knight’s Code, each of which refines into a Vit Up. Either way, refining can get you Vit Up items at a 2:1 ratio.
Other stats are slower to raise - both Mag Up and Spr Up are gained at roughly a rate of 1:3, which is… well, frankly anemic. Spd Up is a bit faster, as one Irvine Card will get you 3x Rocket Engines, and 5x Rocket Engines gets you one Spd Up for a 3:5 ratio. If you beat Ultima Weapon earlier or otherwise can’t or don’t want to grind Tri-Face enemies, this is one of the few truly viable ways to boost your Spd stat.
Other Useful GF Abilities
Now that you know all the ways to boost your stats, you’re free to pursue these gains as much as your patience and desire to min-max will allow. There’s more than simply boosting stats, however, as a GF’s abilities can come in handy as well. If you’ve followed this guide, every character should have access to the following abilities:
| HP-J | Common GF ability, purchase HP-J Scroll from pet shops. |
|---|---|
| Str-J | Common GF ability, purchase Str-J Scroll from pet shops. |
| Vit-J | Common GF ability, purchase Vit-J Scroll from pet shops. |
| Mag-J | Common GF ability, purchase Mag-J Scroll from pet shops. |
| Spr-J | Common GF ability, purchase Spr-J Scroll from pet shops. |
| Spd-J | Learned by Pandemona, Cerberus and Eden GFs. |
| Luck-J | Learned by Cactuar GF, Luck-J Scroll during Obel Lake quest. |
| Eva-J | Learned by Cactuar and Eden GFs, Aegis Amulet during UFO quest. |
| Hit-J | Learned by Diablos, Cerberus and Eden GFs. |
| Elem-Def-Jx4 | Learned by Alexander and Doomtrain GFs, refine from Selphie Card. |
| ST-Def-Jx4 | Learned by Cerberus and Doomtrain GFs, Status Guard during Shumi Village sculptor quest. |
| HP+80% | Learned by Brothers and Diablos GFs, drop from Jumbo Cactuar, refine 10x Giant’s Rings, refine from Ward Card. |
| Str+60% | Learned by Bahamut GF, drop from Bahamut, refine 10x Power Wrists, refine from Zell Card. |
| Auto-Haste | Learned by Cerberus GF, drop from PuPu, refine 100x Lightweights, refine from Kiros Card. |
Whew. What a list! There are still some holes, however, as you quite likely still need to get one more character Luck-J and two more characters Auto-Protect and Auto-Shell. It should also be noted this isn’t a comprehensive list of all abilities you can learn, just some of the more useful ones that you might want every character to have access to. And let’s be real, if you were willing to read about all the ways to grind your stats up, it’s quite likely you’ll go through the trouble to acquire some of these abilities. That being the case, let’s discuss how you can achieve this goal.
Luck-J Scroll: A Luck-J Scroll can be acquired from Odin. If you haven’t fought him yet, you don’t need to worry - just go get him when you reach disc 4 and you’ll be fine. Failing that, your options are somewhat limited. In fact, you’ll need to acquire 100x Curse Spikes, refine them (Tool-RF) into one Dark Matter, then refine that (GFAbl Med-RF) into a Luck-J Scroll. You can acquire Curse Spikes by using Card Mod on Tri-Face cards, or you can Mug them from Tri-Face enemies - each Mug from a high-level Tri-Face should get you 6-8 Curse Spikes, making it by far the fastest method sans Odin. There are static spawns of Tri-Face enemies in the excavation site under the Deep Sea Research Center (provided you had Zell force the door and didn’t defeat Ultima Weapon), but you can also encounter them on the Island Closest to Heaven. If you can’t get your hands on such a scroll, don’t fret - Luck isn’t a killer stat, just a nice to have for the sake of whitening up your status screen.
Auto-Protect: Will halve incoming physical damage, and unlike the normal Protect spell, it will never wear off and can’t be dispelled. Bahamut can learn this natively, but for subsequent characters you’ll need to find Steel Curtains, which teach GFs the ability. The only way to get them is via Adamantine, which you can acquire via the same method as Vit Ups: Buy Vit-J Scrolls from any pet shop, refine them (GFAbl Med-RF) into Orihalcon, refine the Orihalcon into Adamantine (GFAbl Med-RF) and finally refine (GFAbl Med-RF) 20x Adamantine into a Steel Curtain.
It takes 100x Vit-J Scrolls to get one Adamantine, and it takes twenty Adamantine to get a Steel Curtain, so this will require a bit of menu-work and Gil to do - 15,000,000G, in fact. Time-consuming, but doable. There’s no shame in using some spare Adamantine from BGH251F2 and the Minotaur Card to speed this up, by the way. If you’re so inclined, you can also hunt Adamantoise, as they have a chance to drop Adamantine (Lv 30+). Maybe farm this while trying to Devour them to boost your Vit a bit? Two birds, and all?
Auto-Shell: Works just like Auto-Protect in that it halves incoming spell damage (except for when it doesn’t - gravity and some fixed-damage spells are exceptions) and can’t be dispelled and won’t expire. Doomtrain can learn this ability natively, and it can be taught via Moon Curtain items, which can be acquired refining 100x Malboro Tentacles, 20x Magic Armlets (again, you can acquire these entirely in minus) or by using Card Mod on the Alexander Card. The latter is by far the easiest solution, just be sure you’ve completed the Queen of Cards questline and acquired the Doomtrain card, first.
Recover: Not strictly necessary, considering how easy it is to acquire healing items like X-Potions, but Recover is a great command to have. Unfortunately it’s difficult to obtain, considering you need Healing Ring items to teach it to GFs - only Leviathan has it by default. Healing Rings can be obtained via Angelo Search or Chocobo World, (the latter being much faster than the former), but you can also refine (GFAbl Med-RF) 100x Whisper items into one. Sadly, these aren’t easy to farm, as they can only reliably be obtained by stealing them from high level (30+) Adamantoise enemies. Each turtle will yield 3-4 of them per successful Mug. If you can’t be bothered, it might just be easier to buy X-Potions and use the Item command, instead.
And that’s it. Grind as much as you want, boost your stats, learn abilities. Best case scenario, you’ll walk into Lunatic Pandora with a low-level party, 255 Strength, 9,999 HP, Auto-Haste, Auto-Protect and Auto-Shell… very little can slow you down, much less stop you! Higher-level versions of this party will need a few more hits (or better yet, limit breaks) to kill foes, and will take more damage, but they’re pretty nigh indestructible, too. Of course, even if you don’t grind, the low level party with 200~ Strength, 9,000~ HP and Auto-Haste (sans Auto-Protect and Auto-Shell in favor of Str+60% and HP+80%) is more than capable of beating the game - and final superboss - too. Grinding is really just for vanity.
Anywho… there’s nothing left to do but put a stop to Ultimecia’s machinations. Time to fly to Lunatic Pandora.
Se eu já usei a carta alexander no Disc 3? Não tem como concluir a missão da rainha das cartas no disco 3?
Se eu já usei a carta alexander no Disc 3? Não tem como concluir a missão da rainha das cartas no disco 3?