
The World Map
The world map puts you in a third person isometric view with a camera you can rotate (R1/L1 buttons rotate the camera by default), as well as shift the camera perspective (R2 by default). As you move around the map you may randomly encounter enemies, but for now if you stick to the roads you should be safe enough. Not that you necessarily want to avoid enemy encounters right now, but… more on that in a bit. You can also find draw points on the overworld map, but unlike many of the draw points elsewhere, ones on the world map are hidden unless you have a GF with a certain skill. Another matter you can fret over later.
Drawing and Junctioning Spells
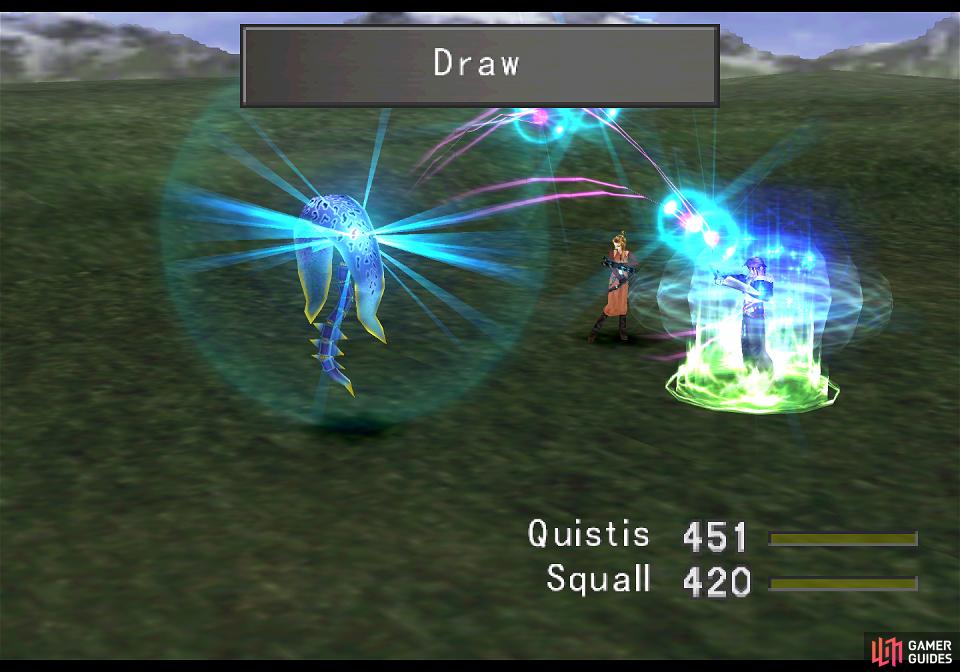
Instead of avoiding random encounters and making a bee-line to the Fire Cavern, you should follow Quistis’s advice and stock up on some magic by seeking out enemies on the field. When you get into battle (just run around off the road in the forests, plains or beaches) simply use the “Draw” command and choose to “Stock” the selected magic, which will add said magic to your inventory for future use. You can also immediately cast drawn magic, which may come in handy as you take damage - just draw Cure and cast it to heal injured characters as necessary.
Right now there are four enemies you can encounter in the wilderness around Balamb Garden. Glacial Eyes and Bite Bugs can be found in the plains areas, and you can draw Blizzard, Cure and Scan from the former and Fire and Scan from the latter. In the forests dwell Bite Bugs and Caterchipillars, the latter of which have the Thunder and Cure magics, while on the beaches you’ll find Fastitocalon-Fs, who possess Blizzard, Sleep and Scan magic. This process can be a bit time-consuming, but once you have 100 of all the aforementioned spells you’ll be in fine form for the challenges that lie ahead. Weighing down the button on your keyboard or using a good old rubber band to do the same for the controller will make this simpler, just make sure you have the cursor set to “Memory” in the config menu.


It’s also worth noting you may not want to actually kill any enemies in combat. In Final Fantasy VIII, enemies level up when you do, and to make the strongest characters (both overall and relatively) you’ll want to keep your levels low. This will be covered in more detail shortly, when you acquire the means to manipulate how much experience you earn in battle (or whether you even fight random encounters!), but for now, just flee from battle (hold both R2+L2 by default) once you have drawn the spells you need.
Once that’s done, go into the menu and pick the “Junction” option, select one of your characters, then select “Magic” instead of GF. This will allow you to junction acquired spell stocks to a character’s attributes, albeit with some limitations. Chiefly, you can only junction spells to stats if your equipped GF has an ability that allows you to do so. In this case Quezacotl starts with the Mag-J ability, allowing you to junction magic to your Magic attribute and can also learn HP-J and Vit-J if you acquire enough AP, while Shiva starts out with Spr-J and can learn Str-J and Vit-J. AP is earned by defeating enemies in combat so long as the GF is equipped to a character in the fight… and wouldn’t it be a wonderful thing if you could further expand your own power by acquiring AP from enemies without earning EXP? All in good time, grasshopper, but for now stop getting ahead of yourself.
So, whomever has Quezacotl can junction magic to their Magic stat, and whomever has Shiva can junction magic to their Spirit stat. If one character has both GFs equipped, they can junction magic to both stats, but there’s no bonus for overlapping, so spreading out your GFs so important abilities are on every character is a good idea. Only one spell can be junctions to one attribute at a time, and generally speaking the more powerful (and rarer) the spell is and the more numerous your stock, the greater the effect of junctioning. Spells that are junctioned to stats can be cast normally, although you probably want to avoid this so as to not lower your stats. Right now Cure will give you the most gains when junctioned to your Spirit stat, and Sleep will boost your Magic stat the most, but the numbers overall are rather small, so don’t expect any dramatic changes.
Finally, make sure your GFs are learning useful abilities in case you do earn some AP. To do this select the GF option in the menu, select the GF you wish to learn an ability with (say for sake of example, Quezacotl), then select the “Learn” option to bring up a list of the GF’s abilities. Simply pick one and an arrow icon will appear to the left indicating it’s what the GF is putting any AP it earns towards. To start out, have Quezacotl learn the “Card” ability, while Shiva should learn “Str-J”.
Whew. When all that’s done, save your game and head over to the Fire Cavern.
Select a reasonable time limit for your trial

but don’t be shy about cutting down weak foes like Red Bats as you make your way through the Fire Cavern
Through the Fire Cavern
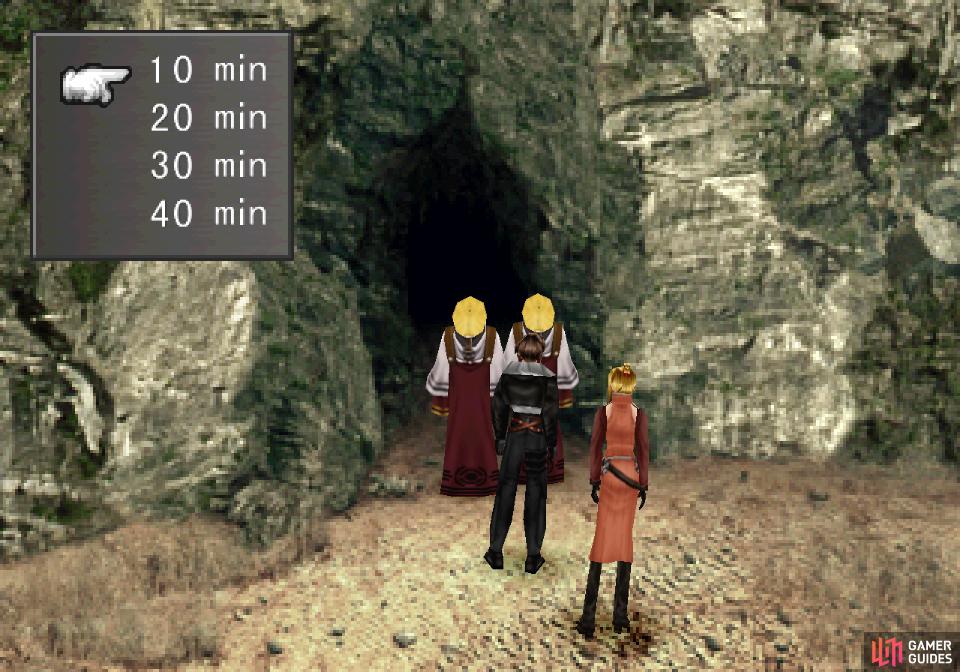
When you arrive, head down a path to reach the entrance to the cave… or attempt to, as Quistis will pester you again with more tutorials. First on junctioning magic to stats (which was covered earlier) and then she’ll try to tell you how to use your gunblade. The nerve! Suffer through these tutorials then head to the entrance to the cave where two Balamb employees await, who will inform you of your mission when you talk to them. Looks like you’re hunting a “low-level GF”, which… well, kind of makes sense given how entwined SeeDs are with these things.
Next pick how much time you’ll need for this mission: 10, 20, 30 or 40 minutes. Completing this assignment quickly isn’t the goal so much as picking the correct amount of time is - you’re being graded on your professionalism and sagacity, so the less time you have left on the timer when you’re done, the better you’ll be judged. Of course, you need not worry too much about this, as Gil (the game’s currency) isn’t something you should fret over much. In any case, just pick ten minutes, as the dungeon isn’t very long or dangerous, and there’s a way you can ensure you get a good grade regardless of how much time is left on the clock when you’re done.
That all taken care of, a counter will start on the top right of the screen. Head on into the Fire Cavern and simply follow the linear path through the lava-filled dungeon. Quistis will make the odd comment as you proceed and you may be attacked by enemies including Bombs, Buels and Red Bats, none of which are terribly strong and all can be fled from if you’re concerned about keeping your experience low. Killing Buels and Red Bats is fine, as their EXP-to-AP ratio is pretty good, but Bombs should be avoided. If you acquired plenty of basic magic earlier, none of these foes should have anything you need to draw, either, which is good considering your time constraints.
Eventually you’ll reach a part of the dungeon where the path forks, and while on the fork to the right you’ll find a draw point, you shouldn’t need the Fire magic stocked there. Continue deeper into the cave until you reach the end, where Quistis will comment on the strength you and Seifer possess. You’ll get a chance to prove that strength soon, as at the end of the cave awaits the GF you came to subdue - Ifrit.

Ifrit awaits you in the depths of the Fire Cavern
Boss - Ifrit
:::ggtable
| Ifrit | |
|---|---|
| Lvl: | 6-6 |
| HP: | 1068 |
| Weaknesses: | Ice (200% damage) |
| Resistances: | Fire (absorbs) |
| Status Resistances: | Immune to all status effects |
| AP: | 20 |
| Draw: | Fire, Cure, Scan |
| Mug: | – |
| Drop: | G-Returner x3-6 |
| ::: |
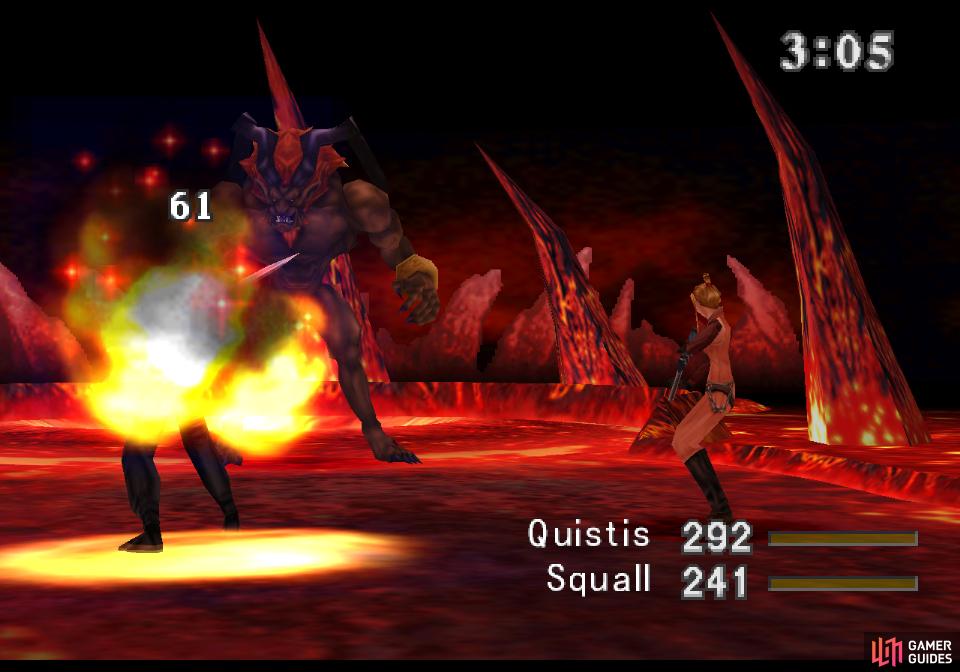
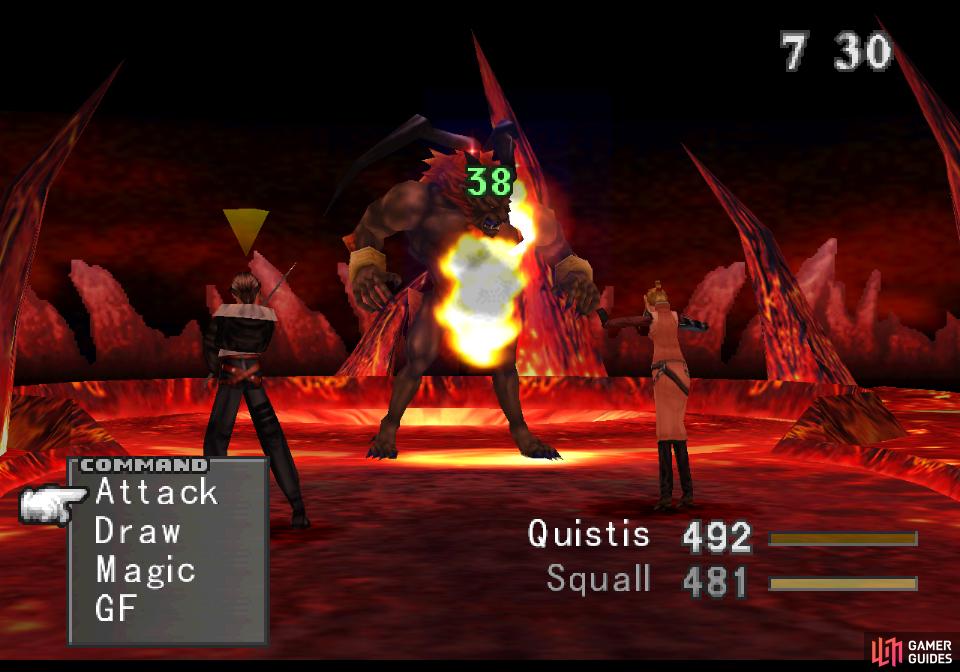
Ifrit will attack mainly with Fire, backed up by the odd physical strike
Keep your characters above 100 HP by drawing and casting Cure from Ifrit
Ifrit is easily the most difficult foe you’ve faced thus far… even if you haven’t been running away from everything! He’s also one of the few bosses with static stats, so enjoy that while it lasts. That said, he’s got just over 1,000 HP, which is plenty to worry about at this level. He’ll mainly employ two attacks, casting Fire (50~ damage) and less commonly performing a physical attack which can hit for over 100 damage. That being the case, you’ll want to keep all your characters above that range, and fortunately you can draw and cast Cure from him. One should be wary of Ifrit’s high Spirit stat, however, as it can cause some spells drawn from him to be less effective than normal, so if you get a low Cure cast, that’s probably why.
Fire will heal Ifrit instead of causing harm
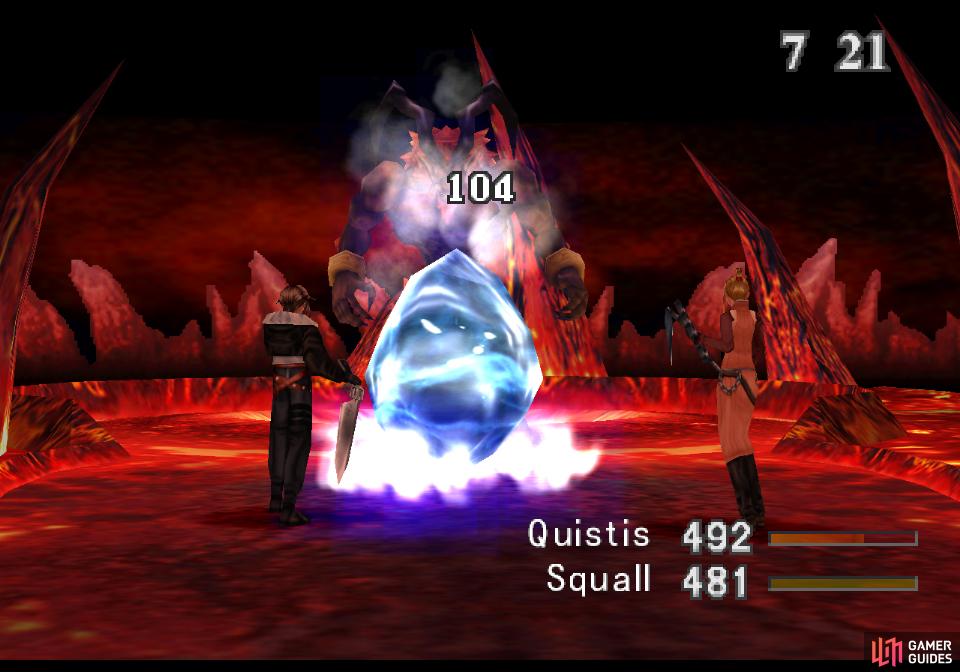
while ice magic will deal more damage than usual.
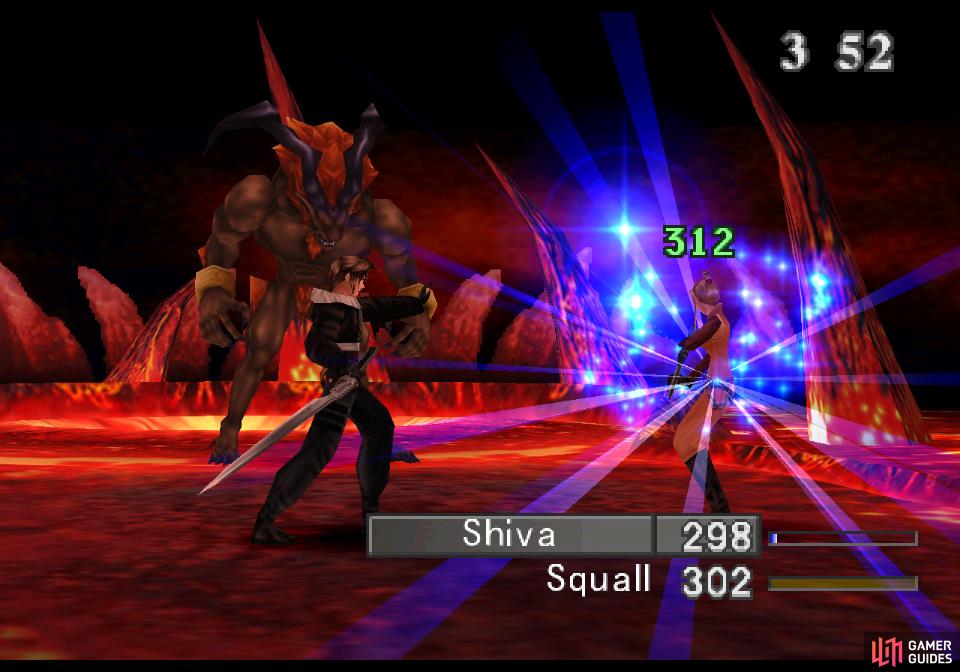
You can also draw Scan and Fire from Ifrit, but considering Ifrit absorbs the latter, you’d do well to avoid fire magics in this fight. On the other hand, ice will deal twice as much damage to Ifrit as normal, so using Blizzard or summoning Shiva are both fine ideas. The latter will cause Ifrit to comment about his rival and will likely do around 150~ damage to the GF, making it a worthy summon.
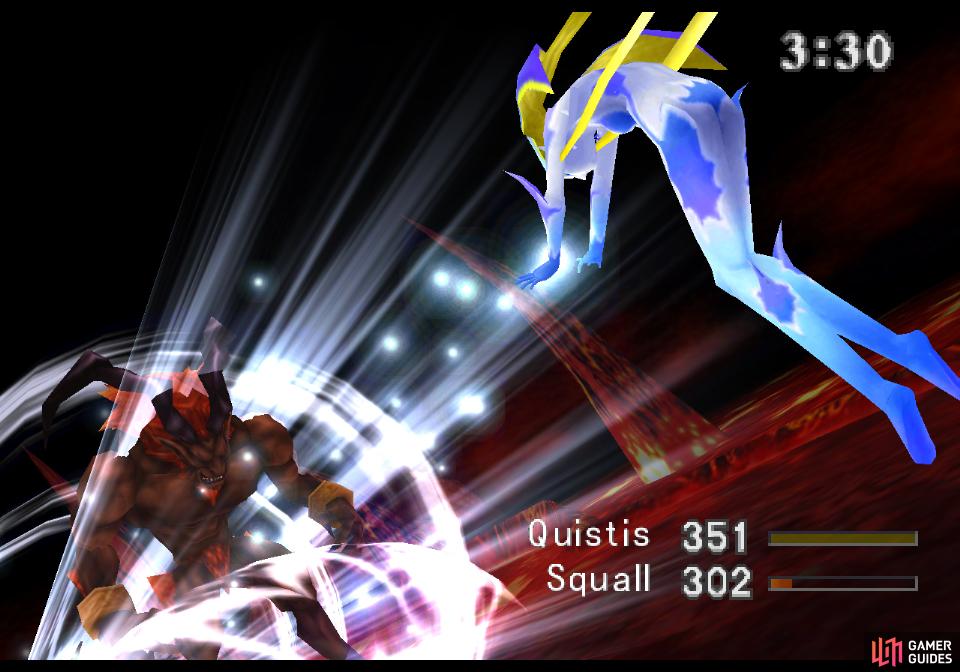
Shiva is especially powerful against Ifrit, and her appearance will provoke some unique dialogue
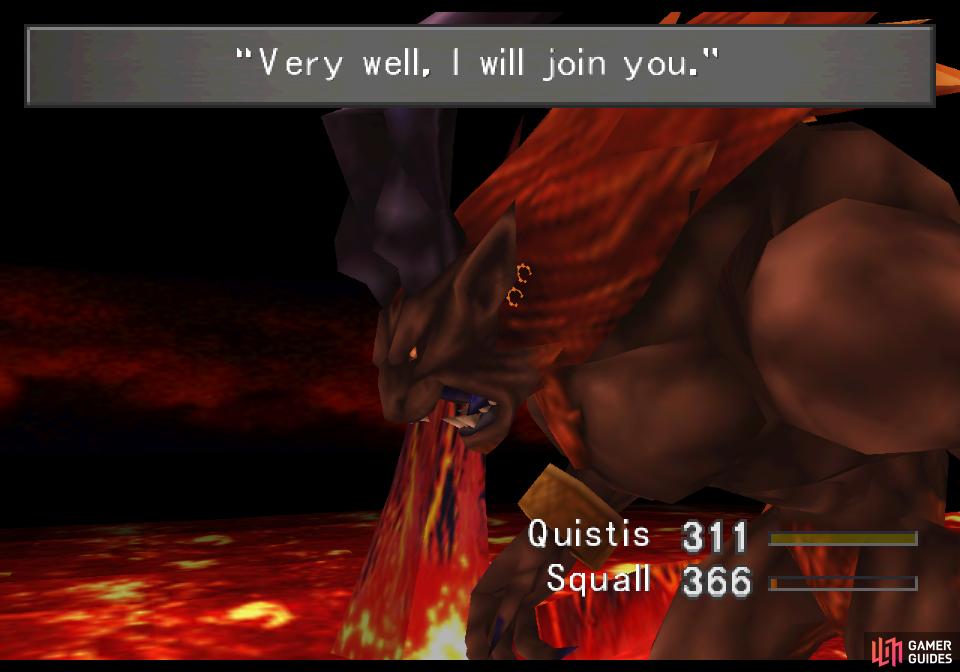
Defeat Ifrit and he’ll submit to you
Keep track of the damage you’re dealing to Ifrit, and when you near 1,000 damage, wait for the timer to run down until it’s under thirty seconds or so. For a perfect score you’ll need to finish the battle, collect treasure and name Ifrit with seven seconds or less on the clock. On the Playstation version, this is as simple as letting the counter hit 00:00 while you’re naming Ifrit (you won’t be able to see the counter after the fight, but it’s still counting down), while on the PC version if you let the timer hit 00:00 while naming Ifrit you’ll get neutral score, which will affect your Seed rank later on. It’s something to strive for, but all your SeeD rank really effects is how much Gil you earn, so you shouldn’t fret over this too much.
After you defeat Ifrit you’ll obtain some G-Returner items (between three and six, with the lower numbers being drastically more common) and the Ifrit card. This item will significantly improve your chances of winning games of Triple Triad when you get back to Balamb Garden. You’ll also earn 20 AP and no experience, which is a feature most bosses share. When you get to the GF naming screen, leave the game idle until you’re sure the clock has run down, then confirm the name (we’ll use the default name Ifrit) to ensure you finish the trial with no time left on the clock. Kind of makes the whole timer point moot, but… it is what it is.


After naming Ifrit, Quistis will decide that now is a fine time for another tutorial, this time explaining the “Elem-J” ability Ifrit has as well as elements in general. Simply put, with the Elem-J ability you can junction elemental magic to your normal attack, which will imbue that attack with said element. This is potentially a good thing and a bad thing, as if an enemy is weak to an element, your weapon will deal more damage, but if it’s resistant, immune or it absorbs that element, your weapon will do less damage, no damage, or will outright heal the enemy. Would have been nice to have Blizzard junctioned for this last fight, but there’s nothing to be done about it now. Elemental resistances are less worrisome, just so long as you know what you’re likely to come up against, you can equip the correct spells and increase your resistances.
Go put Quistis’s advice to practice and equip Ifrit to Squall, then go to the magic junction menu and assign any element to Strength. Press left on the left analog to move over to the elemental junctioning screen, then equip Blizzard to your elemental attack slot. Or not, you probably won’t be staying in here long anyways, but it’s worth going through the motions to see how this works so you’ll be prepared to do it later. While you’re fiddling around in your menu, make sure Ifrit is learning something useful - the HP-J ability will be a fine place to start for now.
With all that out of the way, start the trek back to the cave entrance. Be sure to kill enough Red Bats and Buels on the way to learn the Card ability with Quezacotl, as that ability will unlock the “Card Mod” ability, which is where some real power-gamey stuff becomes possible… It’s recommended that everybody spend at least a little time grinding to learn Card Mod and a few other abilities, as it’ll make your characters vastly more powerful for relatively little effort. This process will be discussed below in the next section Learning Card Mod, but if you can’t be bothered just return to Balamb Garden in-game, and in the guide skip to Triple Triad Before the Field Exam… which might be moot if you don’t learn Card Mod first, but hey, your call.
No Comments