
This can be a fairly long dungeon and there is one particularly annoying enemy in it, the Spiny Mine. Think of these like Bombs from the Final Fantasy series, as they will explode once their health reaches a certain threshold, damaging everyone in your party. Also, the Forky Pig and Chimaera enemies both have breath attacks that inflict damage to everyone. There’s nothing in the first area of the dungeon and the doorway in the northeast corner leads to a dead end for now, so ignore it and make your way to the northwest corner, where you will find some stairs.
You will find that this floor is a bit of a maze, with multiple paths and stairs leading to a few dead ends. From where you start, take the stairs directly to your west and you’ll spot two chests in this room ( Seed of Resilience and a Chain Sickle ). Take either set of stairs up to the first floor again and use the remaining stairs in the northeast part of this little area to another section of the floor with the treasures you just grabbed.
Go straight south to the next set of stairs and there will be another chest at the end of the path here ( Mini Medal #24 ). Ignore the stairs in the middle and go back up the ones you used to get here, then take the long path down to the south for more stairs. Follow this path until you arrive in an area with some jail cells, some of which have pots. Break the ones in the northwestern, northeastern and the southwestern cells to get some items ( Seed of Strength , Horse Manure and Seed of Magic ).
There are two ways you can get to the next floor, either by taking the stairs in the southwest corner or by dropping through the hole in the northeast section of the map. Before you do that, however, go towards the southwestern stairs and you’ll find a chest at the little dead end there ( Iron Shield ). Use those stairs and head northeast, breaking the pot along the way ( 50 gold coins ) and towards the southeast corner, where there’s another chest ( Yggdrasil Leaf ). Now, start heading straight north from the stairs you used to get here.
Break all of the pots that you can find, which should net you a Mini Medal (#25) and then head to the northeast corner of the map. Enter the doorway there to find a magical prison, holding High Priestess Jacqueline hostage. Go down either set of stairs and you’ll have to solve a minor puzzle in order to free the High Priestess. There are some blocks you can push around and a bunch of holes in the floor above. The goal of the this puzzle is to push the blocks down certain holes to make them smash the orbs below, freeing Jacqueline.
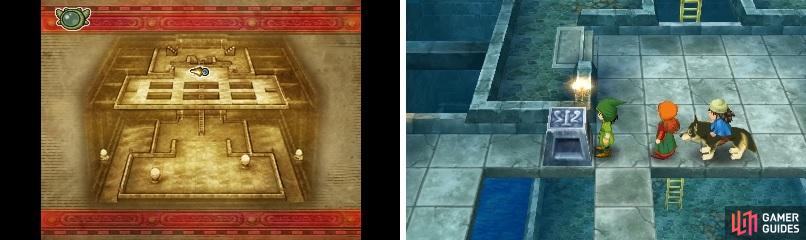
You need to push the stones down specific holes in order to break the two orbs which hold the High Priestess hostage.
Start with the right block and push it four spaces down, three spaces right, one up and once more to the left into the hole. For the other block you need to push, it will be the left one and in the following order: four down, three left, two more down and one right into the hole. Return to the room with the prison to find that you have freed Jacqueline. Unfortunately, you have a couple of party crashers that should be familiar to you, but thanks to a little help from Jacqueline, they won’t be able to squash you this time.
BOSS - Rashers and Stripes
Despite Jacqueline stripping them of the powers they stole (and a full heal too), these duo can still dish out a lot of damage. Thankfully, all of their attacks are physical, but they can still hurt. Of the two, Rashers is probably the stronger of the two, plus he has the annoying ability to Dazzle your characters (he’s the pig). While weapons like Boomerangs are nice since they hit both, it might be a better idea to equip single-target weapons if they are stronger.
Rashers’ normal attack does around 30 damage and he has a desperation attack that can inflict up to 65-70 damage. He can also violently swing his weapon, dealing around 40-45 damage, as well as the sand attack that can Dazzle your party members (it can last a good while before it dissipates on its own). Stripes doesn’t seem as strong, physically, but he does nothing but attack. His normal one does around 20-25 damage and he has an attack with his tail that does about the same. As with Rashers, Stripes has a desperation attack that deals around 50 damage.
The reason this fight is tough is because you have to resort to Medicinal Herbs and the Salvation Stone for healing (the latter should be on a character). One character should be dedicated to healing (probably Maribel, since she’s the weakest, physically) and the other two characters should be concentrating on attacking. Since everyone should have a full inventory of healing items, you can designate a round or two for someone else to help with healing when needed.
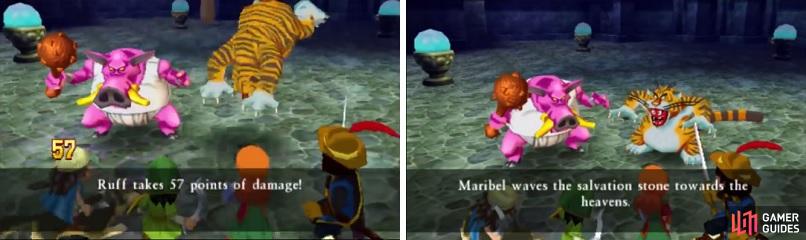
Each of the two bosses has a very damaging attack (left). Make good use of the Salvation Stone during battle (right).
With those two brutes down, you will have to trek back all the way to the dungeon’s exit, although there aren’t any monsters thankfully. If you feel you missed any treasures, feel free to get them now. Once you exit, make sure you rest and save, then go to the house on the hill to get a scene. After that’s over, talk to Jacqueline, who will give you a key that’ll allow you to open a door in the Dungeon of Descent. As you exit the house, there will be one more scene, then you can head to the door.
No Comments