
Fly on over to the continent with Wetlock and look for the church you might have used to the west of the main city. If you head south on your carpet, you should see a small island that you can land on. Do that and open the chest there for a Trailblazing Bandana . In the tall grass that’s east of Wetlock, there will be another chest waiting for you, with this one containing a Serial Quiller Heart . Enter Wetlock to continue.

The one small island near Wetlock (left) will have a treasure chest on it (right).
Check out the equipment shops to see if you can get any stronger stuff for Mervyn, and don’t worry about the chest behind the counter, as it’s empty. The house in the southeast has some interesting books, as well as a Seed of Wisdom in the pot. At the northern end of the town, you should see a scene that plays automatically when you get close enough. Go ahead and speak with Professor Wade about the tablet piece his assistant dug up, but he wants you to do something in return before he hands it over.
Remember that raft you used to access the storehouse in the past? Get on it and go to the eastern side of the town, entering the hidden area there to find a cat on a platform. If you mash the A button around the cat, you should be able to find a Mini Medal (#53) . Wade’s house is the one where you picked up the Seed of Wisdom, so return there and speak with him to find out that he wants you to clear the Highendreigh Tower of monsters, so you can do some research there. Exit Wetlock and cross the bridge to get to the tower, but before entering, look on the northeastern side for a chest ( Gold Bracer ).
Highendreigh Tower (Present)
Enter the tower from either of the southern two entrances and go down the stairs to find a King Slime waiting for you. This thing is not like the normal King Slime you can fight from the 1:8 Slimes calling in their buddies, as it can attack twice per round and hits like a truck, dealing a good 50+ damage with its attacks. It can also use Midheal to recover around 90+ of its own health. Since it doesn’t have any group attacks, it should be relatively easy to outheal it at this point, especially with Mervyn now being in the party.
You will receive an Enclosure Plan from it after defeating the King Slime, which is something used for Monster Meadows, a distraction that you will be unlocking shortly. After the battle is over, the King Slime will split into four smaller Slimes and one named Goobris will offer his help in showing you where the big monster that is causing trouble is located in the tower. Agree to his helping and Goobris will temporarily join your party. Check out the pot in the upper right corner of the room to fight a Frighturn.
Back on the first floor, you will find a Red Fragment at the north end, so go and pick it up. Take the northwestern stairs to the second floor and go around to open up the gate that is blocking access to the central stairs. Use the other stairs to go up to the third floor, where you will find some barrels in the northwest corner ( Mini Medal #54 , 50 gold coins , and Horse Manure ). Inspect the gate in the northeast and Goobris will go through the hole to open it for you. On the next floor, go around to the west and you’ll find two pots near switch that opens the locked gate. One contains a Slime Heart , while the other is a Frighturn; approaching them from the south will heed a warning from Goobris about the floor being unstable and if you don’t listen, you’ll fall through to the floor below. Use the stairs in the middle to reach the top floor, where you’ll get a scene at the southern end, with the boss showing up after it.
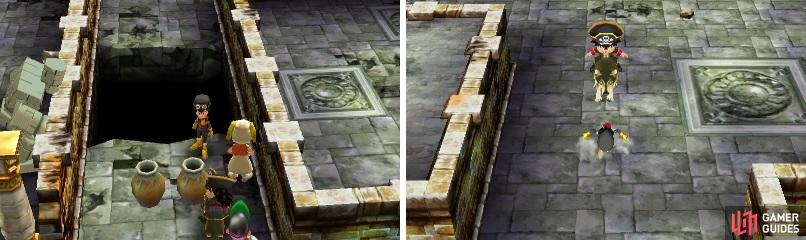
Listen to Goobris’ warning about the floor being weak, as walking on it will create a hole (left) and send you to the floor below (right).
BOSS - Galumph
The Galumph looks a bit scary, because of its size, and you should be worried, as it can do a lot of damage. Its physical attack hits somewhere around 50 damage to a single character and its Cool Breath attack hits about the same (maybe less depending on your equipment), but against your entire party. That’s the extent of its attacks, so the battle pretty much boils down to making sure you can heal your wounds in between rounds. It is vulnerable to Sap and you can use Buff to increase your own defense against its physical attacks, but the only thing that can reduce the breath’s damage is equipment and Insulatle (a few Intermediate classes learn it; Armamentalist, Sage and Monster Masher).
The monster will drop a Red Fragment upon its defeat and you’re finished here, so return to Professor Wade in Wetlock. Inform him of your victory and he will scurry off to the tower with his assistant, so follow him. Upon re-entering, there will be a scene with the Slimes, so say yes to knowing the old man and they will leave Wade and his assistant alone. Head on up to the third floor and speak with Wade, who almost forgot about your reward, which is back in Wetlock. Back at Wetlock, use the raft to get to the storeroom and speak with the guard to make him move. You’ll find a Seed of Life in the chest, as well as a Red Fragment on the ground.
Sunken Citadel (Present)
There’s one more thing you can do here, which is to revisit the Sunken Citadel, with the whirlpool being in the exact same spot as before. If you have trouble finding it, it’s southwest from the church near Wetlock, just off the coast. The first thing you’ll notice is that monsters are roaming around, but they are all friendly and won’t attack, so you don’t have to worry about any battling. Start off by entering the southeastern room to find a Red Fragment sitting on the floor, then go behind the northeastern one to find a chest with a Mini Medal (#55) in it.
Enter the northwestern doorway and follow the path until you find another doorway to enter, where you’ll find a chest ( Ruby of Protection ). Return to the main room and inspect the middle pillar to move it, revealing some stairs. In the left cell, break the pot for a Pilchard Pie , then head to the next floor. You’ll find a bunch of pots at the beginning, two of which are Frighturns and another containing a Seed of Magic . Continue via the right doorway and follow the path until you come to a large room with a doorway in the lower left, which will lead to that chest on the balcony (Mini Medal #56) . Use the stairs the north end of the previous room to encounter another boss.
BOSS - Gracos V
It’s best to think of Gracos V as a more powerful version of Gracos, with pretty much similar moves. His maniacal attack hits everyone for 50+ damage, as does his cool breath move. While his normal attack is about as strong as those, it only hits a single character and is probably the move you want to see the most, since it gives you an opportunity to damage him more often. He also has that poison breath, which only seems to target one character, while Crackle hits everyone for around 30 damage, although you likely have equipment that mitigates this a bit.
The key to this battle, which is highly likely your most challenging yet, is to play it very carefully. Start the battle by using Buff on everyone who doesn’t have high defenses and if you have something like Insulatle, use it to reduce the damage of his cool breath. Both Maribel and Meryvn should be on healing duty, as you will want two healers in this battle. Since Gracos V can attack twice per turn, you will want your health to be above 100 at all times.
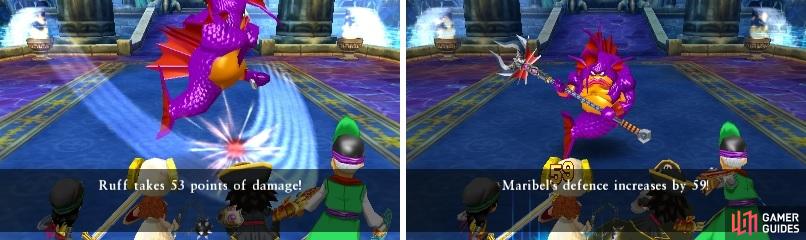
Gracos V’s normal attack is welcome in this battle (left), as it leaves you ample opportunities to do things other than healing (right).
After that tough battle, say yes to sparing him and Gracos V will hand over a Mysterious Fragment . You can’t use these yet, as they are needed to unlock the bonus dungeons in the postgame. The other chest near Gracos cannot be opened at this time, so ignore it and exit the dungeon, preferably returning to some place you can rest. You have enough tablet fragments to visit one of three different places now, either Nottagen, Providence or Hubble. The major thing that unlocks happens after finishing Nottagen, which is the Monster Meadows, so it might be a good idea to do that one first.
No Comments