
At the beginning of the dungeon, ignore all dead ends until you get to the northern part of the first map. Take the upper path there to come to the first chest in the dungeon, which contains absolutely nothing! So, just make your way to the southwestern exit. In the second area, you will see a few chests just to the south of your starting location, but you can’t reach them yet, so ignore them and continue to the west and the first split.
Unfortunately, the southern path is blocked by a barrier, so the only option for you is to take the stairs you see on your map. On the third floor, you have multiple paths you can go at the beginning, so start by going to your east through the covered hallway, where you’ll find two chests ( Mini Medal #17 and Poison Moth Knife ). The northern path has nothing of value, so continue west and then south to some stairs.
There are two side paths here that will result in finding a treasure chest at the end of each, one containing a Seed of Agility and the other containing a Fur Cape . Return to the previous room and go north this time, navigating the perilous walkways (you will fall to the floor below) and ignoring the two chests you see, as they are both empty. Continue to the east and follow the path to the end to find some stairs leading further into the dungeon.
You will run into a short scene with Florin reading a tablet, as well as something else that’s a bit mysterious, then you will be able to soldier on further. Eventually, you will pass through a doorway and come to another split. Go south to find a chest with 5 gold coins , but don’t pass through this doorway, as it will lead into an infinite loop. Instead, go through the southeastern one to come to another split (and two more chests, containing 15 gold coins and 20 gold coins ).
You’ll get an opportunity to open the chests blocked by the water once you drain it in a little bit.
For this one, you will want to take the western of the two paths, as the eastern one will bring you back to the beginning of the loop. There will be yet another three chests in the next area, containing 3 gold coins , a Medicinal Herb and a Seed of Wisdom , and a doorway to the west. This leads to a small hallway (with a Magic Water in the chest) that just runs in another infinite loop, so return to the previous room and start making your way to the stairs you see on your map, taking the side path to nab a Seed of Magic from the chest.
What seems like a dead end here is actually revealed to be a hidden path that is shown to you once Florin does his thing. Cross the now illuminated path separating the little islands until you find one that lets you go into the one in the center, where you’ll find a Prayer Ring in the chest. Take the stairs in the northwest to finally come towards the end of the dungeon, where you can have Florin place the Chimes of the Chosen on the altar thing.
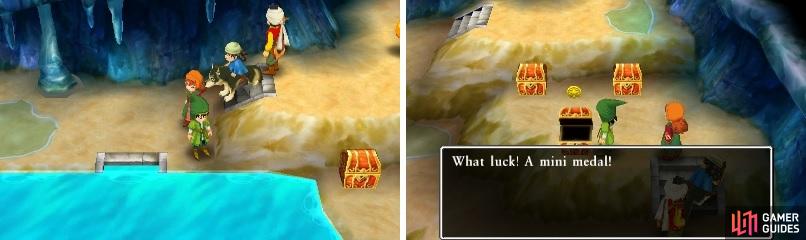
Doing this will not only drain the waters of the lake, but it will also lower the rock barriers throughout the place. Exit to the south and pick up the Yellow Fragment in the next room, then take the exit to the north. You’ll be back at the beginning of the dungeon and you can now grab those three chests you saw earlier, netting you a Mini Medal (#18) , Seed of Resilience , and 15 gold coins . Take the exit to the southeast, which will bring you to the altar of the Almighty.
Speak with Madame Rosa, who will move to allow you to read the plaque she was blocking. You’ll enter the altar following Florin, so move forward to initiate a pretty lengthy cutscene. Once everything is said and done, Boldo will join your party in retrieving the Chimes of the Chosen to restore the altar back to what it was. Enter the cave once more and you will automatically get the Chimes to raise the water again.
Upon waking up, exit the tent and approach the battle, with the outcome being that Kiefer is staying behind to become the next Guardian of the Roamers. Don’t worry about his items, as they will be returned shortly, so exit the encampment to the north to be brought to the teleportal. As you appear back at the Shrine of Mysteries, there will be a bag laying at your feet, containing Kiefer’s equipment and a letter.
No Comments