
| Enemies |
|---|
| Axecutioner, Crabble-rouser, Dragstar, Fighting Batboon, Goodybag, Gyrogre, Harmour, Healium Balloon, Liquid Metal Slime, Pink Panzer, Thuggler, Well Wisher |
Your primary goal in this dungeon is to follow the glowing footprints on the ground, which will lead you to the monster you saw in Buccanham. Ignore that and explore the place a bit to get the treasures inside. In the northeast corner of the first floor will be some pots and barrels; break them to get a Magic Water and fight a Frighturn. Go into the room just below that one to find a Mini Medal (#84) in one of the drawers, then take the stairs to the next floor.
There’s nothing on this floor, so just continue until you find the stairs to reach the third floor. On the northern end of this floor are some moving platforms that are disjointed, but form a path whenever they cross each other. The stairs to the next floor are in the northeast corner, while there’s a chest in the northwest corner that has some Hate Mail in it. On the next floor, you will find another chest in the southwest corner, which turns out to be a Mimic. For the fifth floor, there will be two chests in the center room ( Trailblazing Bandana and another Mimic).
Keep going up until you come to another floor with more moving platforms. There will be two chests in this room, with the one on the right being empty and the left one containing a Seed of Life . Take the final set of stairs, bringing you to the top of the dungeon. Head to the black flame and use the Prism Dew on it to be transported to another room, where you can just follow the footprints to reach the boss.
BOSS - Togrus Maximus
Togrus isn’t a difficult fight, but he does have a desperate attack that can hit a character for around 160 damage. There’s nothing you can do about this, as it is considered a critical hit and it ignores defense. In fact, Buff/Kabuff is extremely useless in this battle, as Togrus’ other move, where he jumps and slams into the ground, ignores defense; this move does around 50-60 damage to the entire party. He rarely uses his normal attack, so wasting turns buffing your defense instead of just piling on the damage is not a good thing to do. He will drop a Mysterious Fragment upon his defeat.
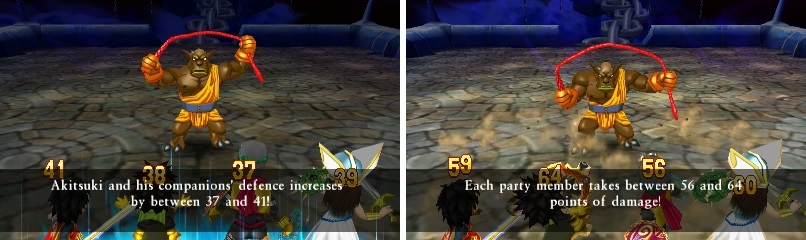
Increasing your defense (left) doesn’t do much to mitigate Togrus’ attacks (right).
Exit The Beacon upon finishing up the boss and return to Buccanham, speaking with the king to receive Buccanham’s Blessing . With this in hand, you’ll need to return to the present and then go back to Emberdale in the past. Speak with the Gaffer, who’s on the second floor of his house. He gives you permission to get the Guiding Light , so return downstairs and talk to the guy right next to it.
Make the trek all the way back to the top of The Beacon and you’ll end up receiving the Sea Serpent Sabre back at Buccanham. This weapon is only usable by the Hero and is quite powerful, so equip it and be on your merry way once all of the scenes are over. As the king mentions, it’s a good idea to pay the dwarves another visit. Speak with the Foreman, then the guard blocking the stairs and grab a Meaty Treat from the pots, a Watermaul Wand and Jawtoise Heart from the chests and another Mysterious Fragment on the ground. That’s all that can be done here, so get back to the teleportal and return to the present.
No Comments