
This scenario is on the blue pillar and is the biggest pedestal at the Shrine of Mysteries. Once you get transported there, head to the town of Frobisher nearby and check out its wares. If you purchase anything here, it should be the Boomerang, as it’s a similar weapon to the whip, but this one actually hits ALL enemies instead of just a group. What’s even better is that both the Hero and Ruff can equip this, so it might be a good idea to get two of them.
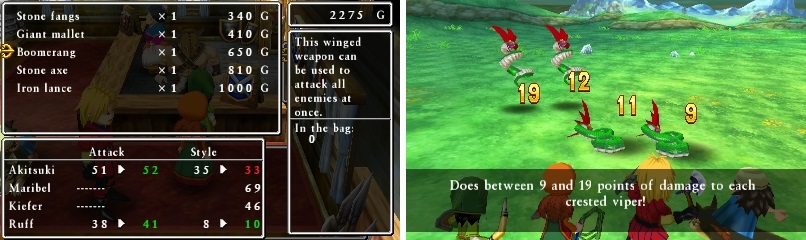
The Boomerang allows you to hit all of the enemies in a battle, making it a great tool in fights with multiple foes.
Should you do this, however, it’s an even better idea to have a backup weapon for bosses, since the Boomerang isn’t ideal for those (unless the boss has minions). The rest of the equipment are minor upgrades and not too large, so choose what you want and move on to looting the place. Head inside the item shop and you’ll find a Mini Medal (#6) inside one of the barrels. Look at the wall on the left side of the town and you should see a door on the bottom floor, which leads to a room separate from the others.
This is the room with the Red Fragment in it, as well as a Medicinal Herb , Seed of Strength , and 15 gold coins in the breakables. Now, go to the north side of town and use the door there to go into another isolated room. There’s 10 gold coins in the breakables, as well as a Leather Armor in the chest. Lastly, go onto the wall and into the only door there to find the church, as well as some stairs leading into the bottom floor of that area. Other than a short scene with the Captain, there’s nothing else here, so take the one door that leads outside to find a lone barrel with 3 gold coins .
Exit the town from the south and head to the big castle, which is in the next area to the south. Head inside the doors on the right to find a Leather Shield in one of the drawers, then go and talk to the guards at the front door to the north to find out you can’t go inside the castle. It looks like only soldiers and mercenaries are allowed inside, so it’s time to become one of the latter. There is a lone soldier standing in the bottom right room, who when talked to, will ask if you’re mercenaries.
Choose yes and you’ll have to demonstrate your prowess in battle against a Drill Sergeant. He has a bit of HP, but the only attack he does is a physical one that hits one character for around 13-15 damage. After the battle, you will be allowed inside the castle, so speak with the guards again to make them move aside. There’s nothing to explore on the first floor of the castle, so head to the second and take the door to the south of the stairs. Head to the southeastern tower and go inside (rotate the camera to see the door) to find a Seed of Strength in one of the vases.
There’s nothing in the southwestern tower and you can probably see some stairs in the northern corners of the castle wall. You can use either set of stairs, since they are both connected below. If you take the northeastern stairs, there will be a gate blocking some more stairs, and there’s a switch right next to it that’s a bit hard to see with the default camera. This leads to a prison cell of sorts where you can get 5 gold coins from the breakables and a Seed of Resilience from the chest.
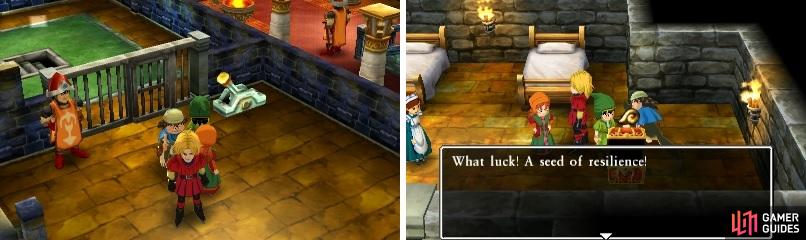
You might need to rotate the camera to see the switch to open the dungeon’s cell door (left). More seeds is always a good thing (right).
By the northwestern stairs, there are two vases in one of the corners, one of which contains a Mini Medal (#7) . That’s all there is, so go and introduce yourselves to the king, then go to the officers’ mess (southwestern door by where the main entrance from the overworld) to have another scene with the Captain. Talk to everyone in the room afterwards, then with the Captain again to trigger the next scene. Talk to Promptly-Wallop after the Captain storms out, who asks you to go and speak with this Autonymus.
Autonymus lives in a shack to the west of the castle, so head there and go inside. There’s a barrel behind the main building that contains 2 gold coins , as well as a barrel in the smaller shack that houses a Mini Medal (#8) and a chest that contains nothing. In the main building, there’s a Shellmet in the drawer on the left side and a Bone Stake in the pot on the right side. Speak with the person inside the main building, who happens to be the Autonymus you seek, and wants nothing to do with the people at the castle.
Return to the castle and speak with Wallop in the officers’ mess, and the Captain will come in and order you to relieve the guard of his post right above you. As soon as you arrive, you see a scene of an injured soldier limping into the castle and after everything’s said and done, Captain Goodwinding will join your party. Go back west to Autonymus and watch the scene there, then you’ll get another scene as you try to leave his place. Upon returning to the castle, you will find that it has been invaded by the Automatons!
There are Automatons scattered throughout the main gate area, most of which are engaged with soldiers and other mercenaries. However, there are at least lone ones that will trigger a battle whenever you “talk” with them; one is by a tree in the southwestern corner and the other is by the bridge leading up to the main gate. Defeat them and then go into the castle, talking to the guard by the stairs. Upon leaving, you should be confronted by two more Automatons. Defeat them and three more show up, but before they attack, the Automatons break down thanks to Autonymus’ tinkering with the pink one earlier.
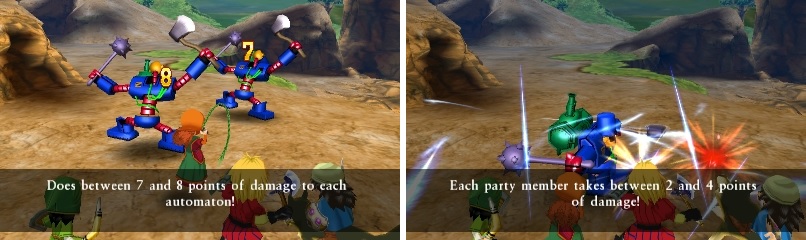
Automatons have a higher defense than normal enemies (left) and their Multislice can hit all of your characters (right).
Thanks to this newfound contraption disabling the Automatons, it’s time to bring the fight to their base. After a good night’s rest, go and speak with the Captain in the southeastern tower in the main gate area, then talk with Wallop in the other and return to the Captain on the right. Go to the left side and speak with the Captain there, then speak with him and Autonymus on the right side. Lastly, with everyone at the front gate, speak with them all (including the two guards at the top) before talking with the Captain to begin the operation. Before leaving, check out the cupboards in the right room to find a Hardwood Headgear, then get ready to go to the Automaton Stronghold, which is located to the northeast of Frobisher.
No Comments