
After defeating the Demon King, return to the stairs at the beginning of this area and you’ll be treated to a scene. You’ll end up back at the Divine Shrine and will learn your next objective, to awaken the Almighty. Exit the building and use the teleportal to return to the surface, where you’ll be back at the Shrine of Mysteries. Your party suggests a visit to Estard to speak with King Donald, so that’s where you’ll be going next.
It turns out that the king is in the middle of eating, so speak with the maid blocking the door and tell her you wish to talk with King Donald. He hints that a kingdom famous for their music is to the northwest, but there’s one little detour you will want to take right now. Zoom back to the Divine Shrine and use the pedestal to return to the past version of the Pool of Piety and Coral Cave. Basically, go through the cave until you happen upon the ghostly maid by the arches. Speak with her to get a Mysterious Fragment .

The lotus flower will send you to the Coral Cave (left). Go back to get the Mysterious Fragment from the ghostly maid (right).
Return to the present and head off to the Grand Conjuratorium next, which is near Hubble. Speak with Queen Euphonia and you’ll end up watching a contest for the greatest torban player, which is exactly what you need right now. Once everything is said and done, which takes a bit of time, Crispin will join your party as a guest. He wants to go and thank his teacher, so head to the town portion of Hubble and go in the northwestern house for a scene. That’s enough with the sidetracking, so find the Roamer Encampment that’s southwest of the Dig Site.
Enter the northern tent and speak to Rom Baro’s wife, who mentions that it’s time to head to the Poolside Cave. Exit to the south and follow the path until you get to the Mountain Pass, which is now populated with stronger monsters, although the place is still as linear as it was before. If there is one thing to note in the Mountain Pass, it’s that you can find Gold  Golems in there, which drop a lot of money upon defeat. Once you reach the other side, you’ll eventually get to the Pool of the Cave, where you’ll meet up with Rom Baro.
Delighted at seeing the torban player, he still needs help in reaching the altar, but first you need some rest. Enter the northern tent and speak to the young lady there to get the option to rest. The next morning, Rom Baro will hand over the Chimes of the Chosen in order to drain the waters, which is something you know to do. Enter the Poolside Cave and note that the place is the same as it was in the past. You don’t have to worry about treasures and of course, the monsters have been upgraded. Remember at the first split, go east and then at the second, go west.
At the bottom, place the Chimes of the Chosen on the altar to unlock the door to the south, as well as drain the water from the altar outside. Once you return to the first room of the cave, take the path that was blocked by water before to reach the Altar of the Almighty. Speak with Rom Baro and let the festivities begin! Once everything is over, you’ll end up back at the Shrine of Mysteries.
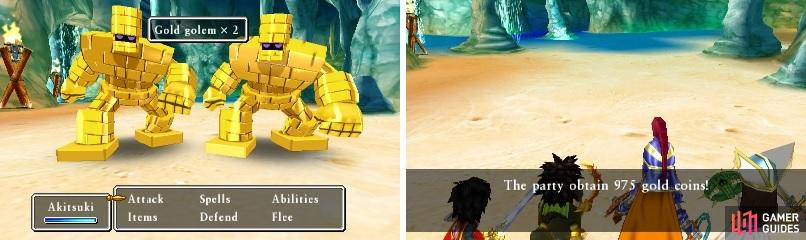
Gold Golems can yield some nice gold when defeated.
Go back to Pilchard Bay and to your house, speaking with your parents before going on the ship after the fact. Head below deck and speak with the chef, telling him that you already told your parents that you’re back, safe and sound. Once you can move again, head back above ground and talk to everyone, then go to the northern part of the town to see an old man on the stairs. Speak with him to finally be able to leave and go to Estard. As soon as you walk into the castle, a scene will play out.
Once the party is over, you will be back at your house, with your mother waking you up. Go downstairs to get a Pilchard Sandwich to bring to your father on his ship at the docks. Hand over the sandwich, then go down to the kitchen of the ship and speak with the chef there. Return to the deck to view a short scene, then run on over to Mayor Mayde near your house. Speak with him twice, then talk to the lady by the town’s exit to make her move. Head to the castle at Estard and speak with the chancellor in the throne room, then interrupt the King’s dinner by talking to the guards to make them move. Upon speaking to King Donald, you’ll eventually be whisked away to the Cathedral of Light.
When you finally regain control, go down two flights of stairs and out the southern entrance, but don’t exit to the world map. Instead, go around to the eastern side of the Cathedral and speak with the nun there to get a bottle of Holy Water . Head back inside the main lobby and take the stairs in the northeast to the second floor. Right where the stairs are located, take the southern exit and go through the middle doorway. Break the two pots at the northern end of the room for a Seed of Life and a Mini Medal (#94) .
Get back onto the balcony and start making your way over to the western balcony. Once again, go through the middle doorway and check out the cupboards for a Silk Bustier . Back on the balcony, go through the northern door and use the stairs right there, then the stairs following that. Through the northern door here, you should spot two chests, one of which contains a Haywire Helm (cursed) and the other, the Ultimate Key . This key is similar to the Thief’s and Magic Key, as it will allow you to open up some doors and chests you couldn’t before. As an example, there were some chests earlier in the guide in The Haven (the final iteration of it) that you couldn’t open because you didn’t have this key.
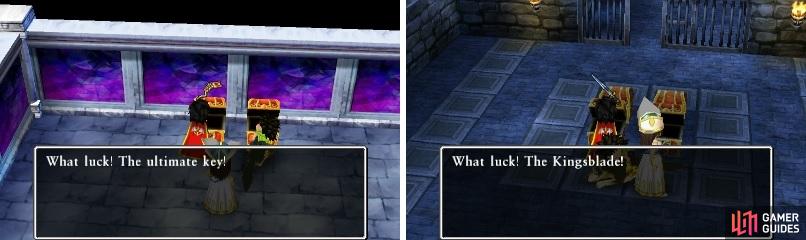
The Ultimate Key (left) let you open some doors and chests to get some nice equipment (right).
Go through the northeast doors to get a Seed of Life from the pot, the southeast ones to get a Seed of Magic and the southern one for a Seed of Strength . That’s all of the goodies here, so return to where you looted the Silk Bustier and use the beds to rest. Now, go back to the main lobby and climb the central stairs to reach the point you couldn’t pass before with the guards. Once you are free, go up and talk to the next set of guards, speak to everyone and then try to leave for a scene. When that’s over, go to the entrance of the Cathedral for another scene with your uncle, so tell him no to finally finish up here.
Well, things aren’t exactly looking up, as you end up on the roof of the castle in Estard. Before things get too crazy, go down two flights of stairs and enter the door to the east. Keep going down until you get to the area with the raft, which you want to use to get to the western side of the castle. Open the cell door on the eastern side and inspect the bed for a Mini Medal (#95) . Make your way back to the first floor of the castle and go down the stairs that’s behind the staircase going up. Open the cell door here and loot the chests for a Platinum Shield , Kingsblade , Mini Medal (#96) and a Seed of Strength .
Upon exiting the castle, the drawbridge will be raised and you won’t be allowed in again for the time being. In the town portion of Estard, there is one thing you can do before you should leave. Go to the underground path and you might remember a certain locked door from earlier in the game. You can open this now with the Ultimate Key, which will lead to that little cliff with the chest that you could see from the overworld; it contains a Yggdrasil Leaf . If you check out the church in town, you see that the NPCs for the Download Bar and Monster Meadows have relocated here, in case you need to utilize their services. Speak with the guard by the front gate to give him a little scare, then lead Estard.
When you step out onto the overworld, you will see that there are now monsters roaming about, with some new ones sprinkled in with ones you might have already fought. Anyway, go to Pilchard Bay and a lady will stop you at the entrance, telling you to go and speak with your mother. She can be found at the docks and after finishing with her, go and talk with Maribel in her house. She will rejoin the party, but the unfortunate side of things is that she rejoins in the same state as when she left earlier, plus she doesn’t have any equipment on at all. On the upside, she still retains her Vocation. Leave Pilchard Bay and head to the Shrine of Mysteries, where you will find that the statue is talking to you. Approach it for a short scene, then enter the shrine. Go into the red door for another scene, then the game will switch on over to someone in Buccanham.
No Comments