
At the Shrine of Mysteries, choose the blue pillar and the southwestern pedestal. Place all of the fragments you have on it to be transported to the new area. The first thing you should do, as always, is head towards the nearest town, which is called Pilgrim’s Rest in this case. Feel free to check out the shops, although there isn’t really anything new that stands out from what was available before.
Check out one of the pots behind the innkeeper to find a Seed of Agility , as well as one of the pots behind the item store for 3 gold coins . In the one room, you will find a Grimoire enemy hiding in the southern bookshelf, which isn’t really a tough enemy. By talking to some of the NPCs around the place, you will see mention of vocations, which means it’s getting awfully close to finally being able to access the job class system of the game!
Before you do that, though, check out the well to find a fully functional casino in it! The casino uses its own tokens as a currency, with them costing twenty gold coins per token. You do not need to visit the casino at all, but there are some nice prizes to be had, which includes some decent upgrades to your current equipment. The counter in the upper left is where you can buy tokens, and you can trade in your winnings at the upper right counter.
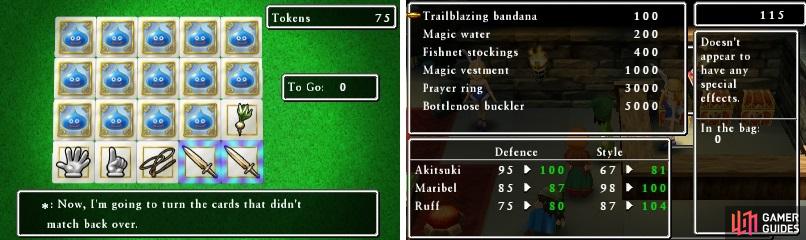
The casino will let you get some nice equipment if you manage to spend some time with it.
Of particular importance is the Lucky Panel game, as you can win equipment and items from it. Creating a template in something like Google Spreadsheet or with pen and paper will help you keep track of the items you turn over. If you wish to cheat the game a bit, you can view some tips and tricks in the Casino section of the guide. The best items to get are a War Hammer, Full Plate Armor and Iron Mask for the Hero, and a Cloak of Evasion and White Shield for Maribel. The War Hammer boosts attack by a lot, but it’s still a good idea to hold on to the Edged Boomerang for normal encounters, since it hits all enemies.
Once you’ve had your fun, exit the little stop and make your way towards the other building on your map, making a short stop to pick up the Strength Ring on the overworld before the path heads south. Enter the Alltrades Abbey and while you can explore the place a bit, you cannot get any of the items inside, since doors are locked. So, head straight to the main priest that’s up the stairs and talk to him, who will offer you a chance to change your vocation…or not, as it’s a trap!
Pilgrims Perdition
All of your spells and abilities have been stripped from you, and you have been dumped into what look like some slums. Well, things aren’t looking up for you and before you check out the “surroundings,” it’s a good idea to advance the story a little bit. If you head north a bit from where you landed, you should see some stairs slightly northeast of the armor shop, with some barrels and a chest by it. You’ll have to go around the western side of the town to get to that spot, where you’ll be treated to a scene.
Once that’s over, head north from there to view another scene, putting you into a boss battle. Despite it looking like a tough battle and one you might be able to win, you cannot win it, so just mash the attack button until all of your party members are defeated. Upon waking up, exit the room to be treated to another scene. Break the pot next to the barrel for 30 gold coins , then head upstairs for yet another scene. Once that is over, speak with Fingers to have him join your party, with him giving you a Salvation Stone .
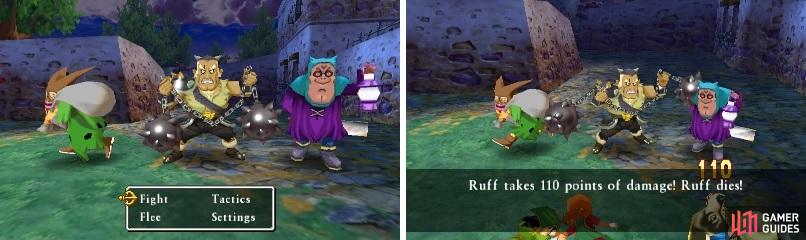
There is no hope of winning against Strom, so take your death with your chin held high!
Exit the house and break the two pots right outside for a Bone Stake and Horse Manure , then enter the house directly to the west to find a Medicinal Herb in the pot. You’ll find another Medicinal Herb in one of the barrels to the left of where the priest is standing near the entrance to the inn. If you speak with the “guard” in front of the priest, you can get into a fight with him. You don’t get anything for defeating the Harmour (except for experience and some gold), so it’s entirely up to you on whether you want to do it or not.
To the north of this is both the pub and the item shop (separate entrances). One of the biggest things you want to do here is fill everyone’s inventory with Medicinal Herbs, as well as carry a nice stock of them in your bag. This will allow you to heal in the upcoming dungeons, especially since you don’t have access to any spells or abilities. Another item you might want to purchase is the Thief’s Key , which will allow you to open certain locked chests and while you can purchase multiple of them, you only need one (it can stay in your bag, too).
Find the back door for the pub and enter it, then check the barrels to get 3 gold coins . There are stairs right outside of this very door that lead to a bath of some kind, where you can get 5 gold coins from the pots and an Antidotal Herb from the barrels. Head around the church and to the outside part of the wall, where you might see three barrels along it; one contains a Mini Medal (#20) . If you head into the bank, you will see both a chest and a Yellow Fragment, but you can’t grab either of these, as the NPC working the place won’t allow you.
In the northeast corner, there are a bunch of breakables you can bust open, netting you 20 gold coins and a Medicinal Herb . Just south of that are the stairs where you saw Eustace talking with Fingers, with some more breakables ( Medicinal Herb and Horse Manure ) and a chest, which contains absolutely nothing. Head down the stairs and break the pot behind the bar for another Mini Medal (#21) . The only place left to explore is the big house near the armor/weapons vendors. There’s an Antidotal Herb in a pot in the first room, and a Yggdrasil Leaf in the chest (revives party members). On the second floor, you can find a Seed of Life in the barrel and a Pointy Hat in one of the cupboards.
Western Cave
When you’re ready to continue the story, exit the town via the south and head on over to the cave you see on the map. There are absolutely no treasures to be found inside of this dungeon, so you can just blitz on through it to minimize the time spent in it, as well as the healing you need to do. The place can be a little confusing, because of all the ways to go, so follow the instructions given here. In the first area, take the northernmost set of stairs, then follow the long winding path to the next set of stairs.
On the third floor, the path you want to take is the one that leads to the northwest, passing through the poisonous waters to find some stairs going down. The rest of this path is linear and will lead you straight to a cutscene, where you’ll be introduced to Rashers and Stripes. As with the battle against Strom in Pilgrim’s Perdition, you are unable to win this battle, so just do whatever until they wipe the floor with you.
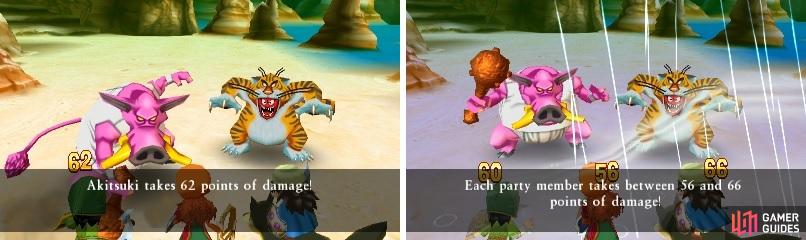
The animal duo are unbeatable at this point, so just accept defeat.
Upon waking up, head into the main room for a scene, then follow the siblings upstairs for another one. Leave the place and find the one set of stairs where you first saw Eustace and Fingers; take these stairs to find Zev arguing with Eustace. Exit the place and start heading towards the bank, when you hear a scream. Now, go south from there to view a scene, go north for a quick cut-in of someone laying on the ground, and finally head to the eastern side of town for one last scene. When all is said and done, you will want to exit the town and head to the Western Cave again.
Take the exact same path as mentioned before to arrive where you encountered Rashers and Stripes, only they aren’t there this time. Follow the path to meet up with Eustace, then go outside to arrive at Precipice Pass. Before doing anything, you can rest by speaking to the female NPC in the church on the eastern side of town. Also, checking out the well right by the church will make a Scarewell appear. Defeat it like any other “mimic” and reap the nice experience and money. Inside of the church, you can get a Pointy Hat from one of the drawers and 35 gold coins from one of the pots. On the western side of the area are some gravestones and if you check the wall in between the two northern ones, you will find a Mini Medal (#22) .
After defeating the Scarewell, head into the well and check one of the cupboards for another Mini Medal (#23) . You can find a Medicinal Herb from one of the pots in the item shop and an Antidotal Herb in one of the barrels in the middle cave on your map. Approach the house at the top of the stairs for a short scene, then talk to Fingers after it’s over to make him move. Enter the house for another scene, then grab the Leather Armour from the drawer. Get close enough to Eustace and Fingers for a quick conversation, then follow them to see they knocked out the guards at the eastern cave entrance. Upon them joining your party (only Eustace participates in battles), you can enter the next dungeon.
No Comments