
There will be a short scene here, showcasing the city and introducing you to another character that you will be controlling shortly. Unfortunately, this character will remain nameless for a little bit, but there is going to be plenty of goodies to be grabbed while you’re controlling him here in Alexandria. As soon as you gain control, walk to the left to find a Potion, then walk inside of the building to your right. Climb the ladder in the back of the building and inspect the dresser up there for a Fang Card, then return to the bottom floor. In the upper right corner of the ground floor is a table, so check it out for another Potion and by the bed to the left of the ladder will be 9 Gil.
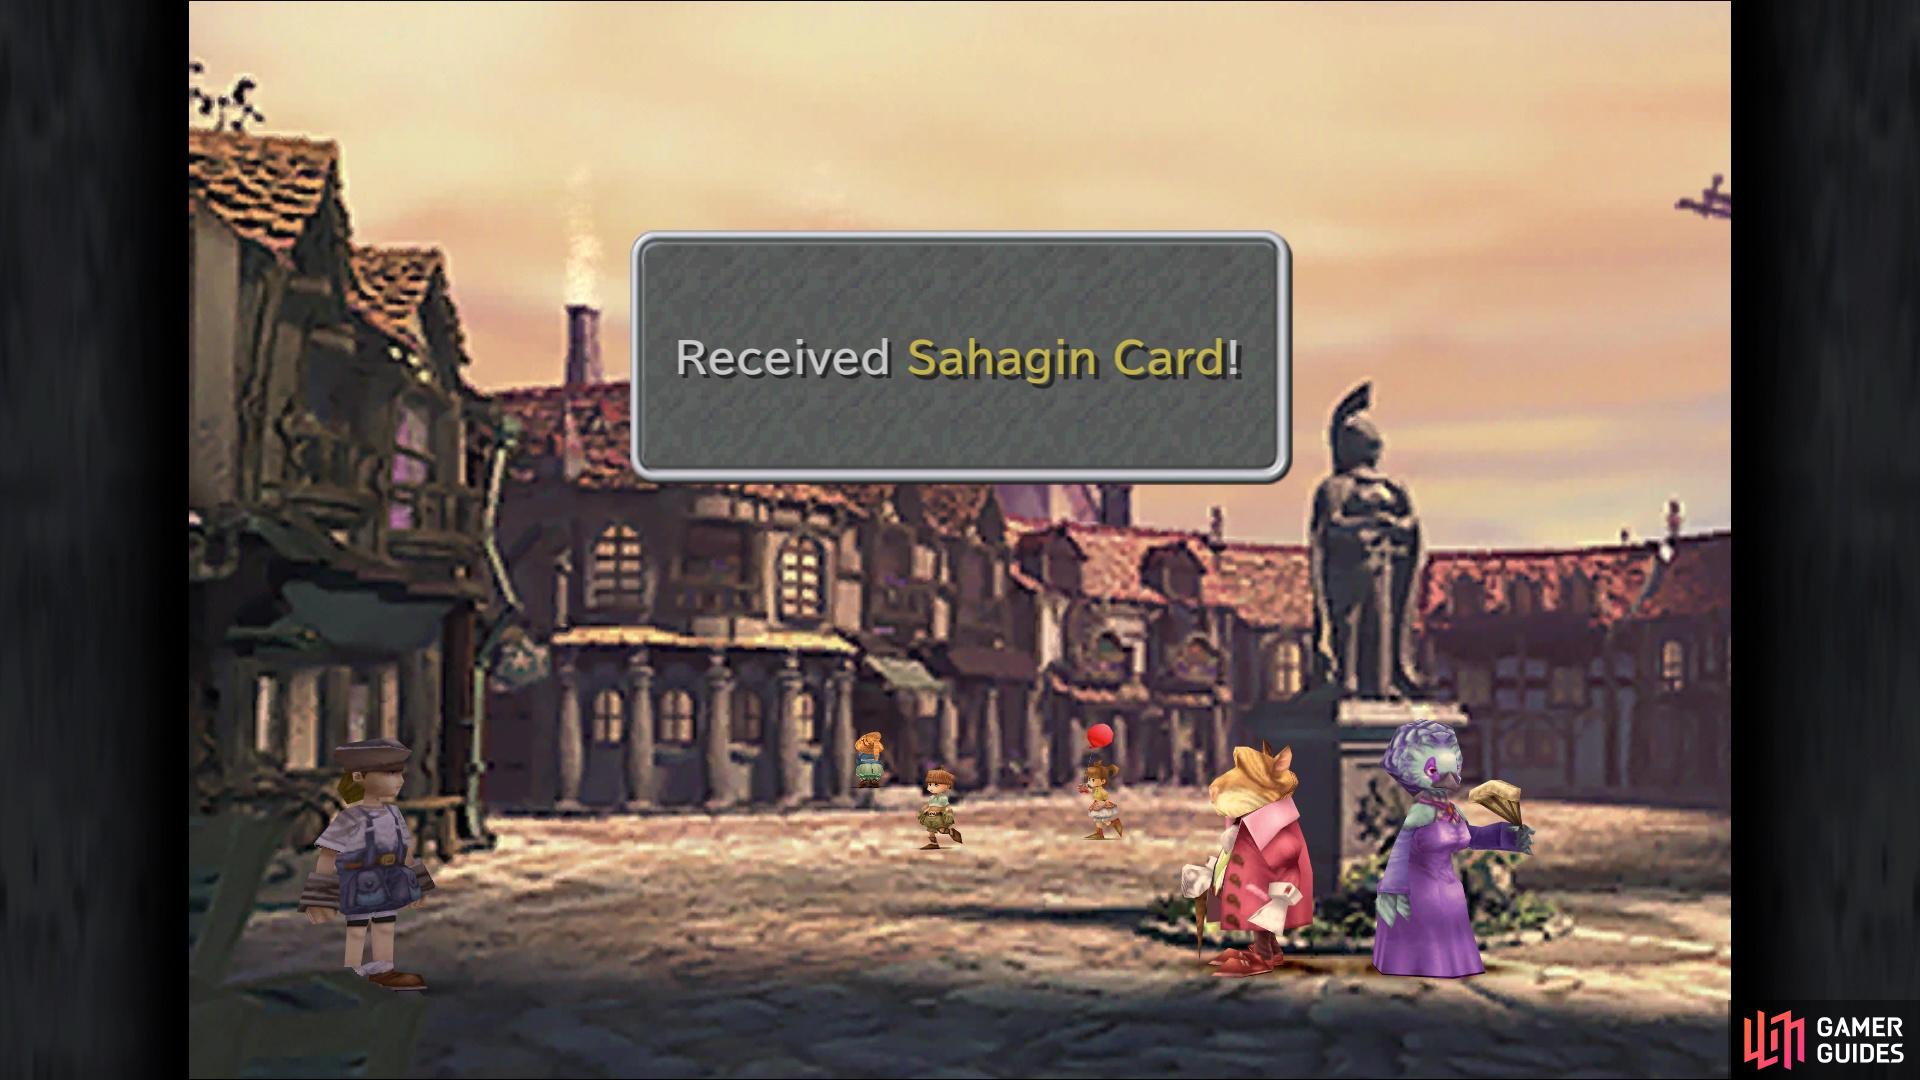
Exit the building and head south this time, to some large square with a statue. There are a few items here, so start by searching the bottom left corner for a Zombie Card, then look next to the statue, on the left, for a Potion. Now, head to the far end of the area, in the back, and there will be a little alcove you can squeeze into that’s not far from where you entered, where you’ll find a Sahagin Card. Lastly, run along the back wall, to the right, and you’ll find one more item that’s hidden from view because of the statue (Lizard Man Card).
You can find a lot of cards just laying around in Alexandria to help get you started with Tetra Master
Return back to the previous screen and run north until some Rat Kid runs into you. Hug the left wall as you move north, and you’ll find another Potion; exit to the north. After a short scene with some nobles, search the right bush along the southern edge of the screen for 33 Gil, then look in the bush on the left side of this screen for a Goblin Card. You should have five cards now, which are used in the Tetra Master mini-game. While this has no bearing on the plot, nor does it really give any rewards, it is a nice distraction to the main plot. However, hold on right now and continue with exploring the town, as you will be receiving an in-game tutorial shortly.
Directly north of the bushes is the Morning Star Bar, so enter it and look at the barrel in the bottom left corner of the room for a Flan Card. By the stairs on the same side will be 27 Gil on the floor, and searching in the bottom right corner will yield a Potion. That’s all you’ll find in the bar, so exit and continue to the next screen on the left. On the right side of the screen is the Item Shop, so let’s browse some of their wares, although you won’t find anything special. You may want to pick up some Antidotes or Eye Drops, but it’s probably best to save your money for right now.
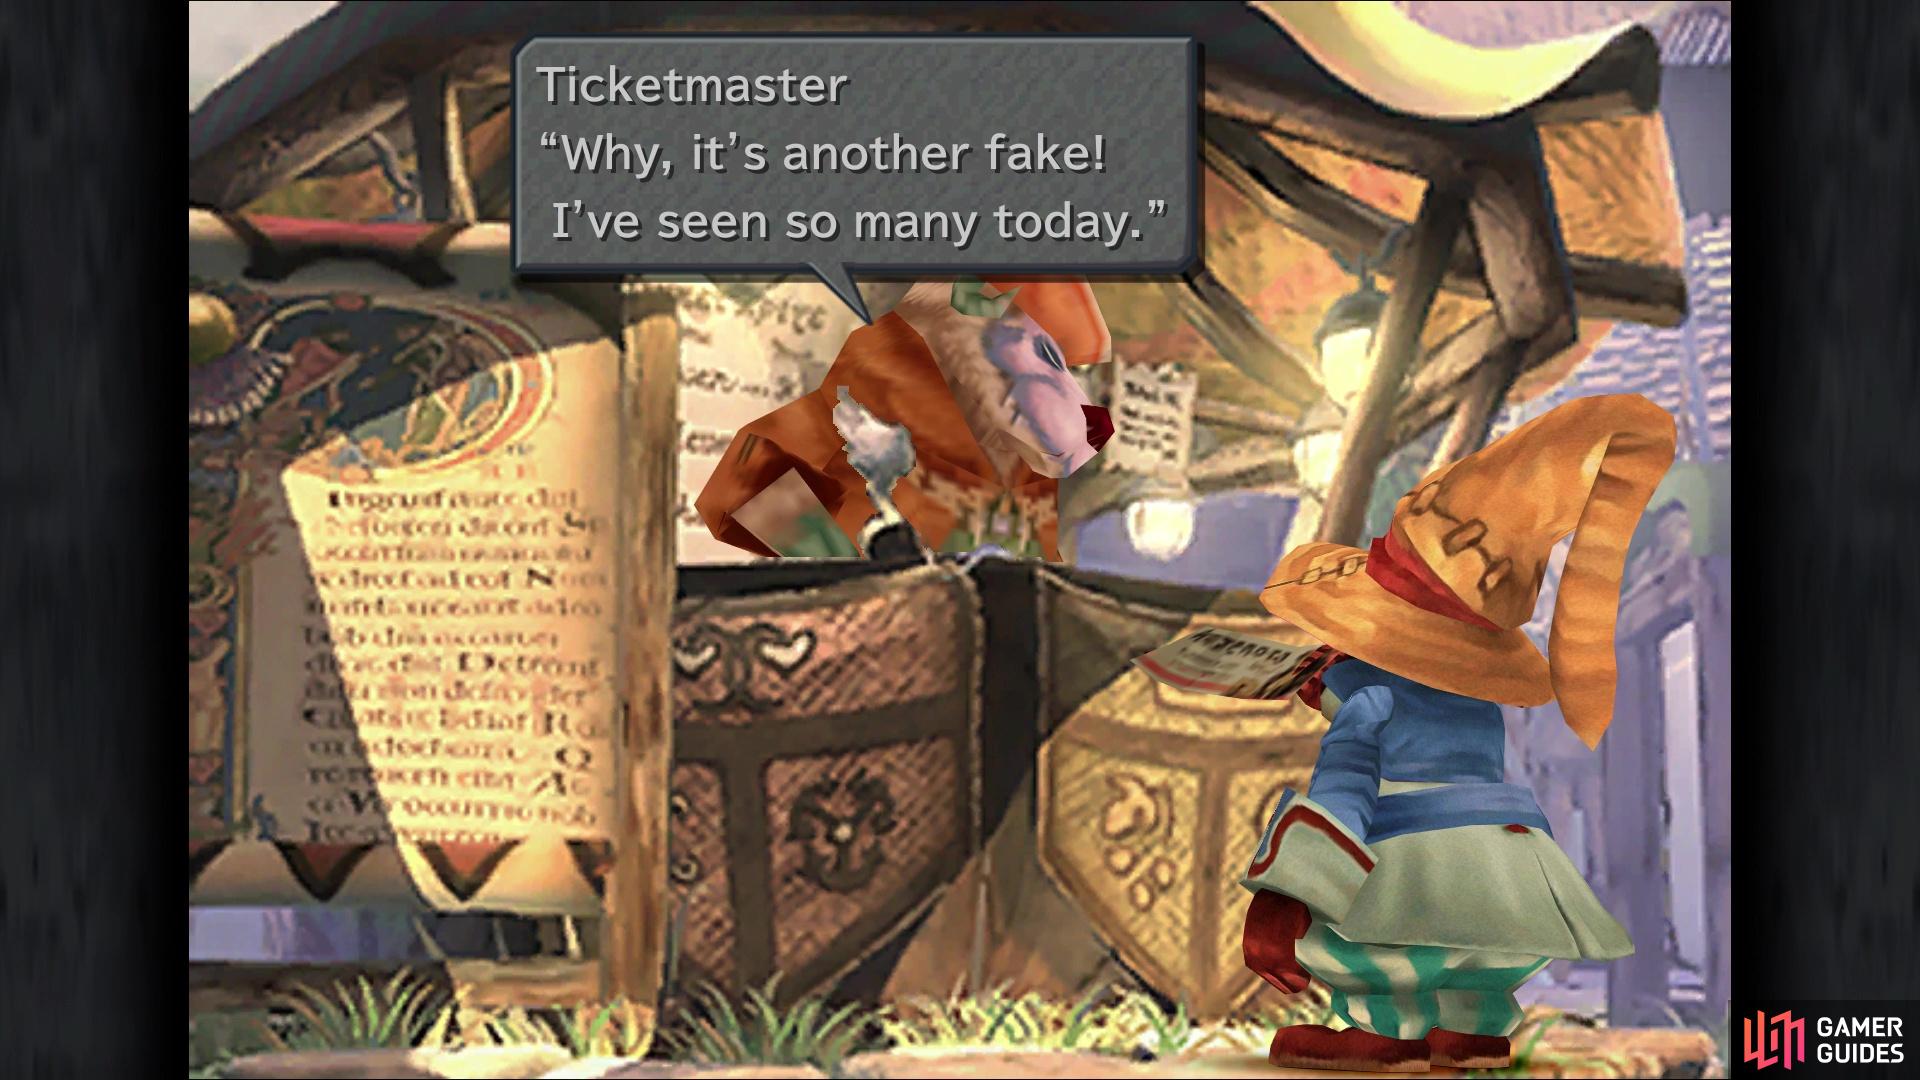
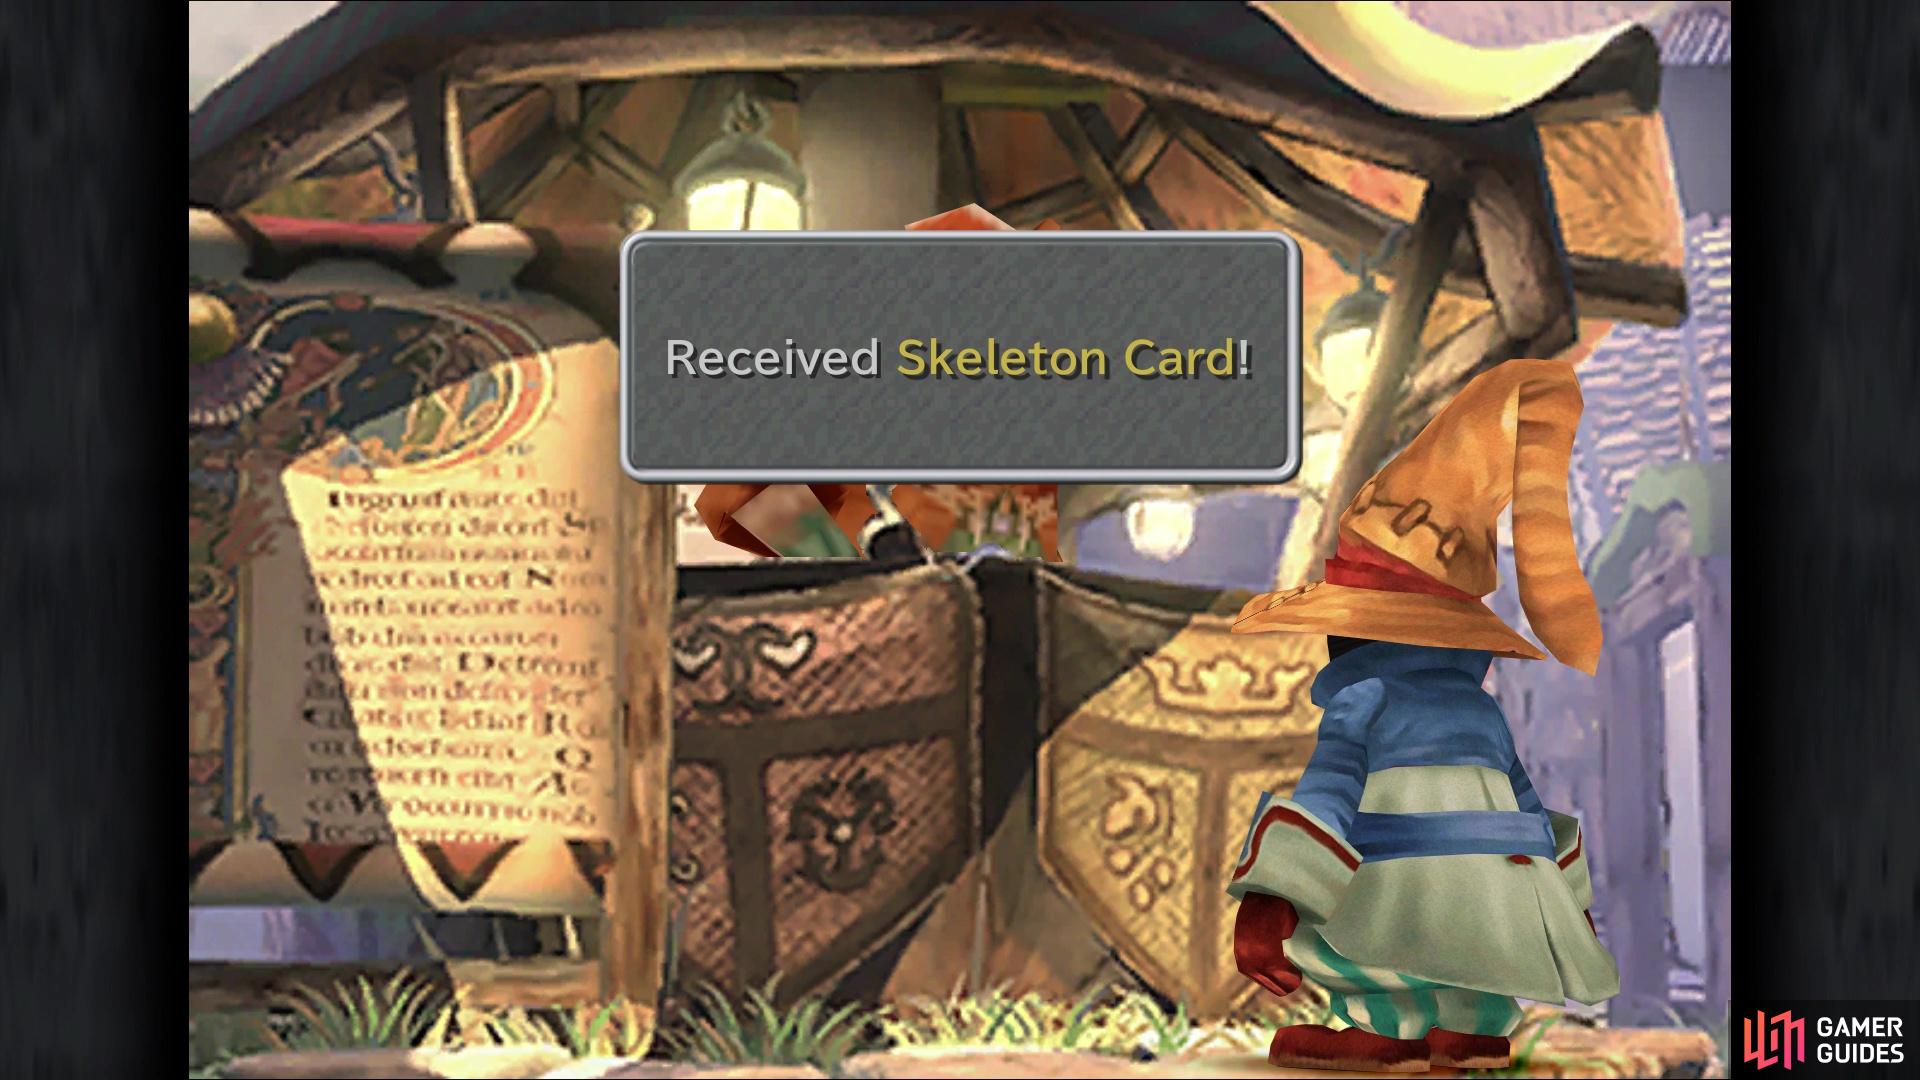
Towards the front of the shop, along the southern edge, you can find 38 Gil on the floor, so grab it and leave. Continue to the north and you’ll see the ticket booth in front of you. Peek into the ticket booth, showing your ticket, and the man at the counter will mention that your ticket is a fake. Feeling sorry for you, he will give you a Goblin Card, Fang Card and a Skeleton Card. He’ll also talk about speaking with someone named Alleyway Jack to learn more about cards. In this area, you will find a few things, so start by entering the building on the right side.
Welp, looks like your ticket for the show was fake
Feeling sorry for you, the Ticketmaster will give you some cards
This is the Synthesis Shop, which basically allows you to create new items by using older ones. Unfortunately, the service isn’t running right now, but if you search long the southern wall, you can find an Ether. Take the door at the top to enter the Equipment Shop, which is also closed for business right now. In the top right corner, close to the transition, you can find a Remedy. Return outside and head north, speaking with Hippaul, who mentions that he hid his three precious cards in a safe place; you will be getting these shortly. Directly to the left of him, though, by the cart on the opposite side, will be a Phoenix Pinion.
Jumping Rope Frustrations
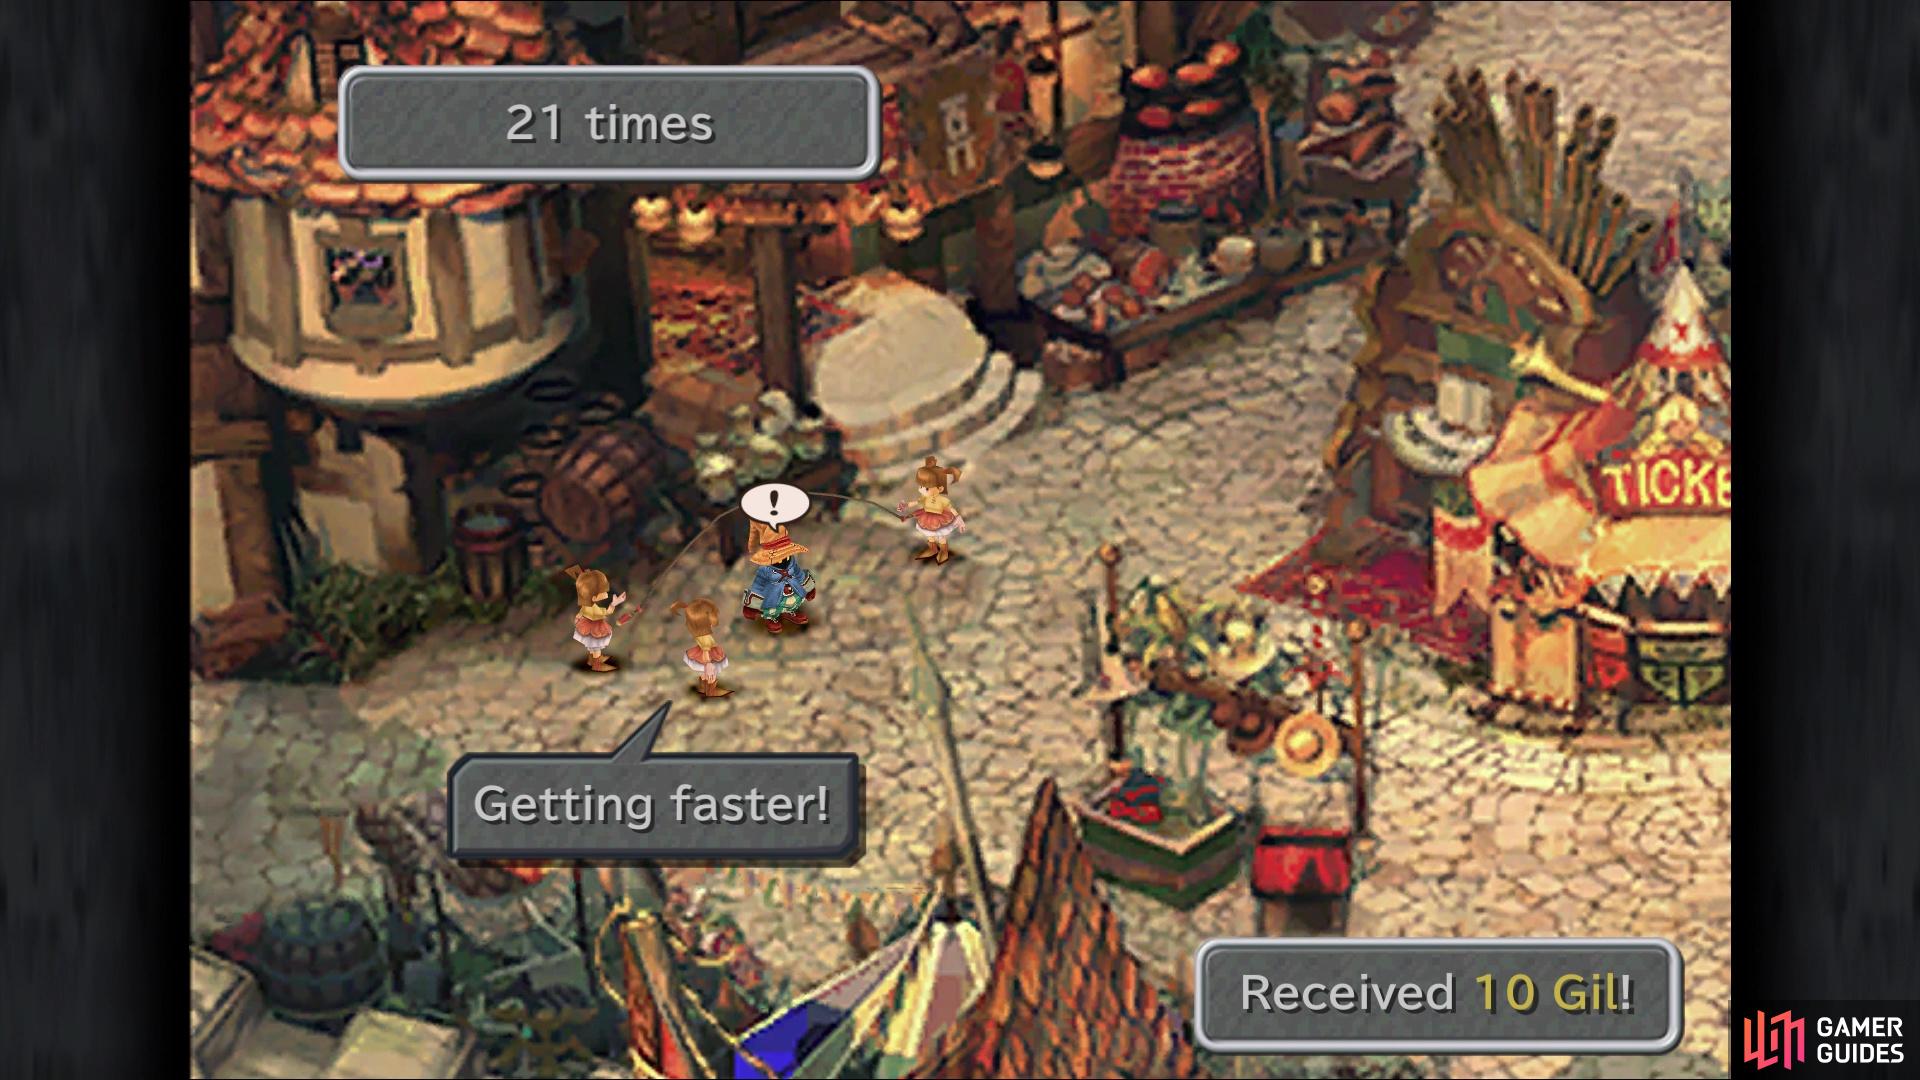
Southwest of the Phoenix Pinion are some little girls jumping rope. You can speak to the one in the middle to join in on the little mini-game. The idea behind it is you press the button whenever you see Vivi have an exclamation point over his head. The catch is that at certain thresholds, the mini-game will speed up, making it harder to keep going. These thresholds are at 20, 50, 100, 200, and 300. The tricky part is 200 to 300, as it seems you need to double tap the button instead of there just being a single tap. From 300 jumps onward, the game will return to the normal rhythm.
So, the tricky part about the enhanced ports is that there is some input lag when pressing the button. That means you’ll have to press the button a little earlier than usual on those versions of the game. This can lead to some problems as the tempo increases, so you’ll have to learn how to adjust to this input lag. Some tips to help you get further along would be to just concentrate on the exclamation point above your character’s head, or you could just to focus on the sound when he lands. As you progress in the main story, the location for the jump rope mini-game will change and some people prefer this one over the first place, as it might be easier to concentrate.
Other than two trophies/achievements tied to the mini-game, the actual rewards in the game are all just Tetra Master cards. Below is a list of all the rewards you will receive from the jump rope mini-game:
- 20 Jumps - 10 Gil
- 50 Jumps - Cactus Card
- 100 Jumps - Genji Card
- 200 Jumps - Alexandria Card
- 300 Jumps - Tiger Racket Card
- 1,000 Jumps - King of Jump Rope Key Item
You’re not going to get good rewards from jumping rope
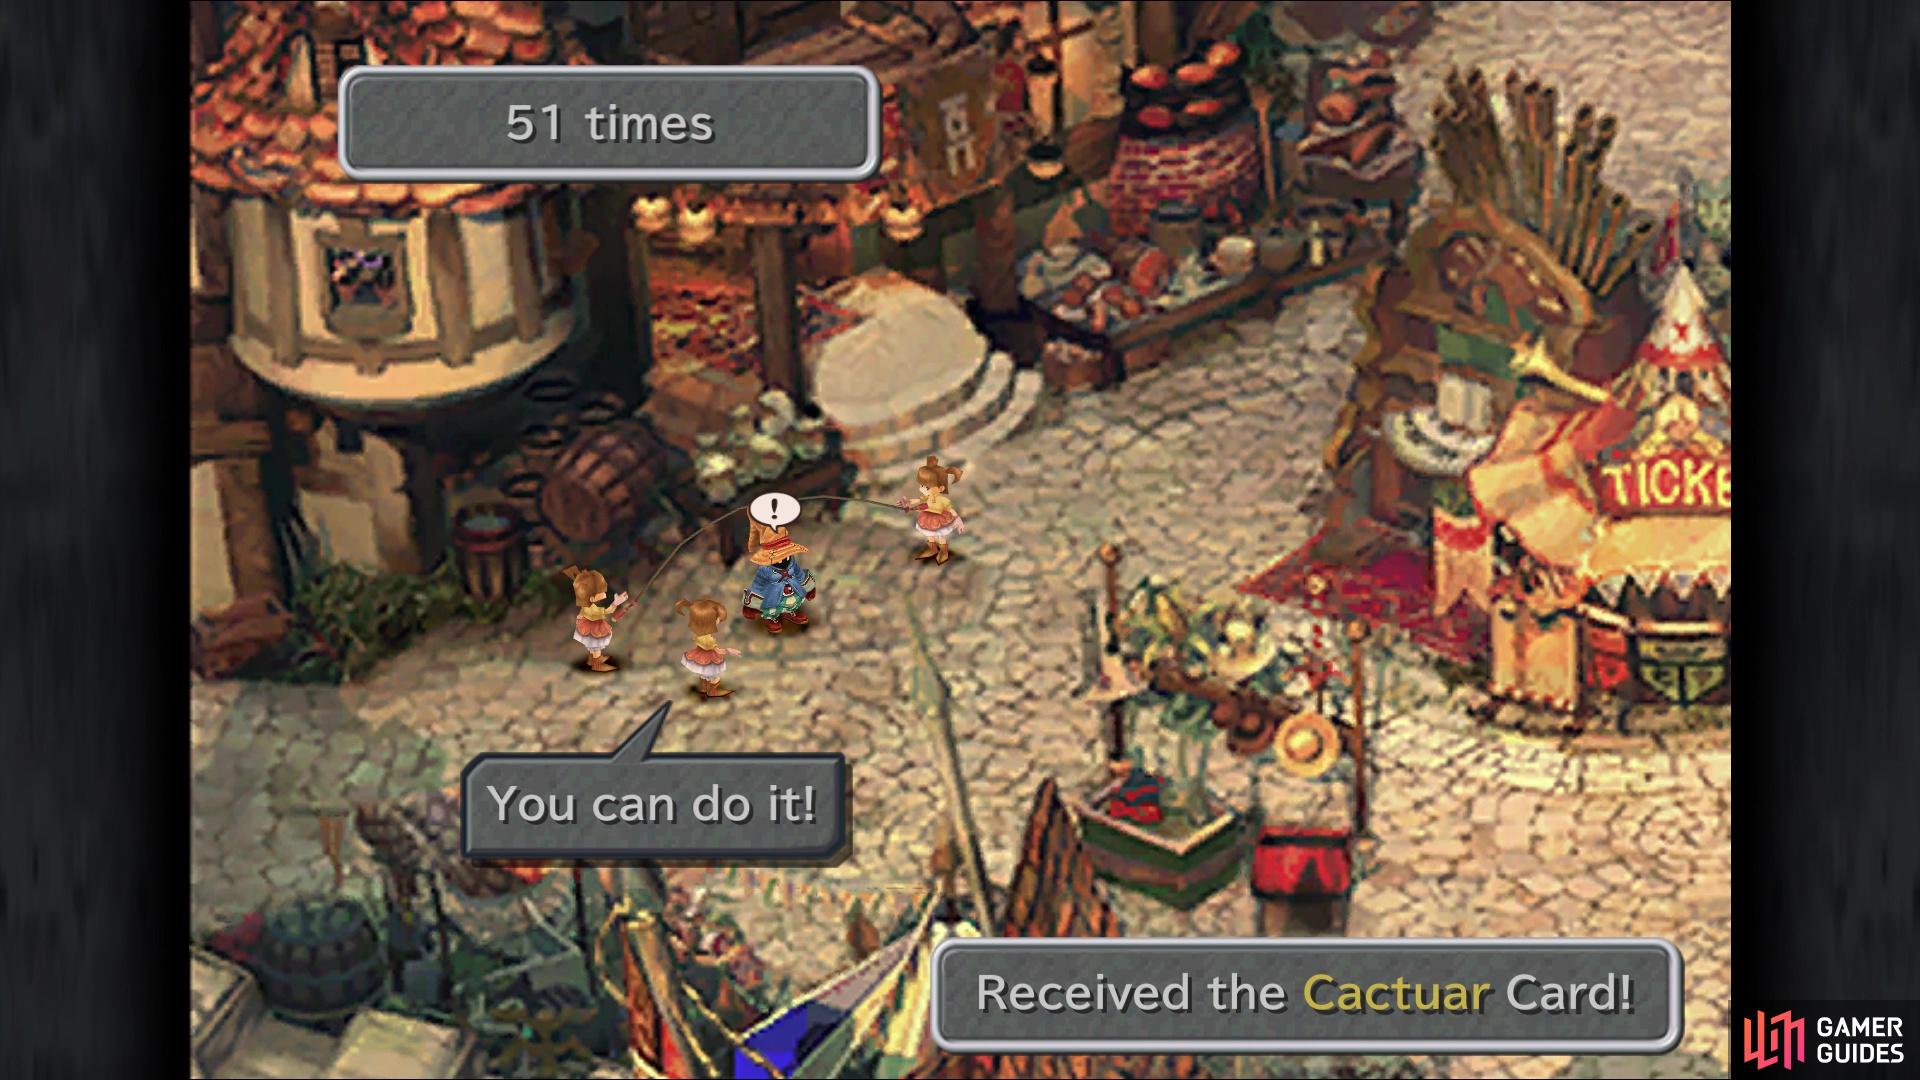
but you can get some nice cards from it if you manage to get a high number of jumps


With that out of the way, it’s time to continue on with the pilfering of Alexandria. Head to the left of the jump-roping girls and as you walk down the alley, there will be a short scene. The Rat Kid, who you might remember from earlier, asks you to become his slave in favor of seeing the show (you had a fake ticket). Decline his offer for right now and continue south to find a steeple and some docks. Go all the way to the docks and move northwest, talking to a NPC named Tom, who seems to have lost his kitten named Mittens. Tell him you’ll help him out, then backtrack all the way back to where you first gained control.
Head to the square south of there and interact with the cat walking around, which should trigger Tom to come and get his cat. Return to Tom back at the docks and he will thank you by giving you a Bomb Card. Next to the steeple is another building you can enter, so go ahead and do that and look in the corner on the left side to find some Eye Drops. Exit and go inside of the steeple now, checking just left of the entrance for a Tent. On the right side here will be another item, a Potion, so grab it and then climb the ladder. At the top, pull the rope to ring the bell, which will cause something to fall out of it; this is Hippaul’s treasure, an Ironite Card, Goblin Card and Fang Card.
Return to the alley where you met the Rat Kid and exit to the north, then re-enter it again to make him appear once more. Speak to him and agree to become his slave this time, telling him it’s clear when you have the option. Rat Kid will run off, but don’t follow just yet. If you stay in the alleyway, a red-haired NPC will approach from the north. If you don’t move, then he will come up and steal some Gil from you. However, speak to him and you’ll learn he’s actually Alleyway Jack, the one person the ticket salesman mentioned earlier. You’ll follow him back to the bar, where he will give you a brief tutorial on Tetra Master.
Quick Tetra Master Tutorial
Whenever you walk up to a NPC and see a card icon, you have the option to challenge them to a game of Tetra Master, a card battling mini-game that has some similarities to Triple Triad in Final Fantasy VIII. You can find cards just laying around, like with the ones you’ve found in the city thus far, but you can also get them from side quests. Battles take place on a 4x4 grid, where you might find some blocks occupying some spaces; you won’t be able to place cards on those spaces. You will only be able to play five cards at a time and if you don’t have five cards in your possession, then you won’t be able to play.
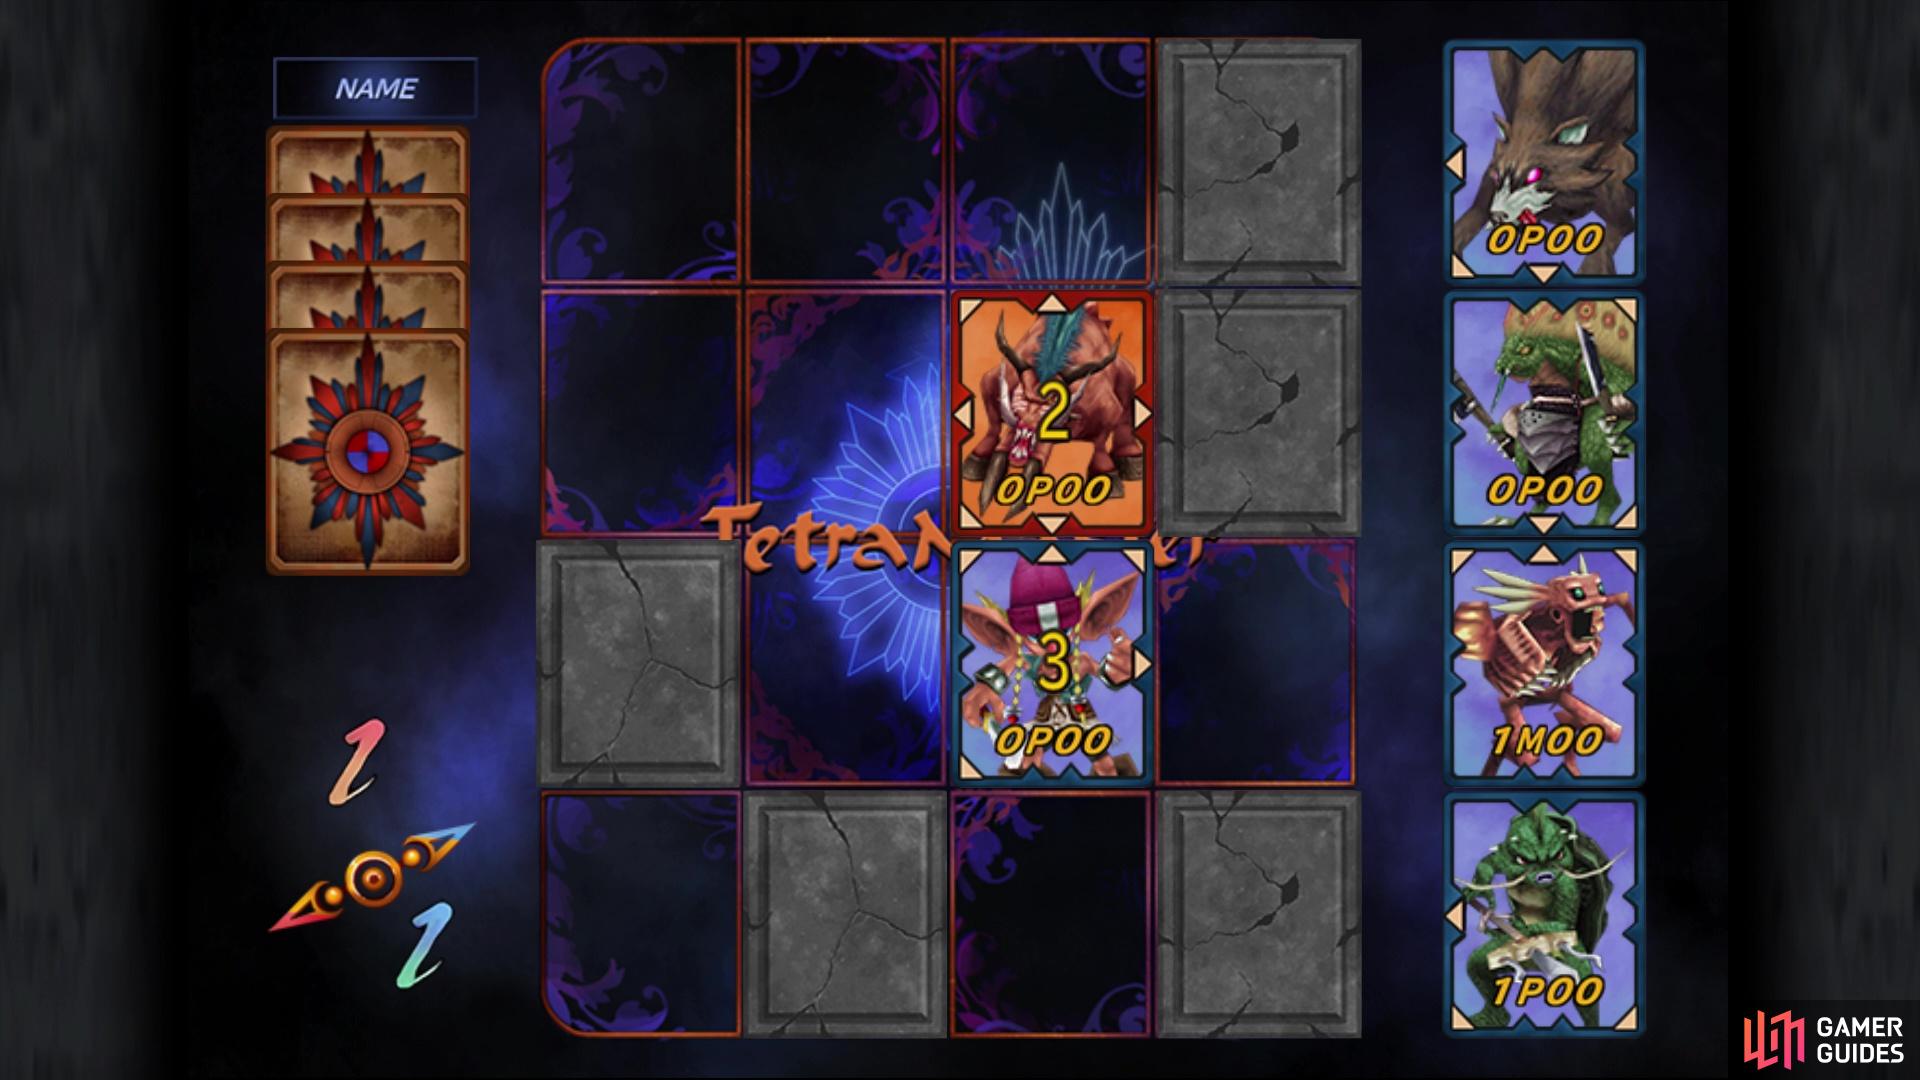
Cards that have arrows facing each other will do battle
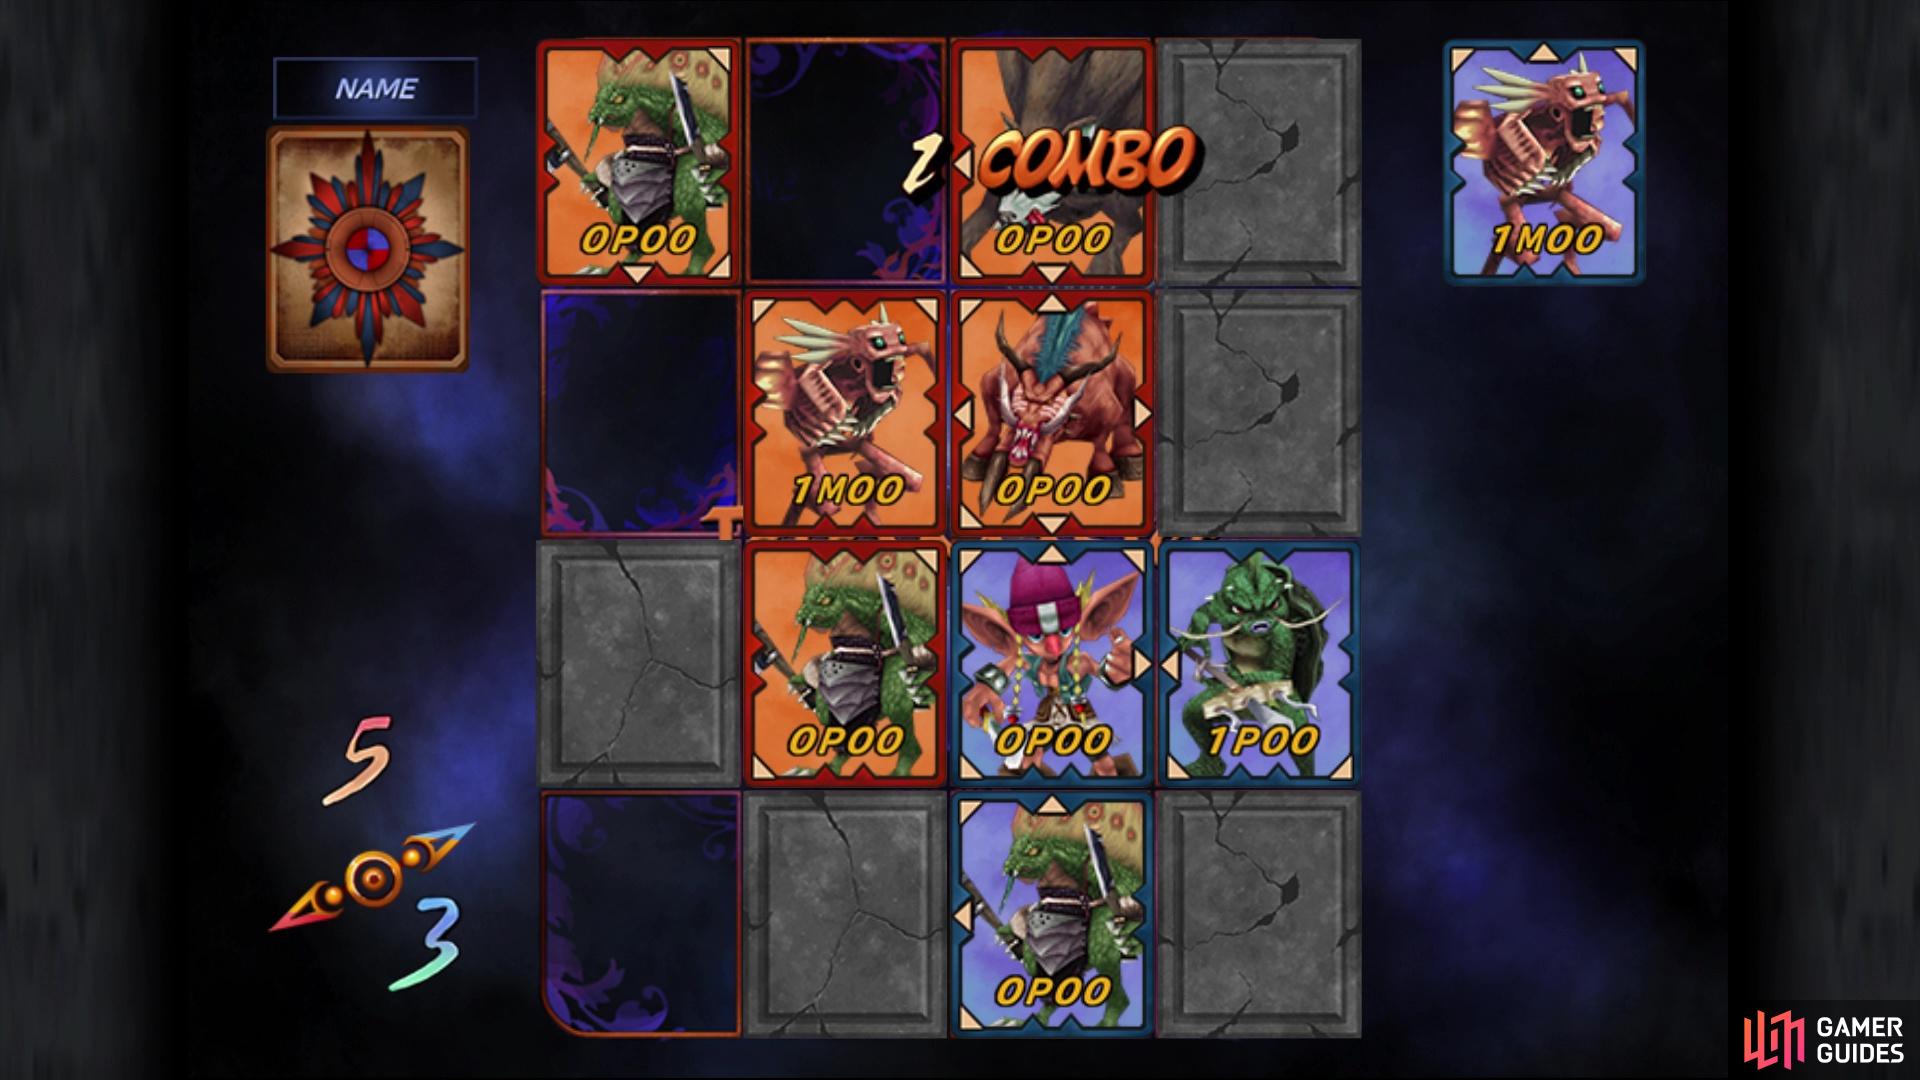
If a card that is taken over has an arrow facing another card, then you will have a combo
So, every card in the game has arrows on it, which will indicate the direction that they will attack other cards. A card whose arrow doesn’t face an opposing arrow will capture that card, but should they have an arrow facing them, then the cards will do battle. If your card wins, then you capture the other, but should you lose, then your card will be captured. The player with more cards in their possession at the end of the match is declared the winner, and they will be able to take a single card of the other person that was in their possession during the game. If you capture all of the opponent’s cards, then that is considered a Perfect and you get all of the cards.
There’s a lot more under the hood for Tetra Master, including all of the mechanics and how the card battles work, in the Tetra Master section of the guide. Feel free to play a game against Alleyway Jack, if you want, but it’s not necessary. Note that you need to win 100 games of Tetra Master in order to get three trophies/achievements, but you will be able to do that later.
Sneaking Into the Play
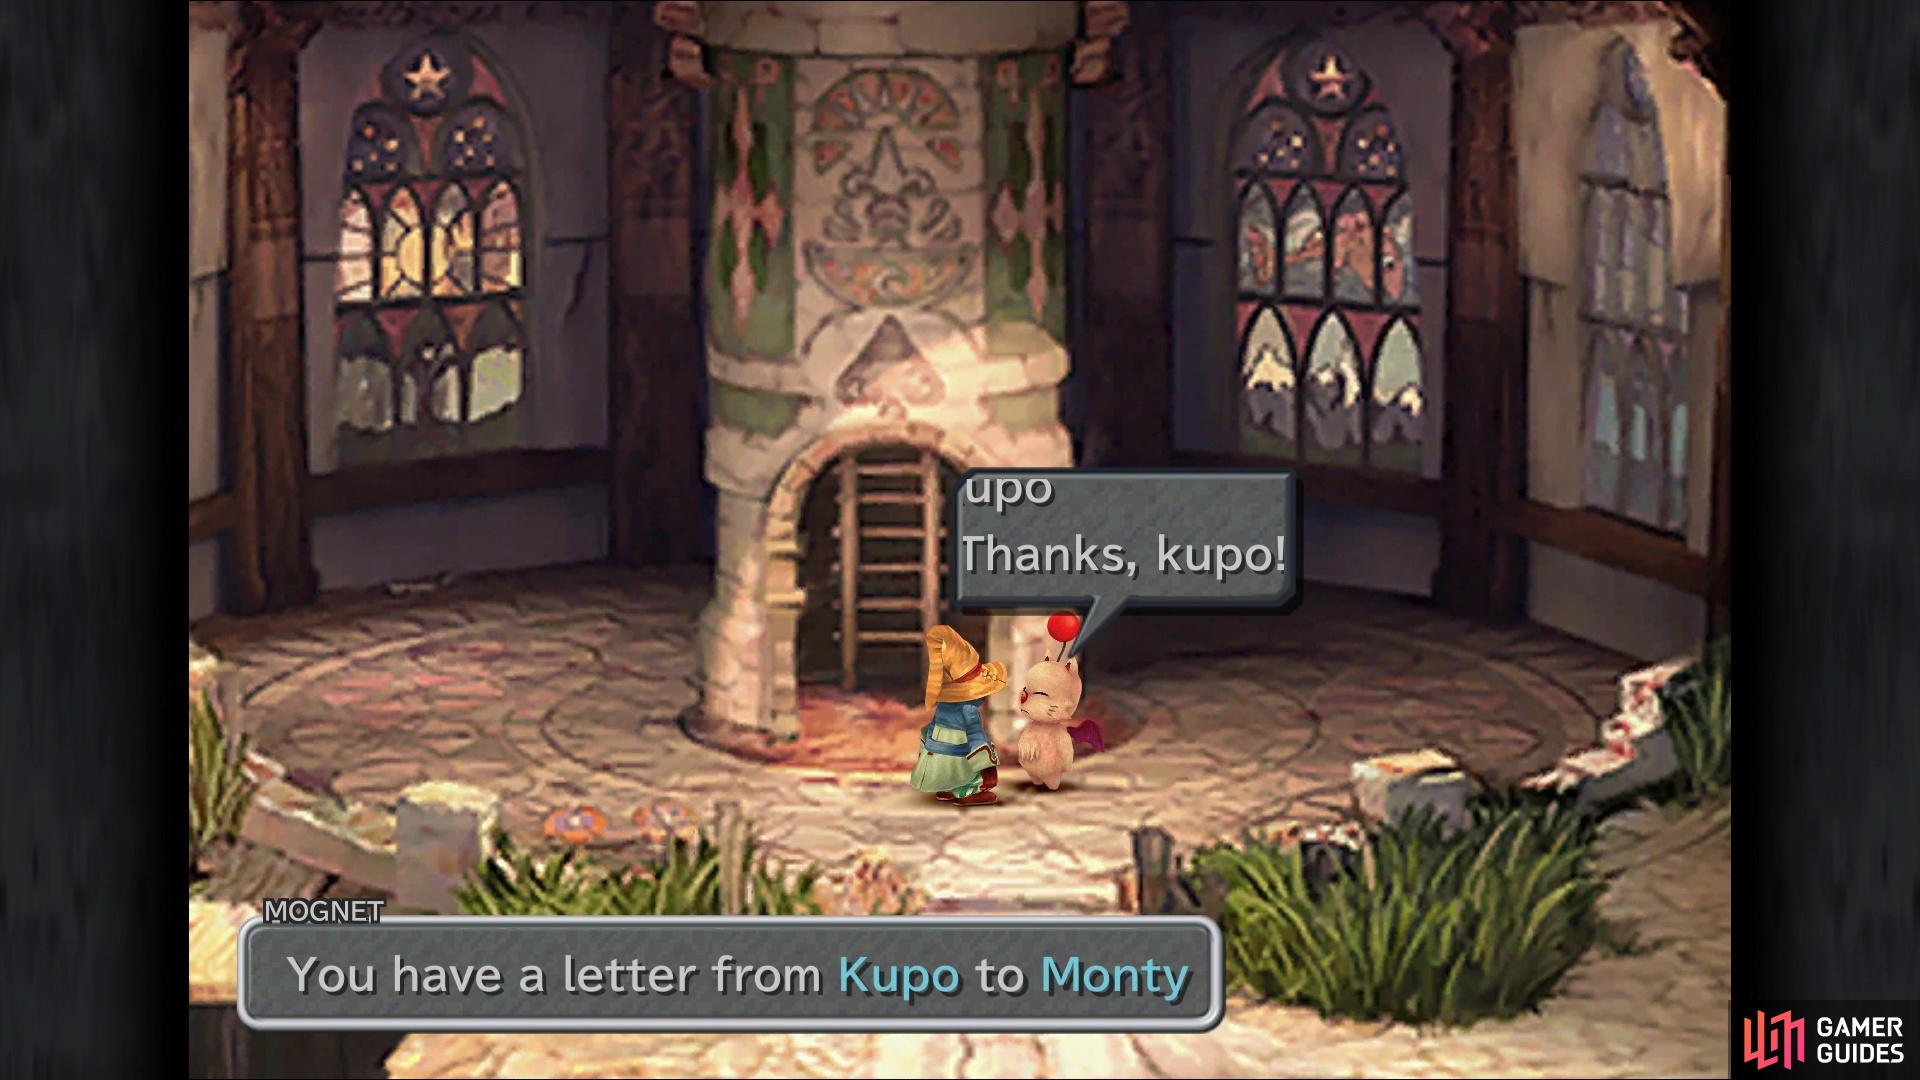
You’ve gotten all of that out of the way, so let’s get back on track. Return to the screen with the steeple and follow the Rat Kid inside. He’ll ask you to climb first, but as you approach the ladder, a moogle drops down on top of you. This is Kupo and moogles have a primary function in the game, which is to save your game. You can also use Tents with the moogles, recovering HP and MP. Before you can join Rat Kid at the top of the steeple, there will be a short scene with some moogles. Speak with Kupo again and select the Mognet option, where you’ll learn about a new side quest, Mognet Central.
This side quest is basically just delivering letters to various moogles around the game’s world. You can only carry three of these letters at a time and while some are missable, you don’t have to do a majority of them, as it’s possible to complete the side quest near the end of the game without those missable letters. Either way, say that you’ll help (you don’t have a choice here, as you can’t say no) and you’ll receive a letter from Kupo to Monty. Save your game and proceed up the ladder to meet up with the Rat Kid, who brings you onto the roofs.
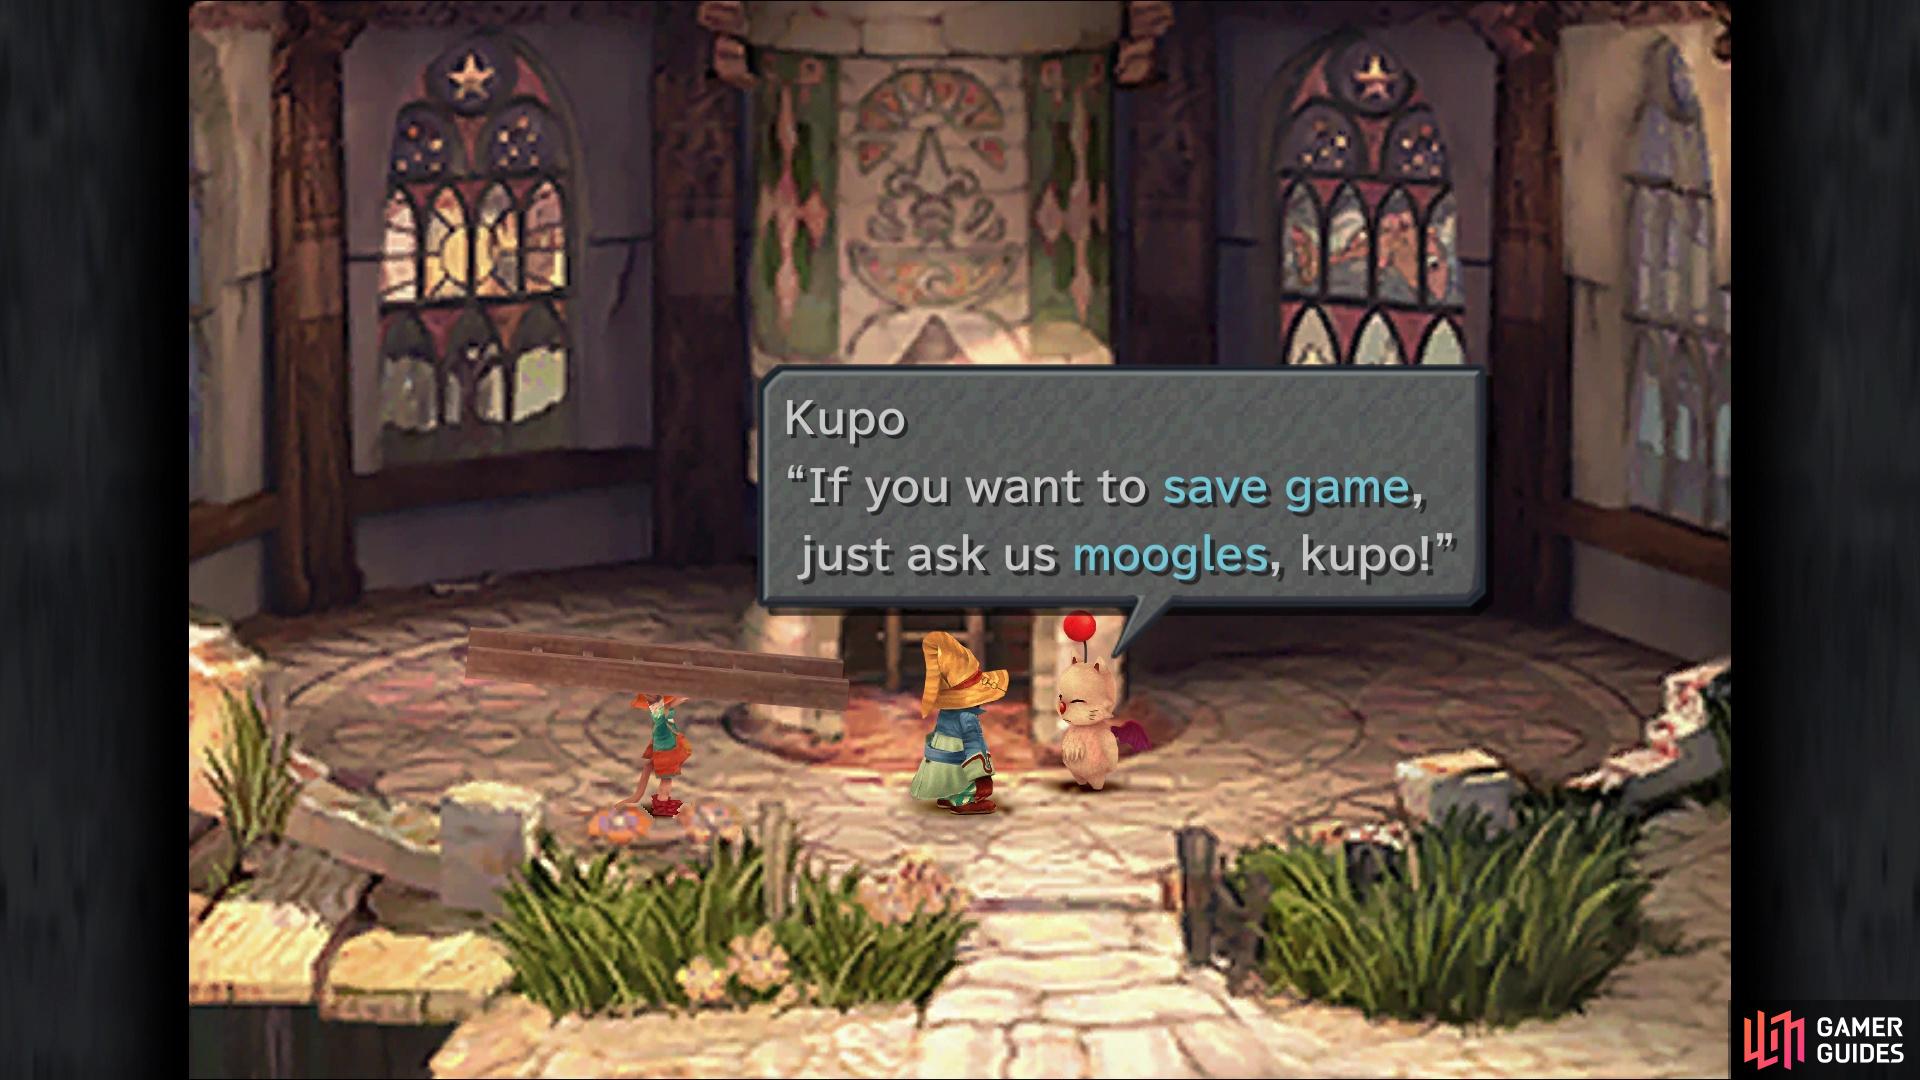
Moogles are your save points in this game
One of the side quests is to deliver letters between Moogles
Cross the planks to the left and on the second roof, check the bird’s nest towards the lower left for 29 Gil. Travel north and when you reach the Rat Kid again, you’ll have the opportunity to name the character you’re controlling. Naturally, this guide will use his default name of Vivi. You’ll also learn the name of the Rat Kid, who is called Puck. Follow Puck up, to the left and down the stairs. Cross the planks to your right and then south, and you’ll be able to reach the bird’s nest on the far right, where you’ll find 63 Gil. Return to the stairs and go up them again, heading north to find one more bird’s nest, this one containing 92 Gil.
Double back, go right, then up and you’ll arrive at the play. Some scenes will play out and you’ll be forced into another battle.
Forced Battle - King Leo
You have three targets in this battle, King Leo, Zenero and Benero. The only one that matters is Leo, so just concentrate on him. Your options for attacking is Attack and SFX, with the latter just putting on a good show. It shouldn’t really take too long, as this is just a mock battle put on for everyone watching the show.
After the battle is over, the game will carry you to a “sword battle” with Blank. In this, you have to press the buttons as they appear on your screen, but you don’t get a lot of time to do it. At first, you will typically have two buttons to press, then it will introduce left/right. Eventually, the game will throw the rest of the face buttons into the mix, as well as up and down. At the end of the mini-game, you will be graded by how many nobles were impressed, out of 100, as well as whether Queen Brahne was impressed. Thankfully, Queen Brahne has no relevance on your prize, so don’t worry if she isn’t impressed.
The scoring is entirely dependent on hitting the button presses correctly and quickly, with you getting one noble for each of those. There’s a total of 49 button presses, which equals out to 98 nobles. There’s also two nobles assigned to entering all buttons correctly and quickly, adding up to the 100 total. Unfortunately, if you wish to get all of the trophies/achievements, you will need the 100 nobles. The one trophy for getting an encore only needs around 80 nobles impressed, but the 100 noble reward is a Moonstone. These are limited and there’s only four in the game. Luckily, you can retry as much as you want, so you aren’t stuck with reloading your game after failing, but make sure you don’t accidentally retry after achieving the max score.
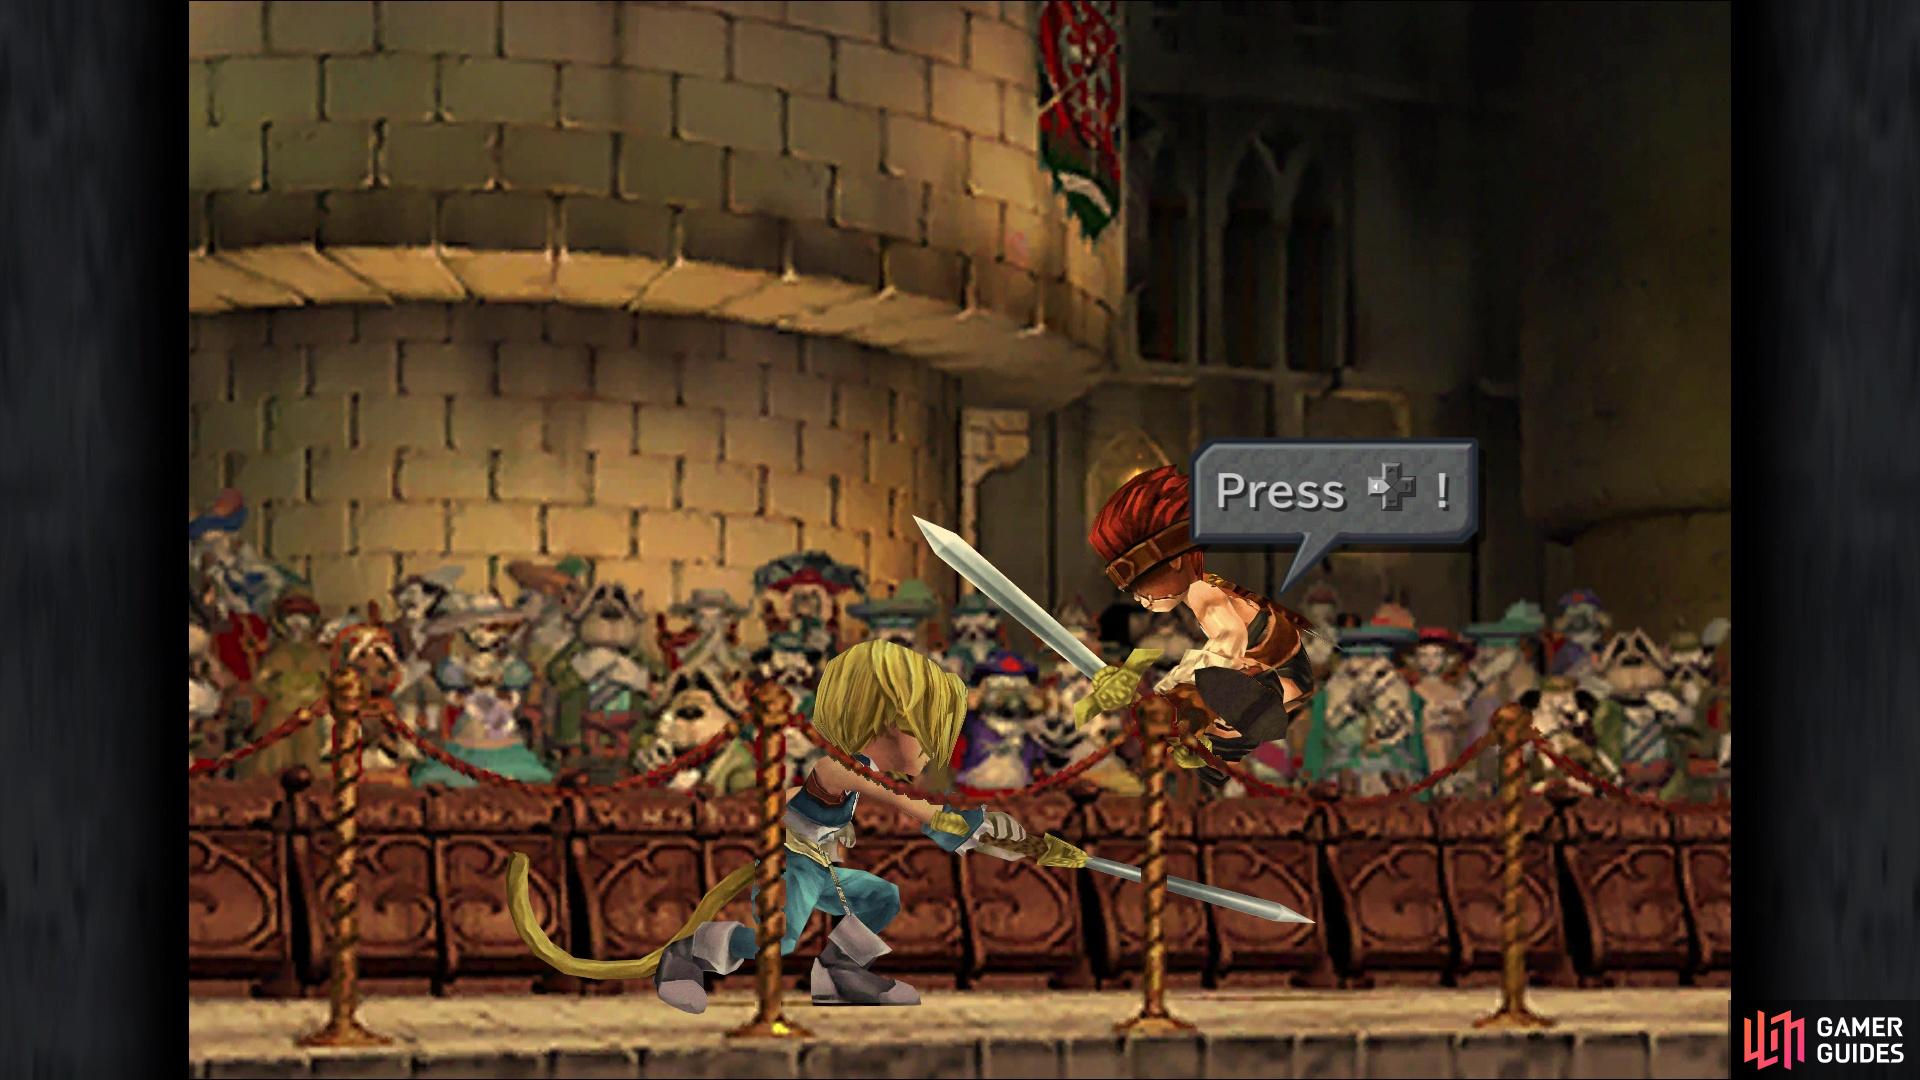
Press the buttons as they appear on the screen
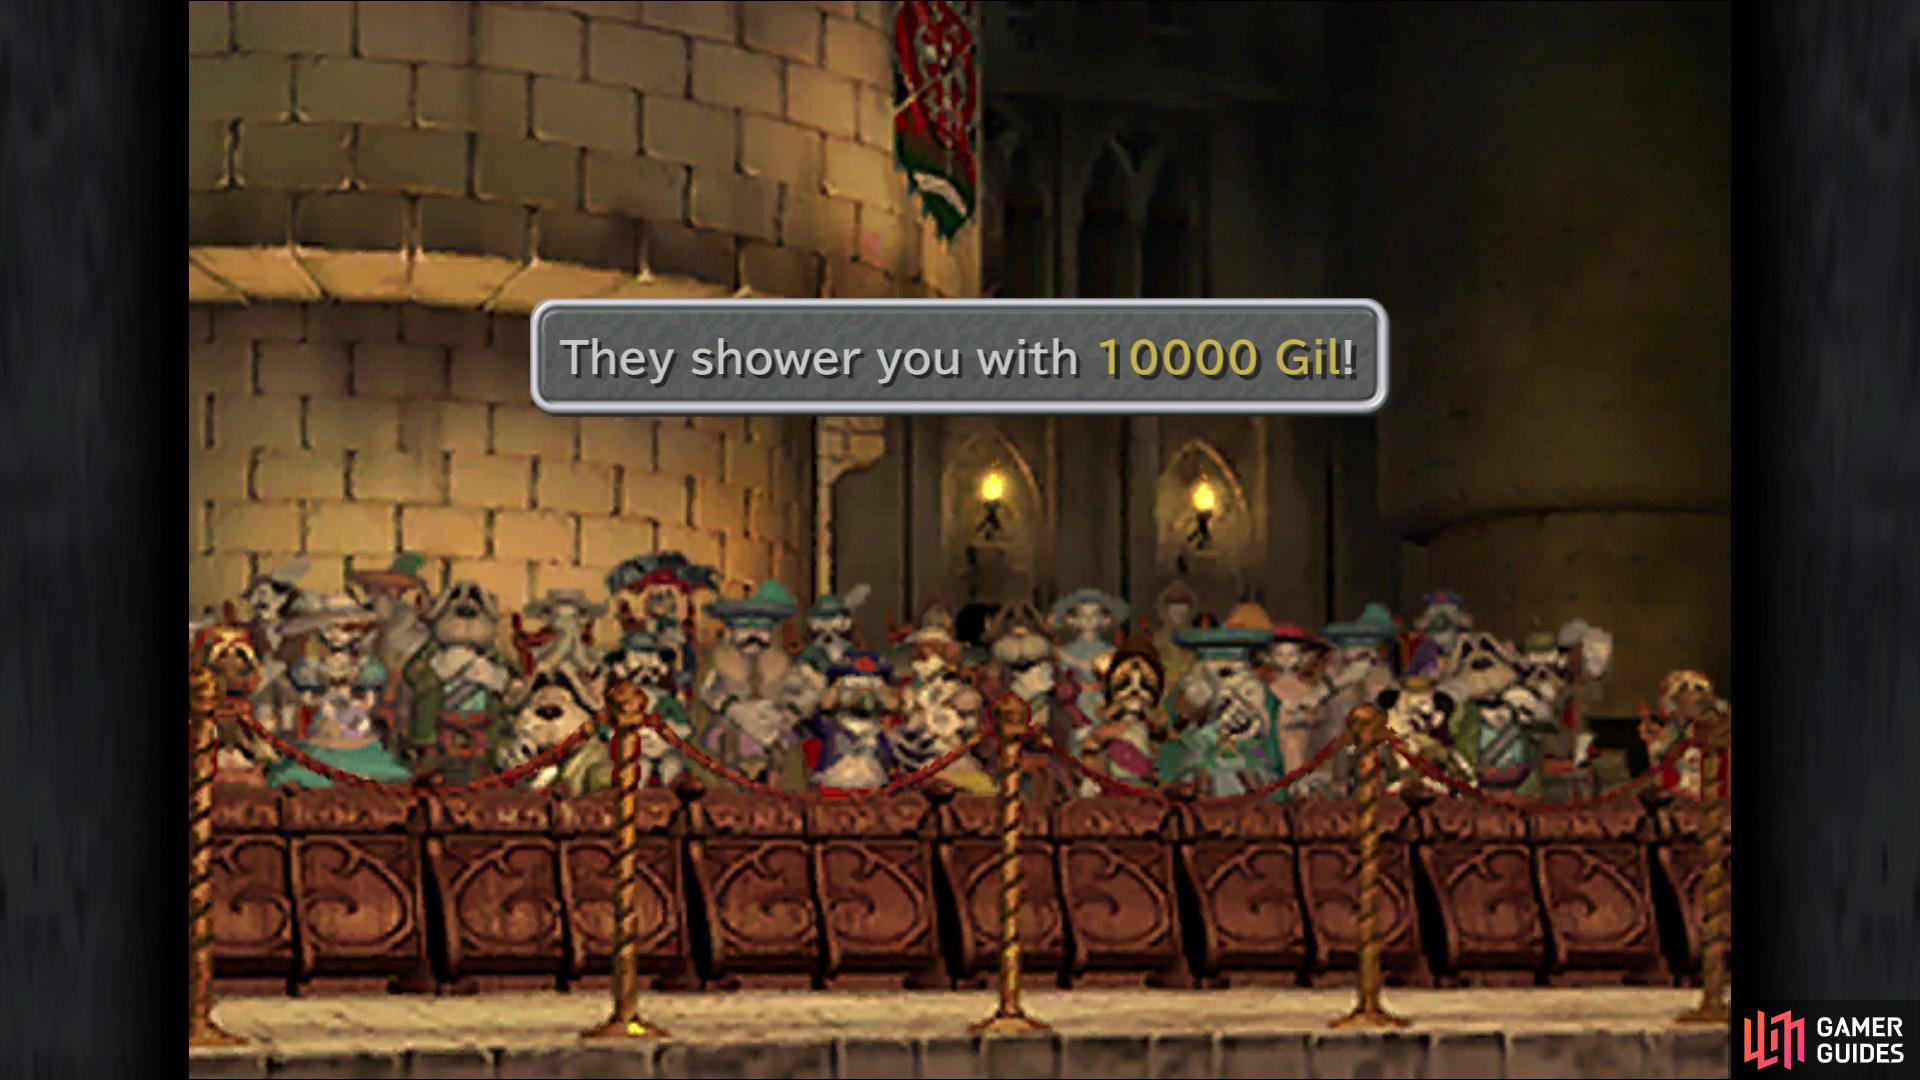
Impress 100 Nobles to earn 10,000 Gil
Other rewards include the following:
| Nobles Impressed | Reward |
|---|---|
| 1-49 | Ether |
| 50-79 | Elixir |
| 80-99 | Silk Shirt |
| 100 | Moonstone |


Upon completing the sword battle, a scene will take over and you will be inside of Alexandria Castle.
No Comments