
Your next target is Cleyra, the city surrounded by that whirlwind in the desert area earlier. There’s nothing optional to do right now, so go to the whirlwind and walk up to it to enter the place. You won’t appear in the actual town, though, as you have to climb up the trunk to get there, which is basically a dungeon.
Cleyra’s Trunk
After the introduction, you will gain control in the second area. There’s nothing here, so just take the steps to get to the next area, where you will find a locked door in front of it. The door won’t open if you push on it, but there is a lever to the right that will open it. The next screen doesn’t have anything exciting, except for a chest with a Phoenix Down on the right side. Before diving further into the dungeon, let’s take a quick break to talk about some of the monsters here in Cleyra’s Trunk. The Sand Golem can be an annoying enemy, if you don’t know what to do, as the main body is not the actual target here.
Depleting the main body’s HP to zero will just put it out of commission for a short while, until the Core revives it. You should be focusing on the Core to begin with, but attack this with anything will make the Sand Golem counter with a physical attack. Other enemies you want to keep an eye out for are the Dragonfly and Carrion Worm (one more later on, too). These aren’t dangerous, but they do have Blue Magics for you to learn. The Dragonfly (around 348 HP) has Matra Magic, which can reduce an enemy’s HP to 1, and the Carrion Worm (around 259 HP) has Auto-Life, which basically revives anyone who is KO’ed that has Auto-Life cast on them with 1 HP.
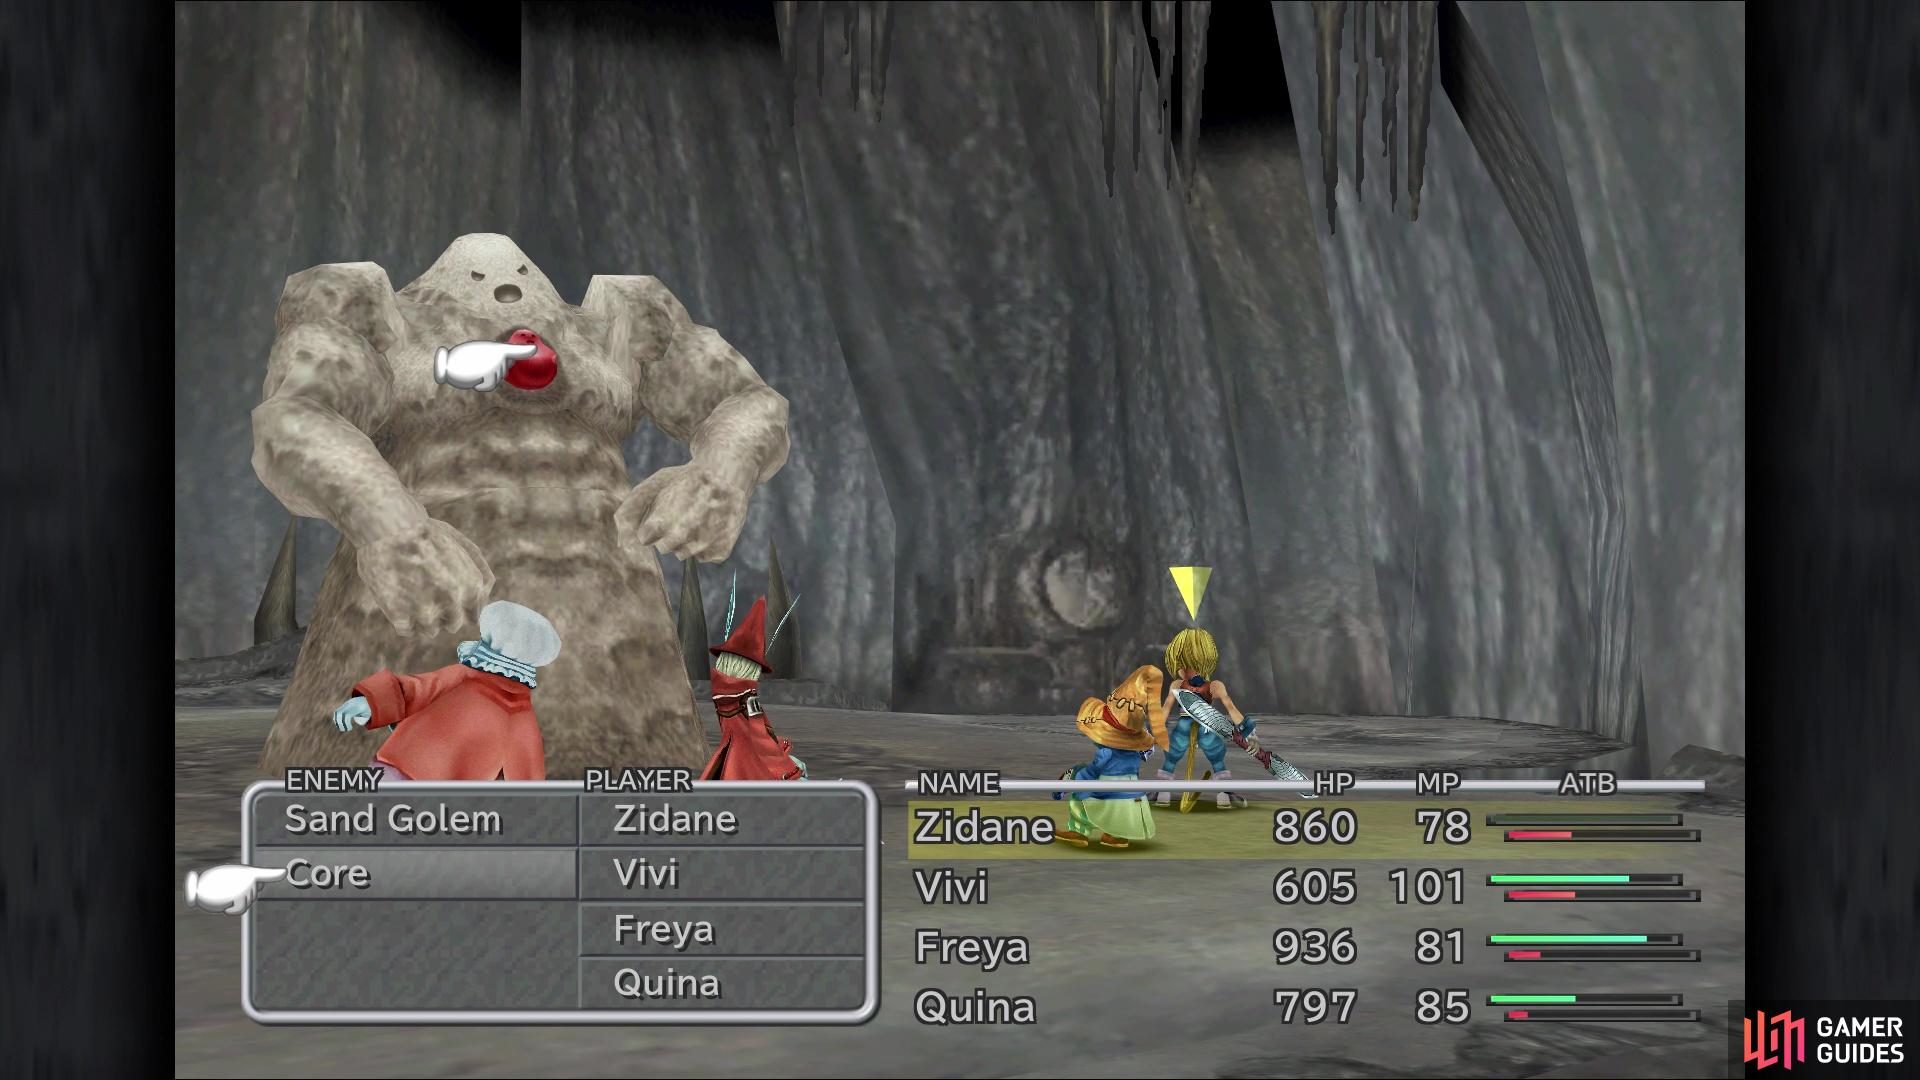
The Core is what you need to attack when facing a Sand Golem

It’s hard to see, but there is a chest with an Ice Staff hidden behind the tree
Back to the action, continue to the next screen to arrive in a slightly open area, with a tree in the middle of it. There will be a chest with some Magician Shoes to the south of where you enter, plus another hidden behind the tree, close to the flowing sands at the top of the screen (Ice Staff). Exit to the right and ignore the vines right in front of you, opting to go up and find another exit. In this small room is a chest, which contains an Ether, and there’s also a small hole near it. Stick your hand in it and you will hear something click, making sand pour out near you.
As you try to go back to the one room you were in, you can’t, but climb the nearby vines and enter the hole there. The previous room you were in is now filled with sand, but there’s nothing new to grab, so look for the opening on the left. On the next screen, you can find a chest in the lower left corner that contains a Needle Fork, as well as another up the hill from where you entered (Tent). There is a path to the left of that chest, leading to a moogle named Monev. You just happen to have a letter for Monev from Atla, so hand it over, then feel free to use a Tent and/or save if needed. Once you’re finished, head up and into the next area.
You will come to a split here, where you can go either left or right. Go left first and at the end will be another chest (Flame Staff); the other direction dives deeper into the dungeon and will bring you to a cave with multiple ways to go. First off, go to the right to find a chest in plain sight, which has a Remedy, then look behind the central root where you entered to find a pair of Desert Boots. The next treasure is a little harder to pinpoint, due to being in a blind spot. From the previous chest, look for the opening in the trees just left of it and go in there. Fiddle around while in this opening until you spot the exclamation point over your head, which is where the treasure is located (Mythril Vest).

The Desert Boots are right behind the central pillar

You’ll have to fiddle around a bit in the back to find the Mythril Vest
That’s all in this cave, so head straight to the back, in the middle, to find an exit to the outside. Open the chest in front of you for some Mythril Gloves, then follow the trail to the next screen, where you’ll find a lever to pull at the end. Backtrack to the cave now and exit via the left side now, which will put you on the higher section you saw earlier, with a chest being right there in front of you (Potion). There’s another split just beyond this chest, so take the right path to end up at a dead end with one more chest that contains an Elixir. Return to the split and take the left path this time, where you’ll end up in a room with some whirlpools.
Should you get caught in one of them (and you will), you will have to mash the action button to get out of them, but Zidane will jump out of them in the direction that he’s facing. With this knowledge, it can be a little annoying to get the two chests in the room, but it’s possible to try and control the way Zidane jumps by not frantically mashing the button as soon as you get sucked into the whirlpool. Tap the button ever so lightly, but enough to not get sucked in all the way. The two chests in the room contain a Hi-Potion and 900 Gil, so you can see if they are worth it or not, especially if you’re having a lot of trouble.
The exit is on the left side and you’re nearing the end of the dungeon. On the next screen, you will want to get into some random battles, until you find a Zuu (around 1,149 HP). This thing is a little beefier compared to the other normal enemies, so you probably don’t need to hold back as much, since you want Quina to Eat it for the White Wind Blue Magic. Once you’ve gotten the spell, continue onto the next screen to encounter a ladder. There is a chest with some Gysahl Greens at the far end, so grab those and climb the ladder, where you’ll reach the Cleyra Settlement.
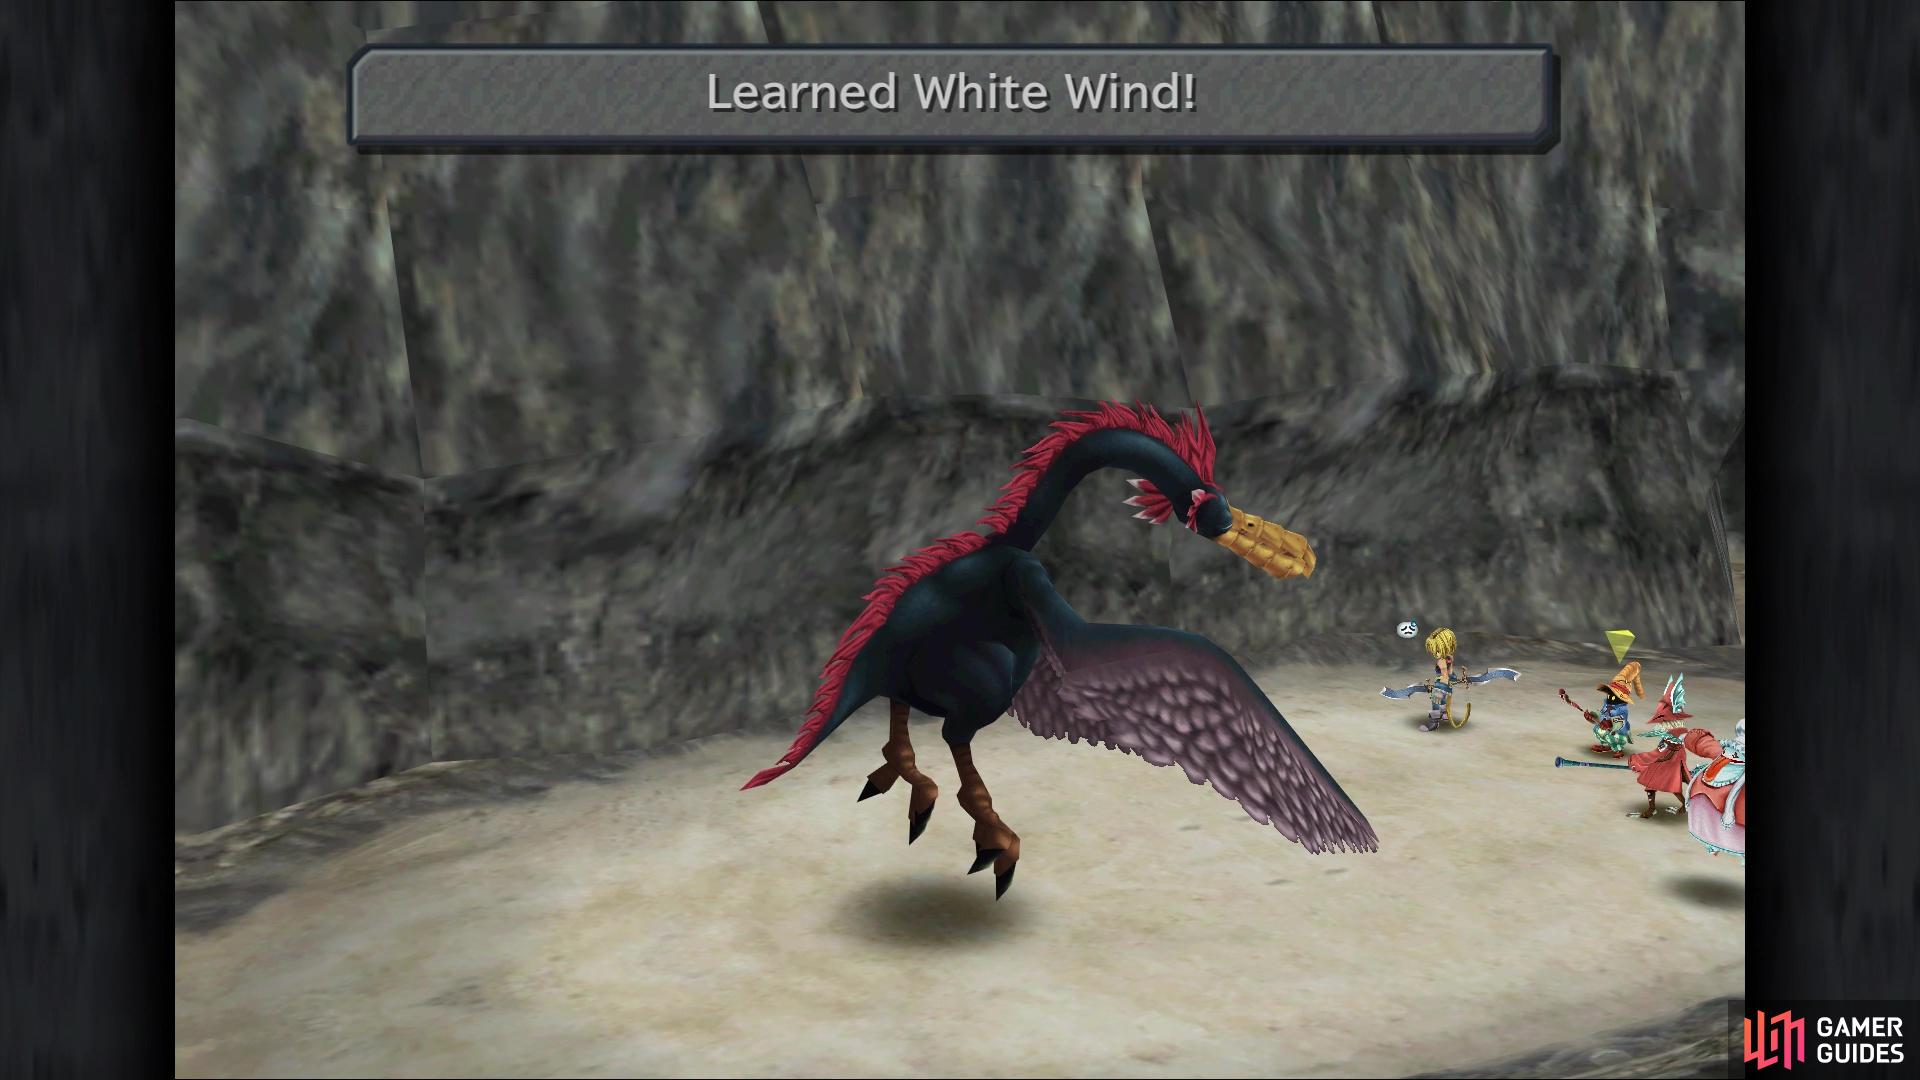
White Wind is a nice magic for Quina, as it gives him/her some back up healing
Cleyra Settlement
At the entrance to the Cleyra Settlement, Freya will go off to meet with the king, while the Forest Oracle Kildia will offer to show you around the village. If you say yes, then he will go to a few spots, briefly tell you about them, then bring you back to the entrance of the village. If not, then you are free to explore on your own from the beginning. Let’s go over the four ATEs you can view while exploring the village, since you will see them pop up as you go. They are as follows:
- No Yummy-Yummies!
- There a Mushroom!
- Don’t Hate Me
- I-I Haven’t Hurt Anyone
It’s time to raid the village of its goodies, so start off by going behind Kildia to find a sand whirlpool. It appears there is nothing here, but search in front of the piece of wood sticking out of the bottom of the screen in the front to find 970 Gil. Head back to the previous screen and go up the stairs, stopping after the very first set. On the right-hand side here is an item you can grab, so search around until it pops up on your screen (Phoenix Pinion). Continue up the stairs, opting to take the northwestern set to exit. This will place you in the pond area, where you should trigger two of the ATEs in the above list. View them both, then return to the previous screen, exiting to the top right this time. Head to the right as soon as you get off the stairs to find an Ore at the end of the path there.
Continue to the north to find the soldier, Dan, standing in the middle of the square with his family. Speak to him a couple of times until he offers you a look at his wares. There’s a few things of worth here, like the Partisan for Freya. The Mythril Armlet is an upgrade over the previous arm piece, plus you can use it to synthesize a nice piece of gear later on in the game, so grab as many as you need, plus one more. The only other item of value for synthesis is the Mythril Armor, but that isn’t available until the final disc, so just buy what you need. For upgrades, you have the Thunder Gloves, Mage’s Hat, and Mythril Helm.
That’s all the shopping done here, so start climbing the stairs to the right and a few steps up, you can find a Remedy along the right-hand side. Keep going up to the next screen, where you should have the other two ATEs pop up. That’s all you can do here, so head back down to the entrance and go to the sand whirlpool to find Quina there. Talk to him/her to have Quina actually jump into the whirlpool, with Zidane following him/her into it. This will put you back in Cleyra’s Trunk, in the one area you couldn’t access before when you went through earlier. As soon as you land, open the two chests there for a Silk Robe and Magician Shoes. Noting that you only have Zidane and Quina here, you have to make the trek back to the village.
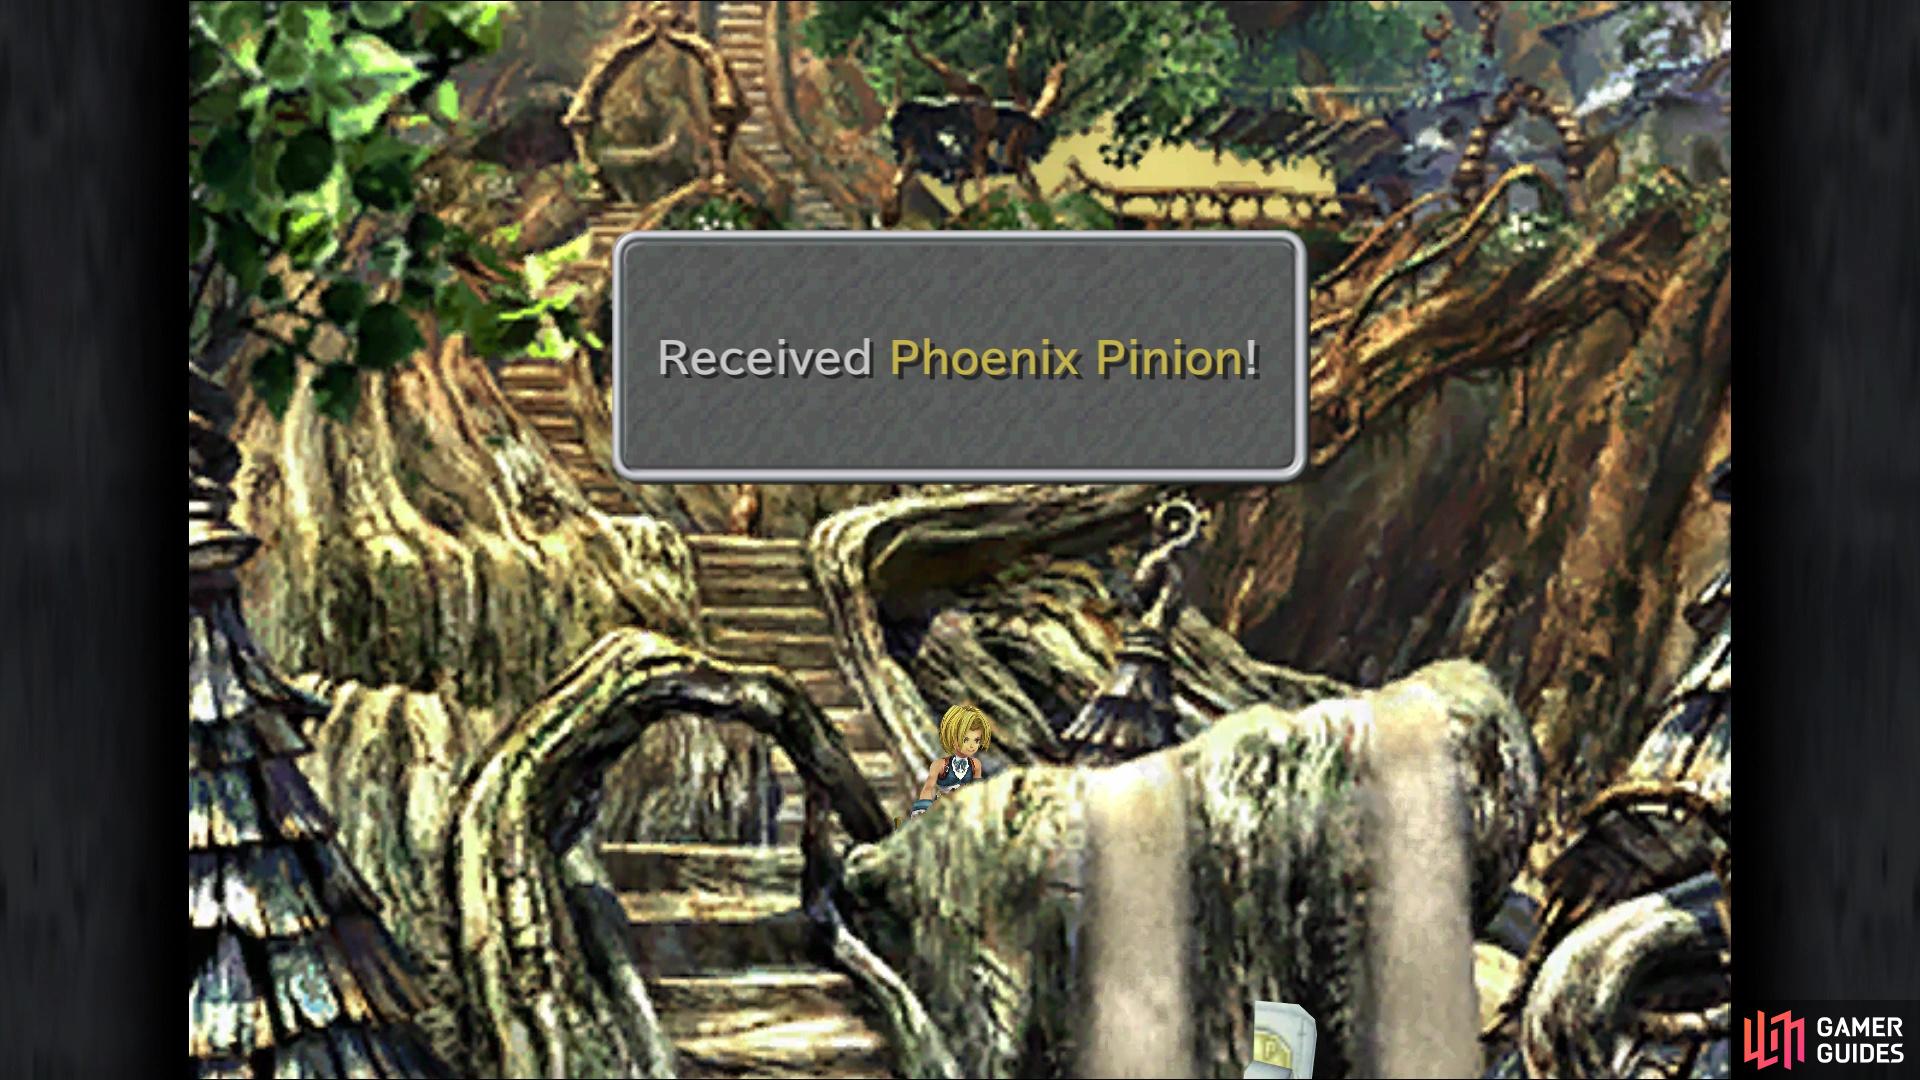
There are a number of hidden items in Cleyra, like this Phoenix Pinion
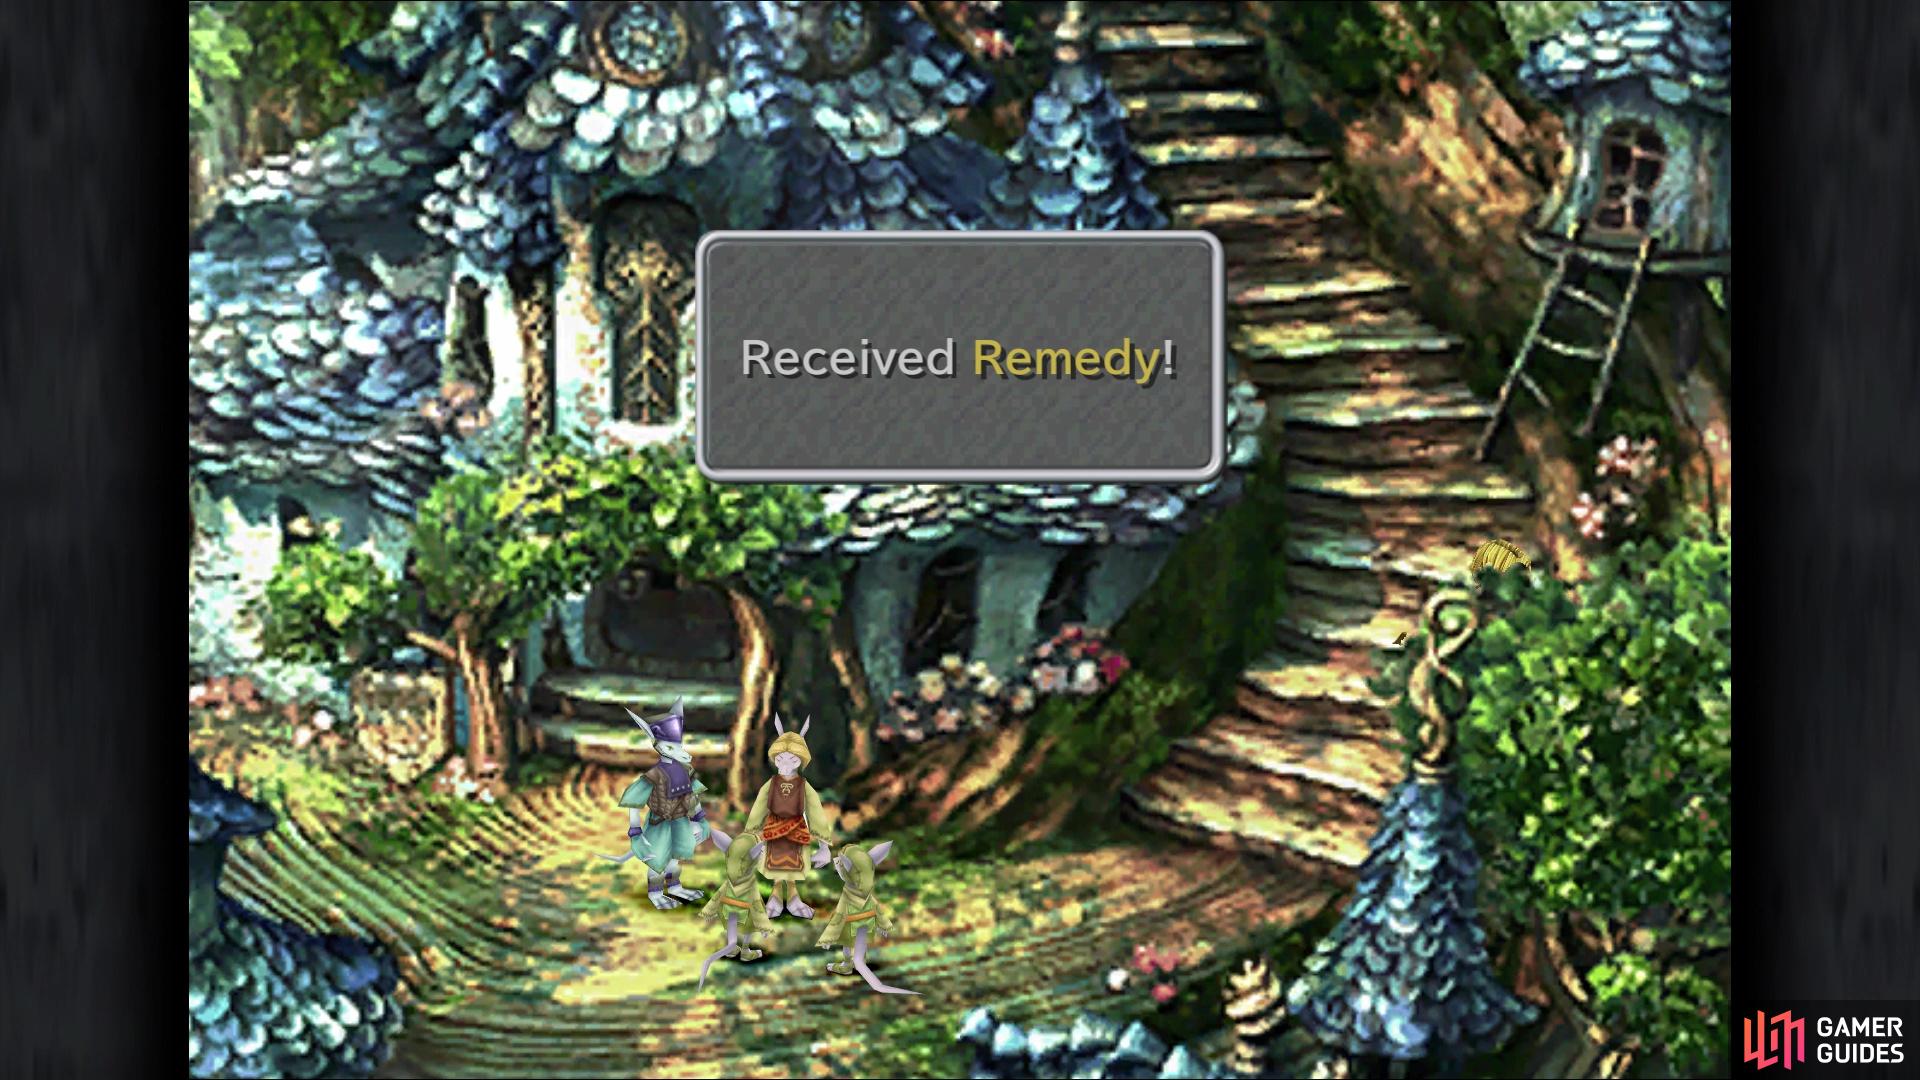
as well as this Remedy on the stairs
Once you make it back, return to the pond area and look for an item straight from where you entered, which will be a pair of Thunder Gloves. Head to the right and you will be back where you found Dan, the soldier. Behind him is the inn, so let’s enter it for now. Upstairs is a moogle named Mopli, who has a letter for Zidane, from Ruby. While you’re up here, check the stand next to the one bed for an Ether, then look by the wooden chest at the bottom of the stairs for 1250 Gil. There’s one more item in the inn, which is behind Vivi, so grab it (Echo Screen) and leave. There is a wooden bridge to the left of the inn, so take that to get to the Windmill Area.
To the right of Sand Oracle Satrea, is another wooden bridge and between the two of them on this side will be an item (Phoenix Pinion). The other NPC in front of Satrea runs an item shop, in case you need anything. If you don’t have any Annoyntments, get some right now, as they will be needed for an upcoming boss. Go up the stairs to the left of Satrea to arrive at the cathedral. Check the grass near the sign post for some Gysahl Greens, then check the flowers to the right of the entrance for an Echo Screen. Go inside the cathedral now and check the left side of the room, close to where you entered, to find a Yellow Scarf. Speak to the oracle on the left to get relayed a message from Freya to wait at the inn.
As you approach the entrance of the inn, a scene will occur and you will be told to follow Dan to the whirlpool. Before doing that, go inside the inn and save your game, as there’s a boss battle approaching. Make your way back to the entrance of the village and make sure you equip Bright Eyes on anyone who has it, as it will be needed (unfortunately, you only have Zidane and Quina right now). Go to the whirlpool to find the boss waiting for you.
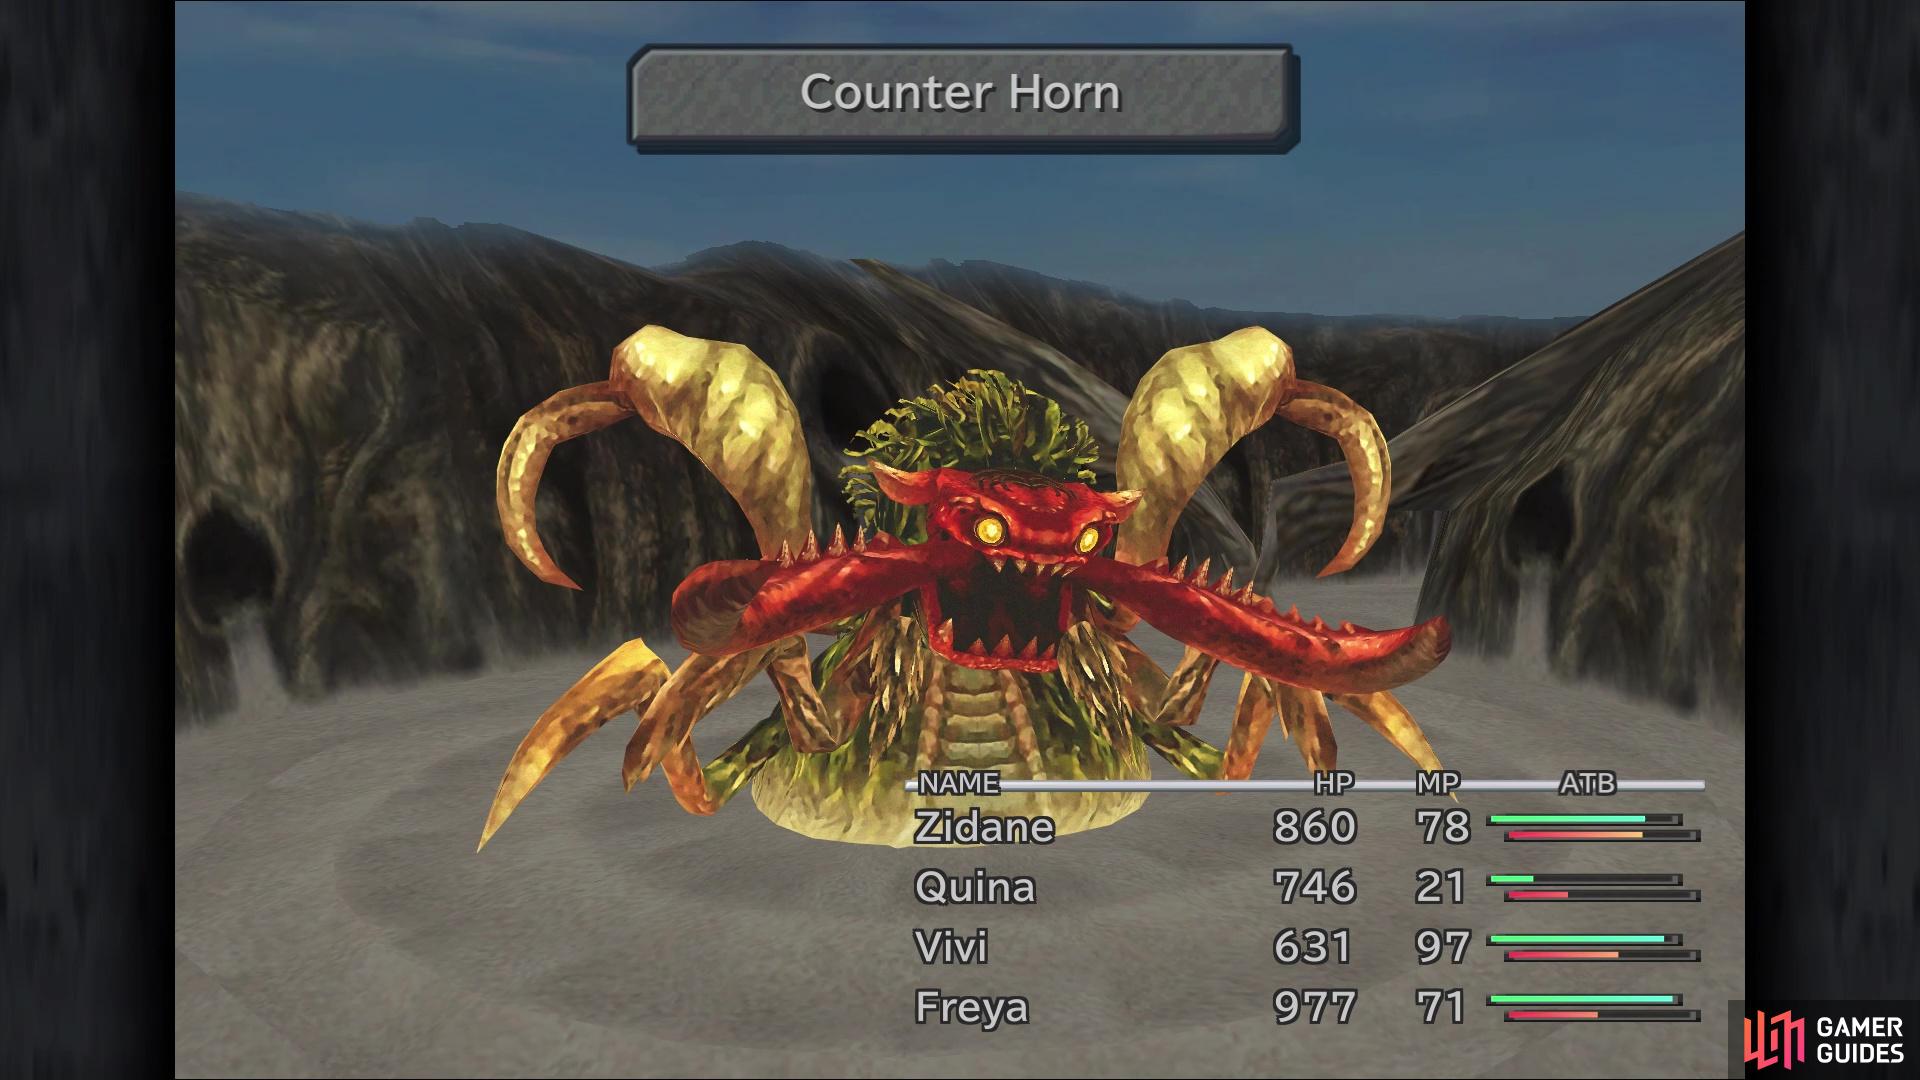
BOSS - Antlion
The Antlion can be annoying boss, for two reasons, one of which is Trouble Mucus, inflicting Trouble on whomever it hits. This status ailment will make it so if that character is hit with damage, half of that damage is shared with the rest of the party. The only way to cure Trouble is with Annoyntment items. The other reason that Antion can be troublesome is because of Sandstorm, which reduces all of your characters’ HP to single digits, as well as inflict Darkness on them. If they have Bright Eyes equipped, then they should be safe from the latter. Hopefully you picked up White Wind for Quina, as it will be extremely useful here, as will Reis’ Wind for its regen effect.
Outside of the above two attacks, Antlion will counter all physical attacks with Counter Horn, plus it can cast Fira on a single character. Being weak to ice, having Vivi use Blizzard or Blizzara will definitely make the battle go more quickly. You can also supplement this by casting Slow on the boss, and even Sleep. The latter helps a lot in trying to secure all three of the steals from the Antlion, which are an Annoyntment, Mythril Vest, and a Gold Helm. As long as you keep Trouble in check, as well as Sandstorm, this battle shouldn’t provide too much difficulty.
After the battle is finished, there will be a number of scenes, and the choices present later on don’t really matter. Once they are all over, you will be in control of Freya, so start off by returning to the throne room. Speak to the High Priest to have him give you an Emerald, then check the center of the room in the back for an Ore. By the left pillar, at the front of the screen, will be an Ether and on the right side, behind the harp, will be a Phoenix Pinion. That’s all you’ll find here, so return to the inn to find Stiltzkin upstairs. Buy the item set from him for 444 Gil to acquire a Hi-Potion, Ether and Phoenix Pinion, then speak to Mopli to find out he has a letter from Monev.
Village Under Attack
That wraps up the exploratory portion of Cleyra for right now, so return to the entrance to find everyone waiting for you. Use this opportunity to check on your equipment and abilities, then begin backtracking through the trunk. Once you get to the whirlpool room, you will be pitted against two Alexandrian Soldiers. They’re nothing special, so don’t feel threatened by them at all. Continue going backwards and on the next screen, at the split, you’re going to fight two more soldiers. In the cave with a lot of hidden paths, there is one final fight for you with two last soldiers.
On the screen after that, with the bridge, there will be a scene, where Puck comes out to confirm your true fears that the town is under attack. You will automatically return to the town, where you will be met with a Type B mage to fight. You should be able to wipe the floor with it, so act like it’s nothing because it really is. Control will be yours after the fight, but you don’t want to advance just yet. Instead, go to the right, to the whirlpool, to find Stiltzkin and Mopli. You can pick up a letter from Mopli, for Serino, plus you will want to save your game here.
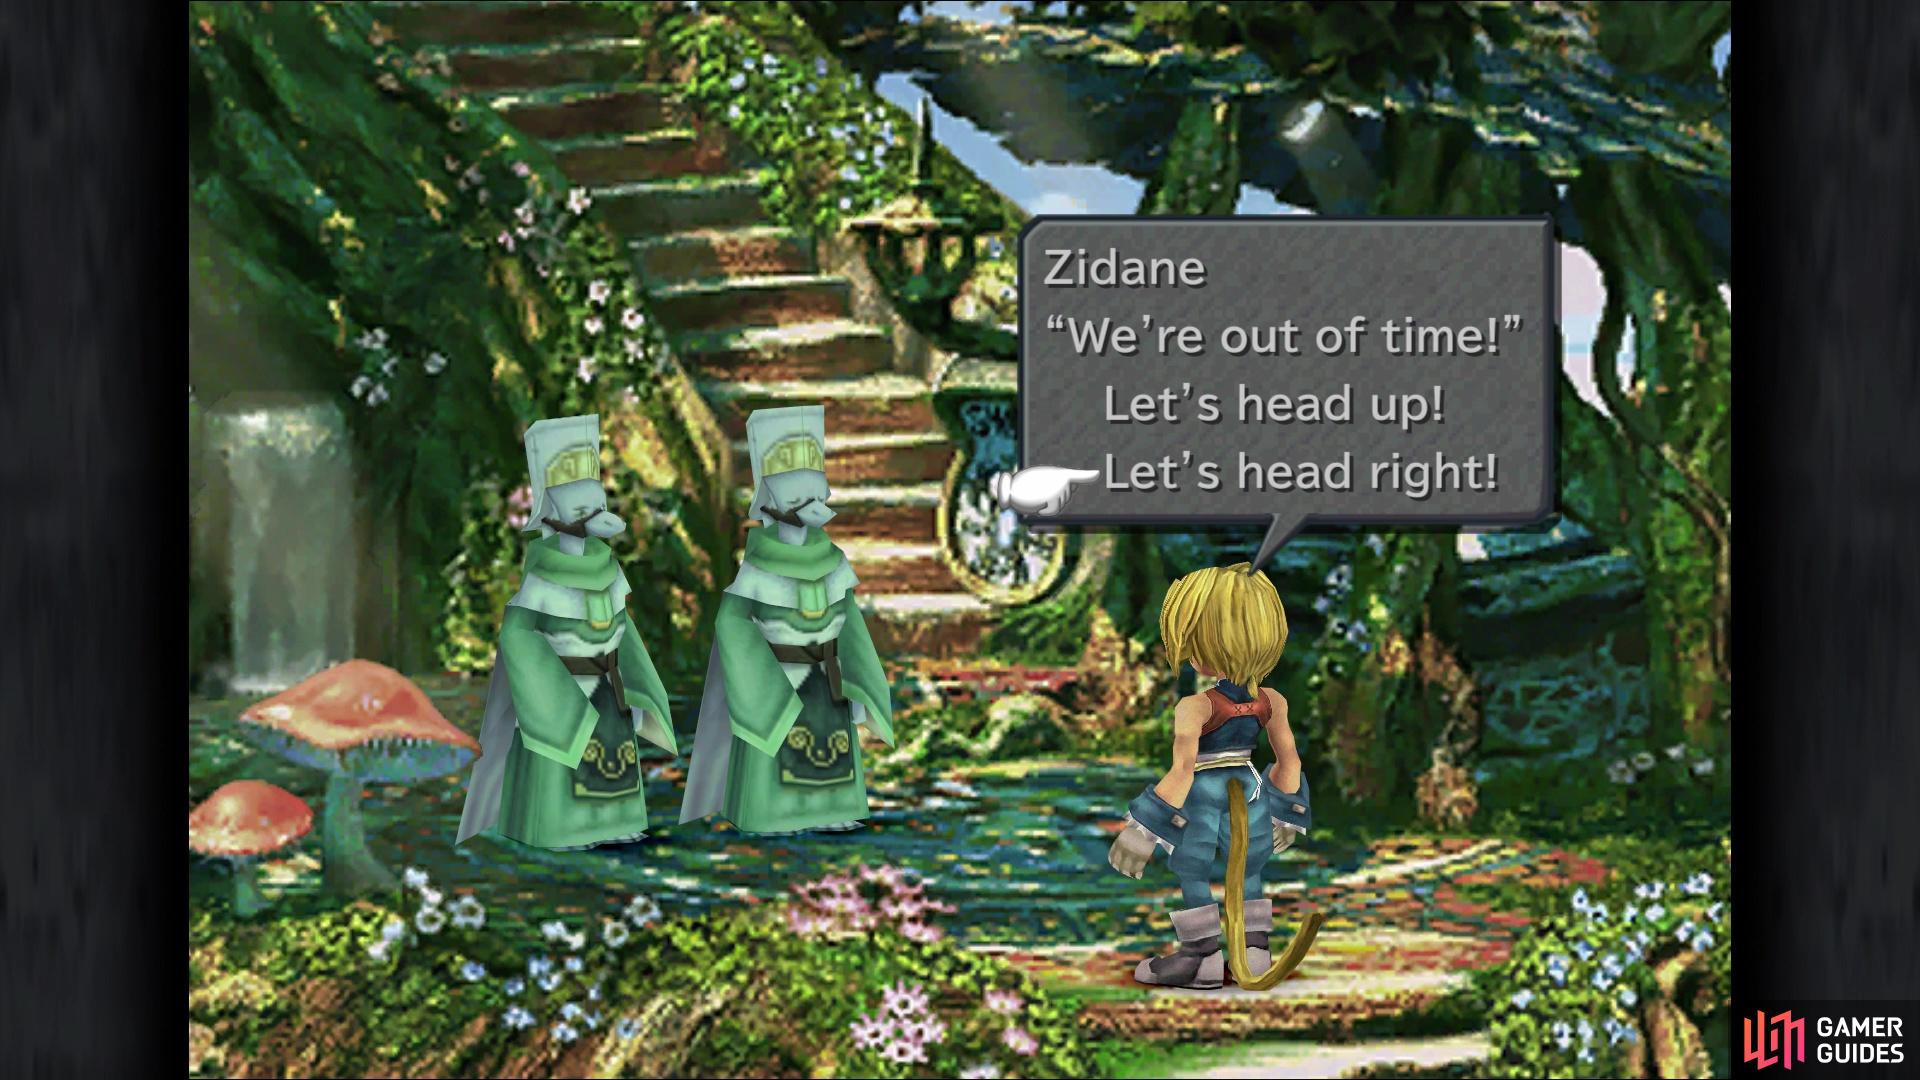
Back at the entrance, go up the stairs and you will be thrown into another battle, this time against three soldiers. Immediately following that one will be another fight against two Type Bs. Zidane will move forward on his own when you’re done, and this is where the missable trophy/achievement comes into play. The first option has you going up or right, so begin by choosing Let’s head right!. Move towards the front of the inn to find Dan’s family, with the correct choice being Let’s go left!. You will be thrown into another battle, with two soldiers and one Type B.
You will go to the next screen, with Dan’s family waiting for you. Pick Cross the bridge to the right! to send them on their way, then get ready for another battle with three soldiers. On the next screen, they will ask you if they are safe, so reply with We’re not safe yet to wrap up the trophy/achievement. During the cutscenes leading up to the next story bit, it will unlock. When you regain control, heal and save at the moogle, then place everyone in the back row. Also, if you synthesized more Coral Rings for the rest of the party, equip them now. Exit the cathedral to begin the refight against Beatrix.
BOSS - Beatrix
Well, you may think it’s time to finally take her down, but this fight is the exact same as the first battle earlier in the game. The battle will end if you either deplete her HP to zero (she has close to 5,000 HP) or if she uses up ten turns of hers. If you wish to steal the items from her, which are a Phoenix Down, Thunder Gloves and Ice Brand, then have Vivi cast Slow on her. The only real item of value, the Ice Brand, can be annoying to get, so don’t worry if you don’t steal it. As before, Beatrix finishes the fight by reducing everyone’s HP to 1.
Once the battle is finished, there will be more scenes for you to enjoy, with Zidane, Freya and Vivi ending up on some ship (note that Quina is gone for now). Climb the stairs and go to the next screen for some more story. Follow Vivi after that and when you go back down the stairs, a moogle will appear at the top. This moogle will be back where you eavesdropped on Brahne and Beatrix, so go ahead and make use of her facilities. You can deliver Mopli’s letter, as well as get another one to give to Moodon. Heal up and save, then find Vivi on the lower level to continue with the story.
No Comments