| Item List | Item List Cont |
|---|---|
| Alistair’s Mother’s Amulet | Silver-Framed Still Life |
| Chevalier’s Mace | Small Silver Ring |
| Eamon’s Shield | Steel Bracers |
| Kaddis of Hakkon Wintersbreath | Stone Dragon Statuette |
| Lamb Bone | The Fox’s Bow |
| Love Letter | The Guerrin’s of Ferelden: A Genealogical History |
| Redcliffe Vault Key | Warpaint of the Tempest |
| Codex |
|---|
| 064 Apostates |
| 084 Blood Magic: The Forbidden School |
| 117 History of Ferelden: Chapter 1 |
| 121 Geography of Ferelden |
| 133 The Orlesian Empire |
| 192 Aveline, Knight of Orlais |
| 202 The History of the Chantry: Chapter 2 |
| 212 The First Blight: Chapter 2 |
| 222 Journal of the Tranquil |
| 300 A Rolled-Up Note |
You start off in the basement. Open the door and kill the corpses. Here you will meet Jowan, a Blood Mage, someone you might recognize if you are a mage. Ultimately the choice you want to make is to let Jowan go for the time being, this will give you the most story line options in the future though it will damage your reputation with Leliana a little bit. Venture forth and loot the pile of filth, a note which is Codex 300: A Rolled-Up Note , and a pile of bones. Defeat the corpses and be sure to loot them for Corpse Galls . Proceed to the Main Floor.
Open the door and go across the hall defeating the Shades. Read the book for Codex 202: History of the Chantry - Chapter 2 then head back to the hall. If you can unlock the armory door there are three weapon stands, two chests, and an armor stand that could be helpful. Pass through the eastern room to find a horde of corpses. The connecting northern room has a group of Mabari and a charred corpse and chest to be looted. As you progress east disarm the tripwire trap. Enter the first room in the hall to find two cabinets. The second room has a few corpses and an armoire. The final room has Valena , the smith’s daughter, and a wooden crate in it.
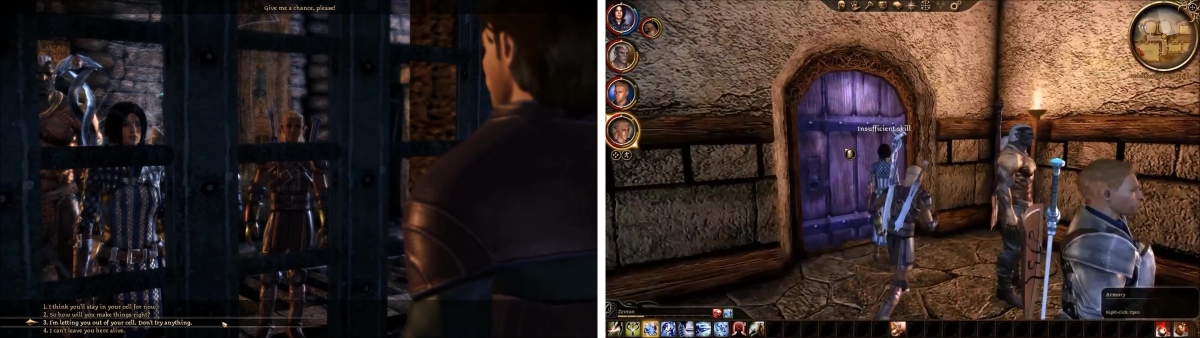
Choosing to free Jowan opens up a lot more story for you. If you have high enough skill, you can unlock the armory (right) and gain a lot of good equipment.
Take the southern door and defeat more corpses then take the eastern door doing the same. In the next room are two wooden crates and a path to the Basement Cellar. Two chests, a vase, and a pile of junk are here for the looting. One of the chests contains a Love Letter(6) and Steel Bracers . Head to the Courtyard now where Ser Perth and his men await. If you have a rogue that can stealth, have him/her do so over to the Gate Lever, else head into battle and send a ranged to the deed. Ser Perth and his men should burst through and provide healthy assistance.
The Revenant is what will give you the most trouble, so do your best to neutralize it until the rest of the enemies are taken care of. Loot the two barrels and then speak with Ser Perth to enter the Main Hall together. Connor is obviously possessed and demands more “fun”. He basically means a fight. Bann Teagan was being mind controlled and Isolde doesn’t know what to do. Jowan will enter if you let him go as suggested. You are given three choices: 1. You can kill Connor 2. Sacrifice Isolde to enter the Fade in an attempt to defeat the demon or 3. Ask the Circle of Magi to aid in the ritual instead of sacrificing Isolde. Choice 3 is best but for now we’ll explore the rest of the castle.
In the western room Suits of Armor come to life. The southern door holds many corpses as well as a chest, vanity, and cabinet. The Chamberlain holds the Redcliffe Vault Key so be sure to loot him. The western-most room holds a book of Codex 133: The Orlesian Empire and a desk with Alistair’s Mother’s Amulet , a key gift for Alistair. In the previous room take the stairs to the second floor. The room to the right yields a vanity and bookshelf with a gift for Wynne. Back in the hall a horde of corpses spawns all around.
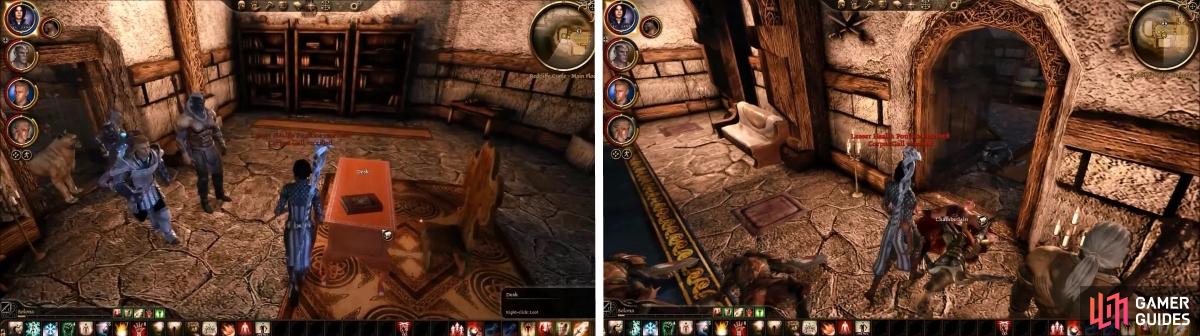
Examine the Chamberlain’s corpse for the Vault Key. In the western room, search the desk for Alistair’s Mother’s Amulet.
Go into the eastern door and fight off more corpses then unlock the Vault door to find three chests, two weapon stands and an armor stand which contain many unique items like the Chevalier’s Mace, The Fox’s Bow , and Eamon’s Shield . Head back to the original hallway and go through the bottom door. Upon approaching the southern door you are attacked by more corpses. The room holds a chest with a gift for Alistair inside. The other room has a chest and book that gives Codex 222: Journal of the Tranquil .
Head past the vault into a room where Connor is. Go into the west room to find a book which is Codex 192: Aveline - Knight of Orlais . Should you try to approach Arl Eamon the Desire Demon takes over Connor and you are forced to kill it along with Connor. This path eliminates the option of unlocking the Blood Mage specialization so it is best to turn back after acquiring the book and go to the Circle Tower. Speak with First Enchanter Irving who is concerned and agrees to aid you. Return to Isolde as soon as possible.
You can only send a mage into the Fade. Jowan is rather weak so if you have Morrigan that is probably your best choice unless of course you are a mage. Run around and find Arl Eamon then take the Portal. Approach Connor, call the demon out, and defeat it. Take the next portal and repeat the process. Another portal and another useless conversation with Connor leading to another fight. This time when you take the portal you meet the Demon head on. If you are a mage and went in yourself you have the option of bargaining to learn the Blood Mage skill, gain a talent point, or receive pleasure from the Demon. If you want the Blood Mage Specialization but also want the good path, get the specialization and save a new file. Reload your old file and it will be unlocked so you can defeat the Demon and still have acquired Blood Mage.
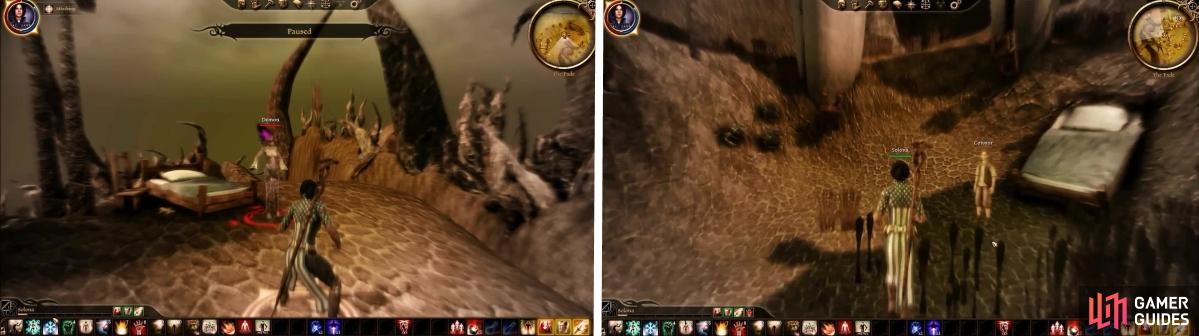
There are different iterations of Connor in the Fade but they are just demons in disguise.
Regardless of your choice Arl Eamon is still sick. Jowan’s fate can be decided if you so choose, but for now leave that to Teagan. Agree to find the Urn of Sacred Ashes and be on your way. Check the book on the table for Codex 212: The First Blight - Chapter 2 and the pile of books for Codex 117: History of Ferelden - Chapter 1 then head to Redcliffe to turn in “Lost in the Castle” and finally proceed to Denerim.
No Comments