
This is a walkthrough for Da’at: Minato of Shin Megami Tensei V, taking place in the Hamamatsucho and Shiba Park areas. How to complete every objective, find every chest and locate every Miman.
You’ll learn more about Bethel in Hamamatsucho.
Demons
| Icon | Name | Lv | Weakness |
|---|---|---|---|
| Agathion | 10 | ||
| Kodama | 6 | ||
| Cait Sith | 7 | ||
| Daemon | 7 | ||
| Azumi | 11 | ||
| Sandman | 8 | ||
| Tsuchigumo | 13 |
Items
| Name |
|---|
| Foul Talisman |
| Mandrake’s Essence |
| Grimoire x2 |
| Daemon’s Essence |
| Chakra Drop x2 |
| Mermaid’s Essence |
| Azumi’s Essence |
| Ice Gem x3 |
| Kodama’s Essence |
| Revival Bead |
Quests
| Subquest | Location | Reward |
|---|---|---|
| Bully Breaker | Road to the west of Hamamatsucho Leyline | Agathion’s Essence |
| Pollution Panic | Mandrake on the path west of the Hamamatsucho Leyline | Yoma Talisman |
| The Water Nymph | Cave to the South of Tokyo Tower Leyline | 2 x Stamina Incenses, Leanan Sidhe joins |
Hamamatsucho Abscess
Safely at a new Leyline, your first task should be to reveal more of the map by taking down the nearby Abscess (in fact, this should always be your first action in a new area). Head to the southeast, dash past the demons that spawn and enter the battle against a Mermaid.
| Icon | Name | Lv | Weakness |
|---|---|---|---|
| Mermaid | 10 |
You’re only up against one foe here, but the Mermaid has some damaging magic at her disposal. Marin Karin has the chance to inflict Charm on an ally, dangers if it hits your healer and you have no means to cure it (Patra will work here) whereas Stormcaller Song can hit up to 6 times and can outright kill an ally weak to Ice (such as Onmoraki).
With that in mind, Onmoraki is a gamble here as although you’ll be able to strike the weakness of Mermaid using Agi, you also risk giving her more turns by being struck by Stormcaller Song. With that in mind, it’s better to focus on demons that can use Zio (along with the Nahobino), Mandrake being an excellent option. If you enter the battle with a full Magatsuhi gauge, be sure to use Omagatoki: Critical from the outset, starting the battle with 8 turns of critical damage is enough to deal nearly half of her HP on your first turn alone. All being said, Mermaid shouldn’t cause too many issues so long as you’re at least Level 9, any lower and you may wish to consider gaining a Level or two before trying again. Clearing this Abscess will unlock the following Miracles:
| Miracle | Category | Effect | Glory |
|---|---|---|---|
| Divine Amalgamation | Doctrine | Allows the Nahobino to acquire affinity resistances from Essences during Essence Fusion. | 20 |
| Divine Garrison II | Awakening | Increases demon stock by 1. | 20 |
| Light Mastery I | Awakening | Increases the Nahobino’s Light skill potential by 1. | 50 |
| Dark Mastery I | Cosmos | Increases the Nahobino’s Dark skill potential by 1. | 50 |
| Ailment Mastery I | Cosmos | Increases the Nahobino’s Ailment skill potential by 1. | 60 |
With the map now visible, continue to scout out this location to the east, and head on to the train tracks to encounter some Agathions that are weak to Ice and Dark. Their magic is a little higher than your current demons, and they do have access to Zio which will hit harder coming from them. As a general rule, provided you have the space in your party, you should look to recruit every new demon you encounter, this will open up more opportunities for demon fusion.
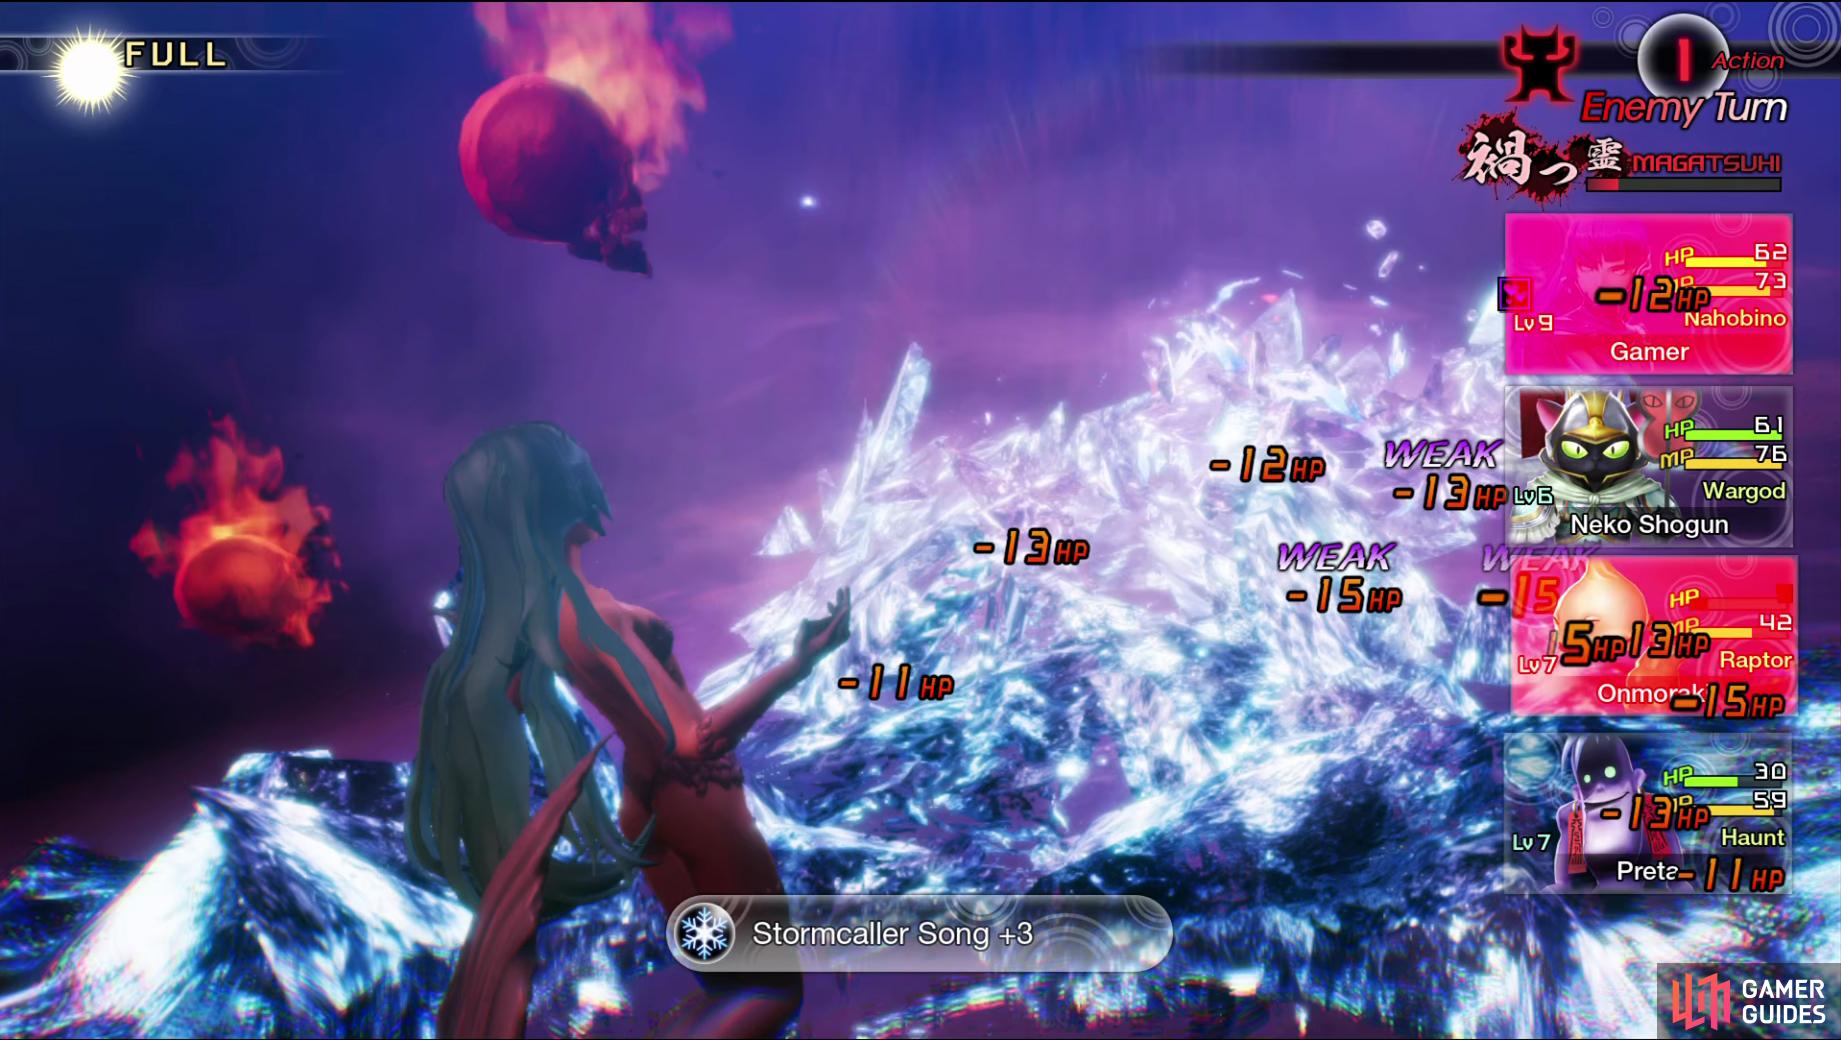
(1 of 5) Mermaid’s Stormcaller Song is deadly if you have any demons with weakness to Ice.
Continue to the southeast here and loot the vending machines before dropping to the ground to speak to the Slime, who will hand over the Foul Talisman unlocking a new Magatushi skill. Head to the east side of this structure now and take the stairs up a few floors to reach Amalgam #3. Return to the stairs and take them to the top to find a Treasure Chest containing Mandrake’s Essence before dropping off to the north to locate Miman #17.
There’s not much else to find here, so return to the Leyline and pay a visit to Sophia at the World of Shadows. Unlock another new Divine Garrison along with Divine Amalgamation so that you can make use of the ability to change the Nahobino’s resistances from Essences. If you’re Level 10, you’ll want to go ahead and fuse Angel, it’s by far the best healing demon for this stage of the game and offers your first taste of group healing.
To the northeast of this Leyline is a cave you can enter, full of Daemons (definitely spend the time to recruit one of these). Head to the north of this cave and south both the south and north corners for two Treasure Chests containing Grimoire x2 and Daemon’s Essence. Hold on to this Essence for now, as it’s soon to come in handy for a tough battle.
Leave the cave and make your way towards the road leading north but before taking a step on it, look to the rocks on your left to locate Miman #18. You’ll find an Agathion on the road that will offer the Bully Breaker Quest, you can complete this one by revisiting the Daemon cave near the Leyline. As you head across the road, you’ll gain some information about the demon that has taken refuge at Tokyo Tower, along with a hint about what kind of attacks to expect.
Regardless, ignore this route for now and drop down below the road to reach Shiba Park, where you’ll find a group of Azumis. These are weak to Electric, like most of the foes you’ve been encounter here and are well worth recruiting to your team should you have reached Level 11 by now. You’ll find some vending machines down here, along with a Treasure Chest containing Chakra Drop x2 and a Mermaid that offers the Quest The Cursed Mermaids along with Mermaid’s Essence.
Return to the road from before and cross it to the west and you’ll meet Sandman for the first time. Head to the end of the western path here (but not across the next road) and use the Climbing Point to find a Treasure Chest containing Aogami Type-1 Essence. The Aogami Essences are always found in Treasure Chests, and often contain skills that are unique to the Nahobino. This particular one houses the incredibly useful Aramasa, one of the best Strength-based Skills for Nahobino until the latter half of the game and one you should slot on him next time you visit a Leyline.
Drop back down and stand at the edge of the waterfall and position you camera down to spot Miman #21. Back in Shiba Park, visit the Leyline once again to slot Aramasa and then proceed across the first road once more. This time, follow the other road up to the southwest to find a group of Sandmen along with Miman #22 behind a rock in the southeast corner. Before leaving this area, be sure to smash the two Treasure Chests to obtain Azumi’s Essence and Ice Gem x3.
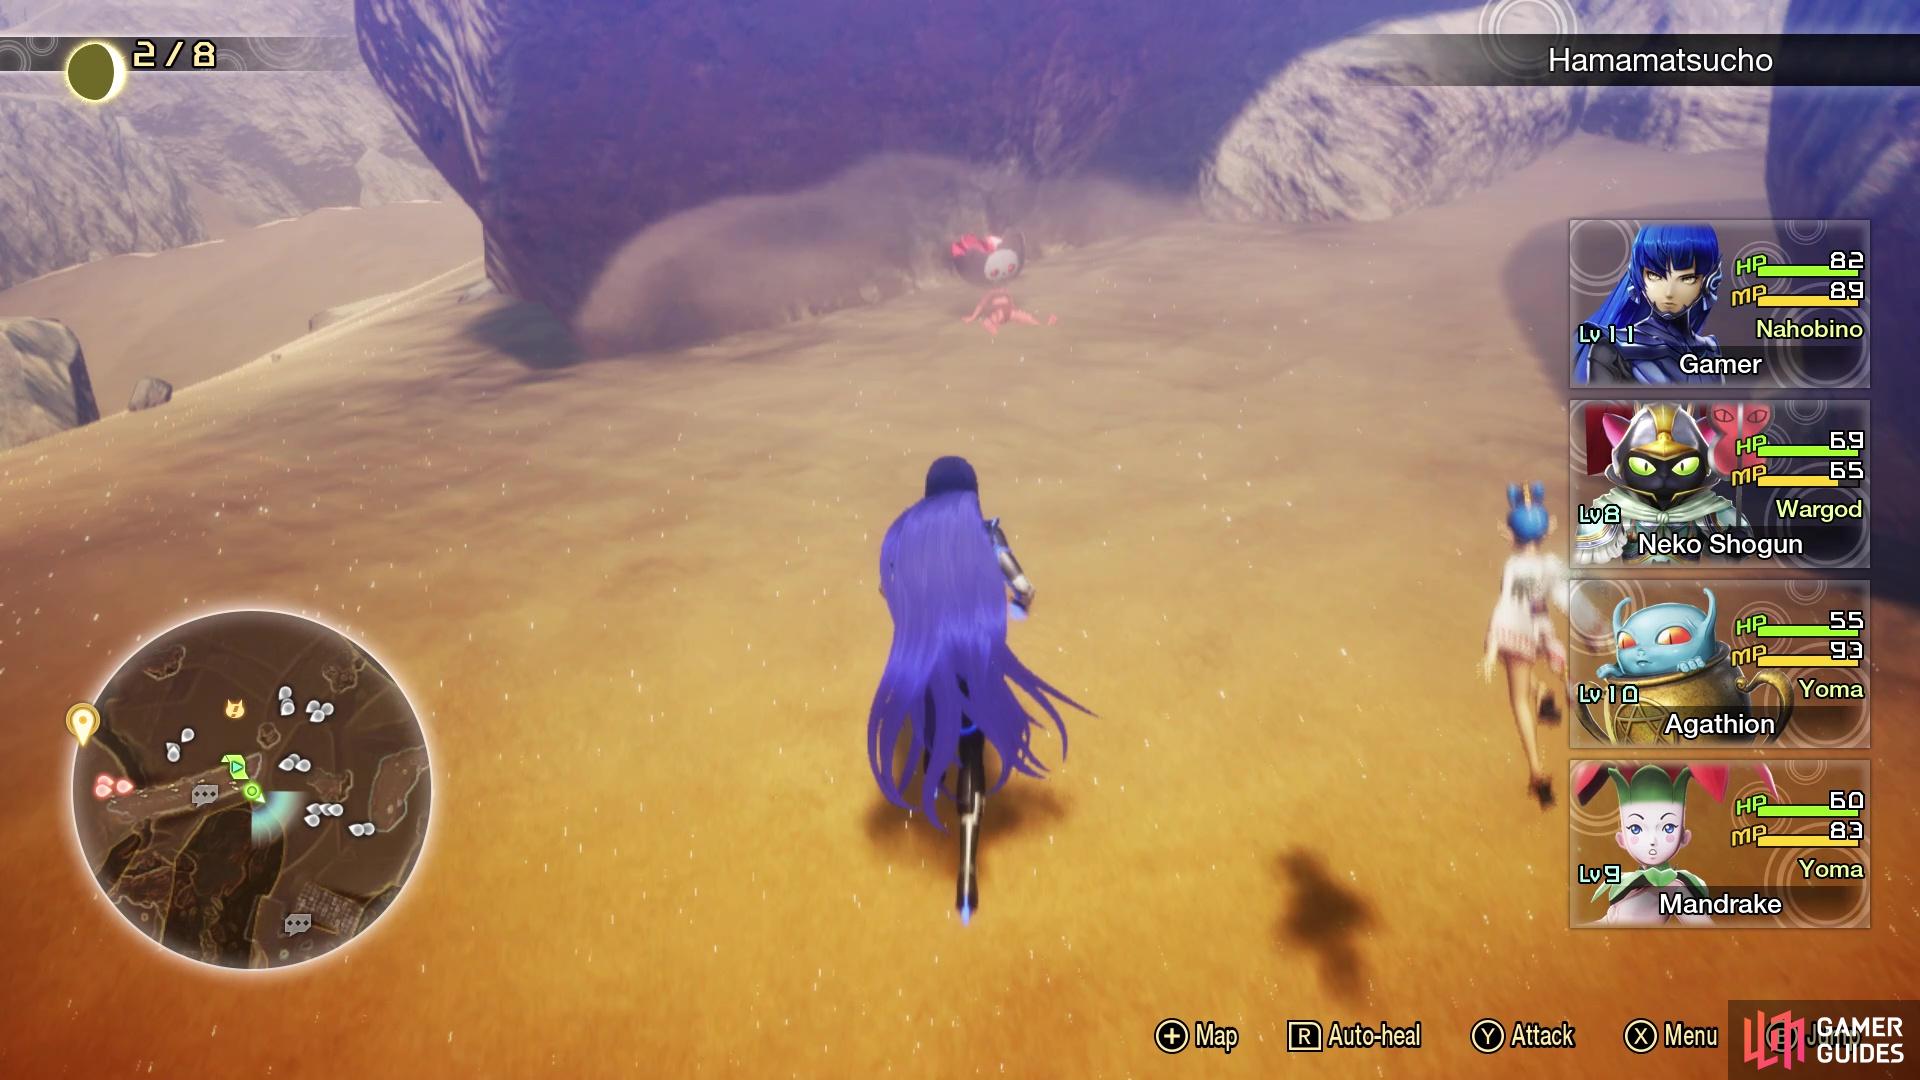
Return down the road and this time take the dirt path up to the northeast and look to the left to find Miman #19 before using the Climbing Point to reach a Treasure Chest containing Kodama’s Essence. Follow the upper path to the west now and look behind the first rock you pass to find Miman #20. Just beyond here is a Mandrake looking for help, speak to it to begin the Pollution Panic Quest. You’ll need to defeat 5 Azumi and you’ll find plenty of them up ahead.
There’s a Mitama spawn up ahead and then just beyond, you’ll find the stream that the Mermaid mentioned, along with plenty of Azumi waiting to be slain. Before any of that however, dash over to the nearby Abscess.
Shiba Park Abscess
| Icon | Name | Lv | Weakness |
|---|---|---|---|
| Sudama x2 | 13 |
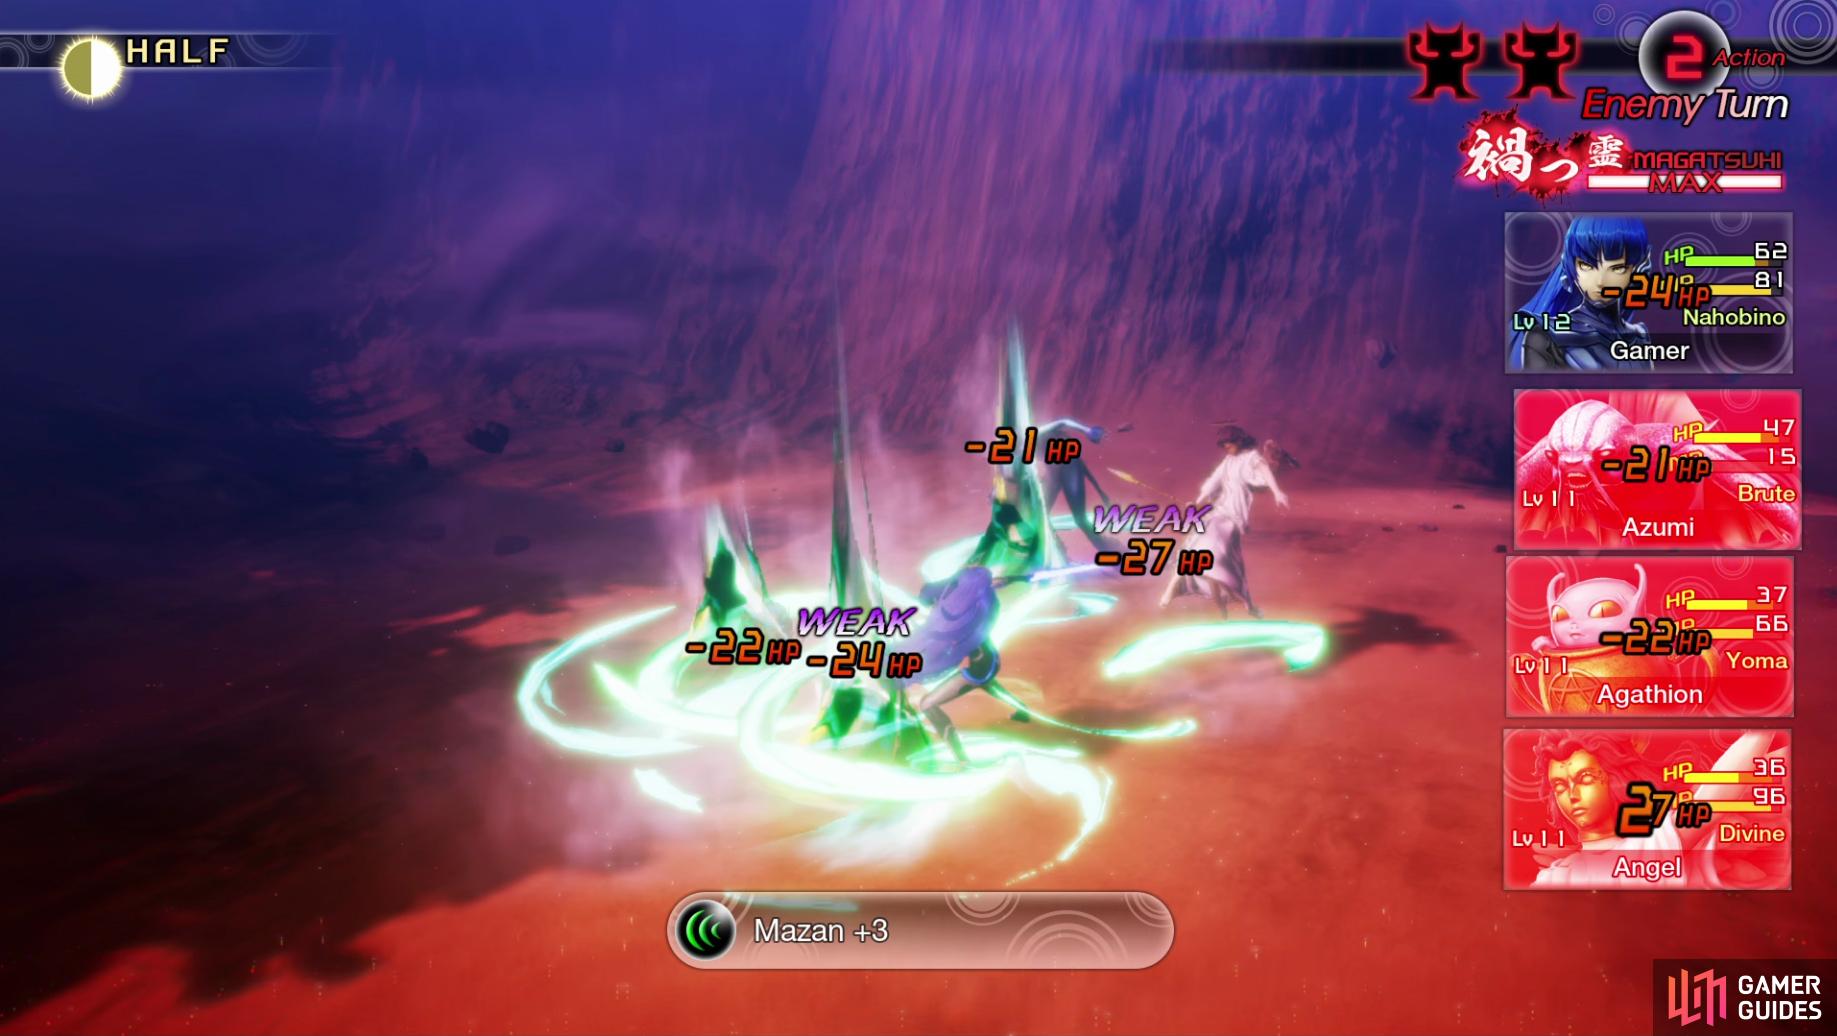
The Sudamas are the first foes you’ll encounter that will make use of group attacks, using Mazan, a Force based skill, against the entire party. For that reason alone, you’ll want to make sure you’re at least Level 12 yourself and that you make use of Guard on the Nahobino if you’ve yet to change his resistances. Angel, despite having a weakness to Force, is still useful due to Humble Blessings being the best way to group heal at this stage of the game. Azumi is a star for this battle, as the Sudamas are weak to Ice. Clearing this Abscess will unlock the following Miracles:
| Miracle | Category | Effect | Glory |
|---|---|---|---|
| Magatsuhi Wellspring | Doctrine | All allies will slightly recover HP and MP if the Magatushi Gauge is full at the start of a turn. | 150 |
| Vengeful Opportunist | Doctrine | The Magatushi Gauge will slightly increase when guarding. | 30 |
| Fell Swoop | Doctrine | The Magatushi Gauge will slightly increase when inflicting WEAK or CRITICAL. | 30 |
| Counter Incentive: Resist | Doctrine | The Magatushi Gauge will slightly increase when an ally’s affinity resistance reduces damage from an enemy attack | 30 |
| Counter Incentive: Null | Doctrine | The Magatushi Gauge will slightly increase when an ally Nulls, Drains, or Repels an enemy attack. | 50 |
| Divine Garrison III | Awakening | Increases demon stock by 2. | 50 |
Head up the stream, killing the Azumis as you go, and you’ll come across Miman #23 and then head to the east side to find a Climbing Point leading to a Treasure Chest containing a Revival Bead. Drop back down and if you’re Level 13, consider recruiting one of the Tsuchigumos as they’re a valuable demon to have right now. They’re tough to take down, but they’re weak to Ice and offer plenty of Exp that you’ll need before the upcoming battles.
You’ll reach a fork of sorts here, ignore the lower west path for now and head north to reach the Tokyo Tower Leyline. Be sure to access this to recover, save your game and visit Gustave to receive the reward for 15 and 20 Mimans (Neko Shogun’s Essence and Ice Gem x3). Finally, visit the World of Shadows and use Daemon’s Essence to change the resistances of the Nahobino so that he Nulls Dark. Ignore the Miracles for now, you’ll be here one more time after taking a short detour where you’ll have more Glory to play around with.
Don’t press on towards the objective marker, a tough boss awaits you and instead return to the previous fork, this time heading to the southwest to find an enclosed area with Ippon-Datara and the Leanan Sidhe from the Spirit of Love Quest and Miman #24 behind them. If you’re not Level 14 yet, consider taking the time to fight the Tsuchigumos and Azumis around this area and then take on the Quest, however, note you have a choice here.
If you agree with Asparas’ proclamations, then you’ll fight Leanan Sidhe, a tough battle as both your adversaries are Level 17, you will however obtain Asparas as a demon for your reward. On the other hand, speak with Leanan Sidhe to hear her side of the story and agree to take out Asparas instead to begin The Water Nymph. This will have you defeating Asparas, who is one level lower than Leanan Sidhe and you’ll gain Leanan Sidhe as a demon and both of these are useful in the battle to come (Asparas will strike the weakness while Leanan Sidhe will Null its most powerful attack).
Be sure to take the time to complete either of these Quests and ensure that you are at least Level 15 before you return to the Tokyo Tower Leyline and recover. Before you proceed to the Objective Marker, ensure that your Nahobino has resistance against Dark, you have either Leanan Sidhe or Asparas in your party from their respective Quests and you’re at least Level 14. Aside from that particular demon, ensure you have Angel and Azumi/Mermaid in your party and purchase a few Dark Dampeners from Gustave. Once your preparations are complete, head forward to trigger a scene, followed by a greeting from the demon of the tower.
Boss: Hydra

Hydra is the first boss in Shin Megami Tensei V.
| Icon | Name | Lv | Weakness |
|---|---|---|---|
| Hydra | 15 |
| Type | Skill | Effect |
|---|---|---|
| Frenzy +3 | Medium Physical attack to all foes. | |
| Toxic Breath | Medium Dark attack to all foes. Chance of inflicting Poison. | |
| Fire Breath +3 | 2 ~ 5 weak Fire attacks to random foes. |
Hydra is your first boss in Shin Megami Tensei V and it’s a massive test of your understanding of the mechanics thus far. You’ll also want to make sure you’re at least Level 14 (or higher on Hard) before you attempt this as Levels make a huge difference on the damage you can output. If you cast your mind back to earlier, a demon mentioned that the Hydra likes both Dark and Fire-based attacks and having protection against them will make life a lot easier.
Hydra has three attacks at its disposal, using Attack as its regular attack which will cause weak damage to a single ally. Fire Breath will hit random allies 2~5 times and it will vary in how deadly it can be based on whether you have any demons weak to fire (Such as Mermaid or Azumi). Most importantly is when it enters Magatsuhi, this means that on its next turn it will cause Critical with every attack and begin by using the deadly Toxic Breath which will cause Medium Dark damage to all allies with the chance of Poison on top. If you’re not protected against this, you will suffer an early defeat.
Once you bring Hydra to below half HP, it will start using Frenzy regularly, hitting the entire party for medium damage, especially deadly if he used its Magatsuhi skill the turn before you drop his HP. Having the Daemon Essence’s resistances on the Nahobino and Leanan Sidhe in the party will cause them both to Null Toxic Breath, ending Hydra’s turn but you’ll need protect your other two party members from the attack. You can do this by either having them Guard on that combat round (which voids weaknesses) or by using a Dark Dampener. Knowing how to survive these attacks will make life a lot easier.
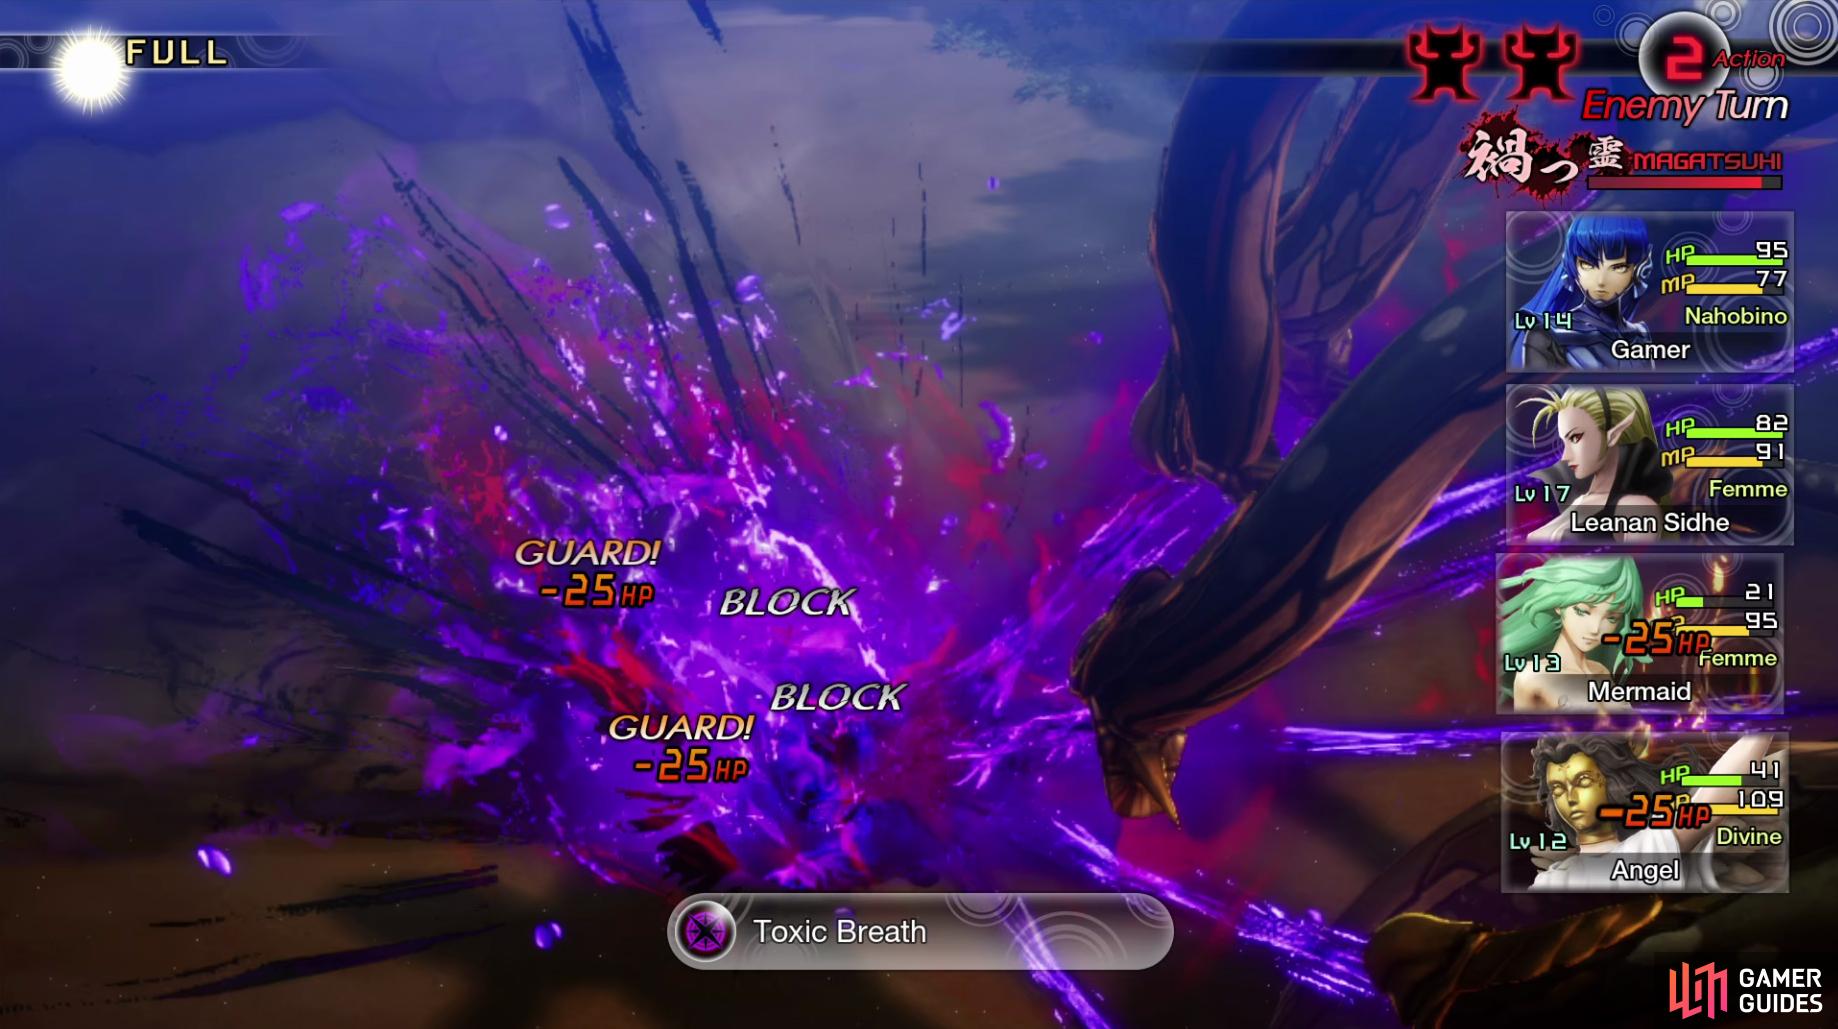
It’s easy to deal with Toxic Breath via resistances and guarding
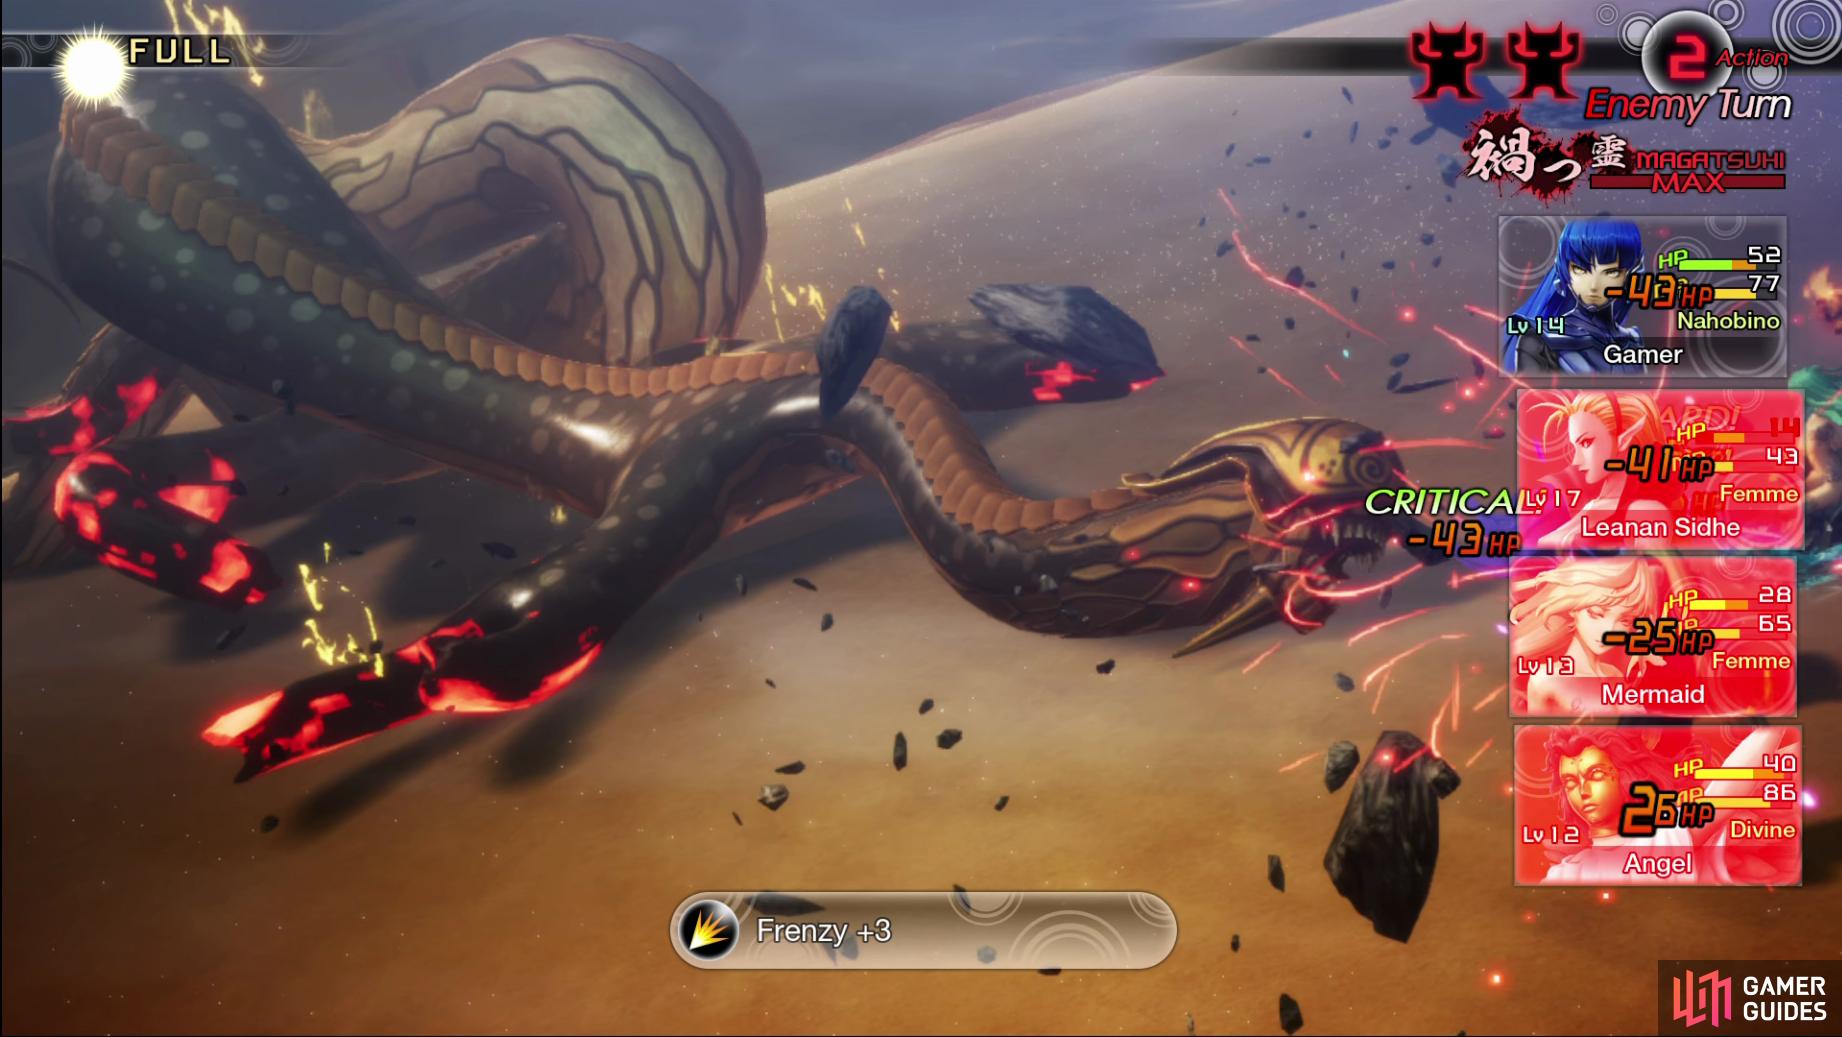
but Frenzy is far deadlier, especially after using Magatsuhi.
As for attacking the Hydra, it’s weak to Ice, making Mermaid’s Stormcaller Song and Azumi’s Bufu excellent choices. If you’re a magic-based Nahobino, you should have all elements covered by now and use Bufu yourself, but if you’re physical, make use of Aramasa, especially when using Omagatoki: Critical to deal massive amounts of damage to Hydra. Keep an eye on your HP, and have Angel use Humble Blessings should you begin to drop under half HP, Fire Breath can easily take out your party if you’re unlucky. If you have both Mermaid and Azumi, be sure to swap one out for the other should they lose all of their MP and you should take down Hydra.
Following Hydra’s defeat, you’ll officially complete The Lay of the Land, receiving Exp as a reward and unlock Hydra as a new Special Fusion (although it’ll be a long time before you can use it). Return to the Leyline to save your game following this and heal up before exploring the areas beyond Tokyo Tower.
No Comments